Home > Article > Web Front-end > Canvas pixel point operation video green screen cutout
This article mainly introduces the relevant information about the video green screen cutout of canvas pixel point operation. The editor thinks it is quite good, so I will share it with you now and give it as a reference. Let’s follow the editor and take a look.
This article introduces the video green screen cutout of canvas pixel point operation and shares it with everyone. The details are as follows:
Usage:
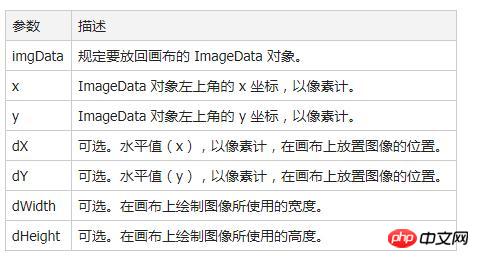
context.putImageData(imgData, x, y, dX, dY, dWidth, dHeight);

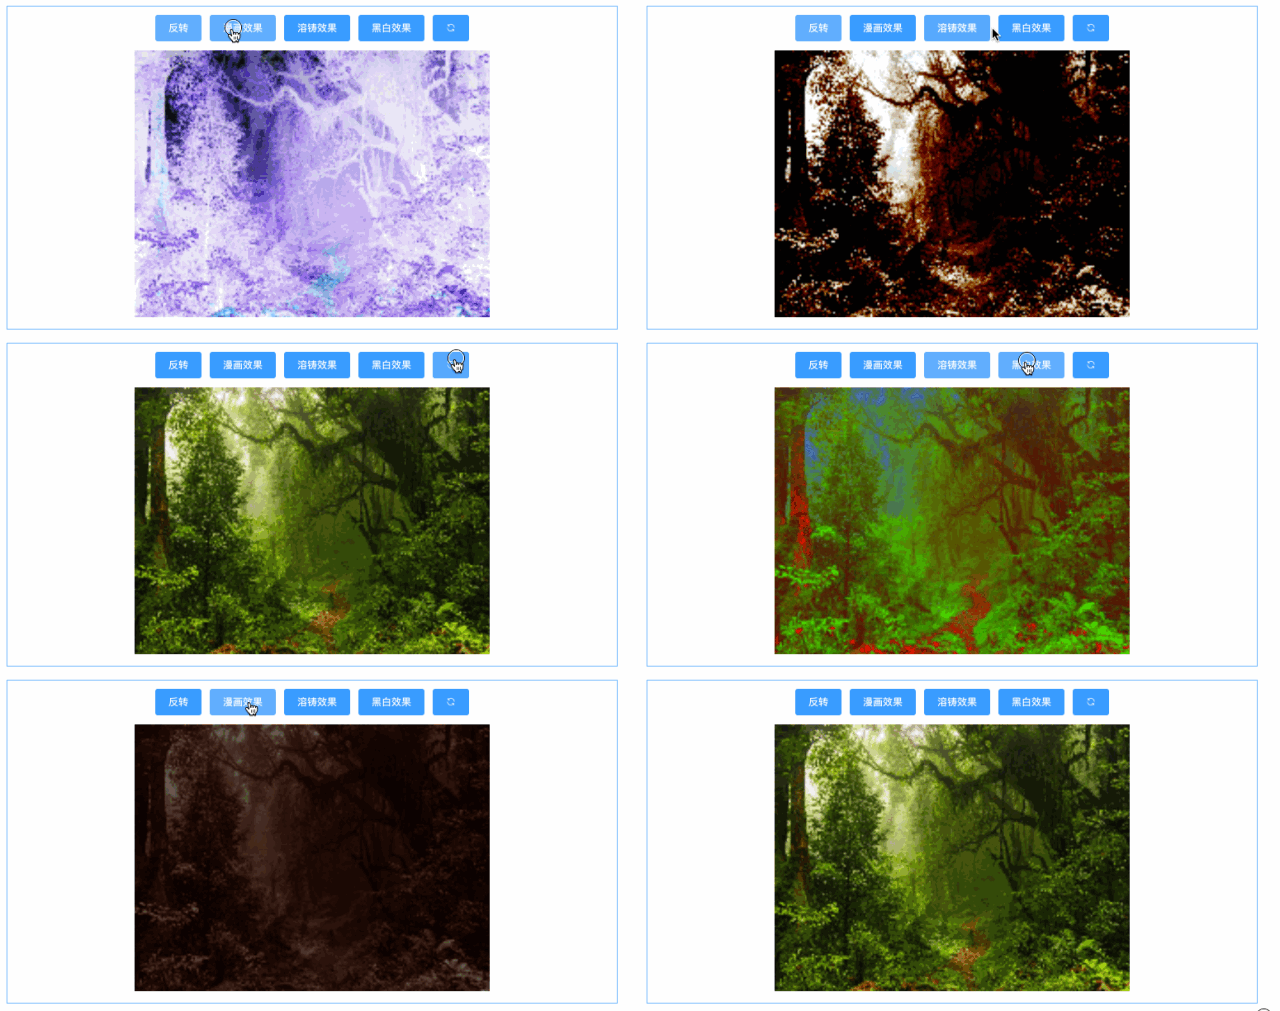
The chestnut below simply implements several simple filter effects. The specific algorithm is referenced here. Students who have studied "Digital Image Processing" should have a deeper understanding of this.
demo

This chestnut is purely for demonstration purposes. If you only emphasize the effect and don’t care about the data, you can use the filter attribute of CSS3 to be efficient and efficient. Get it done easily.
Part of the code
import imgUrl from './component/sample.jpg';

export default {
	data () {
		return {
			imgUrl: imgUrl
		}
	},

	methods: {
		onOperate1 () {
			this.ctx.putImageData(this.onCompute1(), 0, 0);
		},

		onOperate2 () {
			this.ctx.putImageData(this.onCompute2(), 0, 0);
		},

		...

		onCancel () {
			this.reload();
		},

		onCompute1 () {
			let data = this.frameData.data;

	        for (let i = 0; i < this.imgDataLength; i += 4) {
	          	let r = data[i + 0],
	          		g = data[i + 1],
	          		b = data[i + 2];

          		data[i + 0] = 255 - r;
          		data[i + 1] = 255 - g;
          		data[i + 2] = 255 - b;
	        }

	        return this.frameData;
		},

		onCompute2 () {
			let data = this.frameData.data;

	        for (let i = 0; i < this.imgDataLength; i += 4) {
	          	data[i] = Math.abs(data[i + 1] - data[i + 2] + data[i + 1] + data[i]) * data[i] / 256;
            	data[i + 1] = Math.abs(data[i + 2] - data[i + 1] + data[i + 2] + data[i]) * data[i] / 256;
            	data[i + 2] = Math.abs(data[i + 2] - data[i + 1] + data[i + 2] + data[i]) * data[i + 1] / 256;
	        }

	        return this.frameData;
		},

		...
	},

	mounted () {
        this.canvas = this.$refs['canvas'];
        this.ctx = this.canvas.getContext('2d');

        this.reload();
	}
}
Last week I went to the Nanshan Bamboo Sea in Tianmu Lake, Liyang with my classmates, and was fooled into taking a photo in the scenic area, which is this one——
Then I was criticized in the circle of friends for cutting out pictures. In fact, it was taken while standing in front of a green screen :joy:.
The magic wand tool in PS can select and clear all similar pixels within a certain tolerance in the picture, making it easy to "cut out the picture" with one click. The premise is that the subject must be significantly different from the background, that is, The larger the difference in pixel values, the better the cutout effect.
Canvas can do the same and can process video frames. The principle is the same - just set the transparency of the green screen pixel block in each video frame to 0. Like this -
demo

Part of the code
import videoUrl from './component/video.ogv';
import imgUrl from './component/sample.jpg';

const TOLERANCE = 5;
export default {
	data () {
		return {
			videoUrl: videoUrl,
			imgUrl: imgUrl
		}
	},

	methods: {
		draw () {
			if (this.video.paused || this.video.ended) {
	          	return;
	        }
			this.ctx.drawImage(this.video, 0, 0, this.width, this.height);
			this.ctx.putImageData(this.cutOut(), 0, 0);
		},

		cutOut () {
			let frameData = this.ctx.getImageData(0, 0, this.width, this.height),
				len = frameData.data.length / 4;

	        for (let i = 0; i < len; i++) {
	          	let r = frameData.data[i * 4 + 0],
	          		g = frameData.data[i * 4 + 1],
	          		b = frameData.data[i * 4 + 2];
	          	if (r - 100 >= TOLERANCE
	          	 && g - 100 >= TOLERANCE
	          	 && b - 43 <= TOLERANCE) {
		            frameData.data[i * 4 + 3] = 0;
	          	}
	        }
	        return frameData;
		}
	},

	mounted () {
		this.video = this.$refs['video'];
        this.canvas = this.$refs['canvas'];
        this.ctx = this.canvas.getContext('2d');
        this.timer = null;

        this.video.addEventListener('play', () => {
            this.width = this.video.videoWidth;
            this.height = this.video.videoHeight;

            this.timer && clearInterval(this.timer);
            this.timer = setInterval(() => {
            	this.draw();
            }, 50);
        }, false);
	}
}
References
Manipulating video using canvas
Pixel manipulation with canvas
Canvas and images and pixels
Summary: The above is the entire content of this article, I hope it can help Everyone’s learning helps. For more related tutorials, please visit Html5 Video Tutorial!
Related recommendations:
php public welfare training video tutorial
The above is the detailed content of Canvas pixel point operation video green screen cutout. For more information, please follow other related articles on the PHP Chinese website!