
Home > Article > Web Front-end > Code example of HTML5 WebSocket chat room implementation

This article mainlyintroducesHTML5-WebSocket implementation chat room example, which has certain reference value. Interested friends can refer to it.
The method of implementing a chat room on a traditional web page is to request the service server to obtain relevant chat information at regular intervals. However, the websocket function brought by html5 has changed this method. . Since websocket allows maintaining the connection for data interaction after connecting to the server, the server can actively send corresponding data to the client. For HTML5 processing, you only need to process the received data in the receive event of the websocket after the connection is created. Let's experience the function that the server can actively send to the client by implementing a chat room.
Function
A simple chat room mainly has the following functions:
1) Registration
Registration needs to handle several things, including obtaining a list of all users of the current server after the registration is completed, and the service sending the current successfully registered users to other online users.
2) Send a message
The server sends the currently received message to other online users
3)Exit
The server notifies other users of the disconnected user
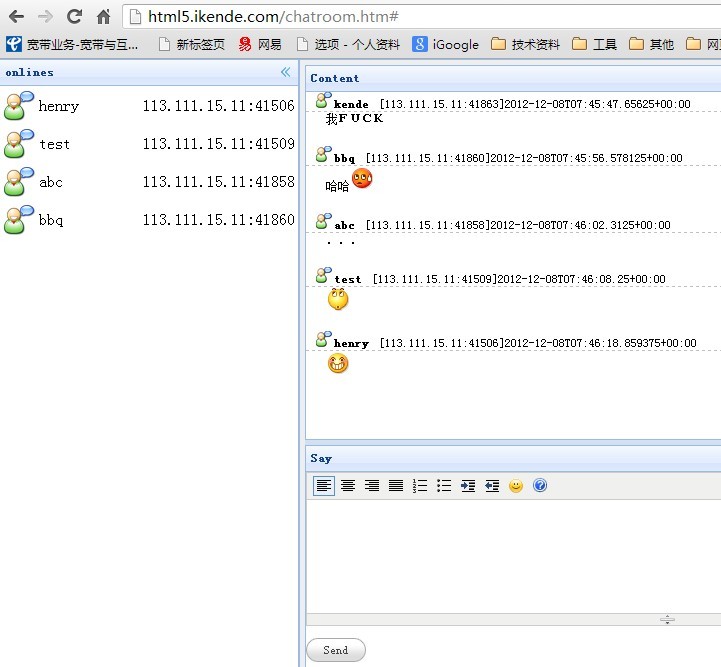
The completed function preview of the chat room is as follows:
C#Server-side code
The server-side code only needs to define a few methods for several functions, namely registration, obtaining other users and sending information. The specific code is as follows:
////// Copyright © henryfan 2012 ///Email: henryfan@msn.com ///HomePage: //m.sbmmt.com/ ///CreateTime: 2012/12/7 21:45:25 /// class Handler { public long Register(string name) { TcpChannel channel = MethodContext.Current.Channel; Console.WriteLine("{0} register name:{1}", channel.EndPoint, name); channel.Name = name; JsonMessage msg = new JsonMessage(); User user = new User(); user.Name = name; user.ID = channel.ClientID; user.IP = channel.EndPoint.ToString(); channel.Tag = user; msg.type = "register"; msg.data = user; foreach (TcpChannel item in channel.Server.GetOnlines()) { if (item != channel) item.Send(msg); } return channel.ClientID; } public IListList() { TcpChannel channel = MethodContext.Current.Channel; IList result = new List (); foreach (TcpChannel item in channel.Server.GetOnlines()) { if (item != channel) result.Add((User)item.Tag); } return result; } public void Say(string Content) { TcpChannel channel = MethodContext.Current.Channel; JsonMessage msg = new JsonMessage(); SayText st = new SayText(); st.Name = channel.Name; st.ID = channel.ClientID; st.Date = DateTime.Now; st.Content = Content; st.IP = channel.EndPoint.ToString(); msg.type = "say"; msg.data = st; foreach (TcpChannel item in channel.Server.GetOnlines()) { item.Send(msg); } } }
Only the above simple code is needed to complete the function of the chat room server. For user exit, the connection release event can be used to handle the specific code:
protected override void OnDisposed(object sender, ChannelDisposedEventArgs e)

        {

            base.OnDisposed(sender, e);

            Console.WriteLine("{0} disposed", e.Channel.EndPoint);

            JsonMessage msg = new JsonMessage();

            User user = new User();

            user.Name = e.Channel.Name;

            user.ID = e.Channel.ClientID;

            user.IP = e.Channel.EndPoint.ToString();

            msg.type = "unregister";

            msg.data = (User)e.Channel.Tag;

            foreach (TcpChannel item in this.Server.GetOnlines())

            {

                if (item != e.Channel)

                    item.Send(msg);

            }

        }
In this way, the server-side code for chatting has been completed.
JavaScriptCode
The first thing to do for html5 code is to connect to the server. The relevant javascript code is as follows:
function connect() {

            channel = new TcpChannel();

            channel.Connected = function (evt) {

                callRegister.parameters.name = $('#nikename').val();

                channel.Send(callRegister, function (result) {


                    if (result.status == null || result.status == undefined) {

                        $('#dlgConnect').dialog('close');

                        registerid = result.data;

                        list();

                    }

                });


            };

            channel.Disposed = function (evt) {

                $('#dlgConnect').dialog('open');

            };

            channel.Error = function (evt) {

                alert(evt);

            };

            channel.Receive = function (result) {

                if (result.type == "register") {

                    var item = getUser(result.data);

                    $(item).appendTo($('#lstOnlines'));

                }

                else if (result.type == 'unregister') {

                    $('#user_' + result.data.ID).remove();

                }

                else if (result.type == 'say') {

                    addSayItem(result.data);

                }

                else {

                }

            }

            channel.Connect($('#host').val());

        }
Use the Receive callback pool number to handle different messages. If the registration information of other users is received, the user information is added to the list; if the registration information of other users is received, Exit information will be removed from the user list; just receive the message directly and add it to the message display box. With the help of jquery, the above events become very simple.
User registrationCalling process:
var callRegister = { url: 'Handler.Register', parameters: { name: ''} };

        function register() {

            $('#frmRegister').form('submit', {

                onSubmit: function () {

                    var isValid = $(this).form('validate');

                    if (isValid) {

                        connect();

                    }

                    return false;

                }

            });

        }
Getting online user list process:
var callList = { url: 'Handler.List', parameters: {} };

        function list() {

            channel.Send(callList, function (result) {

                $('#lstOnlines').html('');

                for (var i = 0; i < result.data.length; i++) {

                    var item = getUser(result.data[i]);

                    $(item).appendTo($('#lstOnlines'));

                }

            });

        }
The process of sending a message:
var callSay = { url: 'Handler.Say', parameters: {Content:""} }

        function Say() {

            callSay.parameters.Content = mEditor.html();

            mEditor.html('');

            channel.Send(callSay);

            $('#content1')[0].focus();

        }
Summary
The above is the detailed content of Code example of HTML5 WebSocket chat room implementation. For more information, please follow other related articles on the PHP Chinese website!