
Home > Article > Web Front-end > Use HTML5 to develop an android localized App game-GemPengpeng

This time I will talk about how to use the lufylegend.js engine to create an HTML5 game and then convert it into an android localized App application. The conversion process is actually very simple. Let’s do it step by step. illustrate.
First of all, let’s develop a game similar to Duel. However, the gameplay of this game is original. Any similarity is purely coincidental. The game The interface is as follows.
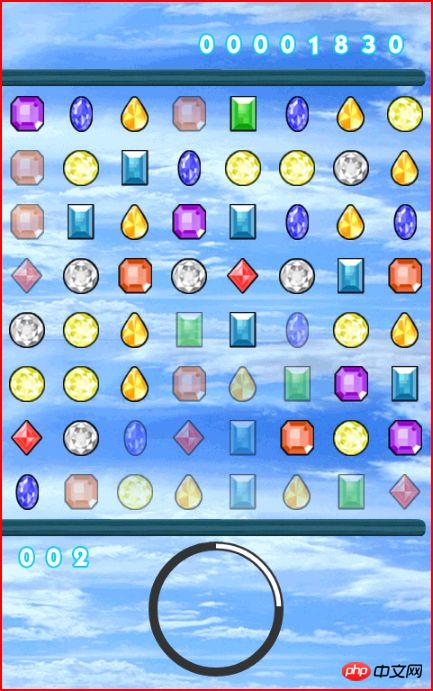
## Game operation: Swipe the screen up, down, left and right to operate the gems to move in different directions.
Game rules: When there are three identical gems adjacent to each other, they will be eliminated. The gems that have been eliminated once will become translucent. When all gems have been eliminated once, the next step will be entered. One level.
Game test connection:
http://lufylegend.com/demo/GemGemProduction starts
1. PreparationFirst, you need to download the lufylegend.js engine. The following is my lufylegend-1.7.0 post on the blog
http://blog.csdn.net/lufy_legend/article/details/8719768Second, game developmentLLoadManage static has been extended in engine lufylegend1.7.0 Class, you can read images, js files and text files. Let’s experience this new function in this game development. First look at the following array
Code List 1
var loadData = [
{path:"../jquery.js",type:"js"},
{path:"./js/share.js",type:"js"},
{path:"./js/Social.js",type:"js"},
{path:"./js/GameRanking.js",type:"js"},
{path:"./js/GameLogo.js",type:"js"},
{path:"./js/GameClear.js",type:"js"},
{path:"./js/Gem.js",type:"js"},
{path:"./js/Stage.js",type:"js"},
{path:"./js/Clock.js",type:"js"},
{path:"./js/Point.js",type:"js"},
{path:"./js/GetPoint.js",type:"js"},
{path:"./js/Bullet.js",type:"js"},
{path:"./js/Event.js",type:"js"},
{path:"./js/function.js",type:"js"},
{path:"./js/GameBody.js",type:"js"},
{name:"num.+",path:"./images/plus.png"},
{name:"num.0",path:"./images/0.png"},
{name:"num.1",path:"./images/1.png"},
{name:"num.2",path:"./images/2.png"},
{name:"num.3",path:"./images/3.png"},
{name:"num.4",path:"./images/4.png"},
{name:"num.5",path:"./images/5.png"},
{name:"num.6",path:"./images/6.png"},
{name:"num.7",path:"./images/7.png"},
{name:"num.8",path:"./images/8.png"},
{name:"num.9",path:"./images/9.png"},
{name:"back",path:"./images/back.png"},
{name:"line",path:"./images/line.png"},
{name:"clear",path:"./images/clear.png"},
{name:"gem01",path:"./images/gem01.png"},
{name:"gem02",path:"./images/gem02.png"},
{name:"gem03",path:"./images/gem03.png"},
{name:"gem04",path:"./images/gem04.png"},
{name:"gem05",path:"./images/gem05.png"},
{name:"gem06",path:"./images/gem06.png"},
{name:"gem07",path:"./images/gem07.png"},
{name:"gem08",path:"./images/gem08.png"},
{name:"gem09",path:"./images/gem09.png"},
{name:"ico_sina",path:"./images/ico_sina.gif"},
{name:"ico_qq",path:"./images/ico_qq.gif"},
{name:"ico_facebook",path:"./images/ico_facebook.png"},
{name:"ico_twitter",path:"./images/ico_twitter.png"}
];
Add the required js files and image files to the array. If the file you need to load is a js file, you need to specify the type as js. If the file to be loaded is an image, the type can be omitted. set up.
The reading process is exactly the same as before
Code List 2function main(){
loadingLayer = new LoadingSample3();
addChild(loadingLayer);
LLoadManage.load(
loadData,
function(progress){
loadingLayer.setProgress(progress);
},
function(result){
LGlobal.setDebug(true);
datalist = result;
removeChild(loadingLayer);
loadingLayer = null;
gameInit();
}
);
}
Let’s add 64 gems in 8 rows, 8 columns, to the game. The specific method is as follows
Code List 3function addGem(){
stage.setStage(stage.num + 1);
gemLayer.removeAllChild();
list = [];
//添加宝石
for(i=0;i<8;i++){
list.push([]);
for(var j=0;j<8;j++){
num = (Math.random()*9 >>> 0)+1;
g = new Gem(num);
g.x = j*60;
g.y = i*60+120;
gemLayer.addChild(g);
list[i].push(g);
}
}
//检验可消除宝石
do{
clearList = checkClear();
if(clearList.length > 0){
for(i=0;i>> 0)+1;
g.change(num);
}
}
}while(clearList.length > 0);
}
The Gem object in the above code is a gem class , the complete code is as follows
Code List 4function Gem(num){
var self = this;
base(self,LSprite,[]);
self.num = num;
self.bitmap = new LBitmap(new LBitmapData(datalist["gem0"+num]));
self.bitmap.x=self.bitmap.y=10;
self.addChild(self.bitmap);
}
Gem.prototype.change = function (num){
var self = this;
self.num = num;
self.bitmap.bitmapData = new LBitmapData(datalist["gem0"+num]);
}
The Gem class inherits from LSprite and contains an LBitmap object internally to display gem pictures.
The checkClear function is called in Code Listing 3 to check whether there are gems that can be eliminated. The detection method is to first perform a horizontal search and then perform a vertical search.
Code List 5clearList = [];
//横向检索
for(i=0;i<8;i++){
checkList = [list[i][0]];
for(j=1;j<8;j++){
if(checkList[checkList.length - 1].num == list[i][j].num){
checkList.push(list[i][j]);
}else{
clearList = addClearList(clearList,checkList);
checkList = [list[i][j]];
}
}
clearList = addClearList(clearList,checkList);
}
//纵向检索
for(i=0;i<8;i++){
checkList = [list[0][i]];
for(j=1;j<8;j++){
if(checkList[checkList.length - 1].num == list[j][i].num){
checkList.push(list[j][i]);
}else{
clearList = addClearList(clearList,checkList);
checkList = [list[j][i]];
}
}
clearList = addClearList(clearList,checkList);
}
The addClearList function is to push the eliminable gems into the clearList array. The method is as follows
function addClearList(clearList,checkList){
	if(checkList.length >= 3){
		clearList = clearList.concat(checkList)
	}
	return clearList;
}
The game operation requires swiping the screen, but in the lufylegend.js engine, there is no event for swiping the screen, so I obtain it through MOUSE_DOWN, MOUSE_UP below The position when and after the click is used to simulate a swipe event.
	backLayer.addEventListener(LMouseEvent.MOUSE_DOWN,onDown);
	backLayer.addEventListener(LMouseEvent.MOUSE_UP,onUp);
Let’s take a look at the specific method, first the onDown function. Code List 8
function onDown(e){
	if(mouse_down_obj.isMouseDown)return;
	continuous = 0;
	mouse_down_obj.x = e.offsetX;
	mouse_down_obj.y = e.offsetY;
	mouse_down_obj.time = new Date().getTime();
	mouse_down_obj.cx = e.offsetX/60 >>> 0;
	mouse_down_obj.cy = (e.offsetY - 120)/60 >>> 0;
	mouse_down_obj.isMouseDown = true;
	list[mouse_down_obj.cy][mouse_down_obj.cx].graphics.drawRect(1,"black",[0, 0, 60, 60],true,"#000000");
}
Get the click position through e.offsetX and e.offsetY, and get the time of the click moment through getTime().
Let’s take a look at the onUp function.
Code List 9function onUp(e){
list[mouse_down_obj.cy][mouse_down_obj.cx].graphics.clear();
if(new Date().getTime() - mouse_down_obj.time > 500){
mouse_down_obj.isMouseDown = false;
return;
}
var mx = e.offsetX - mouse_down_obj.x;
var my = e.offsetY - mouse_down_obj.y;
if(Math.abs(mx) > Math.abs(my)){
if(mx > 50){
move("right");
return;
}else if(mx < -50){
move("left");
return;
}
}else{
if(my > 50){
move("down");
return;
}else if(my < -50){
move("up");
return;
}
}
mouse_down_obj.isMouseDown = false;
}
The function uses the same method to obtain the position and time when the click ends, then compares it with the click time, and finally calculates the direction of the stroke , and then call the move function according to the direction of the stroke to make the gem move. The move function is as follows:
function move(dir){
	direction = dir;
	var m = moveGem(dir,8);
	var mx = m[0],my = m[1];
	var obj,fun;
	for(var i=0;i<8;i++){
		if(mx == 0){
			obj = list[i][mouse_down_obj.cx];
		}else{
			obj = list[mouse_down_obj.cy][i];
		}
		if(i < 7){
			fun = null;
		}else{
			fun = function(){
				hiddenObj.visible = true;
				checkClear();
			};
		}
		LTweenLite.to(obj,0.3,
		{
			x:obj.x+mx,
			y:obj.y+my,
			onComplete:fun,
			ease:Strong.easeOut
		});

	}
}
The following uses moving to the right as an example to illustrate the move function. The processing process is as follows
First move the leftmost gem H to the far left, and then use the LTweenLite easing class to move the entire row of 8 gems, easing one unit to the right. It's just the opposite if you go to the left, and the same principle applies to going up and down.
Every time easing ends, the checkClear function must be called to determine whether there are gems that can be eliminated. If there are gems, start eliminating gems. How to eliminate gems?
I still use swiping to the right as an example. Look at the picture below. Assume that D1, D2, and D3 can be eliminated, and E4, F4, and G4 can be eliminated.
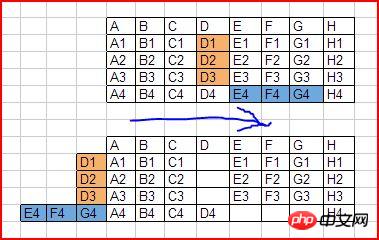
那么首先将D1,D2,D3移到左边边界外,E4,F4,G4也移到边界外,表示被消除,之后对每一行的宝石进行位置判定,如每行的第一个宝石的x坐标应该是60,第二个为120,以此类推。如果他们不在自己的相应位置上,那么将其向左移动到规定位置就可以了,写成代码的话,如下。
代码清单11
function moveList(){
	var gem,time,maxTime,mx,my,fun;
	maxTime = 0;
	switch(direction){
		case "left":
			for(i=0;i<8;i++){
				for(j=0;j<8;j++){
					gem = list[i][j];
					mx = 60*j;
					if(gem.x > mx){
						time = 0.3*((gem.x-mx) / 60 >>> 0);
						if(maxTime < time)maxTime = time;
						fun = null;
						if(gem.x > 420){
							fun = function(gem){
								if(gem.x <= 420)gem.visible = true;
							}
						}
						LTweenLite.to(gem,time,
						{
							x:mx,
							onUpdate:fun,
							onComplete:fun,
							ease:Strong.easeOut
						});
					}
				}
			}
			break;
		case "right":
			for(i=0;i<8;i++){
				for(j=0;j<8;j++){
					gem = list[i][j];
					mx = 60*j;
					if(gem.x < mx){
						time = 0.3*((mx-gem.x) / 60 >>> 0);
						if(maxTime < time)maxTime = time;
						fun = null;
						if(gem.x < 0){
							fun = function(gem){
								if(gem.x >= 0)gem.visible = true;
							}
						}
						LTweenLite.to(gem,time,
						{
							x:mx,
							onUpdate:fun,
							onComplete:fun,
							ease:Strong.easeOut
						});
					}
				}
			}
			break;
		case "up":
			for(i=0;i<8;i++){
				for(j=0;j<8;j++){
					gem = list[j][i];
					my = 120+60*j;
					if(gem.y > my){
						time = 0.3*((gem.y-my) / 60 >>> 0);
						if(maxTime < time)maxTime = time;
						fun = null;
						if(gem.y > 560){
							fun = function(gem){
								if(gem.y <= 560)gem.visible = true;
							}
						}
						LTweenLite.to(gem,time,
						{
							y:my,
							onUpdate:fun,
							onComplete:fun,
							ease:Strong.easeOut
						});
					}
				}
			}
			break;
		case "down":
			for(i=0;i<8;i++){
				for(j=0;j<8;j++){
					gem = list[j][i];
					my = 120+60*j;
					if(gem.y < my){
						time = 0.3*((my-gem.y) / 60 >>> 0);
						if(maxTime < time)maxTime = time;
						fun = null;
						if(gem.y < 120){
							fun = function(gem){
								if(gem.y >= 120)gem.visible = true;
							}
						}
						LTweenLite.to(gem,time,
						{
							y:my,
							onUpdate:fun,
							onComplete:fun,
							ease:Strong.easeOut
						});
					}
				}
			}
			break;
	}
	LTweenLite.to({},maxTime*1.5,
	{
		onComplete:checkStageClear,
		ease:Strong.easeOut
	});
}
当然,游戏是有时间限制的,看下面的Clock类。
代码清单12
function Clock(){
	var self = this;
	base(self,LSprite,[]);
	self.timer = 0;
	self.addTimer = 0.05;
	self.graphics.drawArc(5,"#333333",[0,0,70,0,2*Math.PI]);

}
Clock.prototype.onframe = function (){
	var self = this;
	self.timer += self.addTimer;
	self.graphics.clear();
	self.graphics.drawArc(10,"#333333",[0,0,70,0,2*Math.PI]);
	self.graphics.drawArc(5,"#ffffff",[0,0,70,-Math.PI*0.5,Math.PI*self.timer/180-Math.PI*0.5]);
}
首先将Clock加载到游戏中,然后再利用ENTER_FRAME时间轴事件,来不断调用Clock的onframe不断的绘制圆弧,当timer的数值大于等于360的时候代表画完了整个圆弧,那么游戏结束。
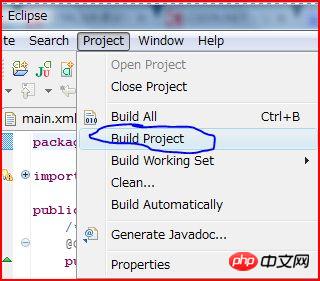
以上,游戏的主要原理都介绍完了,下面看看如何来把游戏转化为本地App
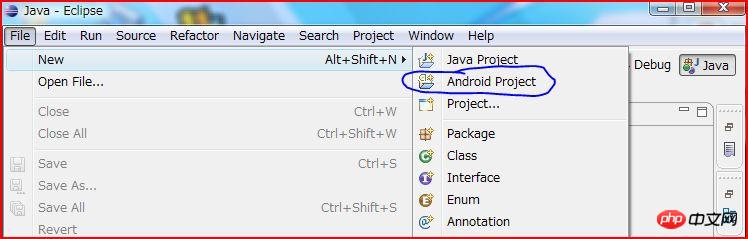
首先,用Eclipse新建一个Android Project
注:如何搭建Android环境,我就不说了,网上教程多得是,随便百度一下吧。
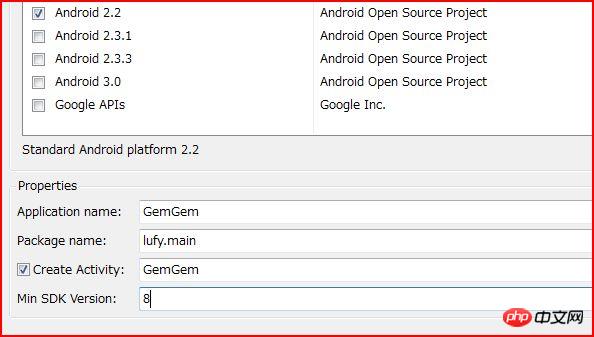
然后,填写项目名称,并选择相应的sdk版本,这里我选了2.2
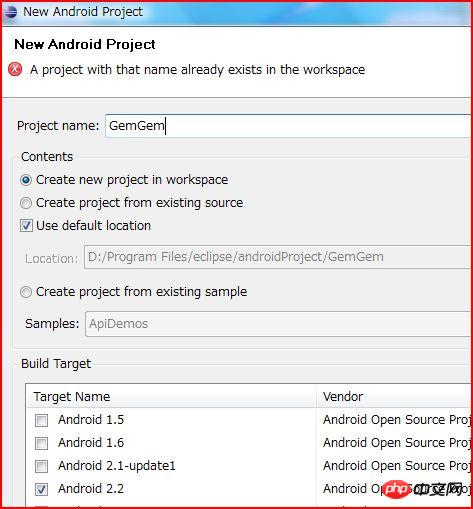
接着是填写相应数据,这个随自己心情就可以了。
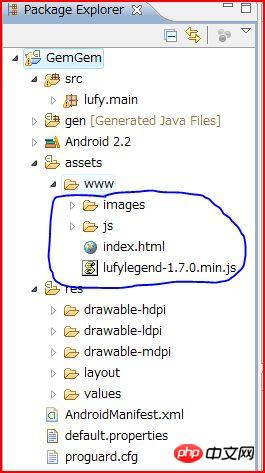
接着,重点来了,在工程下的assets文件夹下,简历一个www文件夹(名字自己随意),然后把刚才开发好的游戏复制到这个文件夹下,当然,lufylegend引擎也必须复制过来。
接着修改res/layout/main.xml文件,添加webView,如下
最后,修改Main.java文件,利用webView来显示html网页,如下
public class Main extends Activity {
/** Called when the activity is first created. */
@Override
public void onCreate(Bundle savedInstanceState) {
super.onCreate(savedInstanceState);
setContentView(R.layout.main);
WebView webview = (WebView )findViewById(R.id.webView1);
webview.getSettings().setJavaScriptEnabled(true);
webview.setVerticalScrollbarOverlay(true);
webview.loadUrl("file:///android_asset/www/index.html");
}
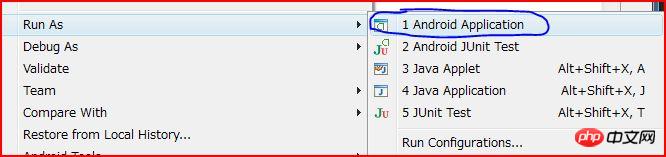
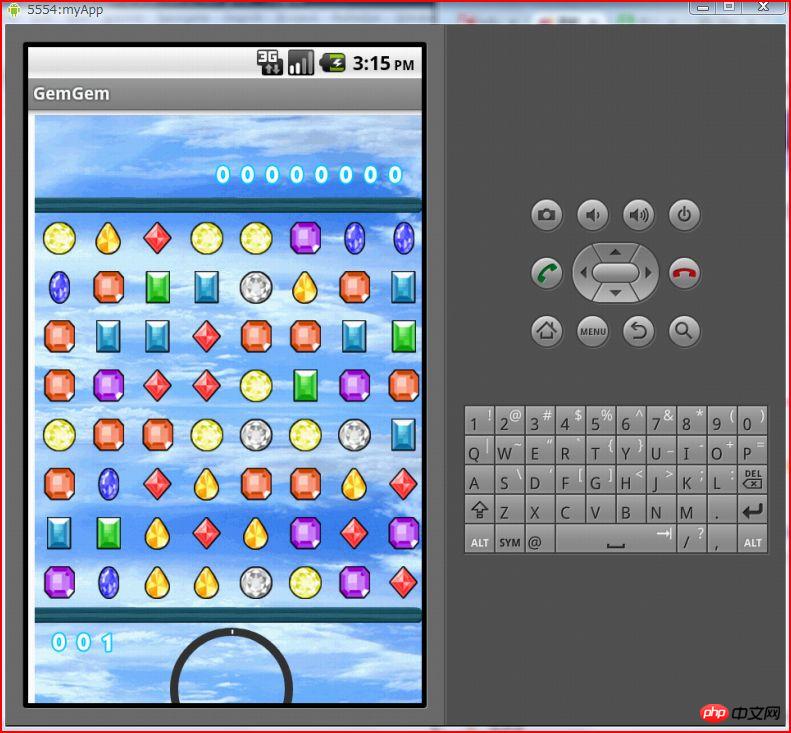
}好了,运行程序吧。
画面如下:
最后,想要发布游戏为.apk文件的话,build一下就好了。
发布后的apk文件。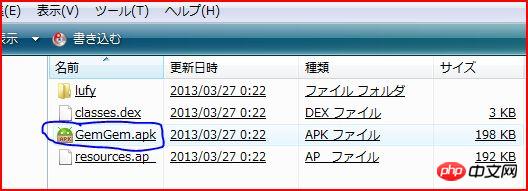
结束了,简单吧?
最后给出本次游戏的源代码
http://lufylegend.com/lufylegend_download/GemGem.rar
注:只含游戏源码,lufylegend.js引擎请自己到官网下载
以上就是用HTML5来开发一款android本地化App游戏-宝石碰碰的内容,更多相关内容请关注PHP中文网(m.sbmmt.com)!