Home  >  Article  >  How to adjust MTU size on Windows 11

How to adjust MTU size on Windows 11

PHPz
PHPzforward
2023-08-25 11:21:184678browse

Windows 11 上如何调整 MTU 大小

If you're suddenly experiencing a slow internet connection on Windows 11 and you've tried every trick in the book, it probably has nothing to do with your network and everything to do with your Maximum Transmission Unit (MTU) Don't care.

Problems may occur if your system sends or receives data with the wrong MTU size. In this article, we will learn how to change MTU size on Windows 11 for smooth and uninterrupted internet connection.

What is the default MTU size in Windows 11?

The default MTU size in Windows 11 is 1500, which is the maximum value allowed. MTU stands for Maximum Transmission Unit. This is the maximum packet size that can be sent or received on the network.

Every network-enabled device has a maximum acceptable MTU size. If these limits are exceeded, there will be consequences.

For example, if your MTU size is set too high, you may encounter errors such as the Xbox 360 MTU error. In this case, there are only two options. You can drop the packet or break it into several smaller packets.

Fragmentation is the most popular option because routers cannot handle packets larger than their maximum transmission unit. This will increase network overhead and reduce performance.

The ripple effect will manifest itself in various ways, such as emails not fully arriving, problems connecting to certain websites, or buffering in streaming services like Netflix.

While a larger MTU means more data can be transmitted in each packet, the disadvantage is that packets take more time to transmit.

Therefore, you need to understand the needs of your device, as increasing or decreasing the MTU size may improve or decrease network performance.

If you are transferring a large amount of data over a network connection, reducing the MTU size may help increase transfer speeds because fewer packets need to be sent.

However, if the amount of data being transferred over the network connection is small, increasing the MTU size may help you send more packets in less time.

Now that you understand the factors that affect MTU size, here's how to adjust some of these settings for optimal internet performance.

How to modify MTU settings on Windows 11

Before performing the following steps, please note the following:

  • Check the maximum MTU size of your computer and make sure it is not exceed these limits. Open a command line as an administrator and enter the following command to find the current MTU: <strong>netsh interface ipv4 show subinterfaces</strong>
  • Make sure your computer has all the latest Windows updates installed , because older versions may not support larger MTU values.
  • Make sure your computer is connected to the Internet via an Ethernet cable or wireless connection and that your network adapter driver is updated.

Changing the MTU may cause problems with applications and services. Some applications may not be able to communicate with other devices on the network if they are configured to use a different MTU setting.

Here’s how to adjust your MTU settings:
1. Use the Control Panel

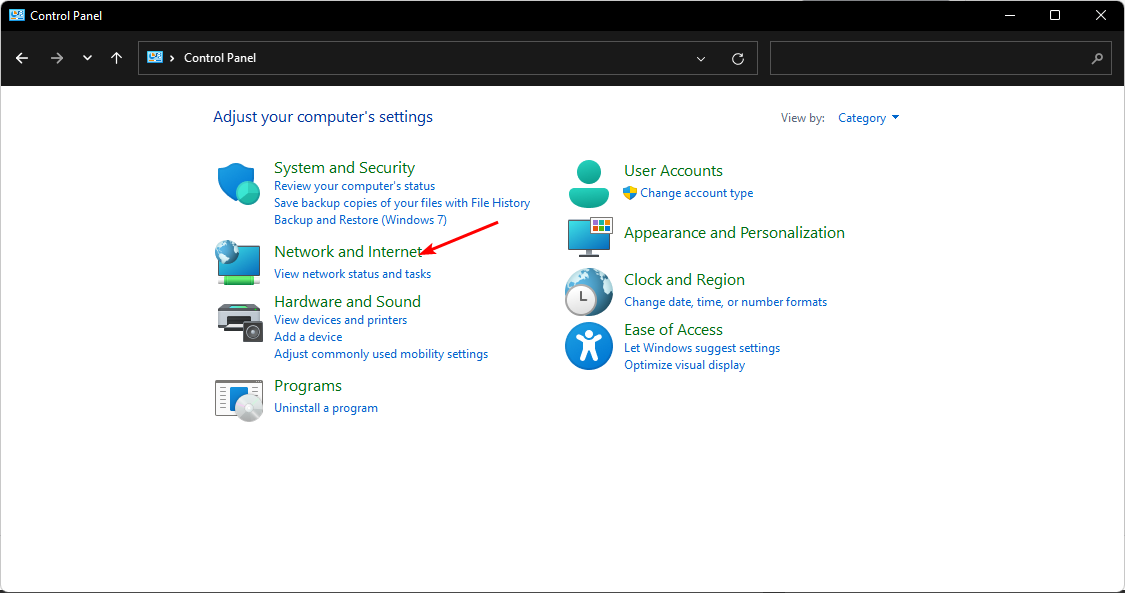
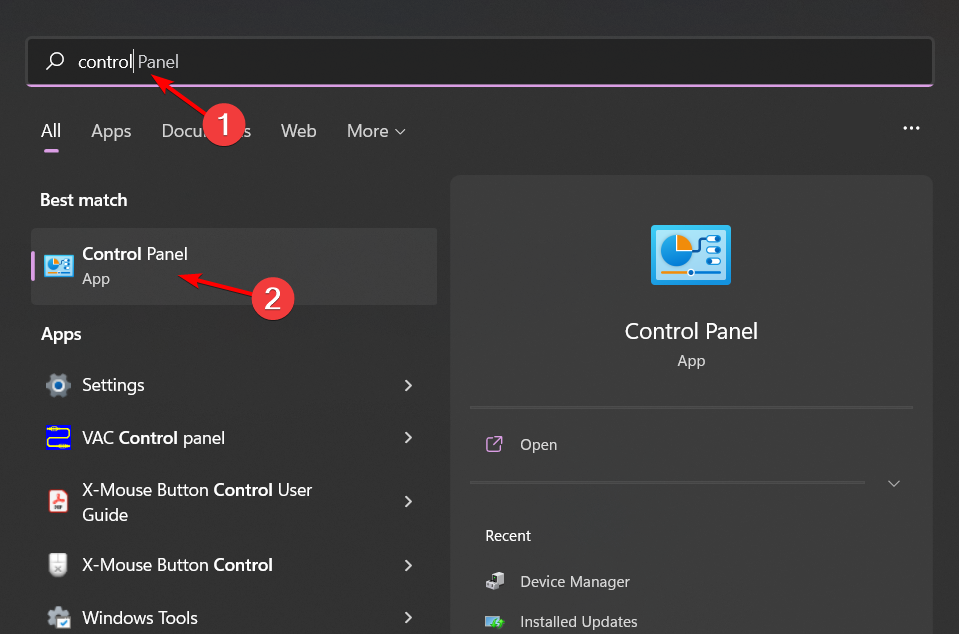
  1. button, type Control Panel in the search bar, and then click Open. WindowsWindows 11 上如何调整 MTU 大小
  2. Navigate to "Network and Internet". Windows 11 上如何调整 MTU 大小
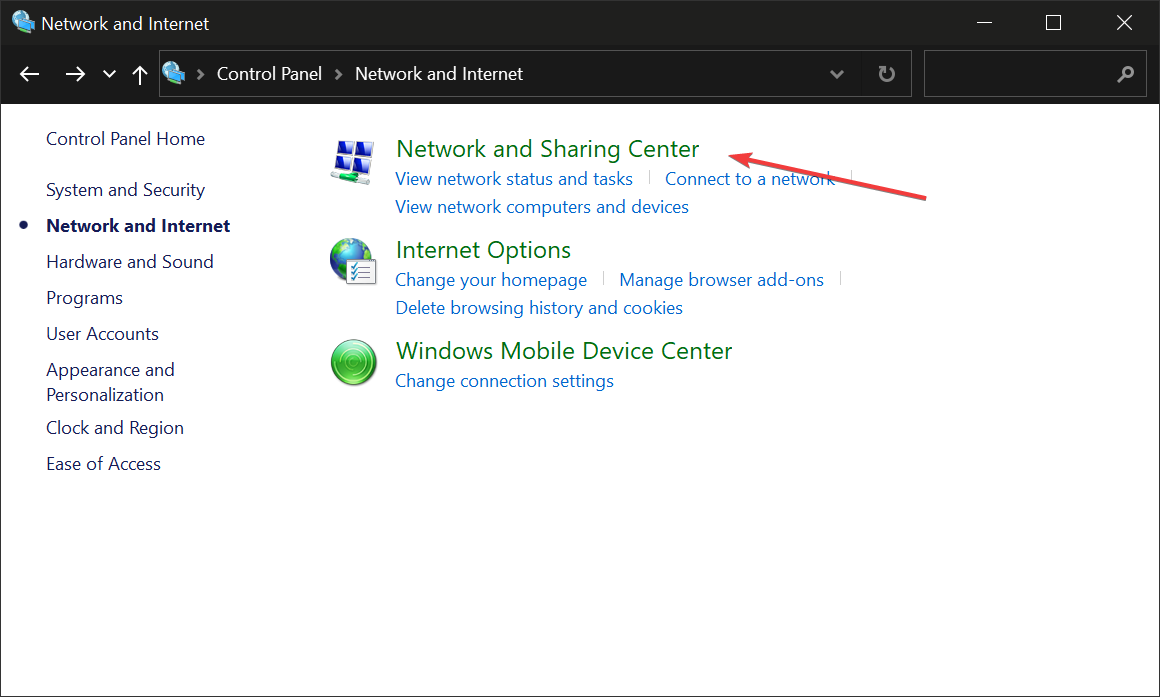
  3. Click on Network and Sharing Center. Windows 11 上如何调整 MTU 大小
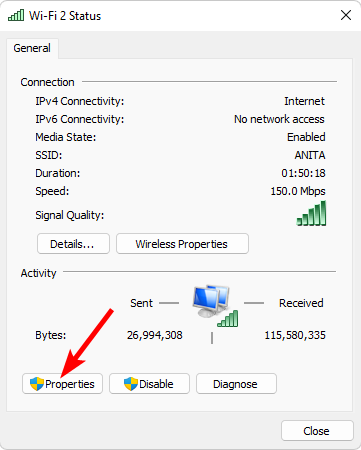
  4. Next, click on your Wi-Fi adapter and select Properties. Windows 11 上如何调整 MTU 大小
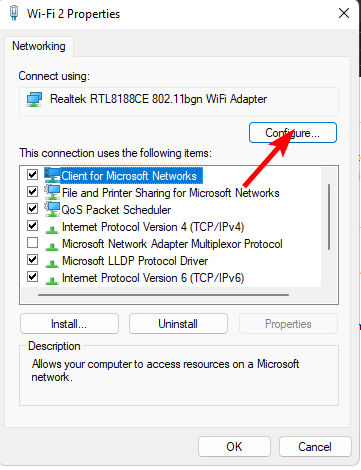
  5. Hit the Configuration button. Windows 11 上如何调整 MTU 大小
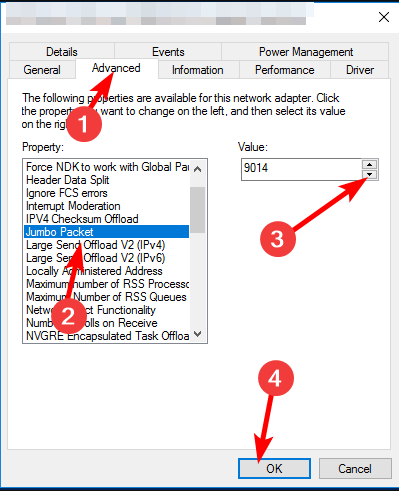
  6. Navigate to the "Advanced" tab, under "Properties" find the Jumbo packet, and then under "Value" Under Options, select an option from the drop-down menu and click OK. Windows 11 上如何调整 MTU 大小
2. Use the Command Prompt

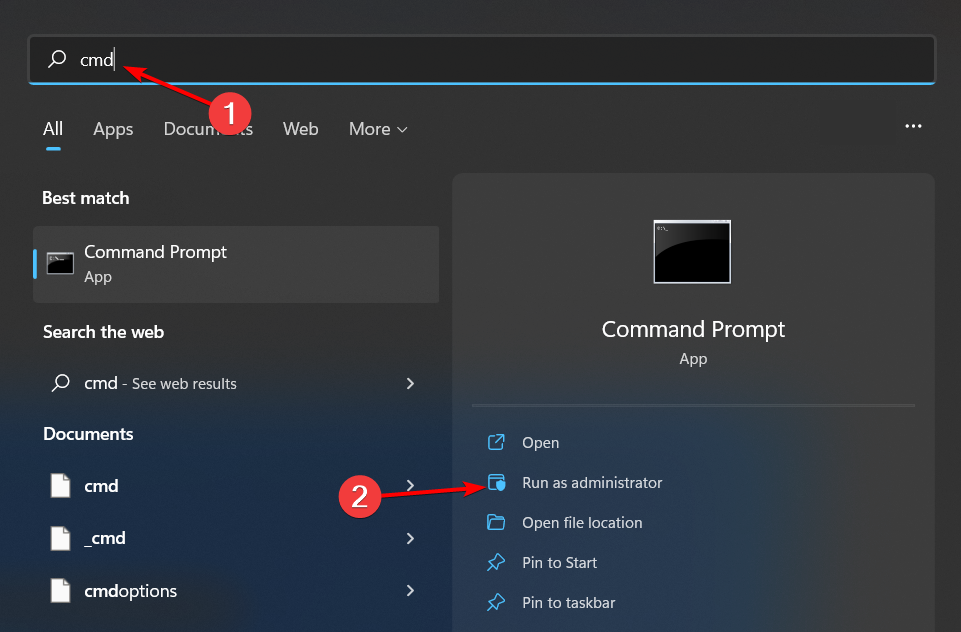
    key, type cmd in the search bar, and then click
  1. Open. WindowsWindows 11 上如何调整 MTU 大小
  2. Type the following command and click:
  3. Enternetsh interface ipv4 show subinterfaces<strong></strong>Windows 11 上如何调整 MTU 大小
  4. Make a note of the interface you want to change, and then enter the next command. Remember to replace the subinterface name with the subinterface name you noted down, and
  5. 9000 with the new MTU value within the accepted limits: netsh interface ipv4 set subinterface < subinterface name> mtu=9000 store=persistent<strong></strong>
#How to verify changes and ensure optimal performance

After changing the MTU setting on a Windows PC, we recommend running Some tests to make sure everything is working as expected:

    Check that your internet connection is working properly by performing a speed test. You can try downloading some files from the web or playing online games.
  • Run some hardware diagnostic tests on your computer. This will help you identify hardware or software issues that may arise after changing the MTU size.
  • Check if your firewall or antivirus software is blocking any connections.
A key sign is to run the ping command. If your gaming performance improves, file sharing is faster, and your website loads slightly faster, you can conclude that the MTU setting change was successful.

However, if the result is vice versa and you are experiencing slow internet speeds, the process may not be successful.

But before reverting these changes, try resetting the tcp/ip stack. The routing of the packets may not be configured correctly, or you may simply be facing network congestion issues that are interfering with your internet connection.

Hopefully these steps enable you to edit your network settings for optimal MTU value optimization.

While you're still here, check out how to handle other network-related errors, such as Wi-Fi does not have a valid configuration.

The above is the detailed content of How to adjust MTU size on Windows 11. For more information, please follow other related articles on the PHP Chinese website!

Statement:
This article is reproduced at:yundongfang.com. If there is any infringement, please contact admin@php.cn delete