Home >Common Problem >5 Ways to Change Folder Icons on Windows 11 (and 3 Tips)
A great way to personalize Windows 11 is to modify the icons of folders, applications, or shortcuts to replace the default versions. If you want to get more creative with icons, Windows allows you to explore its built-in icon repository and icons from third-party websites on your PC.
While the default icons are attractive, using the same set of icons for an extended period of time can cause the Windows experience to become monotonous. So, let’s see how you can change the icons of various applications and folder types on your PC using the third-party and native options provided by Windows 11.
Windows 11 allows you to change the icons of various folder types. In this section, we will discuss how to change folder icons for the 4 main folder types: regular folders, desktop icons, shortcuts, and disk icons.
So without further ado, let’s see how to change the icon for each folder type.
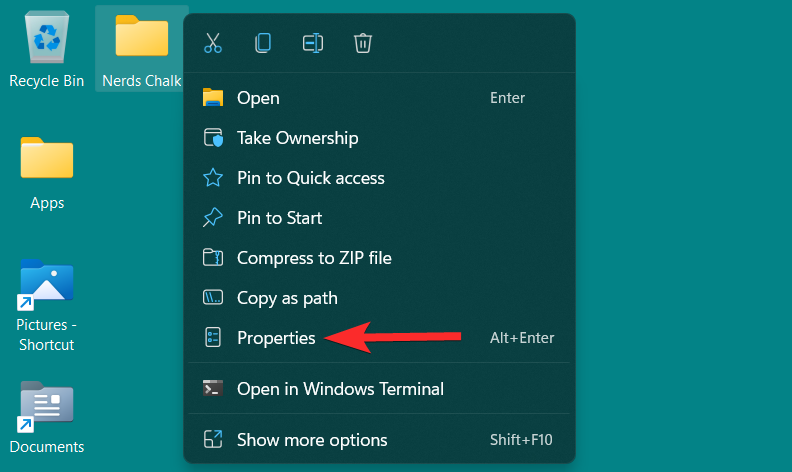
To change the yellow folder icon, right-click this folder and click "Properties".
NOTE: You can also open the properties of this folder by selecting it and then ALT ENTERpressing from the keyboard.
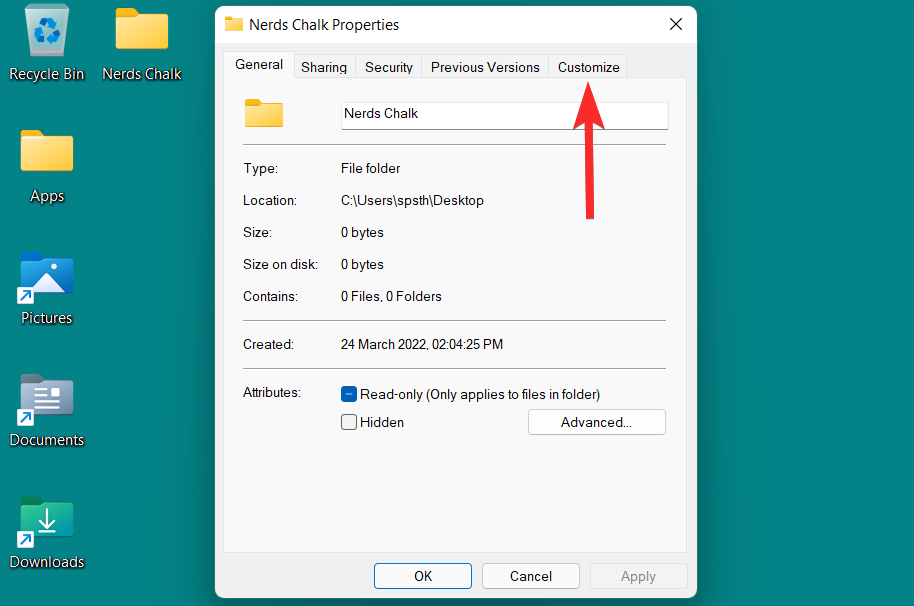
In the folder properties, click the Customize tab.
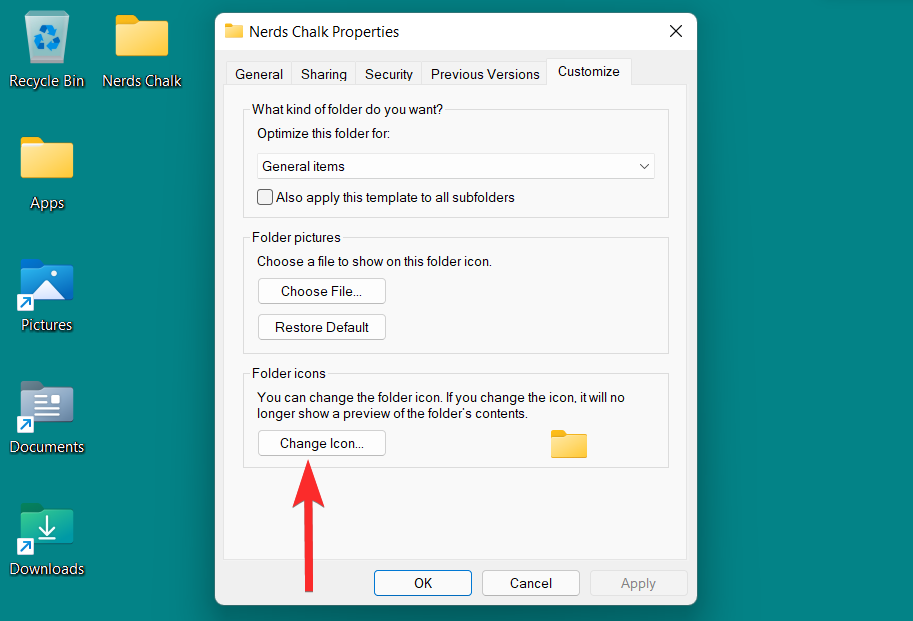
Here, click on the “Change Icon” option under the “Folder Icon” section.
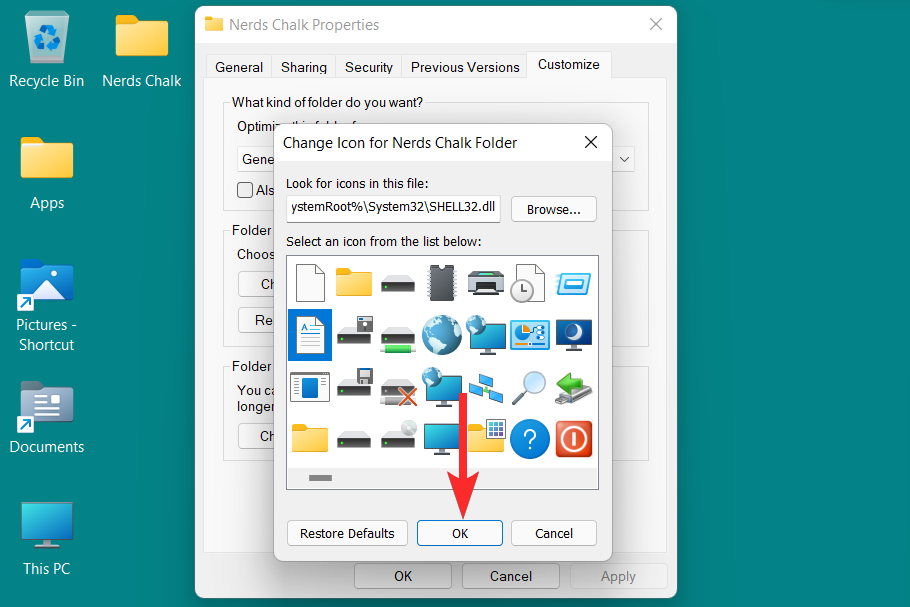
You will now see a list of icons provided by Windows. You can scroll right to see all icons included in this list.
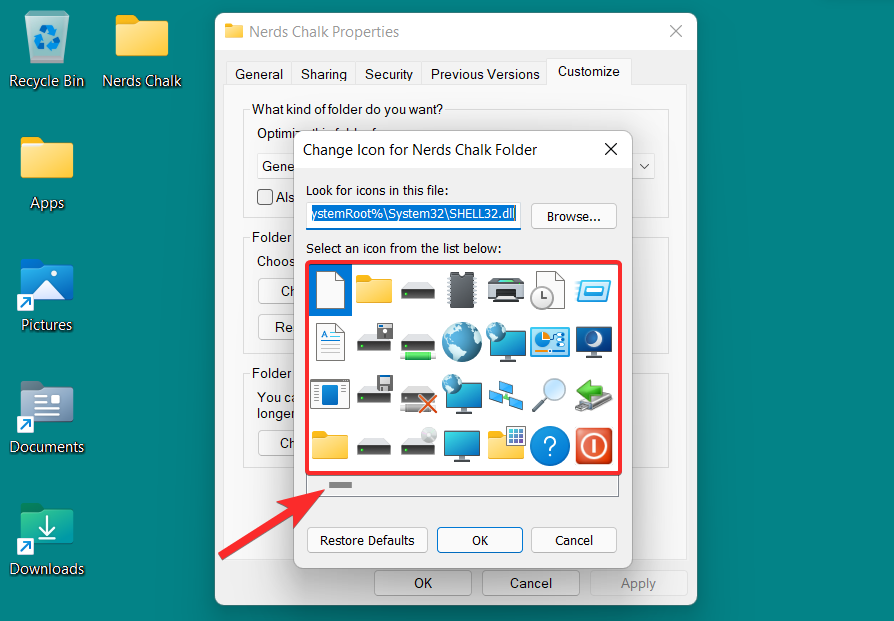
From this list, select the icon that suits you and click on it. Then, click OK to confirm your selection.
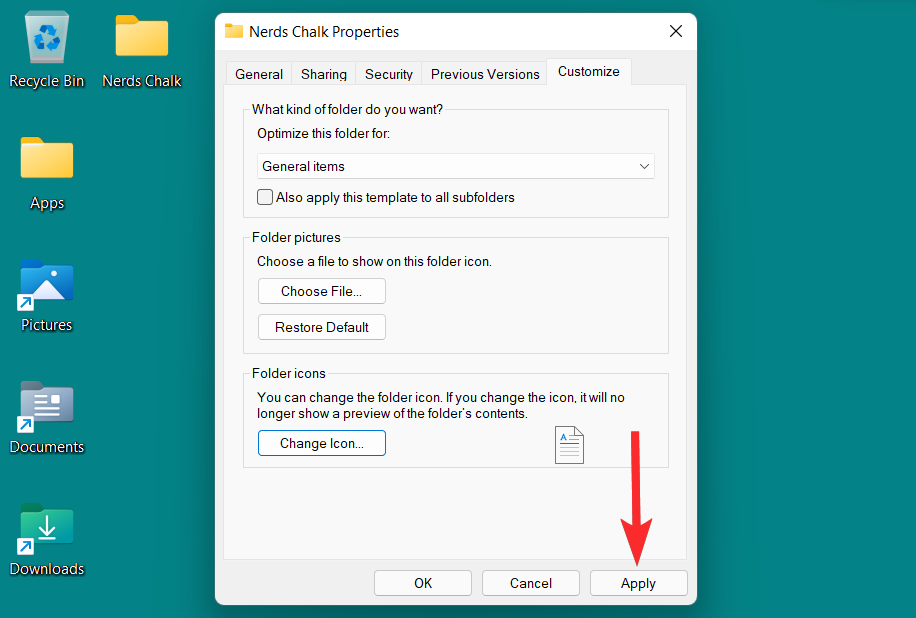
Return to the folder properties and click Apply to apply the new folder icon.
Finally, click OK to exit the folder properties.
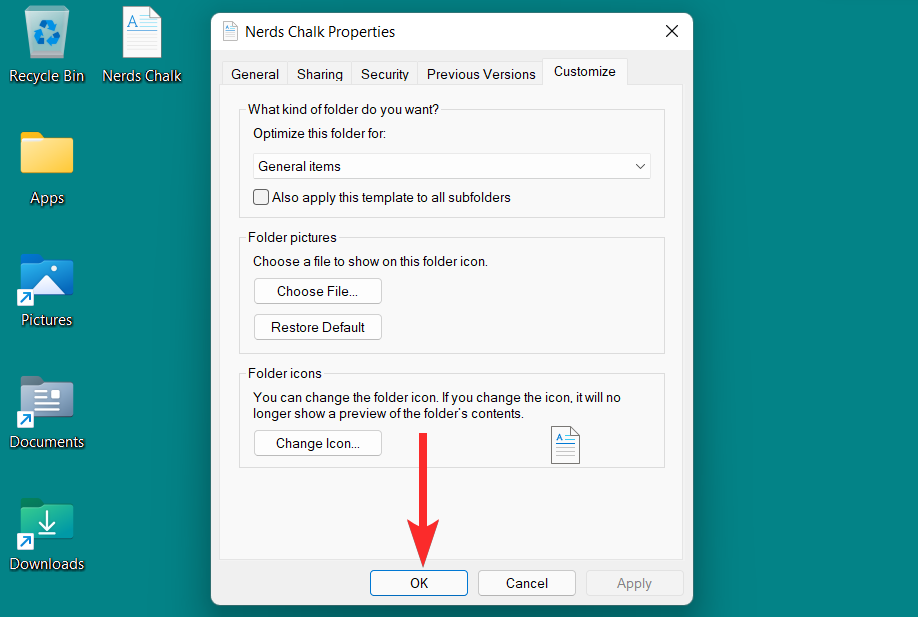
The folder icon has now changed.

"Desktop icons" is a general term that contains special folders. These special folders are Recycle Bin, Control Panel, Network, User Files, and Computer. Let’s learn how to modify the icons of these special folders in the personalization options of Windows 11.
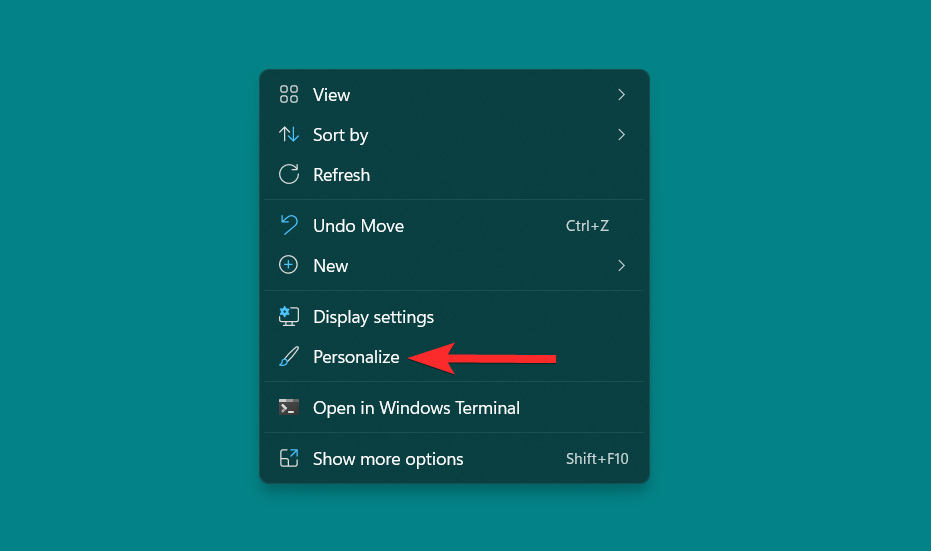
To open personalization, right-click anywhere on your desktop and click Personalize.
Note: Personalization settings can also be found in the Settings app.
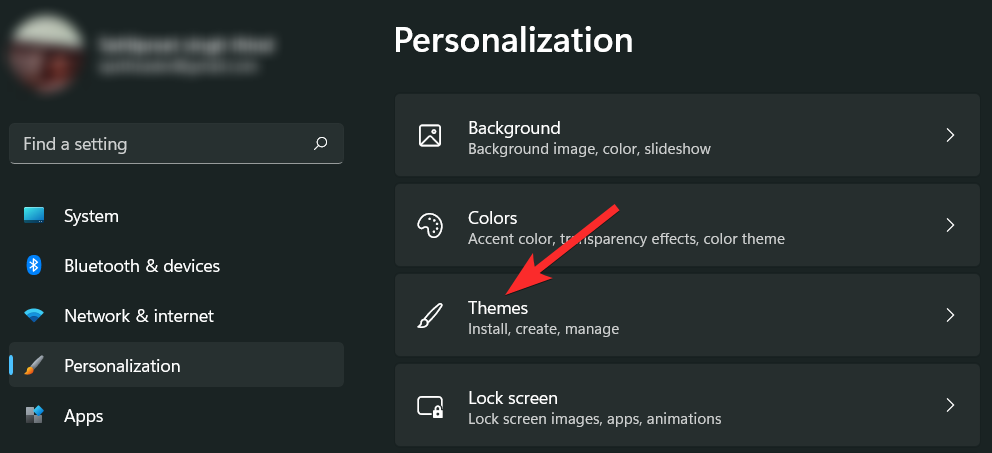
In Personalization, click the "Themes" option on the right.
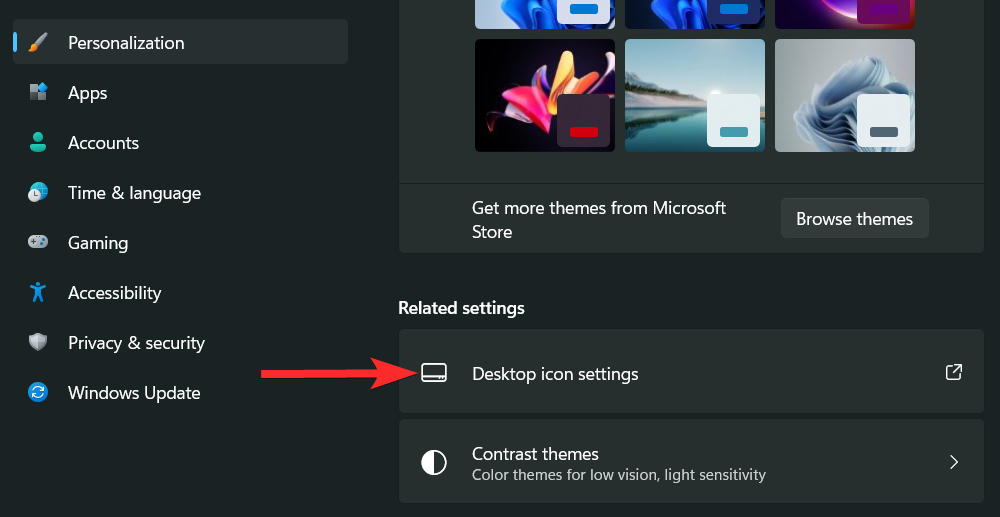
Now, scroll down and click on “Desktop Icon Settings” under the “Related Settings” section. This will open the Desktop Icon Settings window.
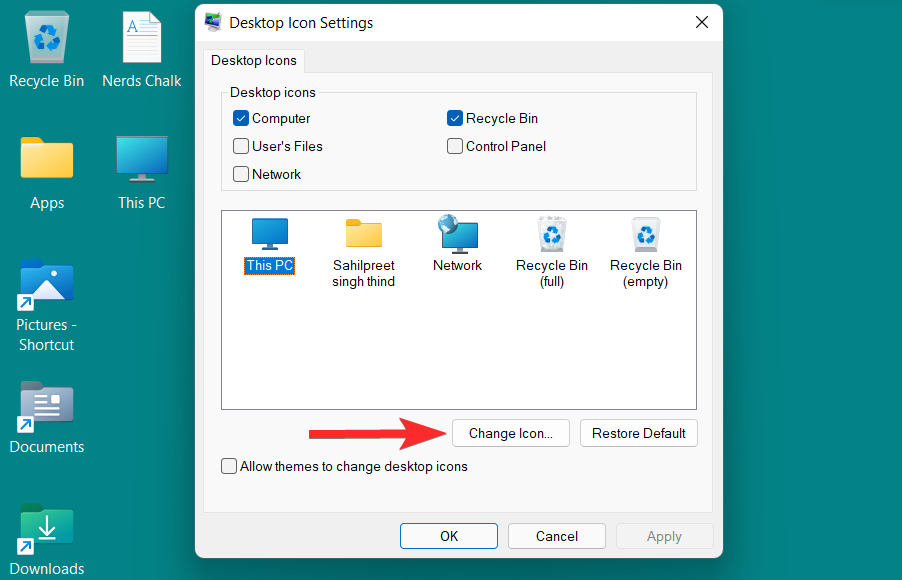
In the desktop icon settings window, click the desktop icon you want to change, and then click Change Icon.
Note: The checkbox next to the desktop icon indicates the icon that exists on the desktop.
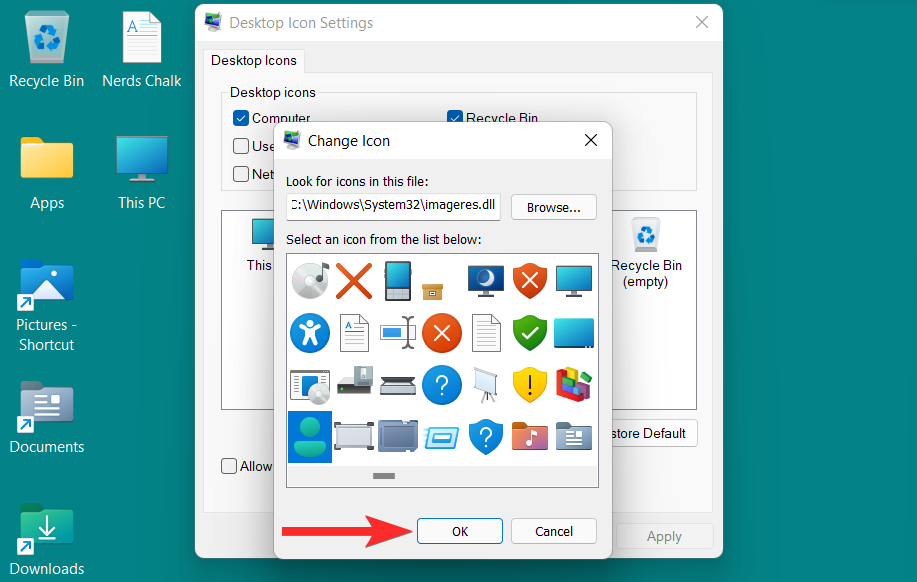
You will now see a list of icons provided by Windows. You can scroll right to see all icons included in this list.
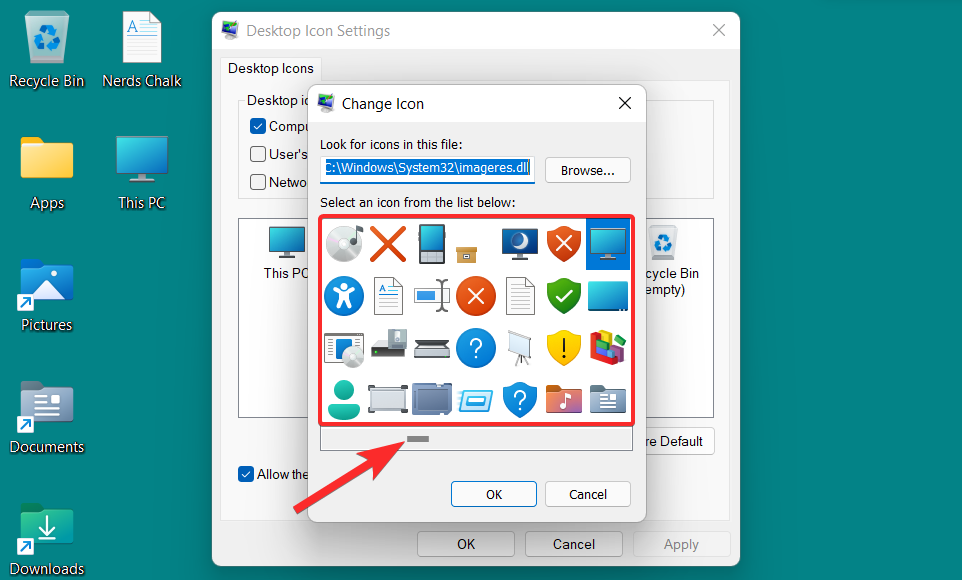
From this list, select the icon that suits you and click on it. Then, click OK to confirm your selection.
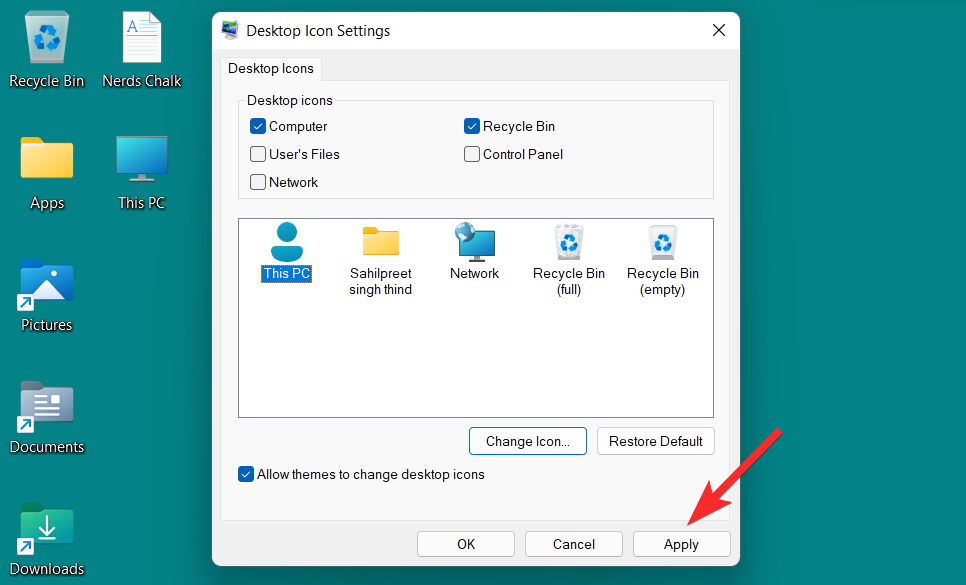
Return to the desktop icon settings window and click "Apply" to save the changes.
Finally, click "OK" to exit the desktop icon settings window.
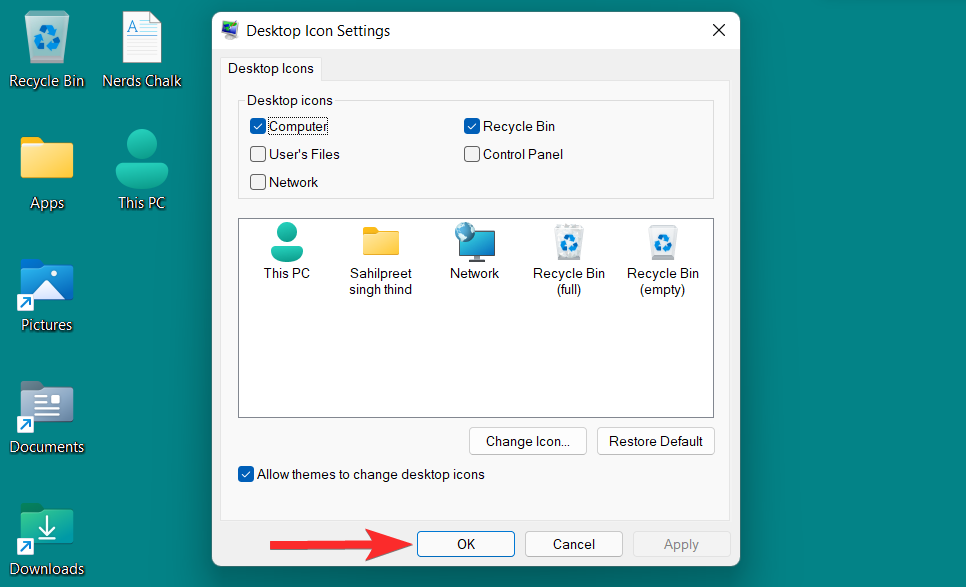
The desktop icon for "This PC" has now changed.

Windows 11 allows you to change the icon of various shortcuts. These can be application shortcuts, folder shortcuts, etc. Changing a shortcut's icon does not apply to other shortcuts for the same application or folder. You will need to perform this process for each shortcut individually.
While the steps for changing a shortcut icon are very similar to those for a regular folder, it's worth noting that for application shortcuts, the list of alternative icons you can choose from is relatively small.
So, let’s see how to change shortcut icons on Windows 11.
Right-click the shortcut and click Properties from the context menu.
Note: You can also open the shortcut properties by selecting the shortcut properties and then pressing ALT ENTER from the keyboard.
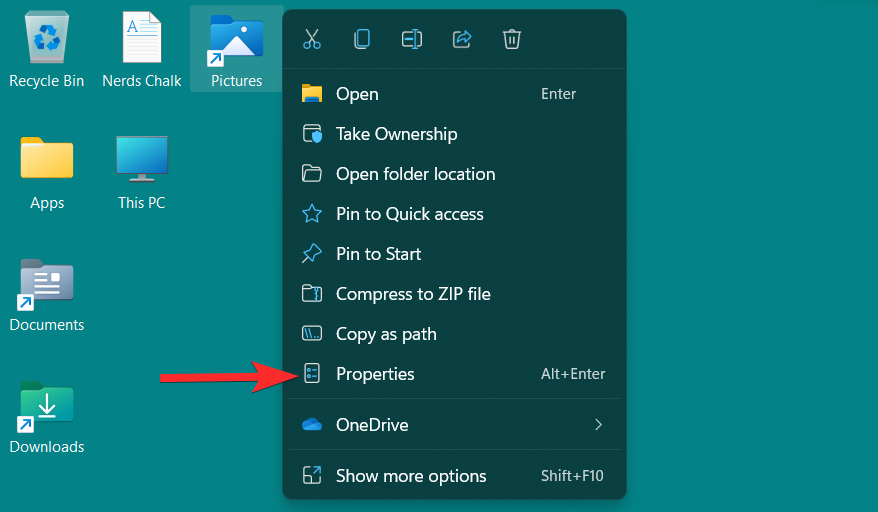
In the properties window, click on the "Change Icon" option under the "Shortcuts" section.
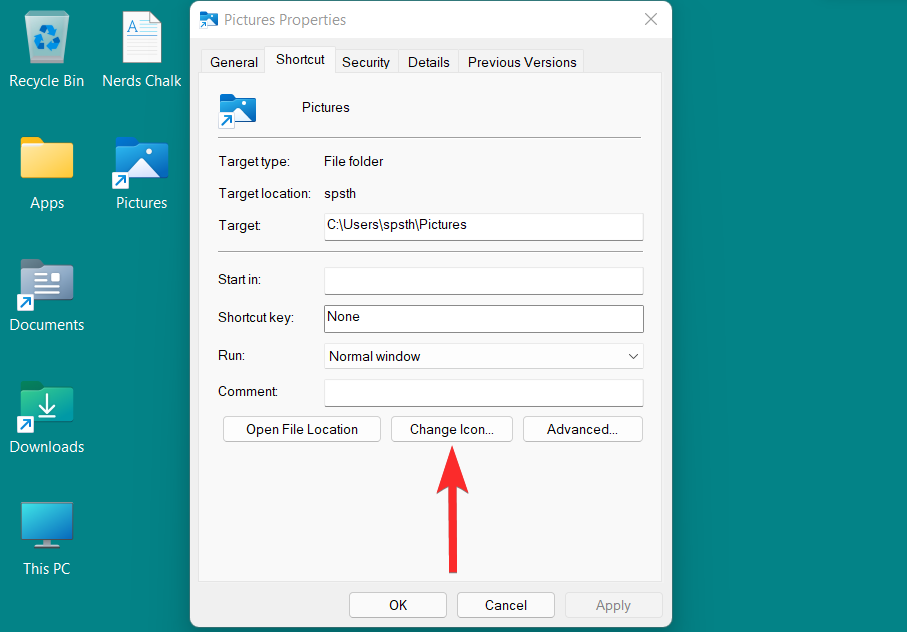
You will now see a list of icons provided by Windows. You can scroll right to see all icons included in this list.
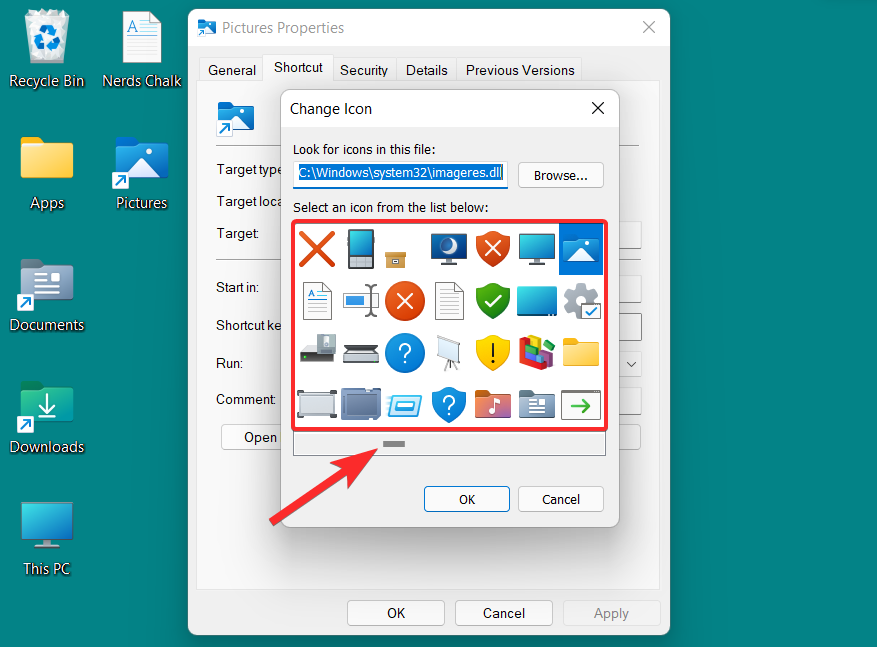
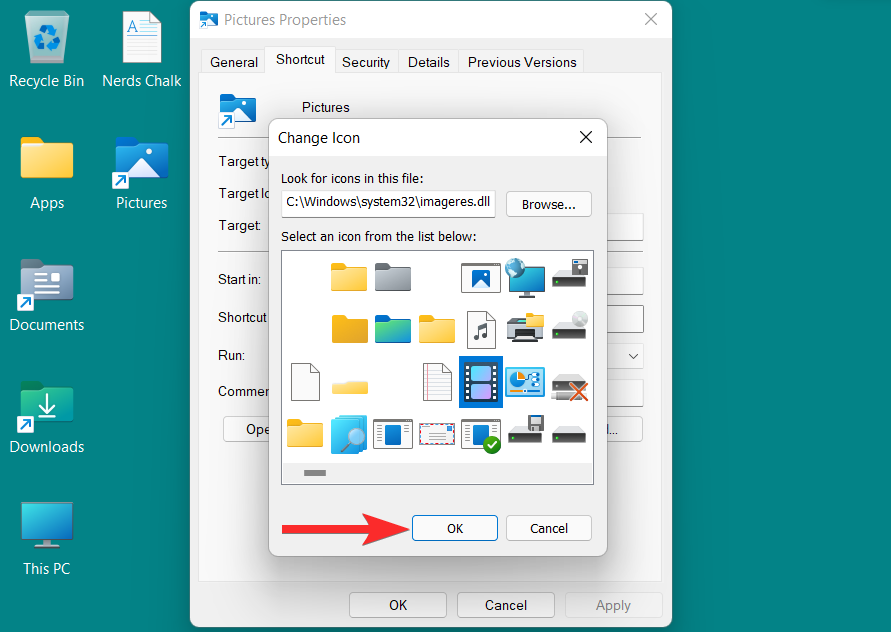
From this list, select the icon that suits you and click on it. Then, click OK to confirm your selection.
Return to the Properties window and click Apply to save your changes.
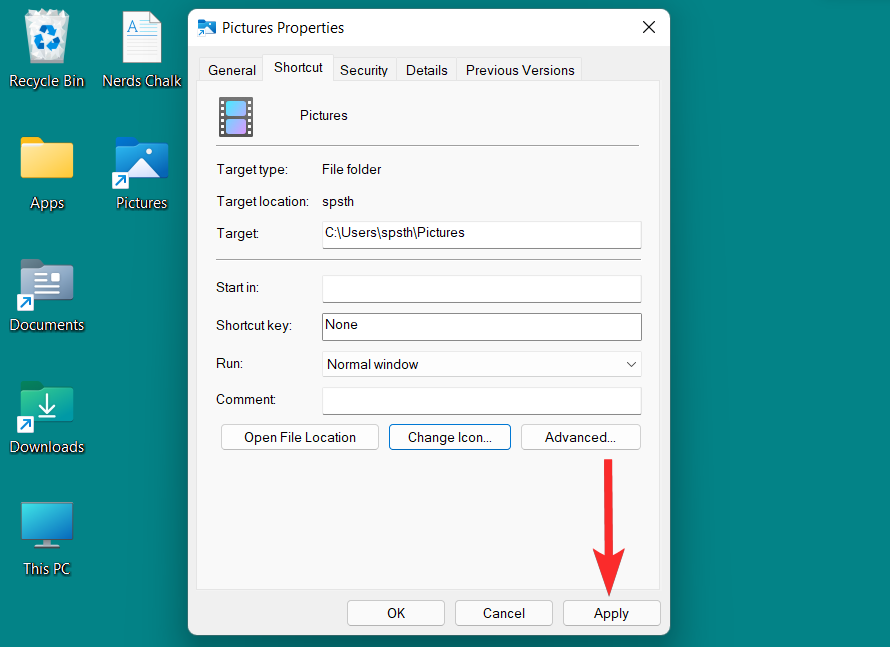
Finally, click OK to exit the shortcut properties.
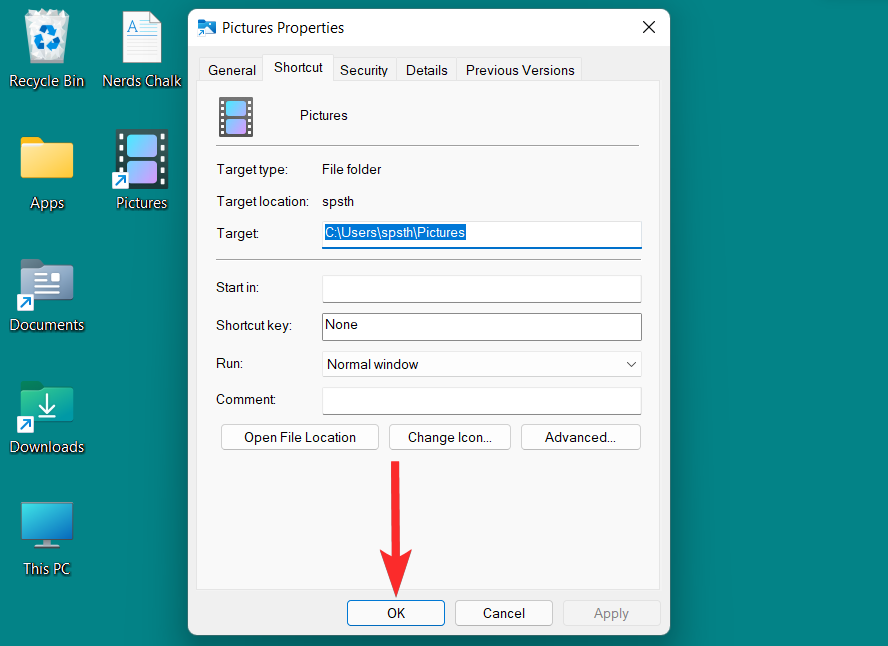
The shortcut icon has now changed.

The disk icon on Windows 11 can be changed in several ways. You can change a specific disk icon by changing the registry or using a third-party application. Both methods produce the same result, you need to provide the path to the .ico file in the Registry Editor.
Note: .ico is a file format used to represent icons in Microsoft Windows. These files can be easily downloaded from online sources and then used as replacement icons for folders, shortcuts or even disk icons on Windows.
NOTE: However, before making the registry changes required to change the disk icon, it is recommended that you back up the registry just in case. Here's how to back up your registry.
To change the disk icon, you need an .ico file as the icon of your choice. You can download icons in .ico file format from icon-icon, iconarchive, findicons and other websites.
Use one of the websites mentioned above to download the desired icon in .ico format.
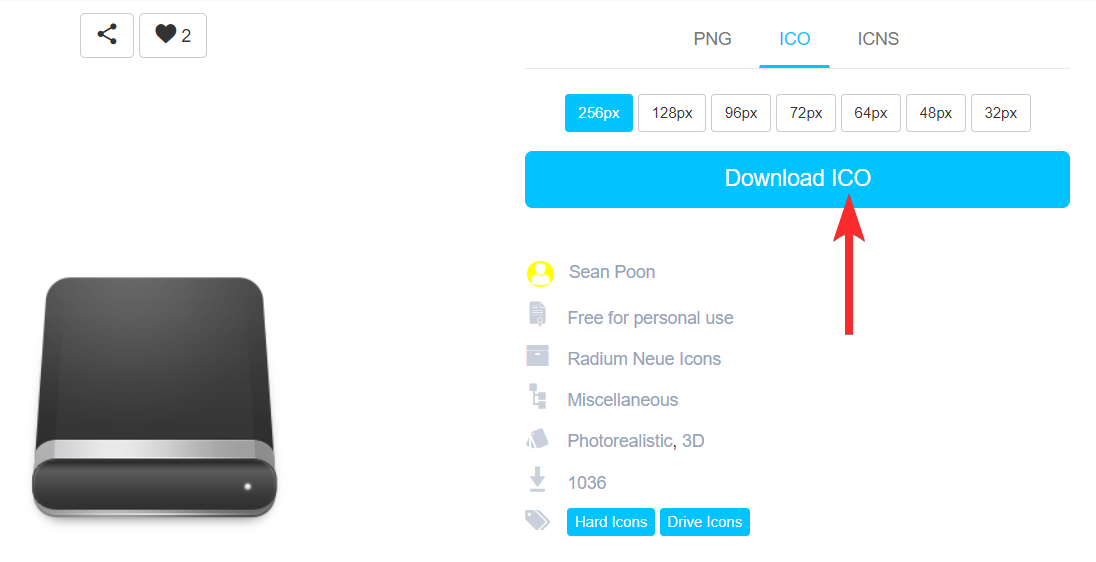
Now, navigate to the location of the .ico file.
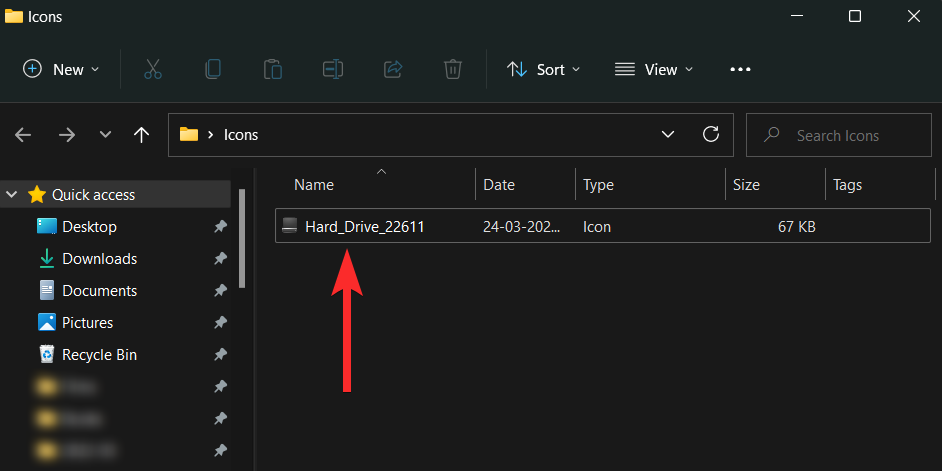
Right-click the .ico file and select "Copy as Path".
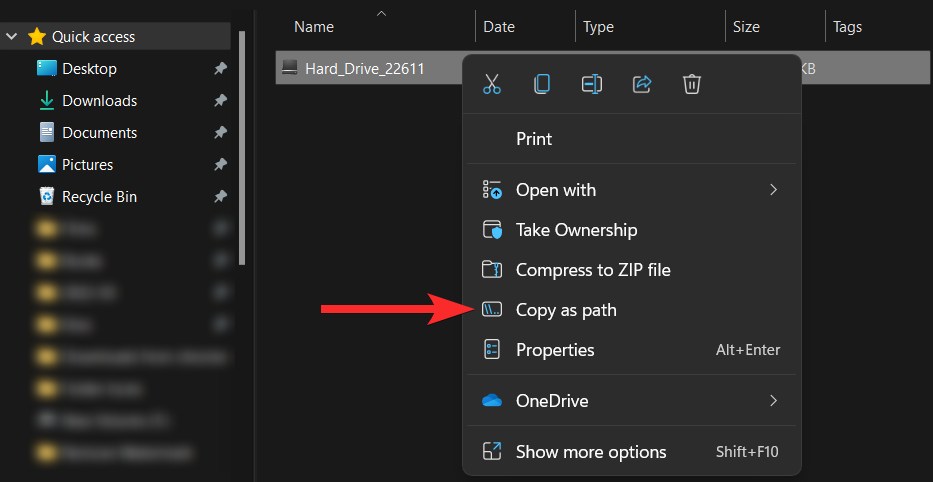
After copying the path, it’s time to make the necessary changes to the registry.
Windows R Open the Run dialog box from your PC by pressing .
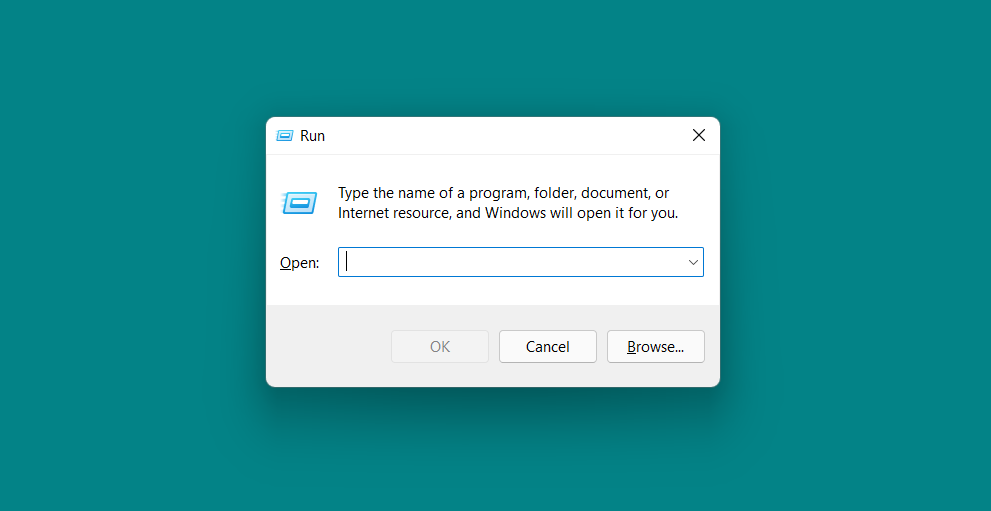
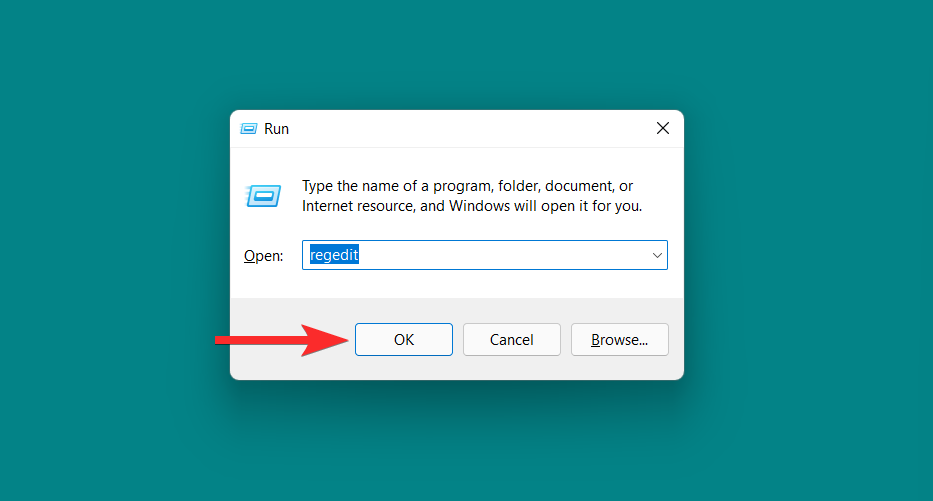
In the Run dialog box, type "regedit" and click OK. Then confirm the UAC prompt to launch Registry Editor as administrator.
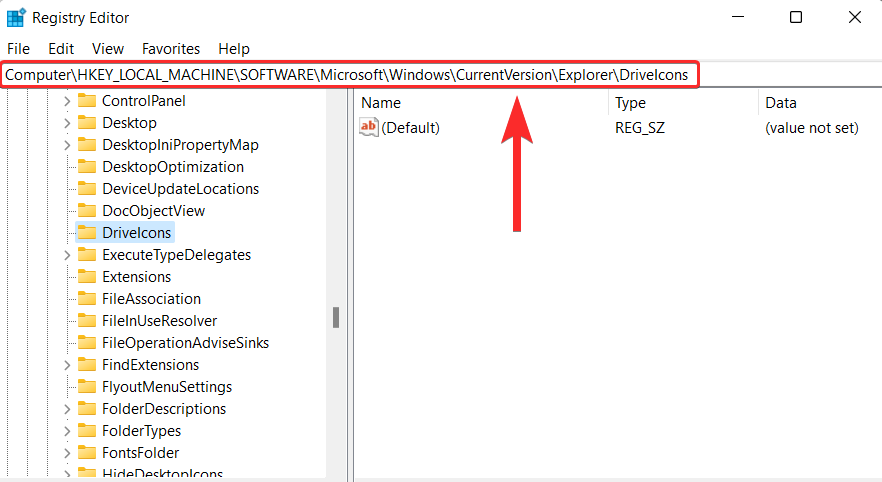
In the Registry Editor, enter the following path in the address bar and hit it with ENTER.
Computer\HKEY_LOCAL_MACHINE\SOFTWARE\Microsoft\Windows\CurrentVersion\Explorer\DriveIcons
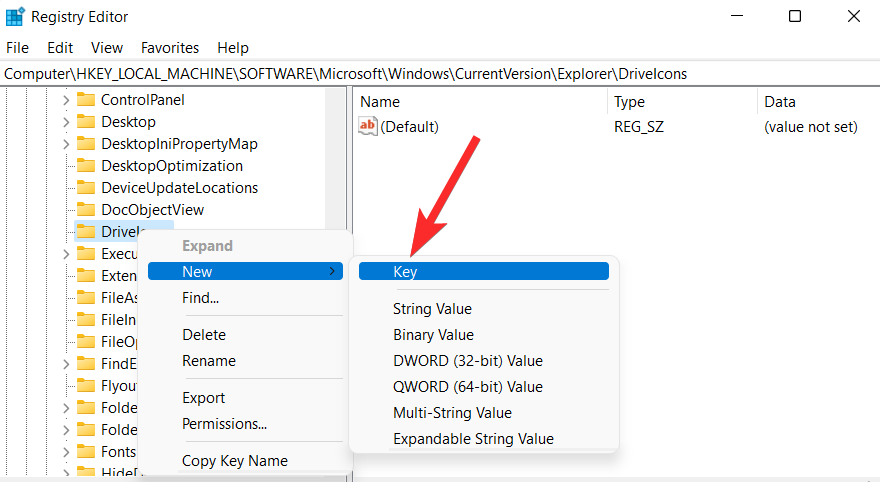
In the left panel, right-click Click "DriveIcons" and select New > Key.
#Name this newly created key the disk number of the disk whose icon you want to change. For example, if you want to change the icon for the F drive, rename this key to "F".
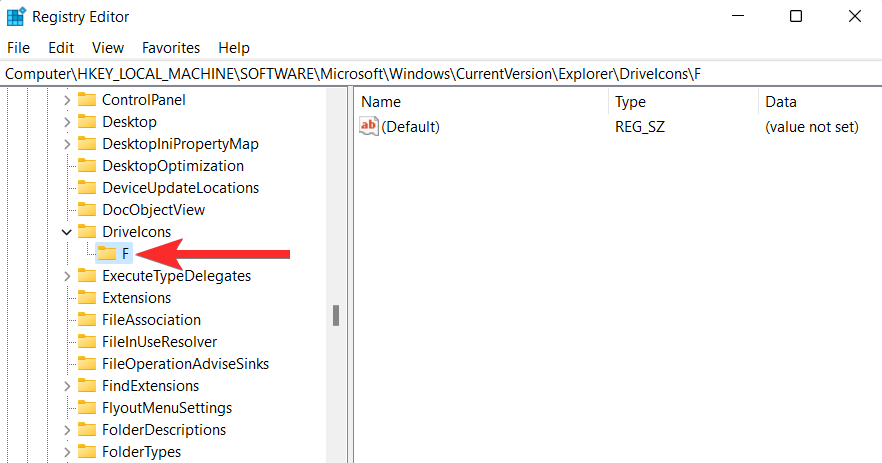
In the left panel, right-click the key you just created and select New > Key.
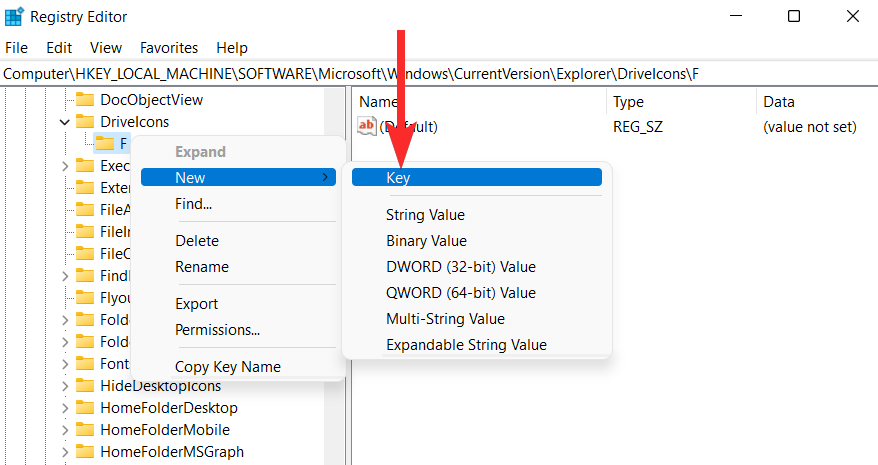
Name this newly created key "DefaultIcon".
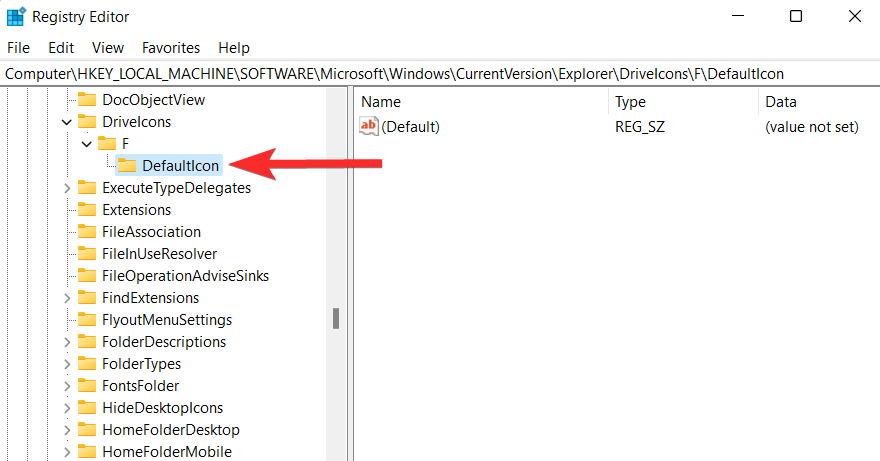
In the "DefaultIcon" key, right-click the "Default" string and select "Modify".
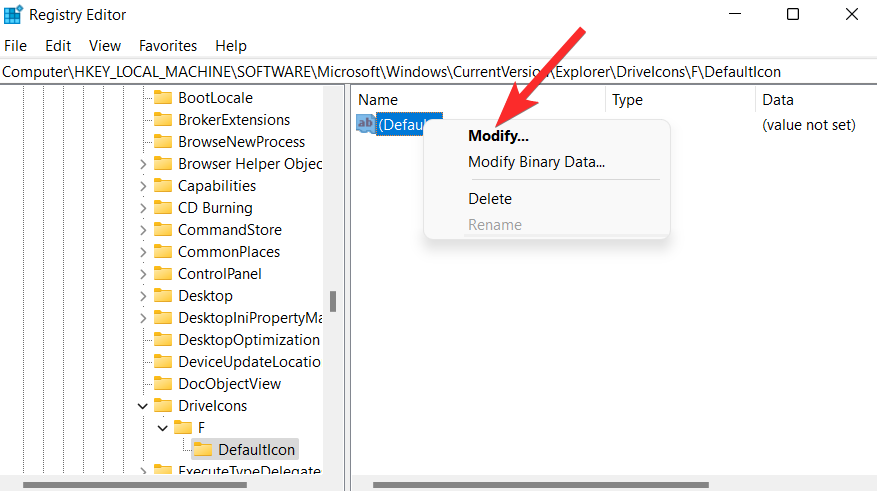
Click on the Numeric Data field and press CTRL V from your keyboard to paste the path to the .ico file you copied at the beginning of this tutorial .
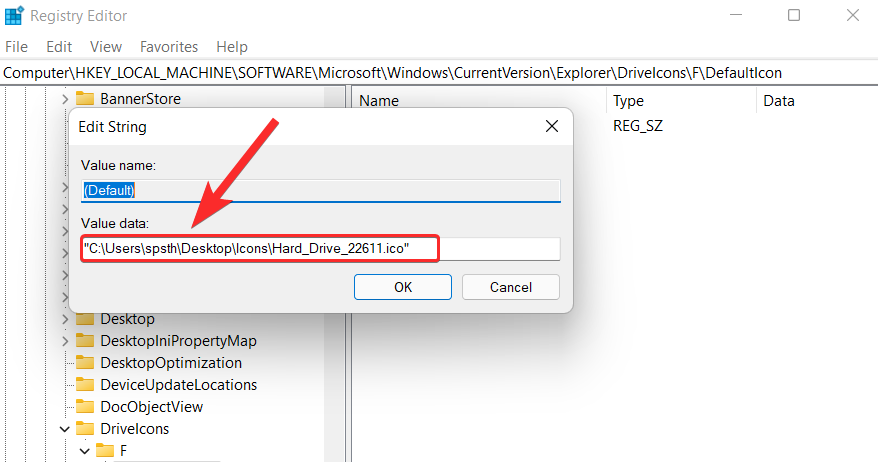
Make sure the path is enclosed in double quotes ("
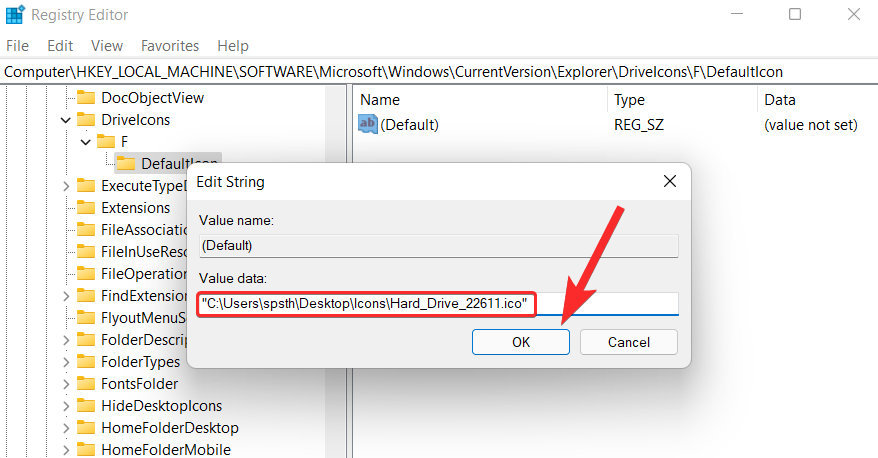
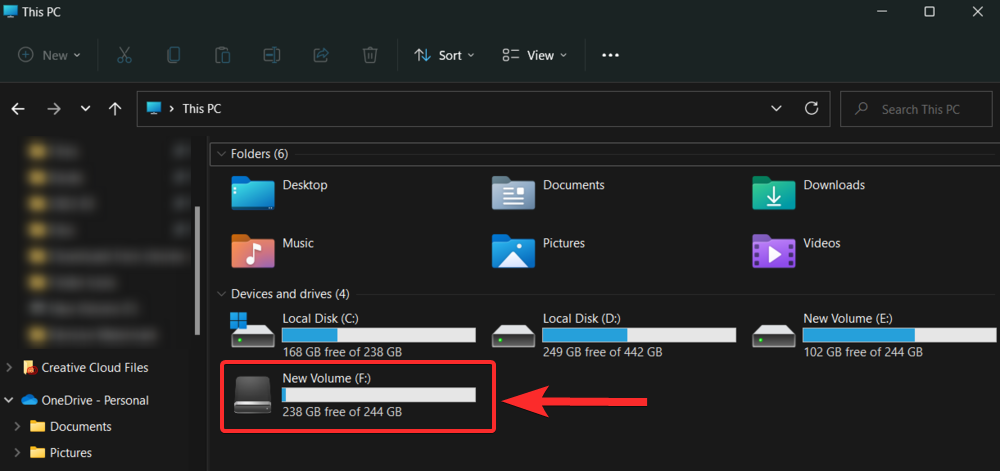
That's it. You can now observe the new icon from File Explorer.
You can also use a third-party tool to install an icon pack on your system. One of the third-party tools called 7tsp is available as a theme source patcher and can be used to install icon packs on your system. So, without further ado, let’s get started.
7tsp is available for download at deviantart.com via the link below.
To download 7tsp, visit the above link in your web browser on your PC and follow the steps below.
On the 7tsp website, click the Download icon.
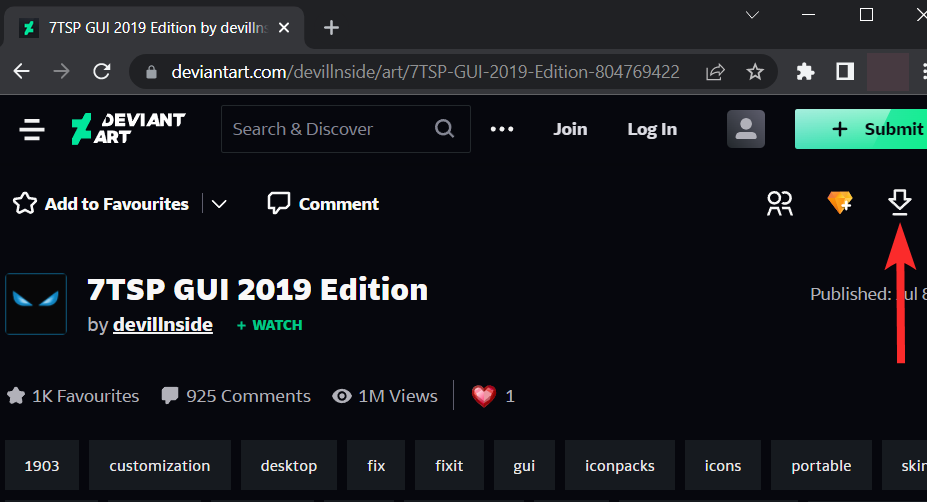
Follow the on-screen instructions to register for the Deviant Art website.
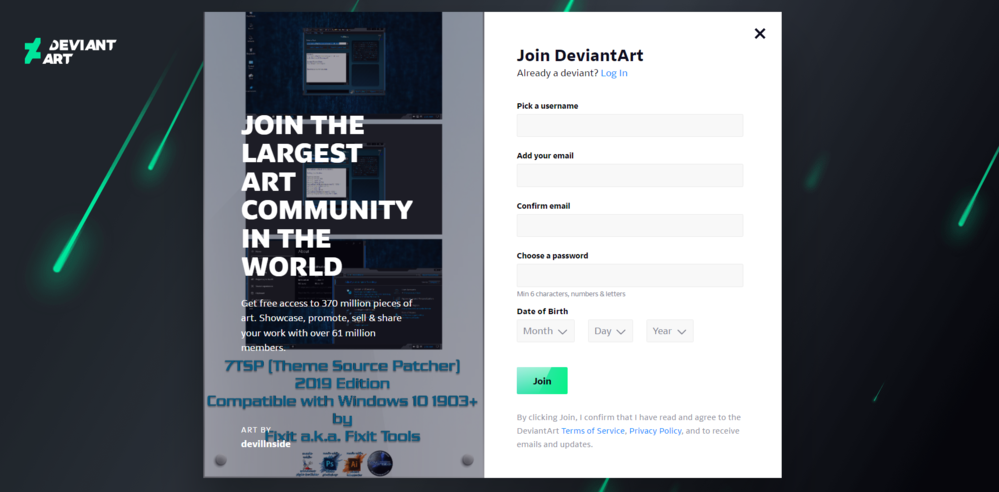
After registering, click the Download icon again.
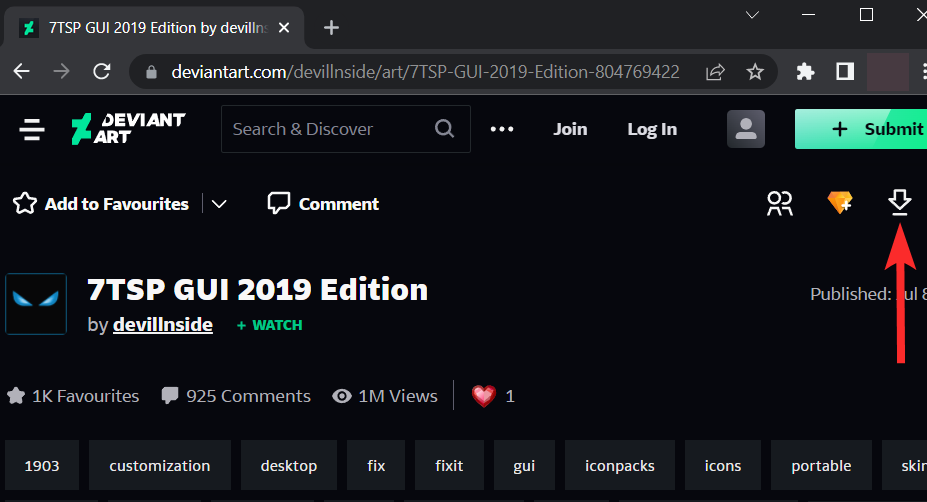
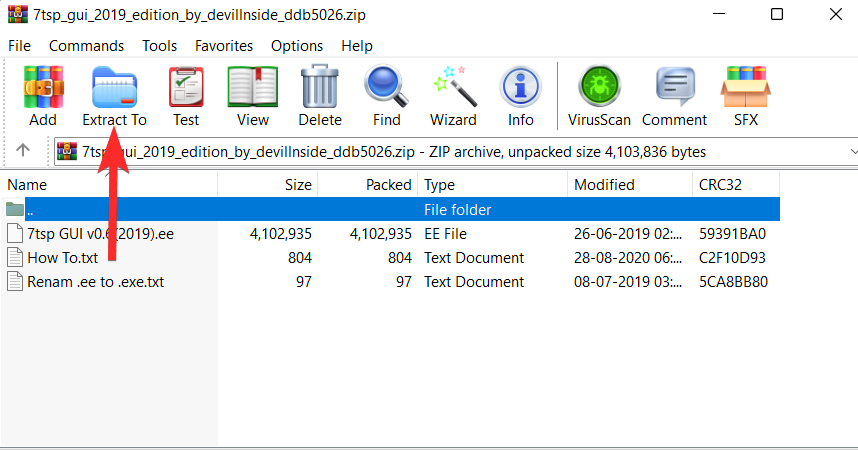
NOTE: This will download a .zip file to your PC. You will need Winrar or any other similar compression tool to extract this file. You can download Winrar from here.
Open the newly downloaded .zip file and extract the file using Winrar or any other compression tool.
Navigate to the location where you extracted the files in the previous step.
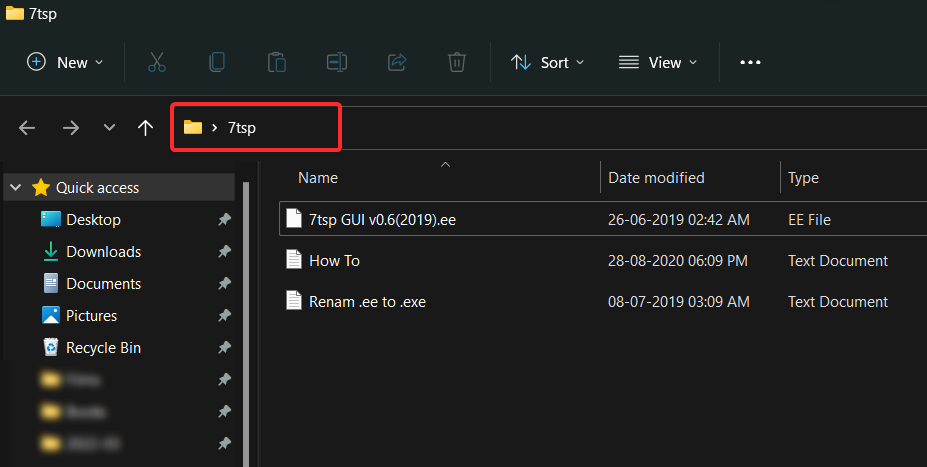
Now, rename the "7tsp GUI v0.6(2019).ee" file to "7tsp GUI v0.6(2019).exe"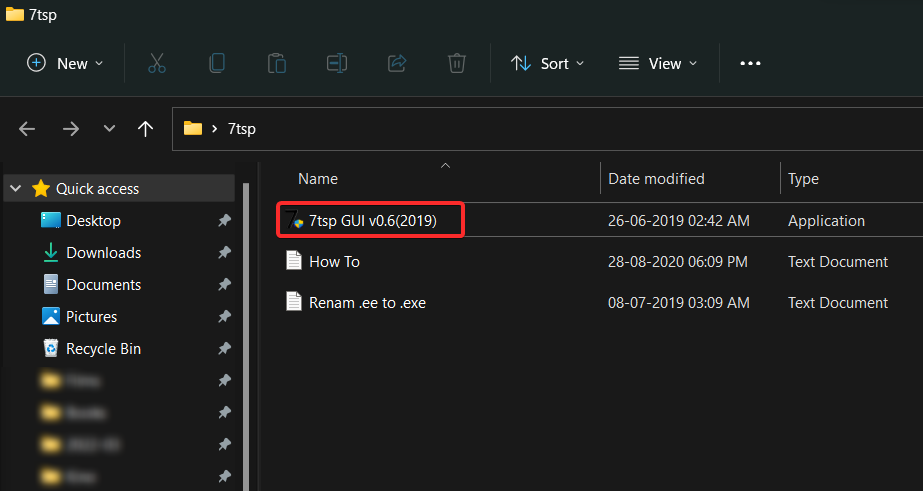
Before using 7tsp, it is recommended that you create a backup. Let's see how you do it.
Open the 7tsp GUI v0.6(2019).exe file.
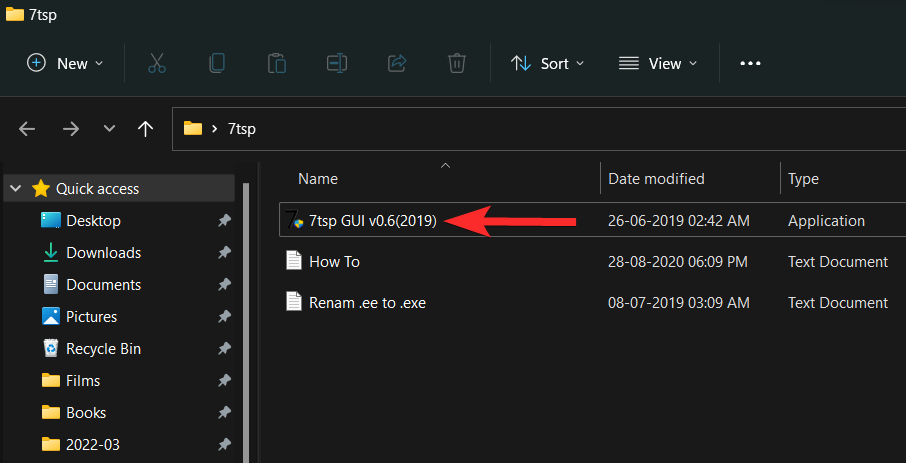
ClickPrograms > Create Restore Point.
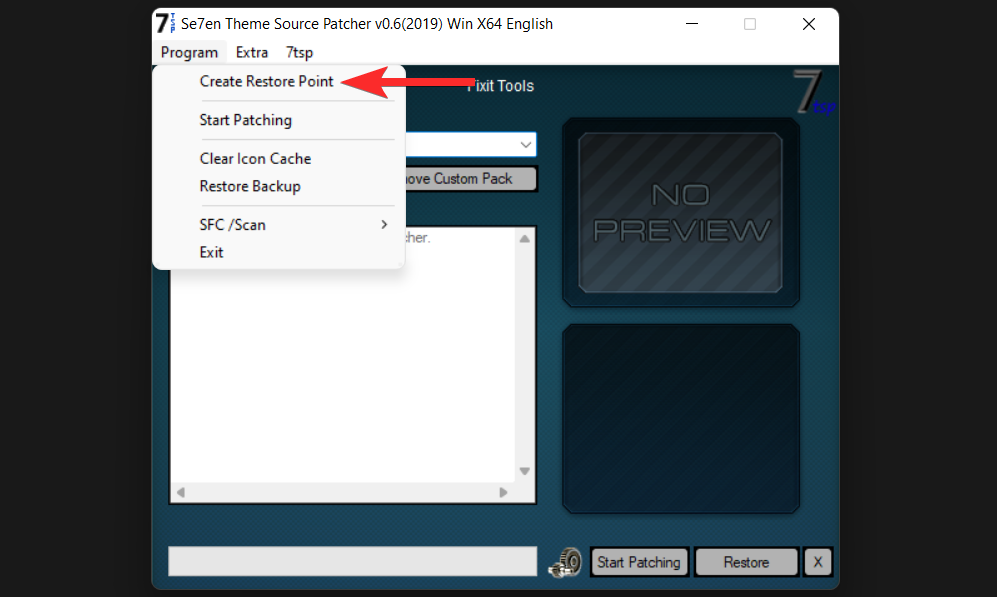
Click "Yes" and wait 7tsp for the restore point to be created.
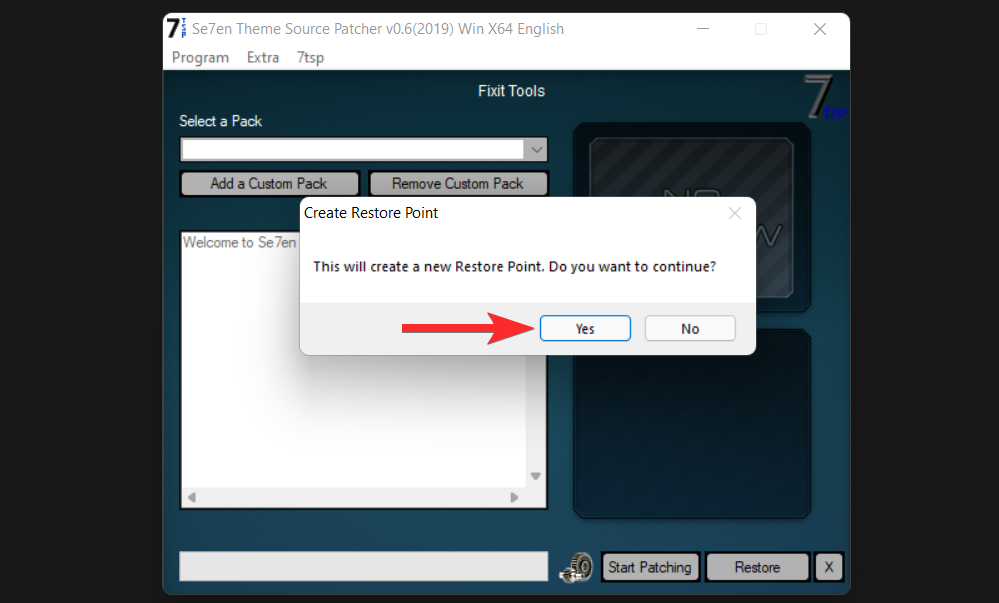
A restore point has now been created.
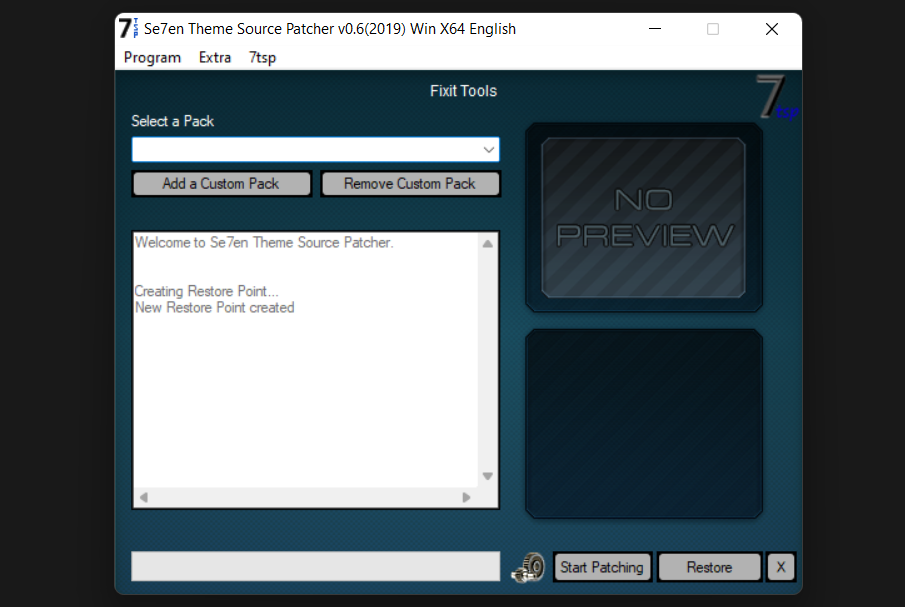
Here’s how to install icon pack on Windows 11 using 7tsp.
Note: 7tsp does not support Insider preview builds. So, proceed with caution.
Download the icon package you want to install from online resources such as virtualcustoms and vsthemes.
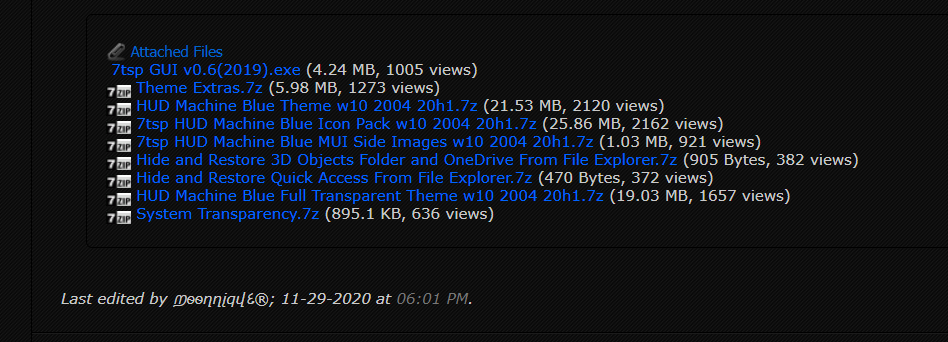
Open the 7tsp GUI v0.6(2019).exe file.

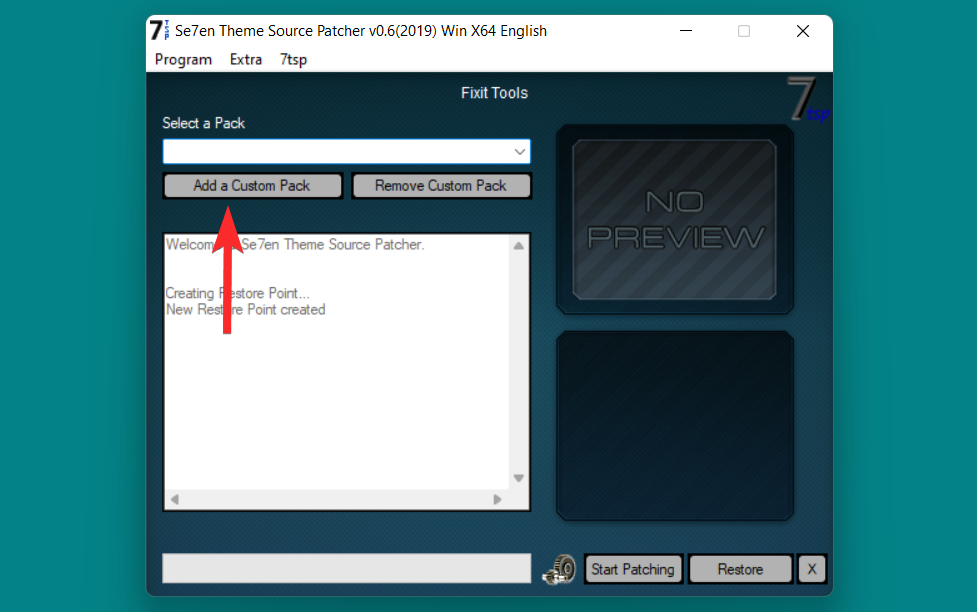
In 7tsp, click Add Custom Package.
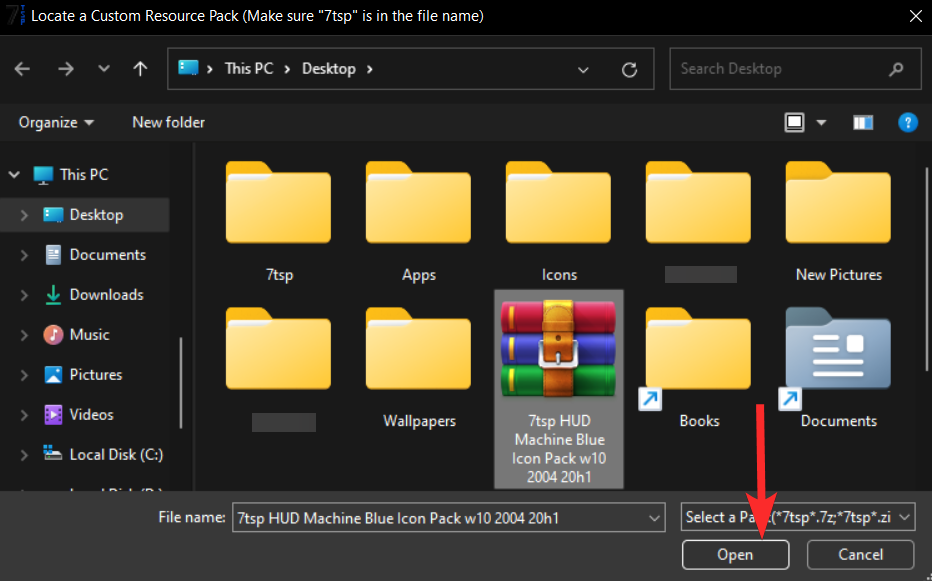
Navigate to the location where the icon pack is stored.
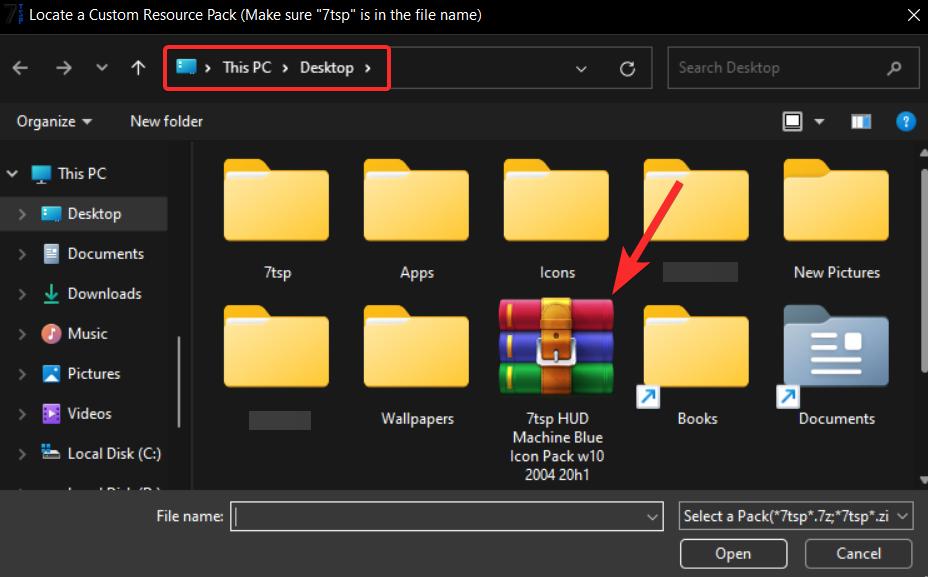
Now, select this icon pack file and click Open.
Finally, click Start Patching.
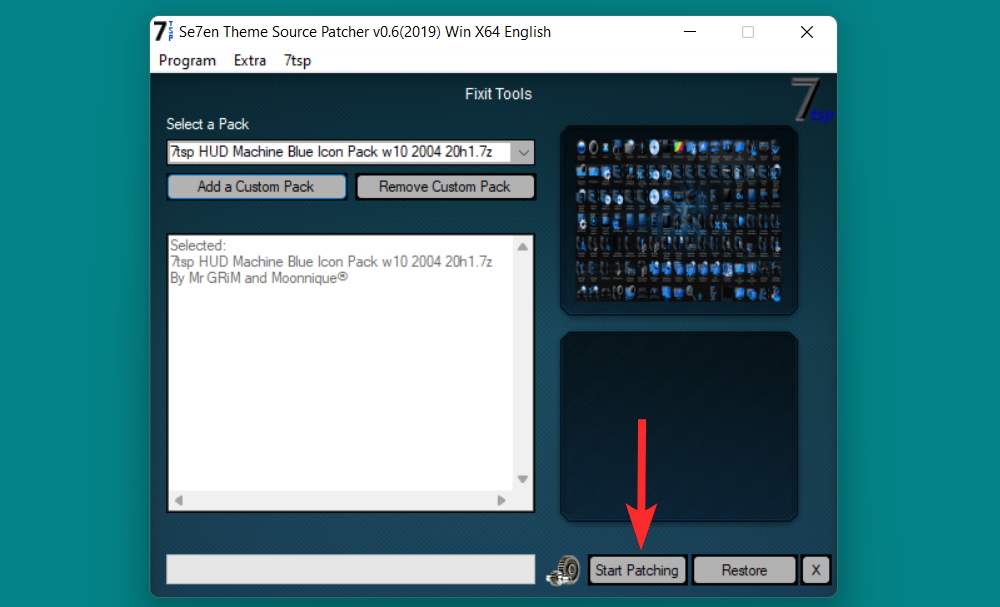
Your icon pack is now installed. Restart your computer to ensure all changes are saved.
Note: If your system is patched with 7tsp and you want to update the operating system, it is recommended that you restore the default icon first.
Open the 7tsp GUI v0.6(2019).exe file.

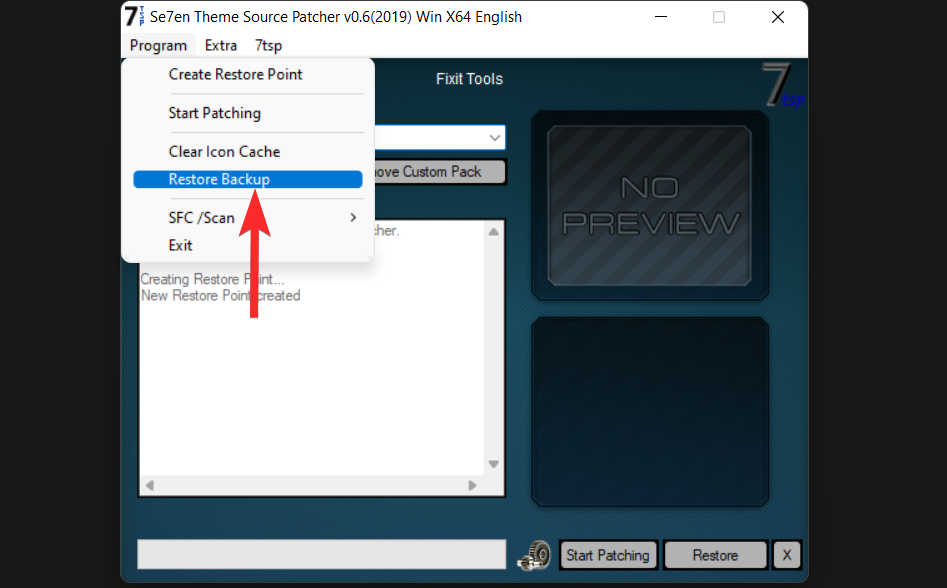
Click Programs > Restore Backup.
Change Icons for specific file types (e.g. .txt files) are possible. Doing so will change the icon of the .txt file present on your PC. However, if you want to do this, you will need to use some third-party tools, such as FilesTypesMan.
Let’s see how to change the icon of a specific file type using FileTypesMan software.
Open a web browser from your PC and download FileTypesMan from Nirsoft’s website.
NOTE: This will download a .zip file to your PC. You will need Winrar or any other similar compression tool to extract this file. You can download Winrar from here.
Open the newly downloaded .zip file and extract the file using Winrar or any other compression tool.
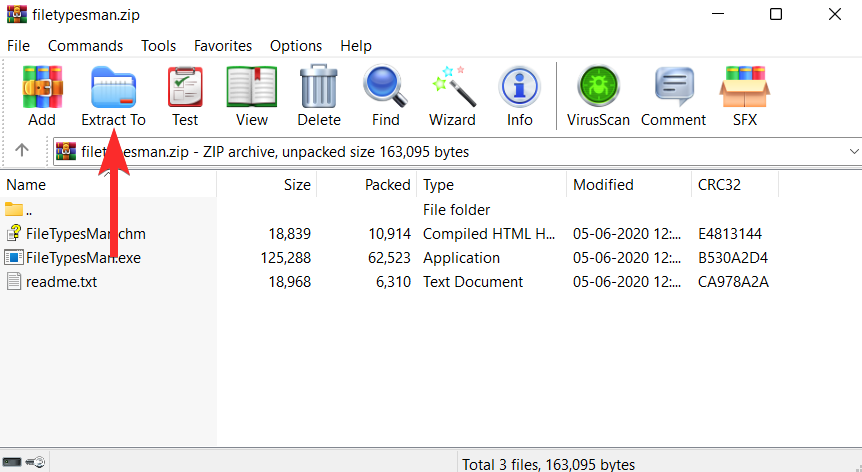
Navigate to the location where you extracted the files in the previous step.
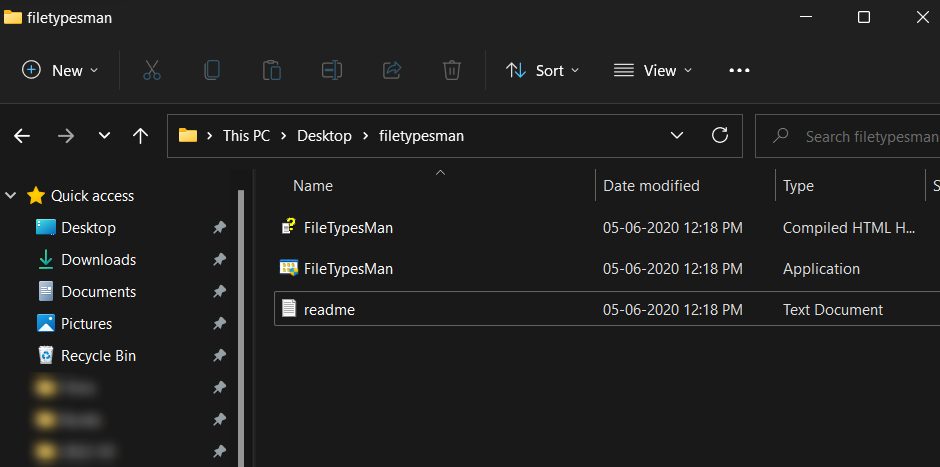
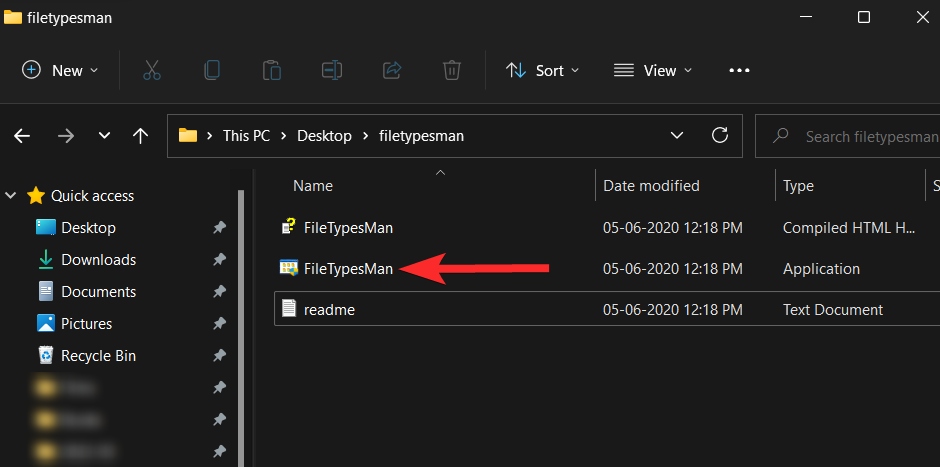
From here, double-click the "FilesTypesMan" executable and confirm the UAC prompt to launch the tool as an administrator.
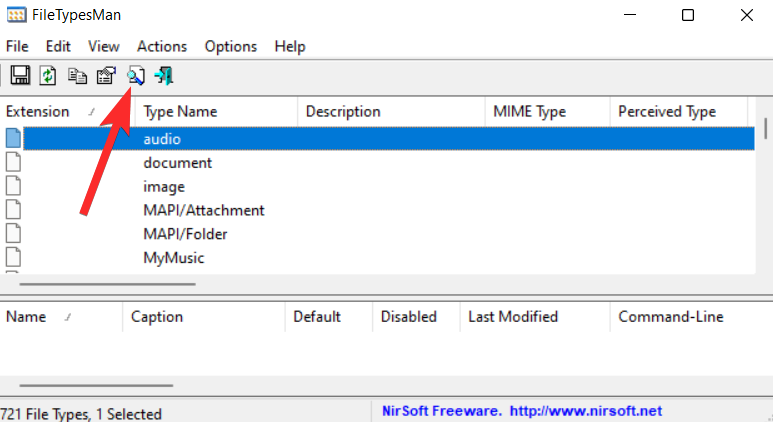
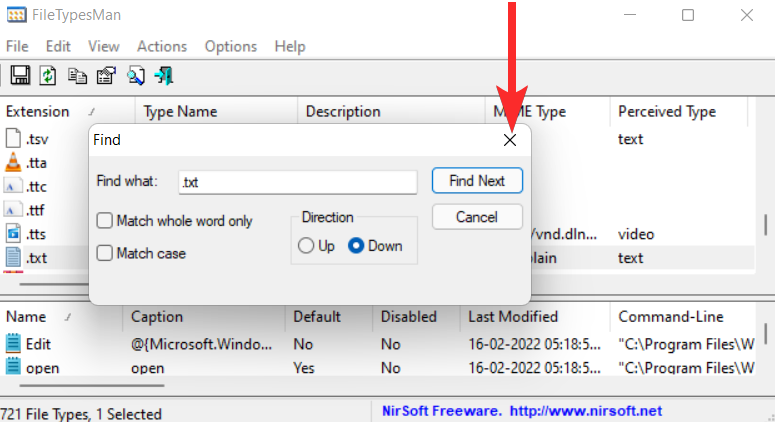
In the FilesTypesMan application, click the Find icon.
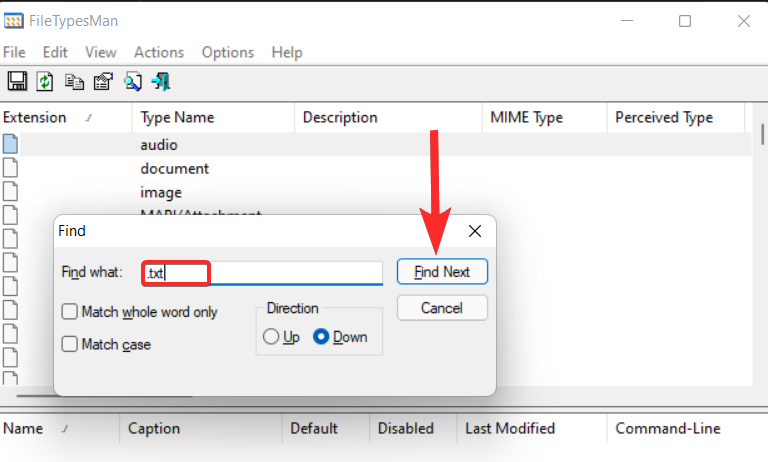
In the Find what field, type the file format for which you want to change the icon, and then click Find Next.
Now, click on the “Cross” icon.
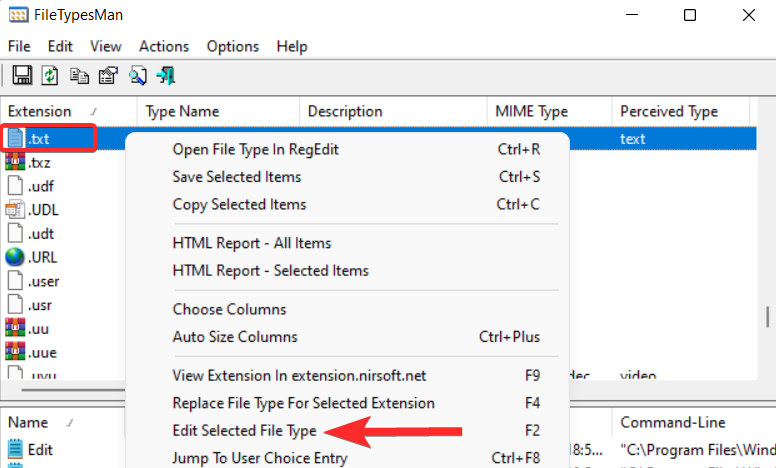
Right-click on the .txt file format (highlighted line) and select the "Edit Selected File Type" option.
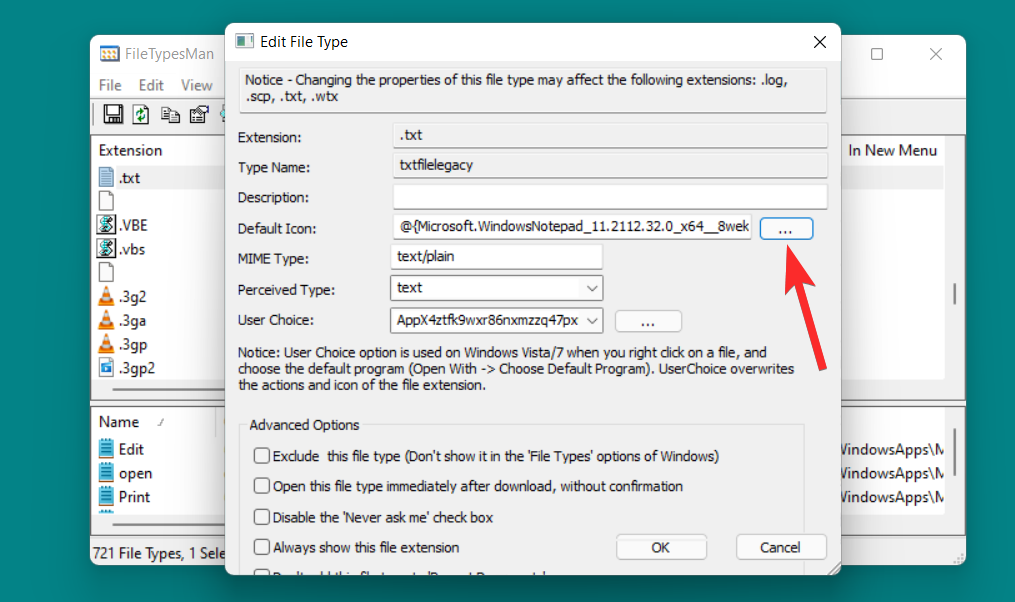
Click the three-dot icon next to the "Default Icon" option.
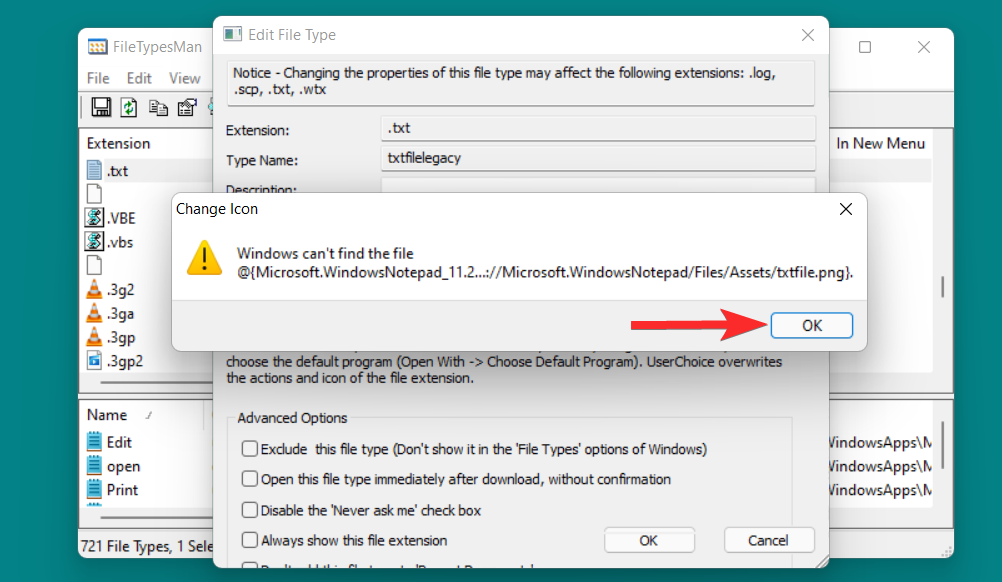
At the following prompt, click OK.
You will now see a list of icons provided by Windows.
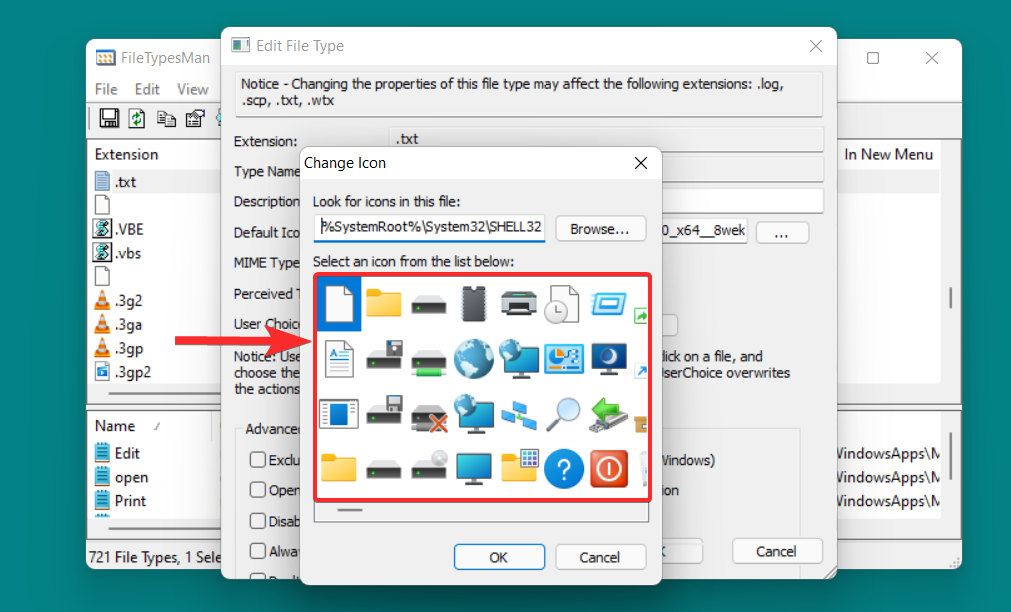
From this list, select the icon that suits you and click on it. Then, click OK to confirm your selection.
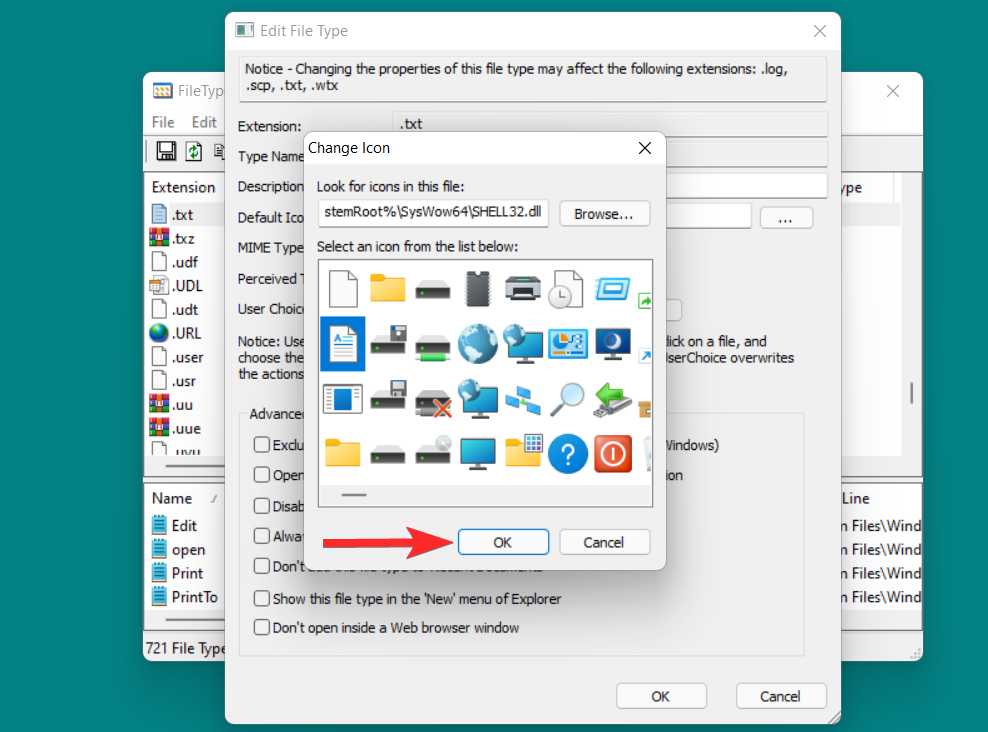
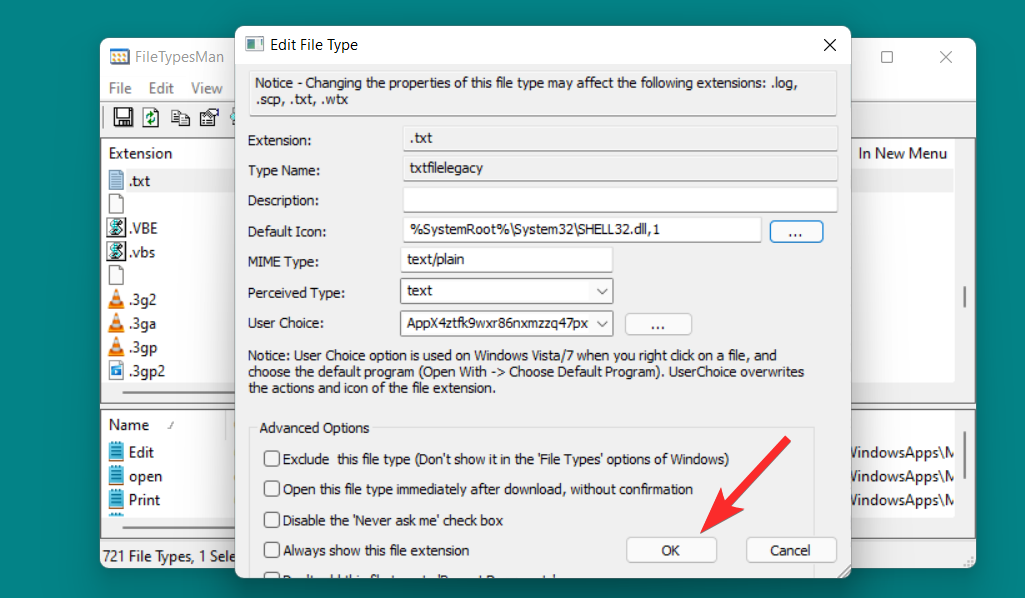
Return to the Edit File Types window and click OK to save your changes.
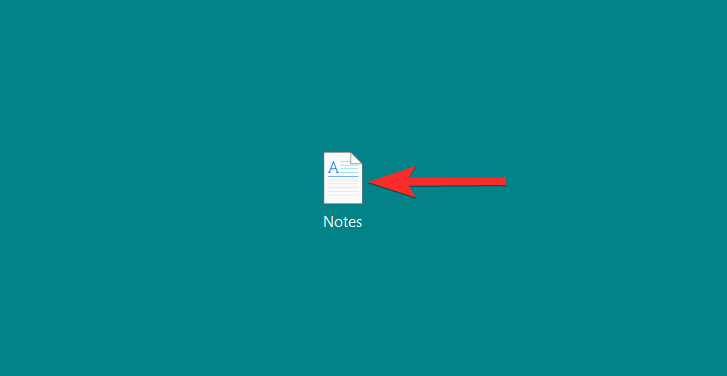
The default icon for the file format you selected has now changed.
In Windows, .ico is Microsoft’s default file format for icons. While icons in .ico file format are easily available on various websites such as icon-icon, iconarchive, findicons, etc., you can also convert images stored on your PC to .ico format and then use them as default icons replacement of.
Let's see how you do it.
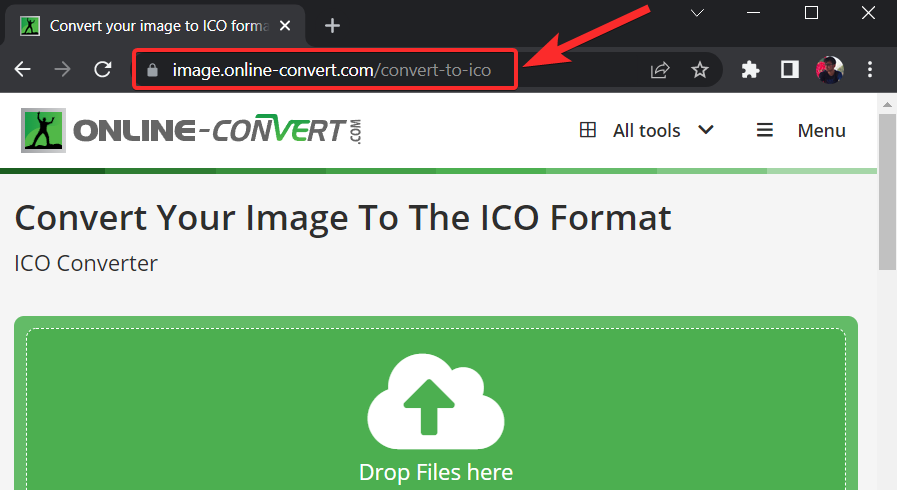
Open a web browser from your PC and visit the link below.
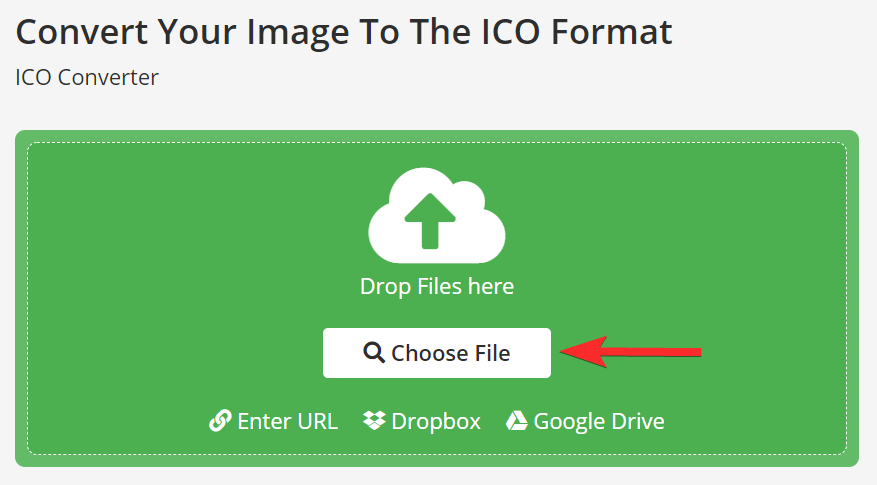
Click on “Choose File”
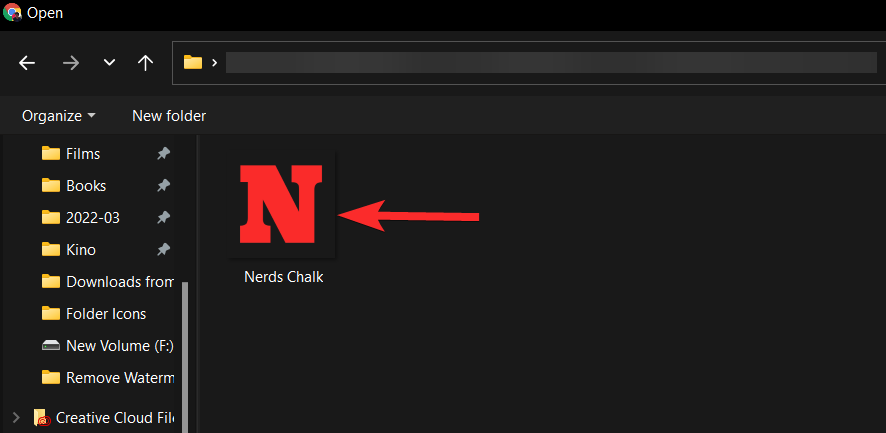
Now, find the image you want to convert to .ico file format and click it.
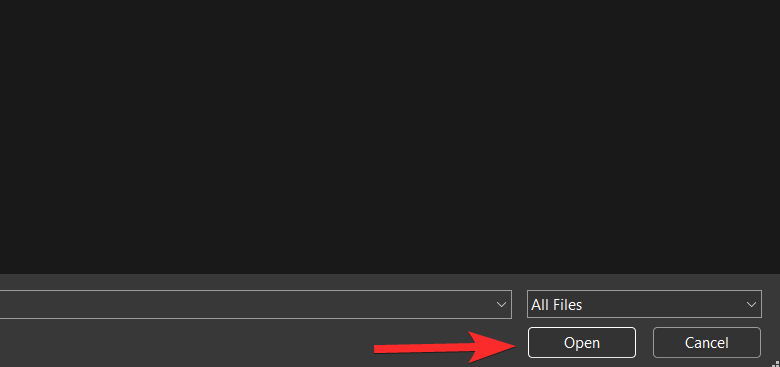
Click Open to upload the selected image.
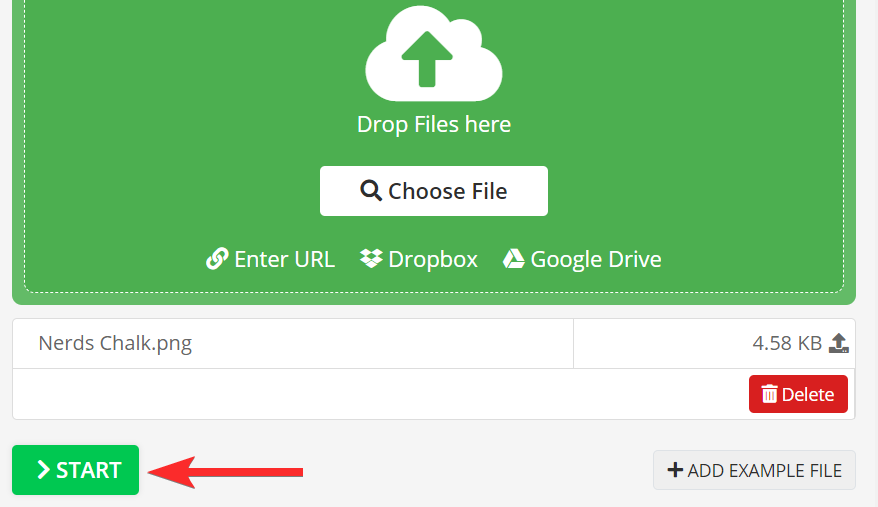
After uploading the image, click "Start" to start the conversion process.
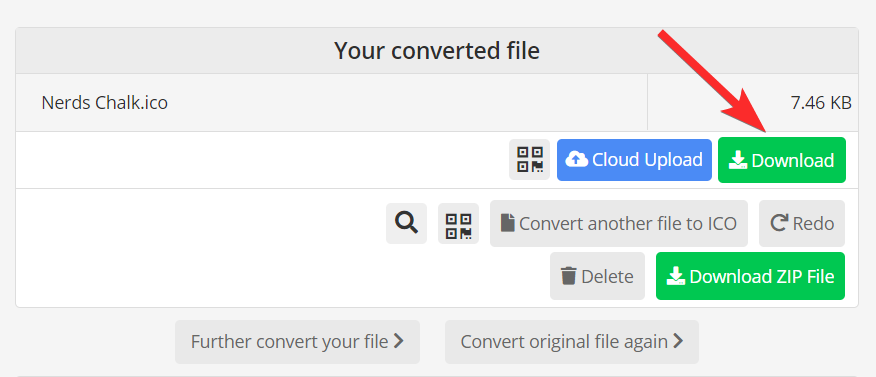
After the conversion is completed, click "Download".
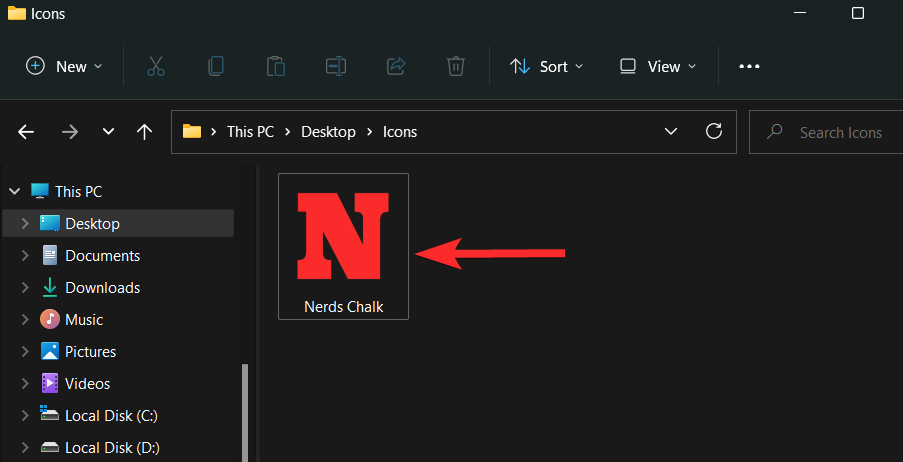
#Now, navigate to this downloaded .ico file on your PC.
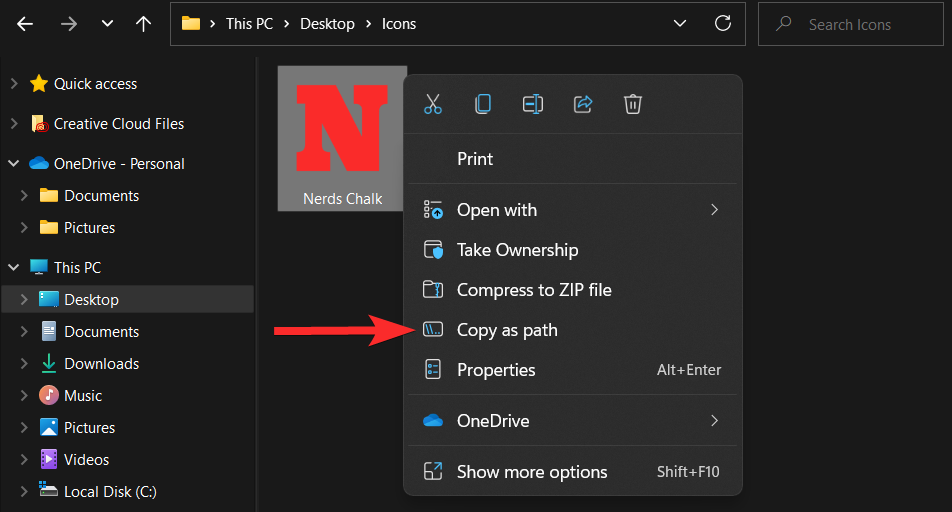
Right-click the .ico file and select "Copy as Path".
#After copying the path, go to the folder or shortcut where you want to change the icon. For this tutorial, we'll show you how to use this custom icon on a folder.
Right-click the folder and select "Properties".
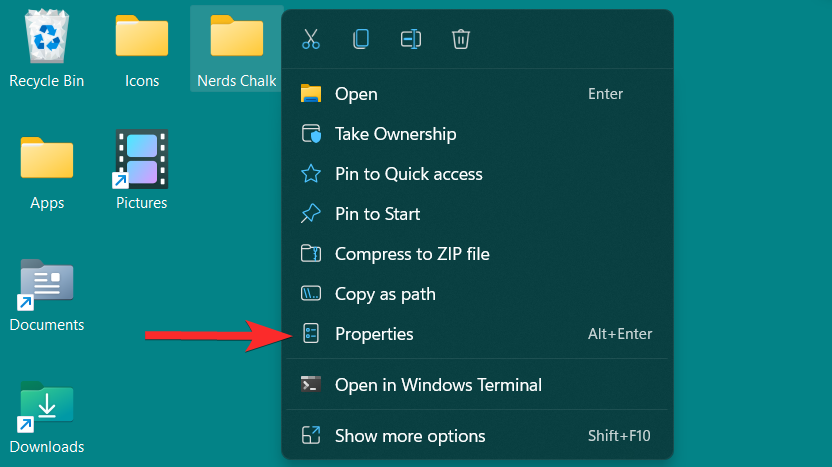
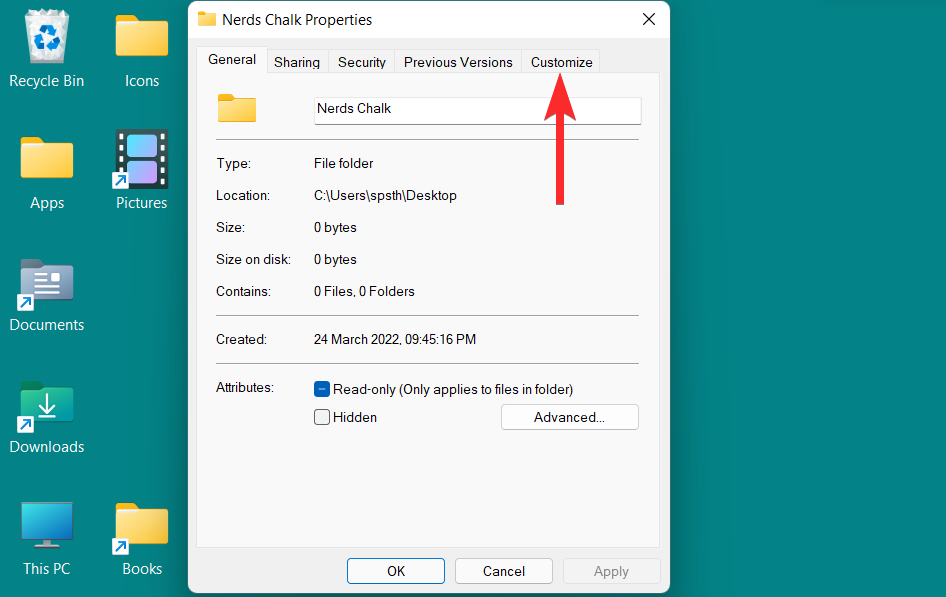
In the folder properties, click the Customize tab.
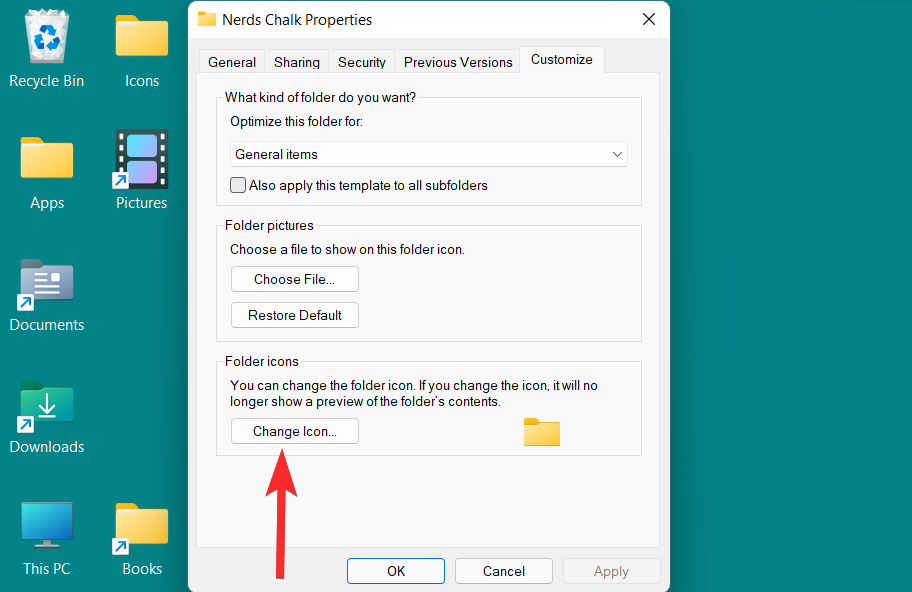
Here, click on the “Change Icon” option under the “Folder Icon” section.
Now, press CTRL V to paste the path to the custom .ico file in the following field.
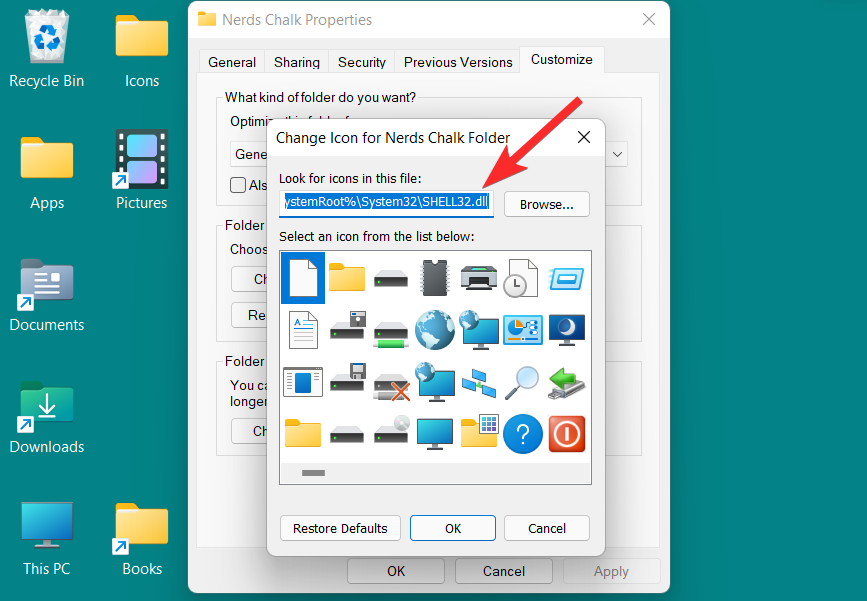
Select the icon and click OK to confirm this selection.
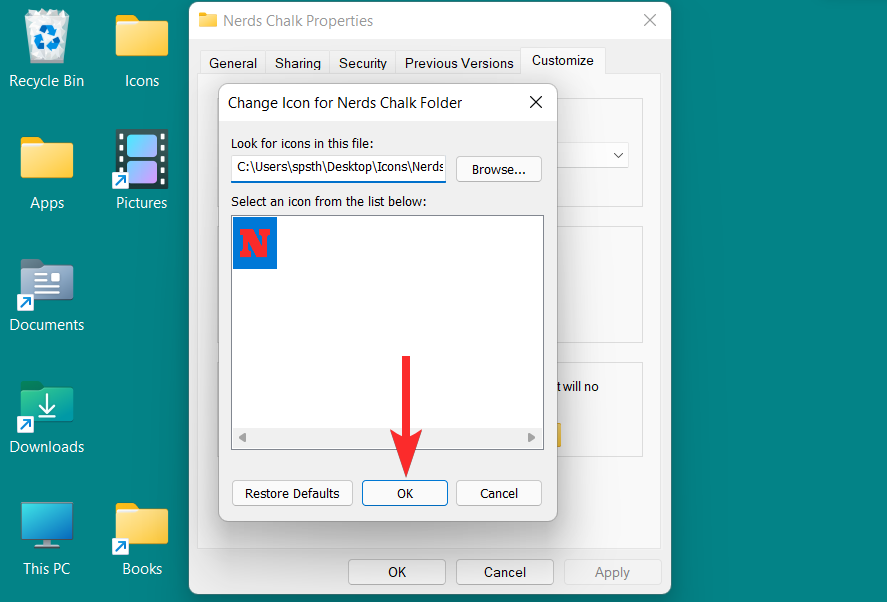
Return to the folder properties and click Apply to apply the new folder icon.
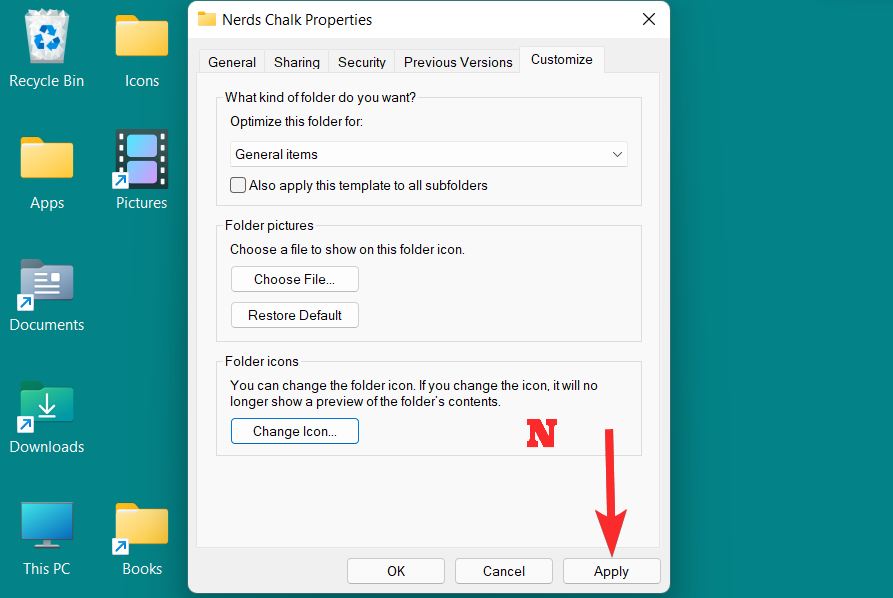
Finally, click OK to exit the folder properties.
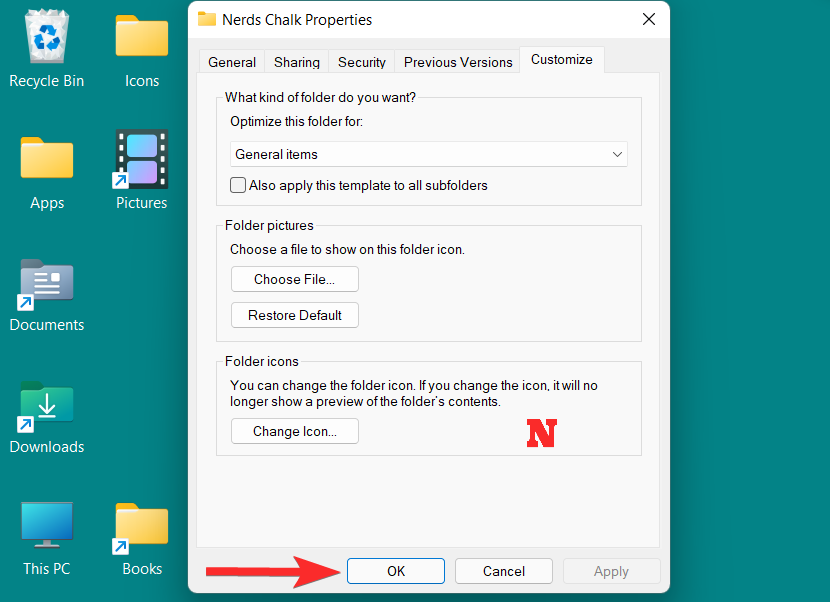
The folder icon has now changed.

Windows 11 provides the option to change app and program icons pinned to the taskbar, in addition to desktop icons . You can change the taskbar icon from the properties options accessible on the taskbar icon itself. However, you can use quick shortcuts for unsupported apps and programs.
Let’s delve into both methods.
Windows 11 provides the option to access supported icon properties directly on the taskbar. You can then navigate the properties window to change the taskbar icon. Here's how you do it.
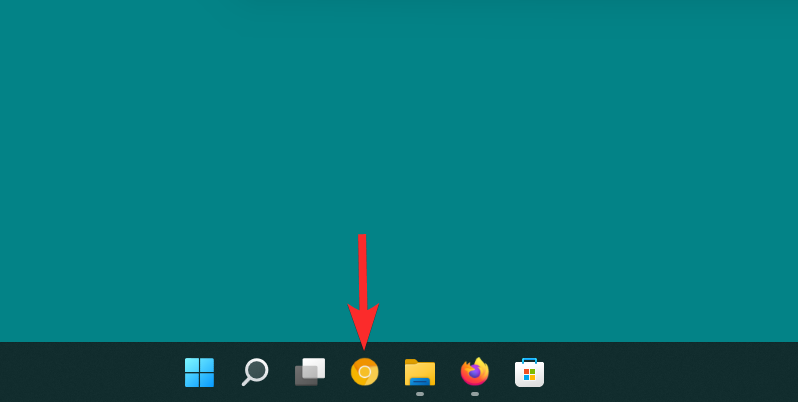
Right-click the taskbar application whose icon you want to change. For this tutorial, we will change the icon of File Explorer.
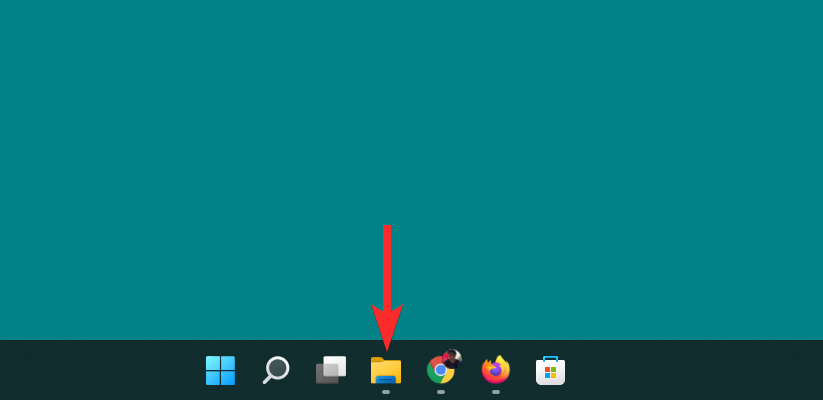
Right-click the application name and click Properties.
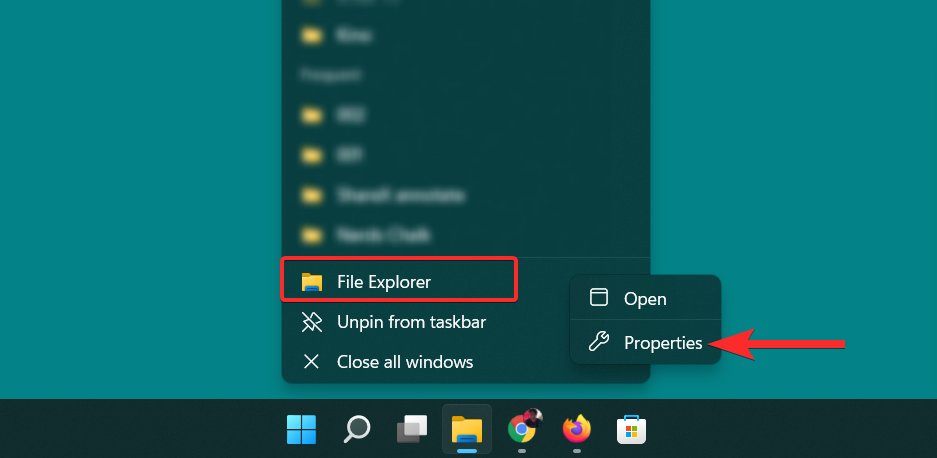
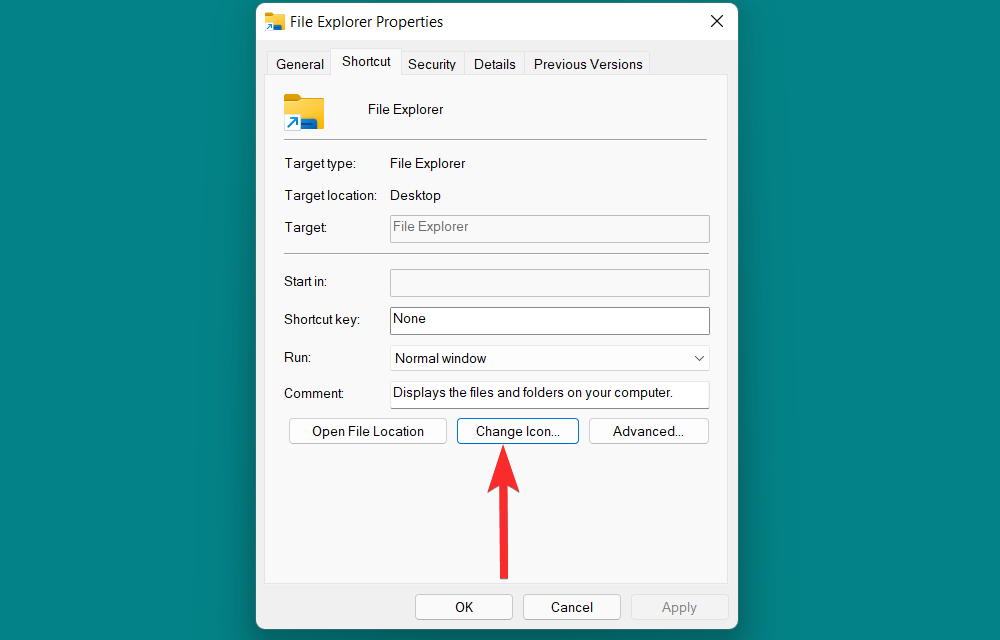
In the properties window, click on the "Change Icon" option under the "Shortcuts" section.
You will now see a list of icons provided by Windows.
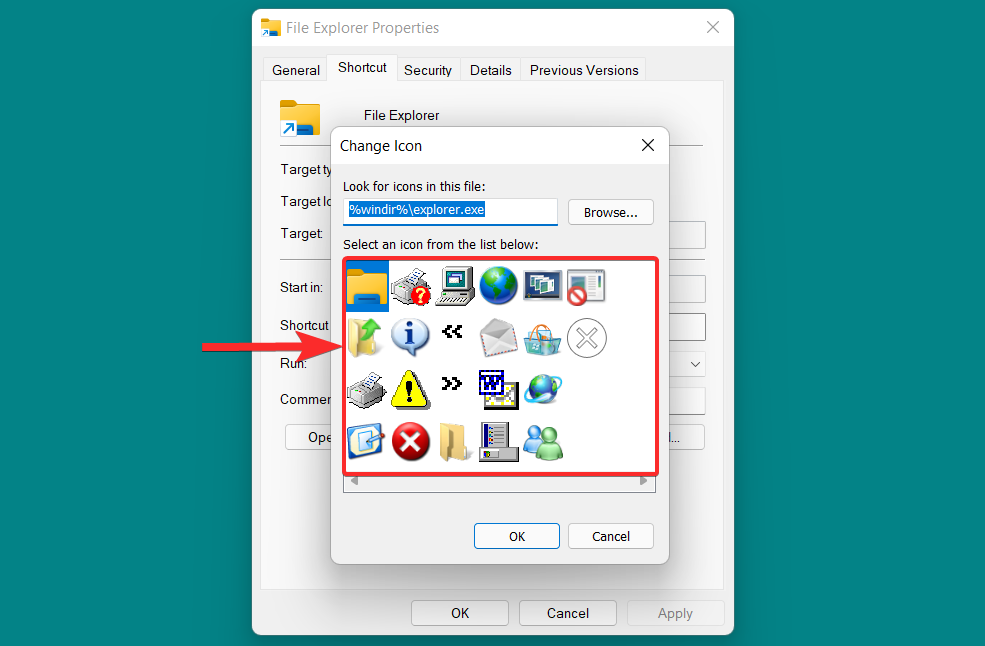
From this list, select the icon that suits you and click on it. Then, click OK to confirm your selection.
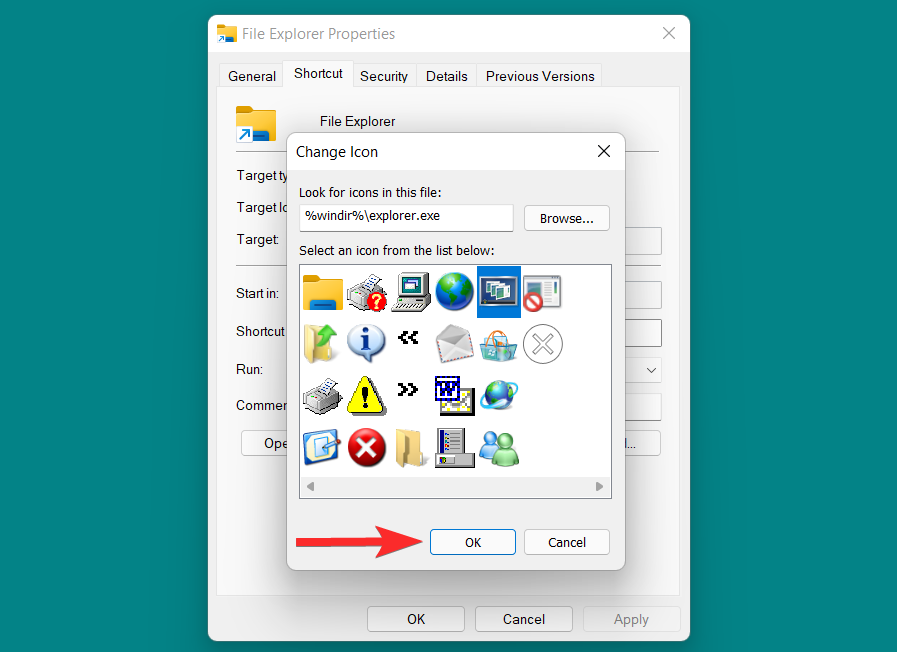
Return to the Properties window and click Apply to save your changes.
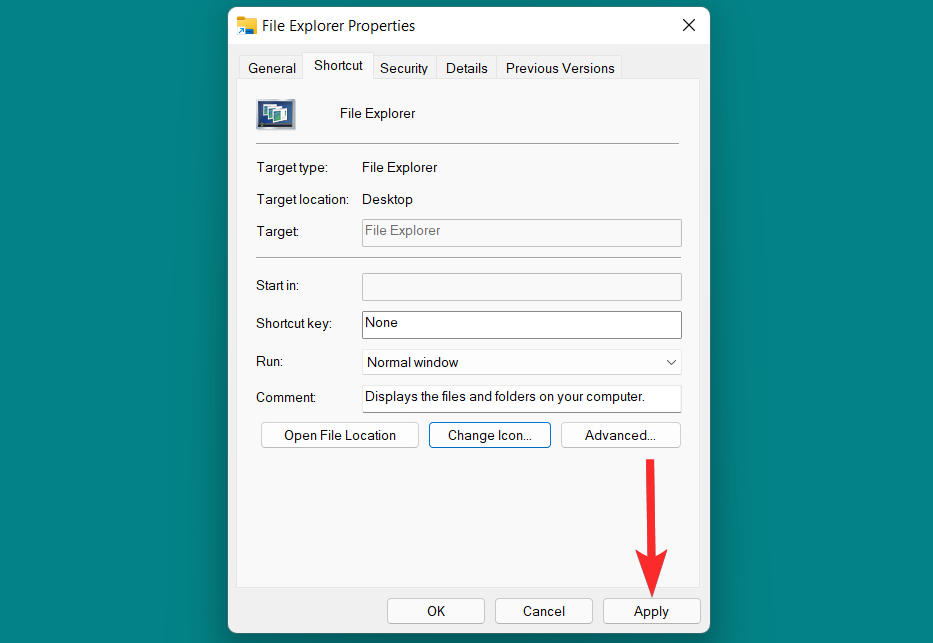
Finally, click OK to exit the properties window.
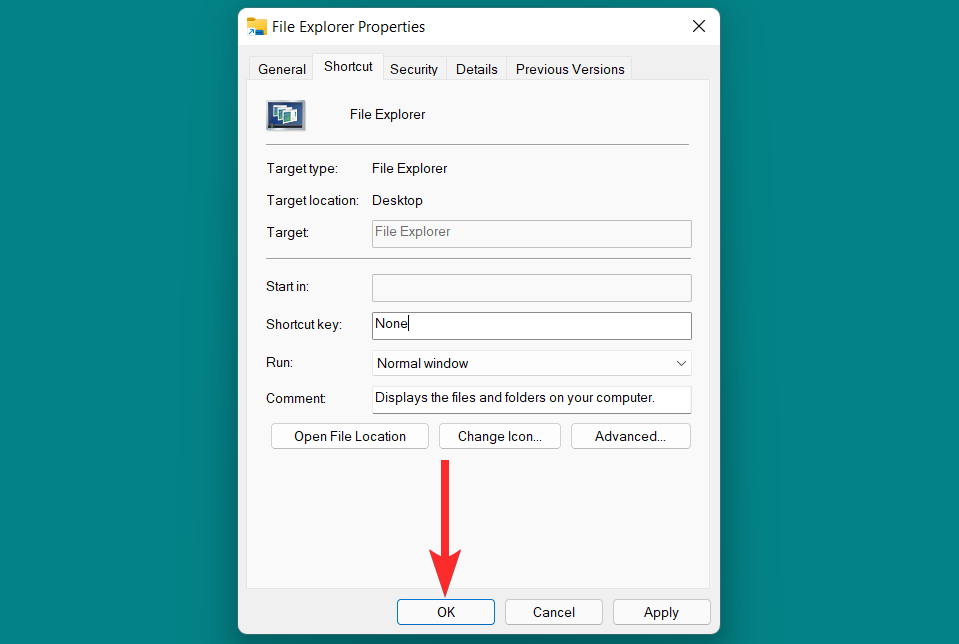
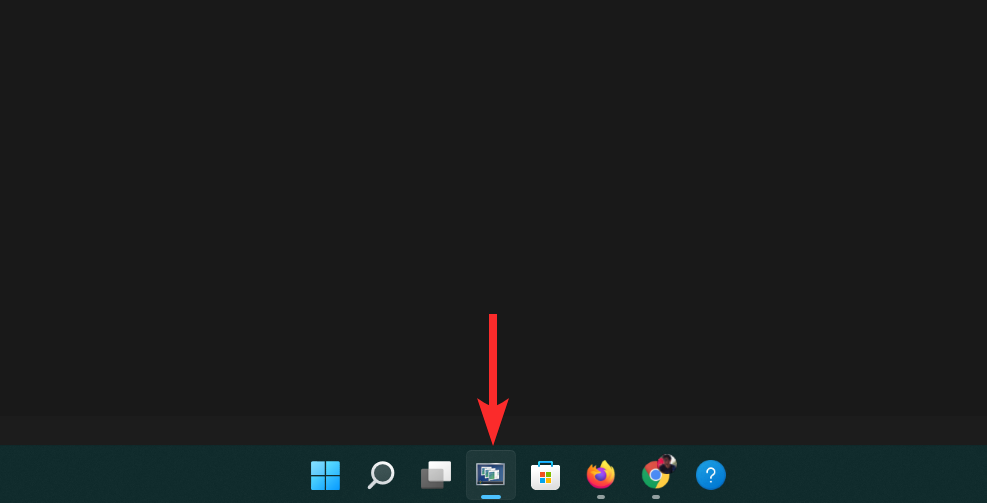
The taskbar icon has now changed.
Also, you can use quick shortcuts to change the taskbar icon, regardless of whether the application or program supports it. Here's how you do it.
Press the Windows keys on your keyboard to open the Start menu.
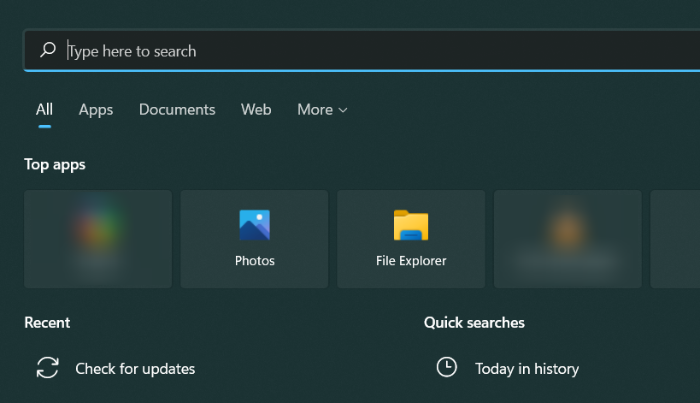
In the Start menu, search for the app or program you want to change the taskbar icon for. In this tutorial, we will modify the icon of Google Chrome on the taskbar.
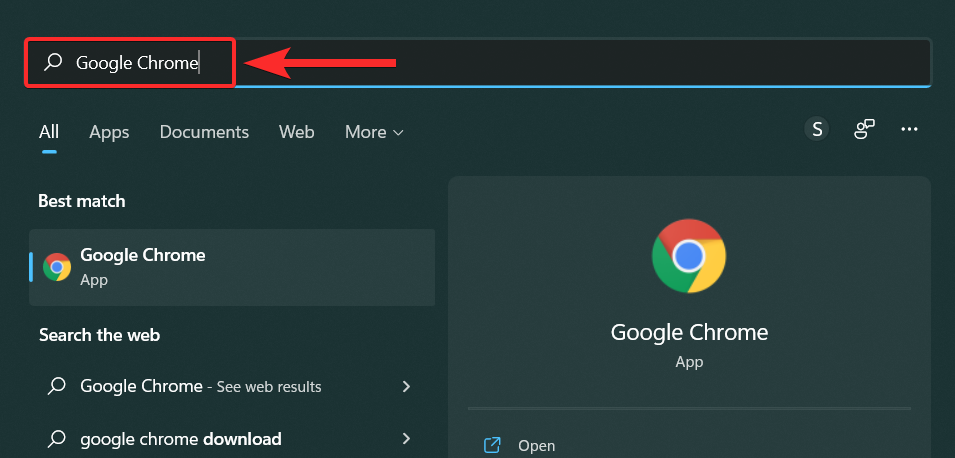
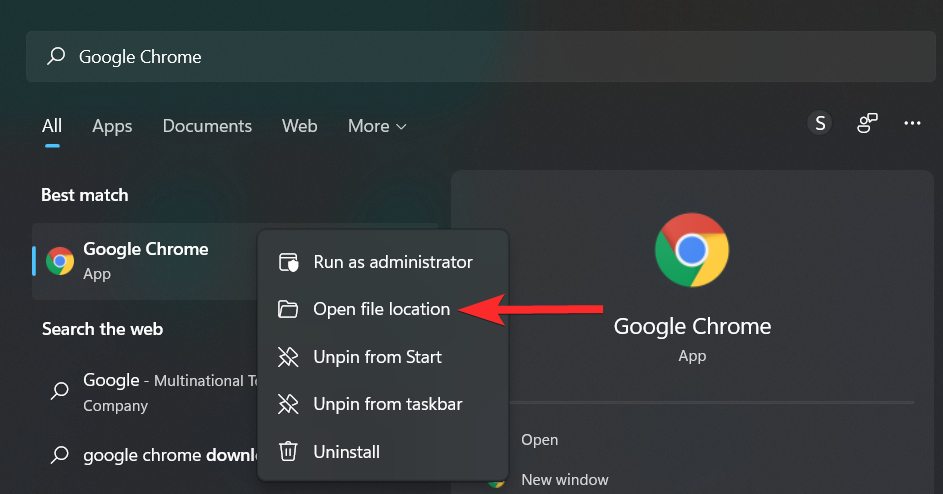
From the search results, right-click your app and select "Open file location."
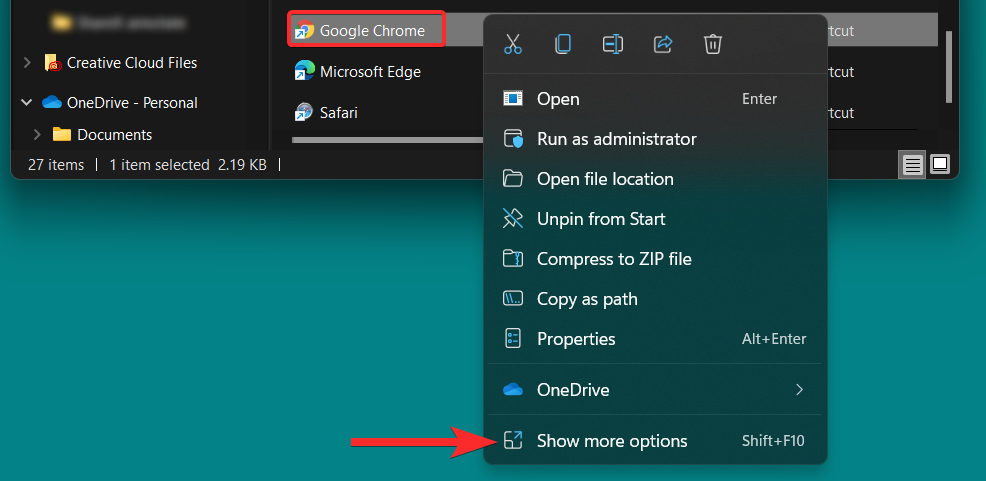
Right-click on your app and select "Show more options".
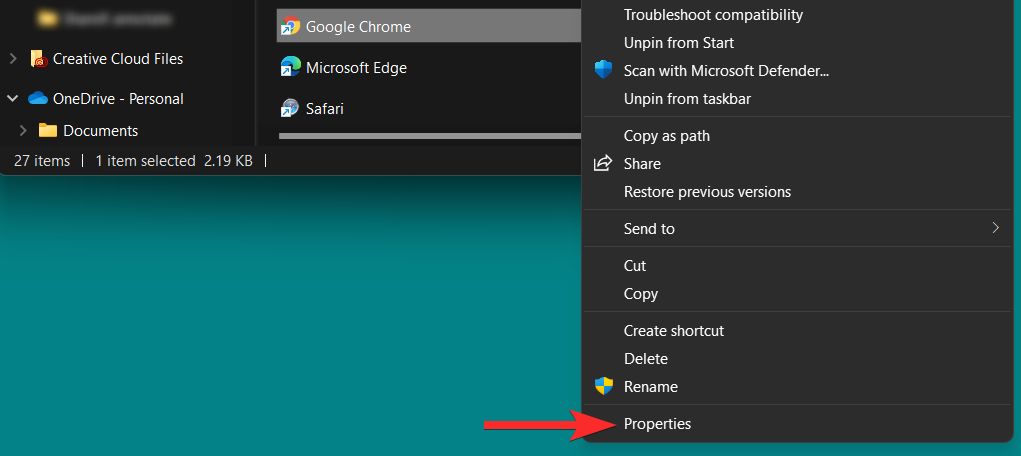
In the context menu, click Properties.
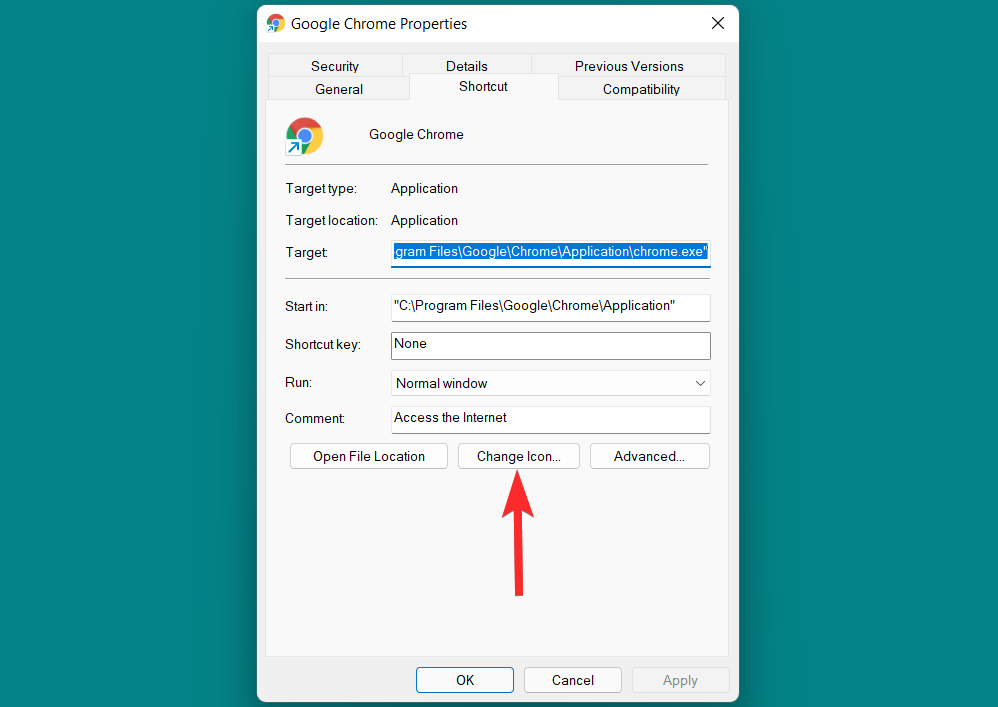
In the properties window, click on the "Change Icon" option under the "Shortcuts" section.
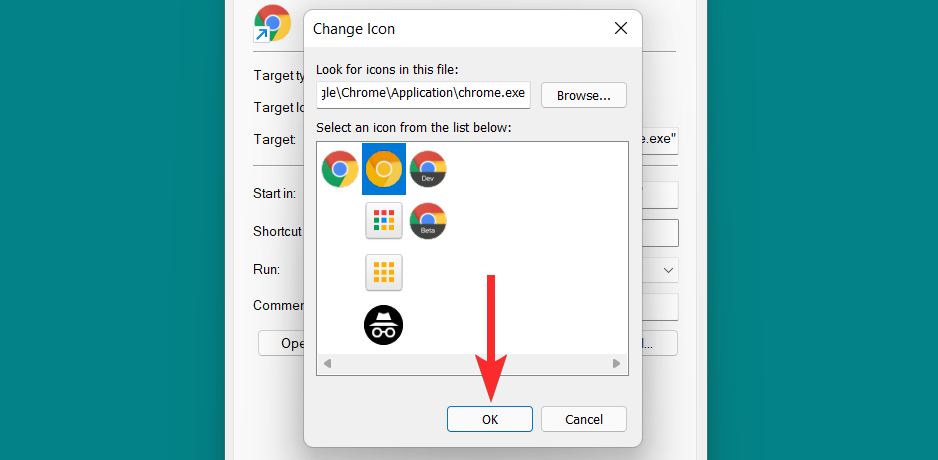
From this list, select the icon that suits you and click OK to confirm your selection.
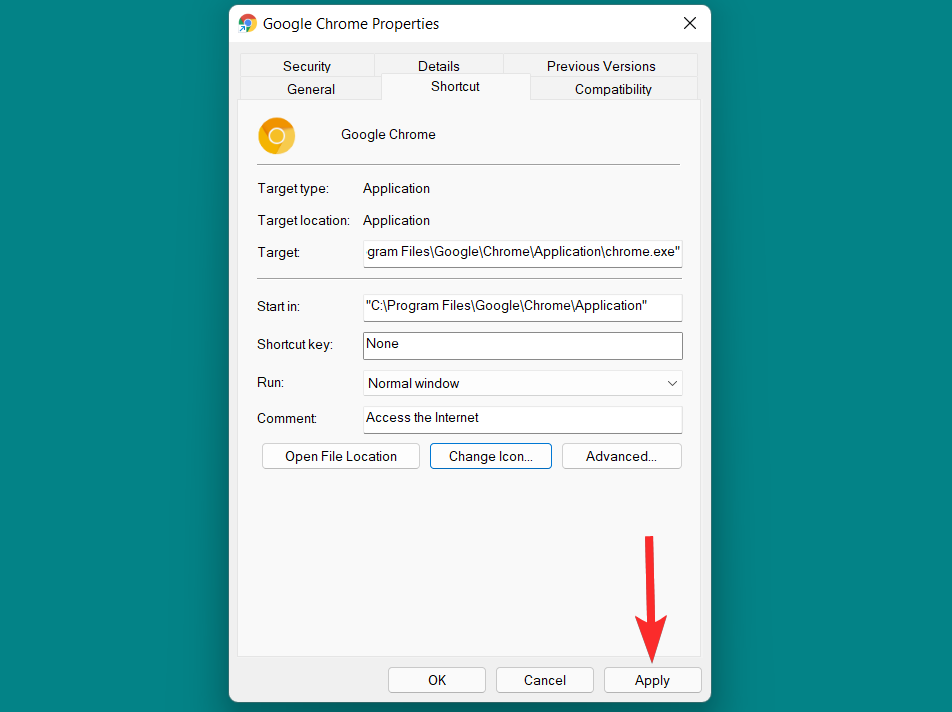
Return to the Properties window and click Apply to save your changes.
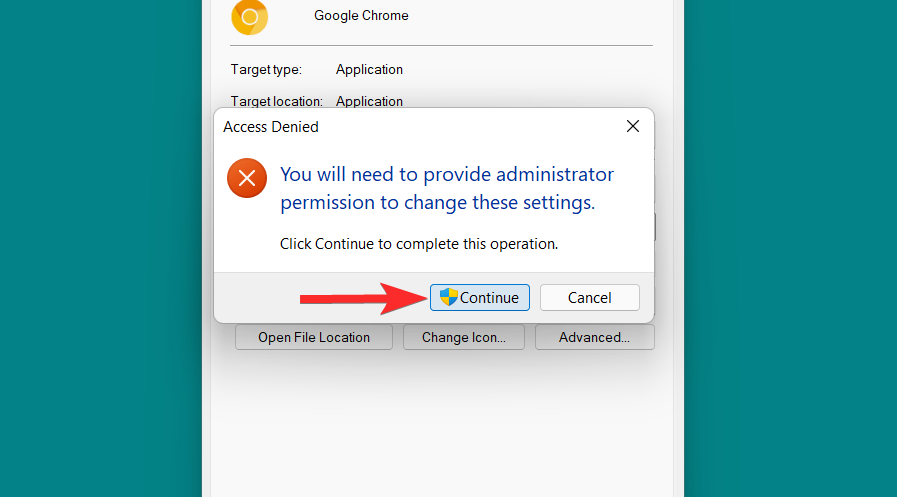
If you see the following prompt, click "Continue" to continue.
Finally, click OK to exit the shortcut properties.
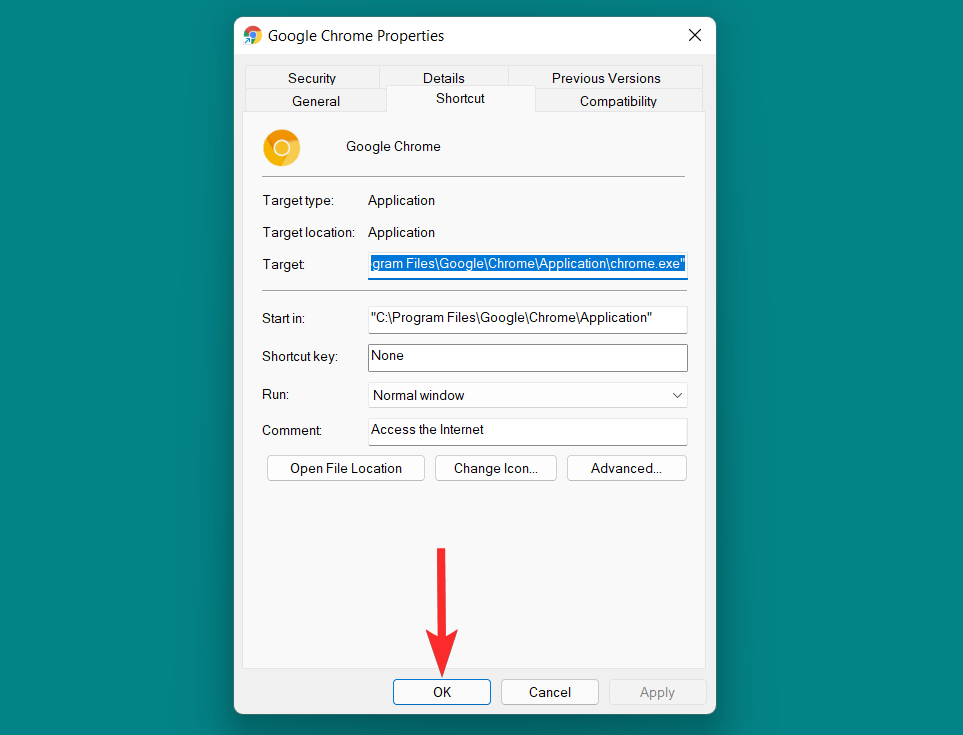
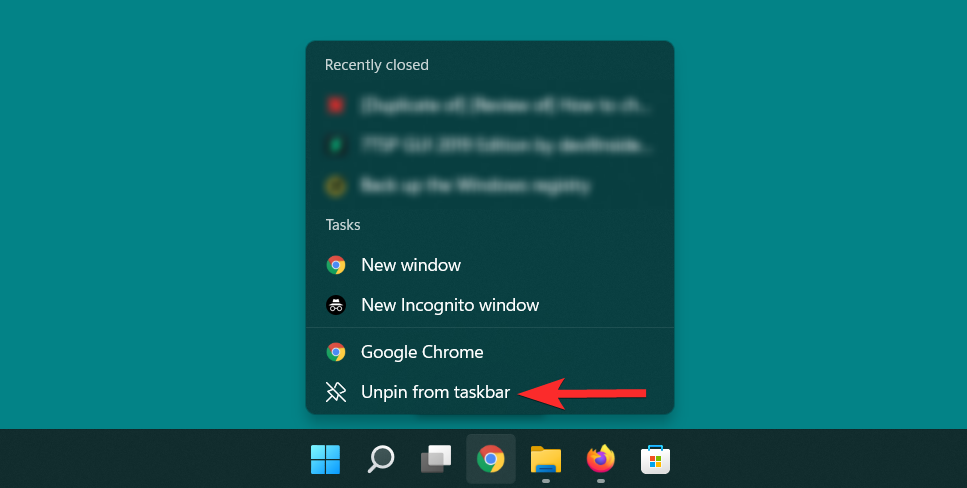
Now, unpin the original taskbar icon. To do this, right-click on the taskbar icon and select "Unpin from taskbar."
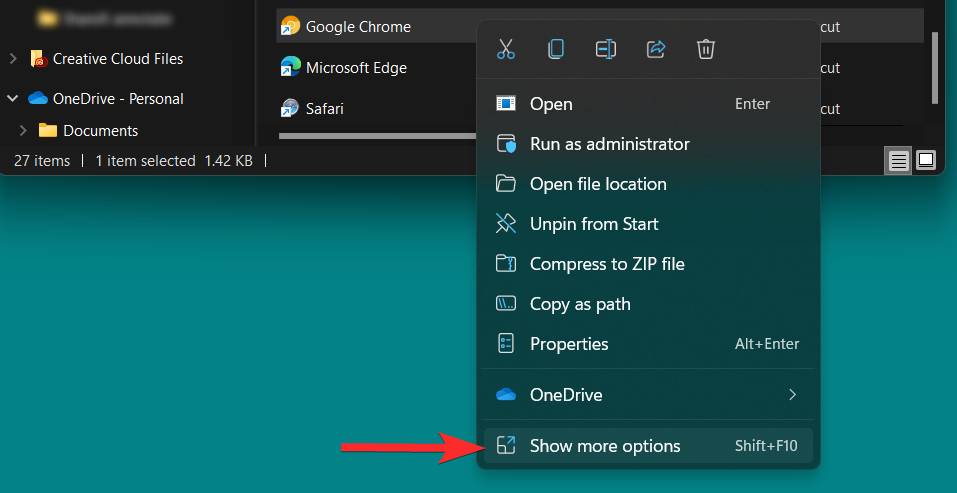
Finally, add the new shortcut icon to the taskbar, to do this, follow the steps below.
Right-click the newly changed shortcut icon and select "Show more options".
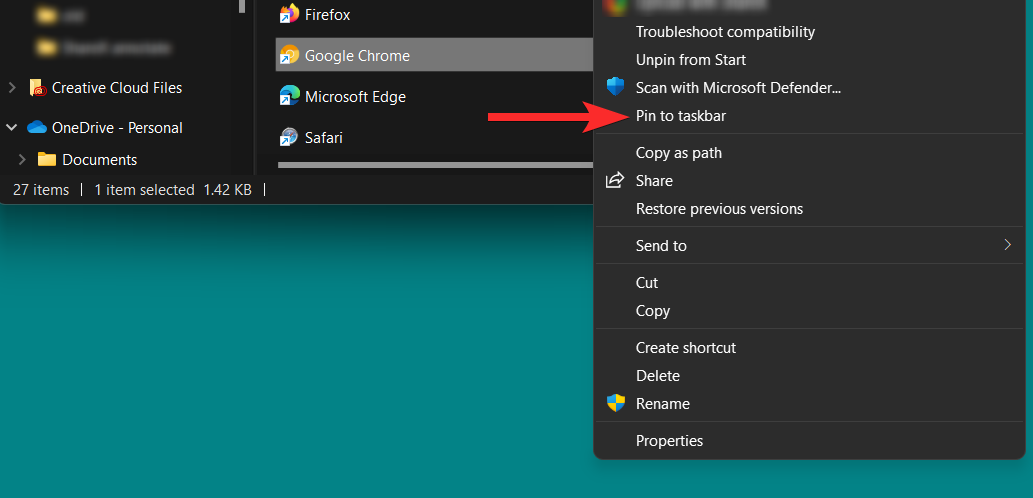
In the context menu, click Pin to taskbar.
Your taskbar icon has now changed.
While we hope all of your questions are answered at the heart of this article, the inclusion of It’s always interesting to have additional information to connect with, especially the FAQs. Here are a few.
is if the local machine changes. If you use one of the native methods described in this article to change an icon, Windows Update will not restore the icon you modified to its original version.
However, if you use a third-party application such as 7tsp to install an icon pack, it is recommended that you restore the default icons before updating Windows.
Yes. You can change the icon of a removable drive by making the necessary registry changes, as described in this article itself.
However, if the removable drive is not assigned a permanent drive letter, you may encounter problems changing the icon of the removable drive. Will changing icons in Windows affect performance? Generally speaking,does not have . However, if you are using an .ico file with an unsupported resolution, you may experience spikes in CPU and GPU usage depending on where the icon is placed (for example: taskbar, desktop, or folder). In the worst case scenario, you may also experience File Explorer crash.
Is it possible to change unsupported app icons in Windows 11? Although for some apps it is possible to change their icons, this is not the case for high-end apps. For example, you cannot change the icon of the original chrome.exe file that exists in the root directory of Google Chrome on your PC. However, you can always change the shortcut icon assigned to an application. Can I change the icon for quick access folders?Yes. You can use various icon packs or third-party applications to change the icons for quick access folders such as documents, pictures, music, videos, etc. To learn more about how to change icons using icon packs and third-party applications, see the
Method 2: Using Third-Party Toolssection in this article.
The above is the detailed content of 5 Ways to Change Folder Icons on Windows 11 (and 3 Tips). For more information, please follow other related articles on the PHP Chinese website!