Home >Web Front-end >Vue.js >This article talks about the three stages of the Vue component life cycle (creation, running and destruction)
This article will give you a detailed introduction to the three stages of Vue component life cycle: creation phase, running phase and destruction phase. I hope it will be helpful to everyone!

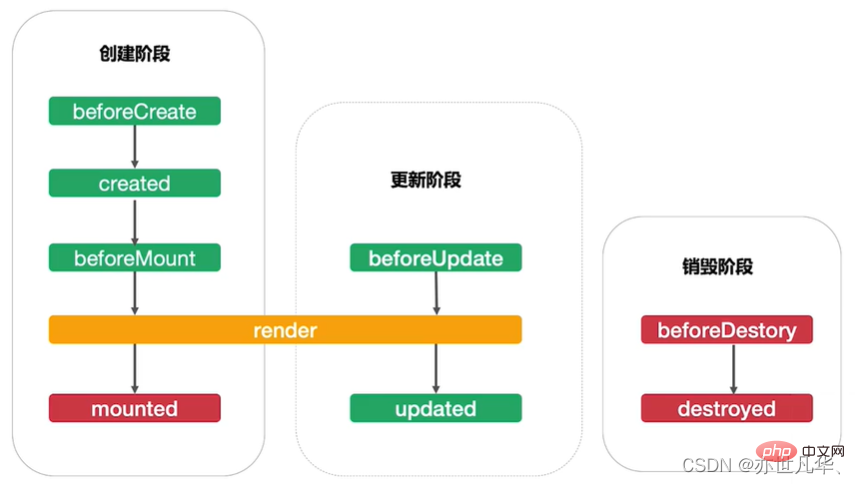
Life Cycle(Life Cycle) refers to A component is created from -> runs -> destroys the entire Stage emphasizes a period of time. [Related recommendations: vuejs video tutorial, web front-end development]
Life cycle function: It is composed of vue framework The provided built-in functions will be automatically executed in sequence along with the component's life cycle.

When we initialize events and life cycle functions, the component’s props/data/methods has not been created yet and is in an unavailable state.
<script>
export default {
    props:['info'],
    data(){
        return {
            message:'hello test'
        }
    },
    methods:{
        show(){
            console.log('调用了 Test 组件的 show 方法');
        }
    },
    // 创建阶段的第一个生命周期
    beforeCreate(){
        console.log(this.info); //props
        console.log(this.message); //data
        this.show() //methods
    },
}
</script>
Because props/data/methods cannot be used but when I call it, all consoles report errors.

props, data, methods, the component’s props/data/methods have been created. They are all in a usable state, but the template structure of the component has not yet been completed!
<script>
export default {
    props:['info'],
    data(){
        return {
            message:'hello test'
        }
    },
    methods:{
        show(){
            console.log('调用了 Test 组件的 show 方法');
        }
    },
    // 创建阶段的第二个生命周期函数
    created(){
        console.log(this.info);
        console.log(this.message);
        this.show()
    }
}
</script>

Request server data, and transfer the requested data to data for use when the template is rendered!
<template>
  <div>
    <h2>test组件--{{nums.length}}</h2>
  </div>
</template>
<script>
export default {
    props:['info'],
    data(){
        return {
            message:'hello test',
            nums:[]
        }
    },
    methods:{
        show(){
            console.log('调用了 Test 组件的 show 方法');
        },
        initlist(){
            const xhr = new XMLHttpRequest()
            xhr.addEventListener('load',()=>{
                const result = JSON.parse(xhr.responseText)
                console.log(result);
                this.nums = result.data
            })
            xhr.open('GET','请求的接口')
            xhr.send()
        }
    },
    created(){
        this.initlist()
    }
}
</script>
<style lang="less" scoped>
    div{
        background-color: #f00;

    }
</style>
data and template , is compiled in memory to generate HTML structure. The compiled HTML structure in memory will be rendered into the browser. At this time, the browser does not yet have the DOM structure of the current component.
<template>
  <div>
    <h2 id="myid">test组件--{{nums.length}}</h2>
  </div>
</template>
<script>
export default {
    props:['info'],
    data(){},
    methods:{},
    beforeCreate(){},
    created(){},
    beforeMount(){
        console.log('beforeMount');
        const dom = document.querySelector('#myid')
        console.log(dom);
    }
}
</script>

memoryThe HTML structure generated by compilation in replaces the DOM element specified by the el attribute. The HTML structure in the memory has been successfully rendered into the browser. At this time, the browserAlready contains the DOM structure of the current component. <template>
<div>
<h2 id="myid">test组件--{{nums.length}}</h2>
</div>
</template>
<script>
export default {
mounted(){
const dom = document.querySelector('#myid')
console.log(dom);
}
}
</script>
vue calls mounted after it completes template parsing and puts the real DOM element it first encountered on the page (mounting is completed). 
<template>
  <div>
    <h2 :style="{opacity}">欢迎学习Vue</h2>
  </div>
</template>
<script>
export default {
    data(){
        return {
            opacity:1
        }
    },
    mounted(){
        setInterval(()=>{
            //我们在使用箭头函数时,this的指向mounted自动帮我们设置好是 vm 了
            this.opacity-=0.01
            if(this.opacity <= 0) this.opacity = 1
        },6)
    },
}
</script>
 Running phase
这个函数的触发的必要前提是,我们修改了 data 里面的数据。将要(注意:仅仅是将要,还没有呢)根据变化过后最新的数据,重新渲染组件的模板结构。
<template>
<div>
<h2 id="myid">{{message}}</h2>
<button @click="message+='~'">点击修改message值</button>
</div>
</template>
<script>
export default {
data(){
return {
message:'hello test',
}
},
beforeUpdate(){
console.log('beforeUpdate'); //说明:点击按钮修改data值才能触发这个函数
console.log(this.message); //打印修改后的值
const dom = document.querySelector('#myid')
console.log(dom.innerHTML); //打印整个文本,但并没有出现我们修改后的值,说明页面并没有重新渲染
}
}
</script>

已经根据最新的数据,完成了组件的DOM结构的重新渲染。注意:当数据变化之后,为了能操作到最新的 DOM 结构,必须把代码写到 updated 生命周期函数中。
<template>
<div>
<h2 id="myid">{{message}}</h2>
<button @click="message+='~'">点击修改message值</button>
</div>
</template>
<script>
export default {
props:['info'],
data(){
return {
message:'hello test',
}
},
updated(){
console.log('updated');
console.log(this.message); //打印修改后的值
const dom = document.querySelector('#myid')
console.log(dom.innerHTML); //打印整个文本,但出现了我们修改后的值,说明页面被重新渲染
}
}
</script>
完全销毁一个实例。清理它(vm)与其它实例的连接,接绑它的全部指令及事件监听器。
将要销毁此组件,此时尚未销毁,组件还处于正常工作状态。在这阶段一般做一些首尾工作。
<template>
<div>
<h2 id="myid">{{message}}</h2>
<button @click="message+='~'">点击修改message值</button>
</div>
</template>
<script>
export default {
props:['info'],
data(){
return {
message:'hello test',
}
},
beforeDestroy(){
console.log('beforeDestroy');
}
}

销毁当前组件的数据侦听器、子组件、事件监听等,组件已经被销毁,此组件在浏览器中对应的DOM结构已被完全移除!
直接暴力的将vm干掉,页面就不能再进行交互。设置透明的按钮也就作废了。
<template>
  <div>
    <h2 :style="{opacity}">欢迎学习Vue</h2>
    <button @click="opacity = 1">透明度设置为1</button>
    <button @click="stop">点我停止变化</button>
  </div>
</template>
<script>
export default {
    data(){
        return {
            opacity:1
        }
    },
    methods:{
        stop(){
            // clearInterval(this.timer)
            this.$destroy()
        }
    },
    mounted(){
        // const dom = document.querySelector('#myid')
        // console.log(dom);
        console.log('mounted',this);
        this.timer = setInterval(()=>{
            console.log('setInterval');
            this.opacity-=0.01
            if(this.opacity <= 0) this.opacity = 1
        },6)
    },
    beforeDestroy(){
        clearInterval(this.timer)
        console.log('vm即将被销毁');
    }
}
</script>
<style lang="less" scoped>
    div{
        // background-color: #f00;

    }
</style>

1)销毁后借助Vue开发者工具看不到任何信息。
2)销毁后自定义事件会失效,但原生的DOM事件依然有效
3)一般不会在beforeDestroy操作数据,因为即使操作数据,也不会再触发更新流程了
生命周期:
1)又称:生命周期回调函数、生命周期函数、生命周期钩子。
2)含义:vue在关键时刻帮助我们调用一些特殊名称的函数。
3)生命周期函数的名字不可更改,但函数的具体内容是程序员根据需求编写的。
4)生命周期函数中的this指向是 vm 或 组件实例对象。
常用的生命周期钩子:
1)mounted:发送ajax请求、启动定时器、绑定自定义事件、订阅消息等(初始化操作)
2)beforeDestroy:清除定时器、绑定自定义事件、取消订阅消息等(收尾工作)
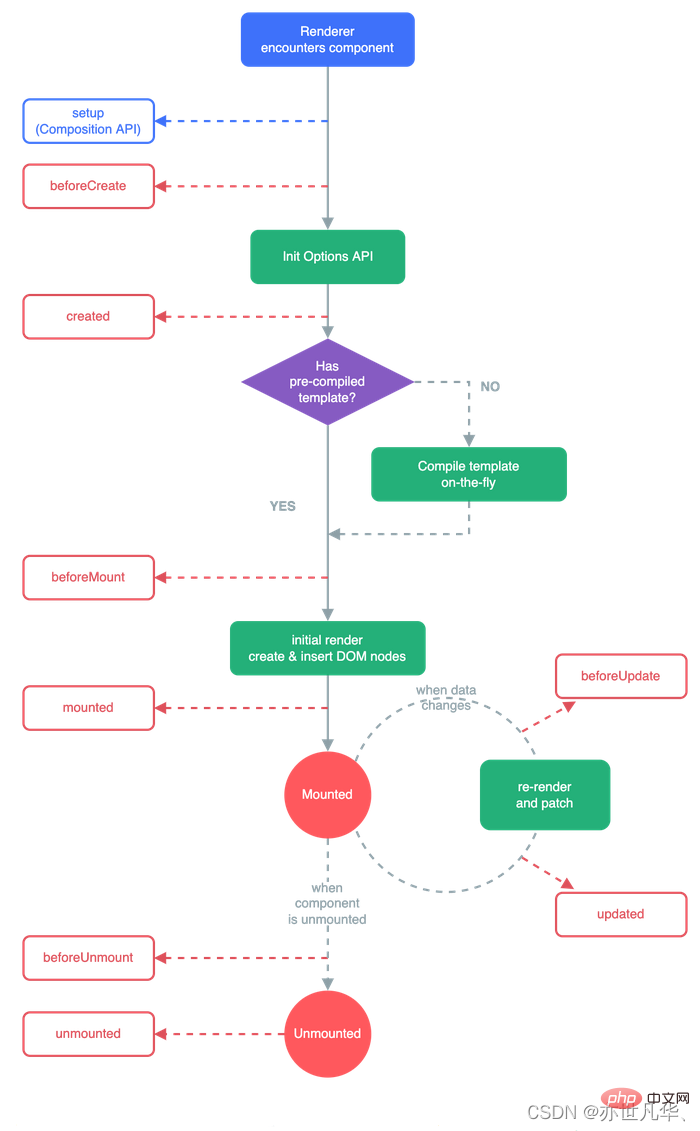
下面是实例生命周期的图表。你现在并不需要完全理解图中的所有内容,但以后它将是一个有用的参考。

The above is the detailed content of This article talks about the three stages of the Vue component life cycle (creation, running and destruction). For more information, please follow other related articles on the PHP Chinese website!