Home > Article > Web Front-end > Sharing useful information to help you understand Vue.nextTick in Vue
This article will share with you Vue pure dry information and introduce you to Vue.nextTick that you don’t know. I hope it will be helpful to everyone!

Friends who have used Vue will know it more or less
$nextTick~ Before formally explaining nextTick, I think you should know Vue clearly When updating the DOM, it is executedasynchronously, because the next explanation process will be explained together with the component update~ Without further ado, let’s go straight to the topic (this article uses the v2.6.14 version Vue source code is explained) [Related recommendations: vuejs video tutorial]
Do you really understand nextTick? Come on, go directly to the question~
<template>
<div id="app">
<p ref="name">{{ name }}</p>
<button @click="handleClick">修改name</button>
</div>
</template>
<script>
export default {
name: 'App',
data () {
return {
name: '井柏然'
}
},
mounted() {
console.log('mounted', this.$refs.name.innerText)
},
methods: {
handleClick () {
this.$nextTick(() => console.log('nextTick1', this.$refs.name.innerText))
this.name = 'jngboran'
console.log('sync log', this.$refs.name.innerText)
this.$nextTick(() => console.log('nextTick2', this.$refs.name.innerText))
}
}
}
</script> In the above code, when clicks the button "Modify name", 'nextTick1', 'sync log' , 'nextTick2' corresponding this.$refs.name.innerText will output respectively? Note, what is printed here is the innerText of the DOM~ (the answer will be posted at the end of the article)
If you have a very firm answer at this time, then you don’t need to continue reading. Okay~ But if you have concerns about your answer, then you might as well follow me and read on. I believe that after reading it, you will have a definite answer without having to see the answer~!
The source code is located in core/util/next-tick. It can be divided into 4 parts and go directly to the code
##callbacksQueue, pendingStatus
const callbacks = [] // 存放cb的队列
let pending = false // 是否马上遍历队列,执行cb的标志
function flushCallbacks () {
  pending = false // 注意这里,一旦执行,pending马上被重置为false
  const copies = callbacks.slice(0)
  callbacks.length = 0
  for (let i = 0; i < copies.length; i++) {
    copies[i]() // 执行每个cb
  }
}
let timerFunc // nextTick异步实现fn

if (typeof Promise !== 'undefined' && isNative(Promise)) {
  // Promise方案
  const p = Promise.resolve()
  timerFunc = () => {
    p.then(flushCallbacks) // 将flushCallbacks包装进Promise.then中
  }
  isUsingMicroTask = true
} else if (!isIE && typeof MutationObserver !== 'undefined' && (
  isNative(MutationObserver) ||
  MutationObserver.toString() === '[object MutationObserverConstructor]'
)) {
  // MutationObserver方案
  let counter = 1
  const observer = new MutationObserver(flushCallbacks) // 将flushCallbacks作为观测变化的cb
  const textNode = document.createTextNode(String(counter)) // 创建文本节点
  // 观测文本节点变化
  observer.observe(textNode, {
    characterData: true
  })
  // timerFunc改变文本节点的data,以触发观测的回调flushCallbacks
  timerFunc = () => {
    counter = (counter + 1) % 2
    textNode.data = String(counter)
  }
  isUsingMicroTask = true
} else if (typeof setImmediate !== 'undefined' && isNative(setImmediate)) {
  // setImmediate方案
  timerFunc = () => {
    setImmediate(flushCallbacks)
  }
} else {
  // 最终降级方案setTimeout
  timerFunc = () => {
    setTimeout(flushCallbacks, 0)
  }
}
. After all, compared to the other three asynchronous solutions, this one should be the most unfamiliar to everyone. <pre class="brush:js;toolbar:false;">const observer = new MutationObserver(() => console.log(&#39;观测到文本节点变化&#39;))
const textNode = document.createTextNode(String(1))
observer.observe(textNode, {
characterData: true
})
console.log(&#39;script start&#39;)
setTimeout(() => console.log(&#39;timeout1&#39;))
textNode.data = String(2) // 这里对文本节点进行值的修改
console.log(&#39;script end&#39;)</pre>
script start, script end will be executed in the first round of macro tasks, this is no problem
setTimeout will be put into the next round of macro task execution
#MutationObserver is a micro task, so it will be executed after the current round of macro task Executed, so it precedes setTimeout

Method implementation
cb、Promisemethod
export function nextTick (cb?: Function, ctx?: Object) {
  let _resolve
  // 往全局的callbacks队列中添加cb
  callbacks.push(() => {
    if (cb) {
      try {
        cb.call(ctx)
      } catch (e) {
        handleError(e, ctx, 'nextTick')
      }
    } else if (_resolve) {
      // 这里是支持Promise的写法
      _resolve(ctx)
    }
  })
  if (!pending) {
    pending = true
    // 执行timerFunc,在下一个Tick中执行callbacks中的所有cb
    timerFunc()
  }
  // 对Promise的实现,这也是我们使用时可以写成nextTick.then的原因
  if (!cb && typeof Promise !== 'undefined') {
    return new Promise(resolve => {
      _resolve = resolve
    })
  }
}
is used for and how it works?
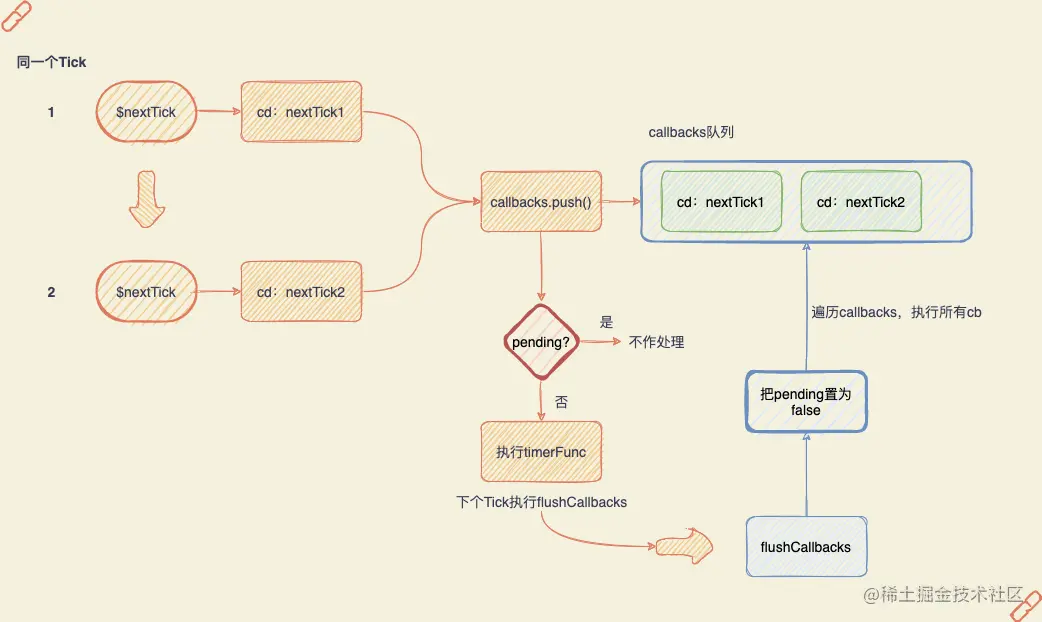
$nextTick, timerFunc will only be executed once
this.$nextTick(() => console.log('nextTick1'))
this.$nextTick(() => console.log('nextTick2'))

, Distribution updateFor those who don’t know much about it, you can click here to see the illustrated Vue responsiveness principle Learn about Vue componentization and distribution updates and then come back~
Vue'sAsynchronous updateDOM is actually implemented using nextTick, which is actually the same $nextTick we usually use~
Rendering Watcher as an example, and enter queueWatcher 里
do? // 用来存放Wathcer的队列。注意,不要跟nextTick的callbacks搞混了,都是队列,但用处不同~
const queue: Array<Watcher> = []
function queueWatcher (watcher: Watcher) {
const id = watcher.id // 拿到Wathcer的id,这个id每个watcher都有且全局唯一
if (has[id] == null) {
// 避免添加重复wathcer,这也是异步渲染的优化做法
has[id] = true
if (!flushing) {
queue.push(watcher)
}
if (!waiting) {
waiting = true
// 这里把flushSchedulerQueue推进nextTick的callbacks队列中
nextTick(flushSchedulerQueue)
}
}
} do? function flushSchedulerQueue () {
currentFlushTimestamp = getNow()
flushing = true
let watcher, id
// 排序保证先父后子执行更新,保证userWatcher在渲染Watcher前
queue.sort((a, b) => a.id - b.id)
// 遍历所有的需要派发更新的Watcher执行更新
for (index = 0; index < queue.length; index++) {
watcher = queue[index]
id = watcher.id
has[id] = null
// 真正执行派发更新,render -> update -> patch
watcher.run()
}
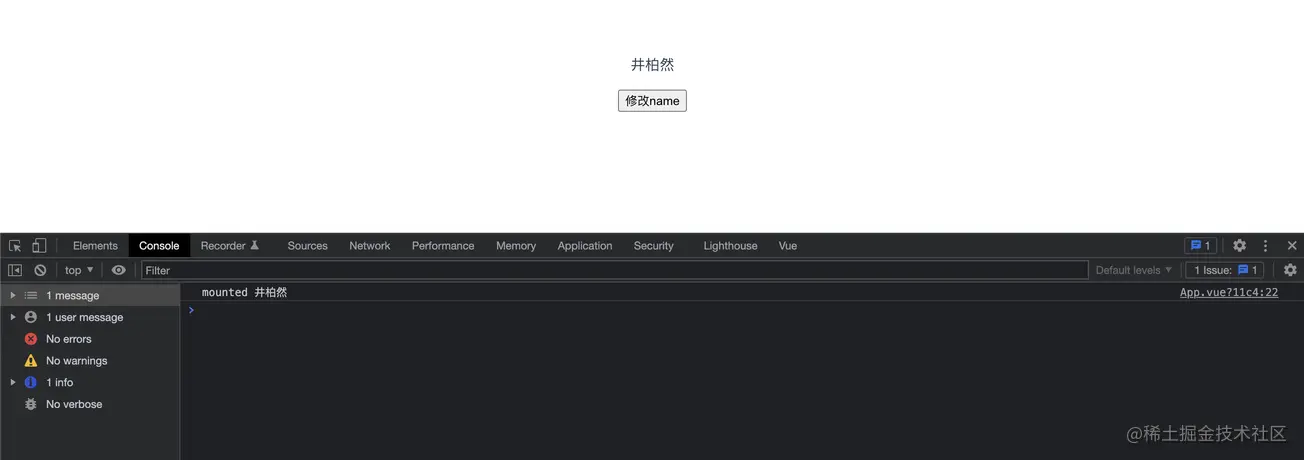
}1、如图所示,mounted时候的innerText是“井柏然”的中文

2、接下来是点击按钮后,打印结果如图所示
没错,输出结果如下(意不意外?惊不惊喜?)
sync log 井柏然
nextTick1 井柏然
nextTick2 jngboran
下面简单分析一下每个输出:
this.$nextTick(() => console.log('nextTick1', this.$refs.name.innerText))
this.name = 'jngboran'
console.log('sync log', this.$refs.name.innerText)
this.$nextTick(() => console.log('nextTick2', this.$refs.name.innerText))
sync log:这个同步打印没什么好说了,相信大部分童鞋的疑问点都不在这里。如果不清楚的童鞋可以先回顾一下EventLoop,这里不多赘述了~
nextTick1:注意其虽然是放在$nextTick的回调中,在下一个tick执行,但是他的位置是在this.name = 'jngboran'的前。也就是说,他的cb会比App组件的派发更新(flushSchedulerQueue)更先进入队列,当nextTick1打印时,App组件还未派发更新,所以拿到的还是旧的DOM值。
nextTick2就不展开了,大家可以自行分析一下。相信大家对它应该是最肯定的,我们平时不就是这样拿到更新后的DOM吗?
最后来一张图加深理解
写在最后,nextTick其实在Vue中也算是比较核心的一个东西了。因为贯穿整个Vue应用的组件化、响应式的派发更新与其息息相关~深入理解nextTick的背后实现原理,不仅能让你在面试的时候一展风采,更能让你在日常开发工作中,少走弯路少踩坑!好了,本文到这里就暂告一段落了,如果读完能让你有所收获,就帮忙点个赞吧~画图不易、创作艰辛鸭~
The above is the detailed content of Sharing useful information to help you understand Vue.nextTick in Vue. For more information, please follow other related articles on the PHP Chinese website!