Home >Web Front-end >Front-end Q&A >What are the APIs of html5?
html5’s APIs include: 1. requestAnimationFrame; 2. Client storage; 3. History; 4. worker; 5. file Reader; 6. websocoket, etc.

The operating environment of this tutorial: Windows 7 system, HTML5 version, Dell G3 computer.
1. requestAnimationFrame (Request animation key frame)
1.1 requestAnimationFrame how to use?
Foreshadowing:
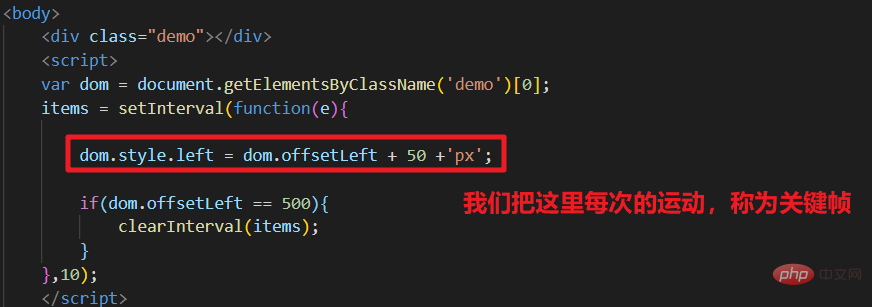
Let’s take a look at how we usually animate an element in JS.
We usually use timers to set the animation or displacement after a long time.
<style>
.demo{
width: 100px;
height:100px;
background-color: red;
position:absolute;
left: 0;
}
</style>
</head>
<body>
<div class="demo"></div>
<script>
var dom = document.getElementsByClassName('demo')[0];
items = setInterval(function(e){
dom.style.left = dom.offsetLeft + 50 +'px';
if(dom.offsetLeft == 500){
clearInterval(items);
}
},10);
</script>
We can see that using JS timer You can achieve animation effects
However, the JS timer will have a shortcoming
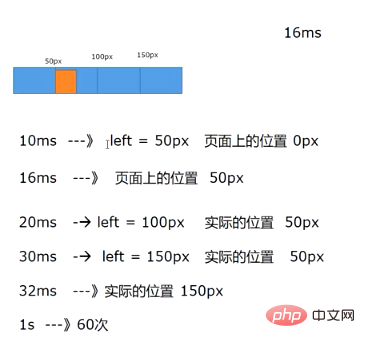
The browser redraws every 1s -> 60 times, so It redraws approximately every 16ms
If we do the same thing as above, increase left50px every 10ms. The page will cause key frames to be lost
requestAnimationFrame: (after optimization)
<style>
.demo {
width: 100px;
height: 100px;
background-color: red;
position: absolute;
left: 0;
}
</style>
</head>
<body>
<div class="demo"></div>
<script>
var dom = document.getElementsByClassName('demo')[0];
function move() {
dom.style.left = dom.offsetLeft + 50 + 'px';
var items = requestAnimationFrame(move);
if(dom.offsetLeft == 500){
cancelAnimationFrame(items);
}
}
move();
</script>
1.2 What is the difference between requestAnimationFrame and setTImeout?
setTimeout executes the callback function after n milliseconds. In the callback function, setTimeout can be called recursively to implement animation.
.demo {
width: 100px;
height: 100px;
background-color: red;
position: absolute;
left: 0;
}
</style>
</head>
<body>
<div class="demo"></div>
<script>
var dom = document.getElementsByClassName('demo')[0];
function move() {
var items = setTimeout(function () {
dom.style.left = dom.offsetLeft + 50 + 'px';
if (dom.offsetLeft == 500) {
clearTimeout(items);
} else {
move();
}
}, 10)
}
move();
</script>
The biggest advantage of using requestAnimationFrame to execute animation is that it can ensure that the callback function is only executed once during each refresh interval of the screen, so that frames will not be lost and the animation will not be lost. There will be no lag.
.demo {
width: 100px;
height: 100px;
background-color: red;
position: absolute;
left: 0;
}
</style>
</head>
<body>
<div class="demo"></div>
<script>
var dom = document.getElementsByClassName('demo')[0];
function move() {
var items = requestAnimationFrame(function () {
dom.style.left = dom.offsetLeft + 50 + 'px';
if (dom.offsetLeft == 500) {
cancelAnimationFrame(items);
} else {
move();
}
})
}
move();
</script>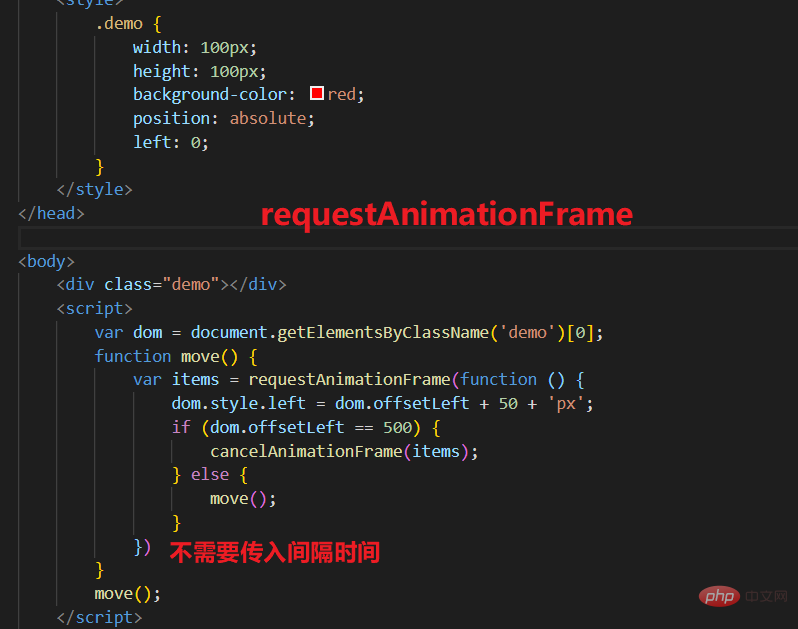
##1.3 Advantages of requestAnimationFrame

2. Client Storage
2.1 Storage: Will not be transmitted to the server
2.1.1 How to use Storage Master method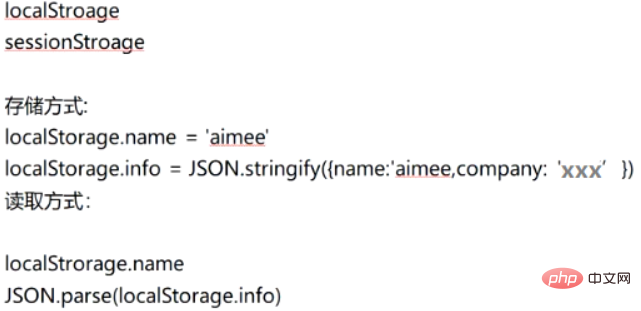
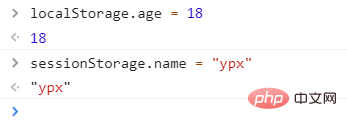
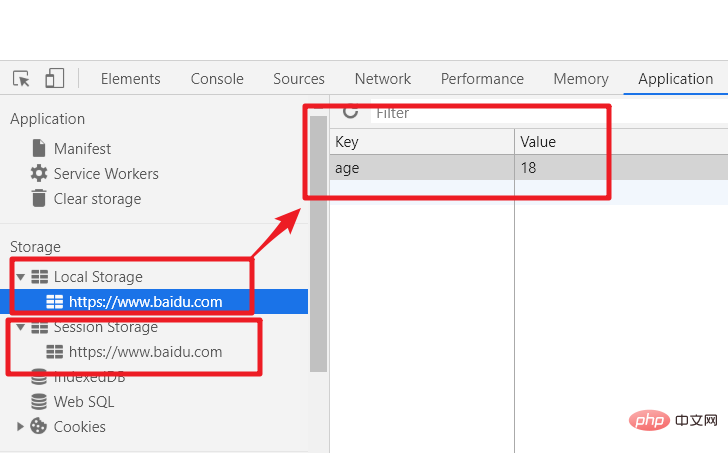


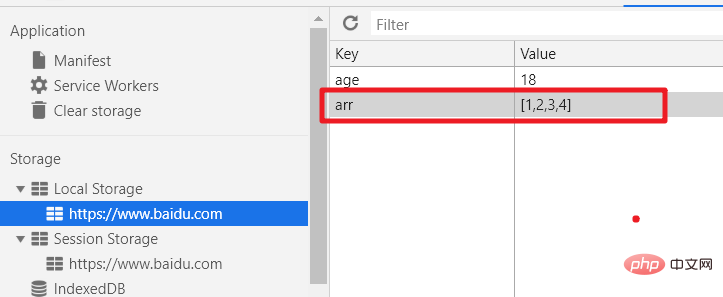
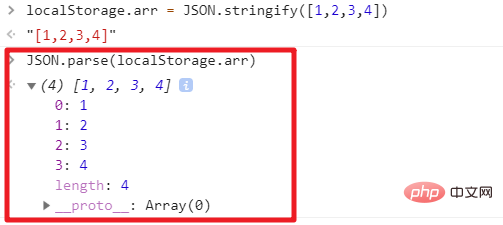
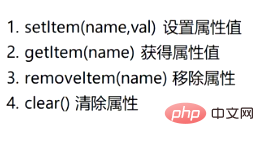


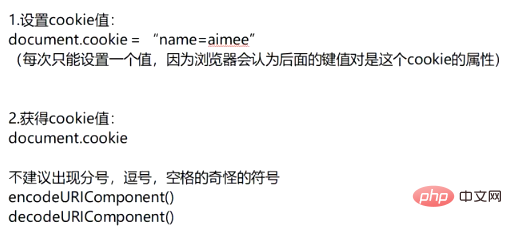
存储信息到用户的设备上,数据量较小 4k
navigator.cookieEnabled 检查是否启用了cookie
三、历史记录
BOM中的 History对象方法
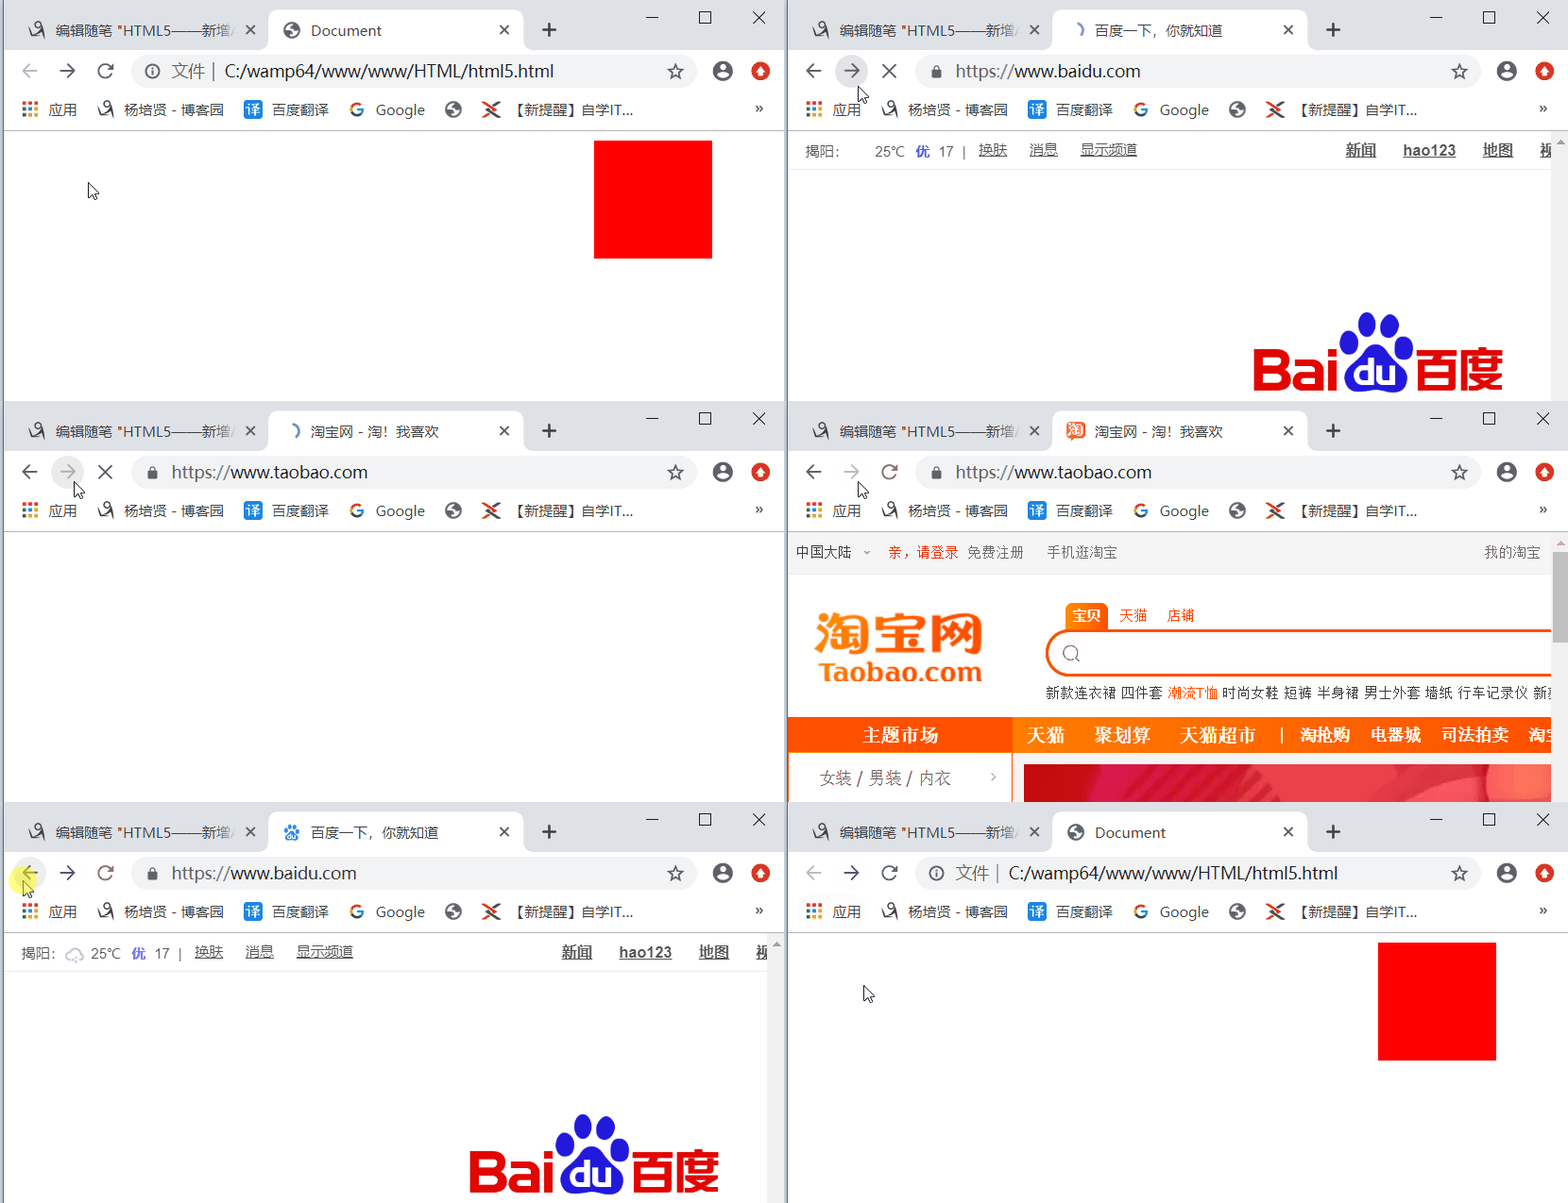
现在已知我有三个标签页(从红色小方块开始)
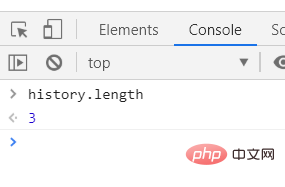
3.1history.length 长度
通过调用这个方法就可以知道,当前历史记录里面有几条数据(几个网页)
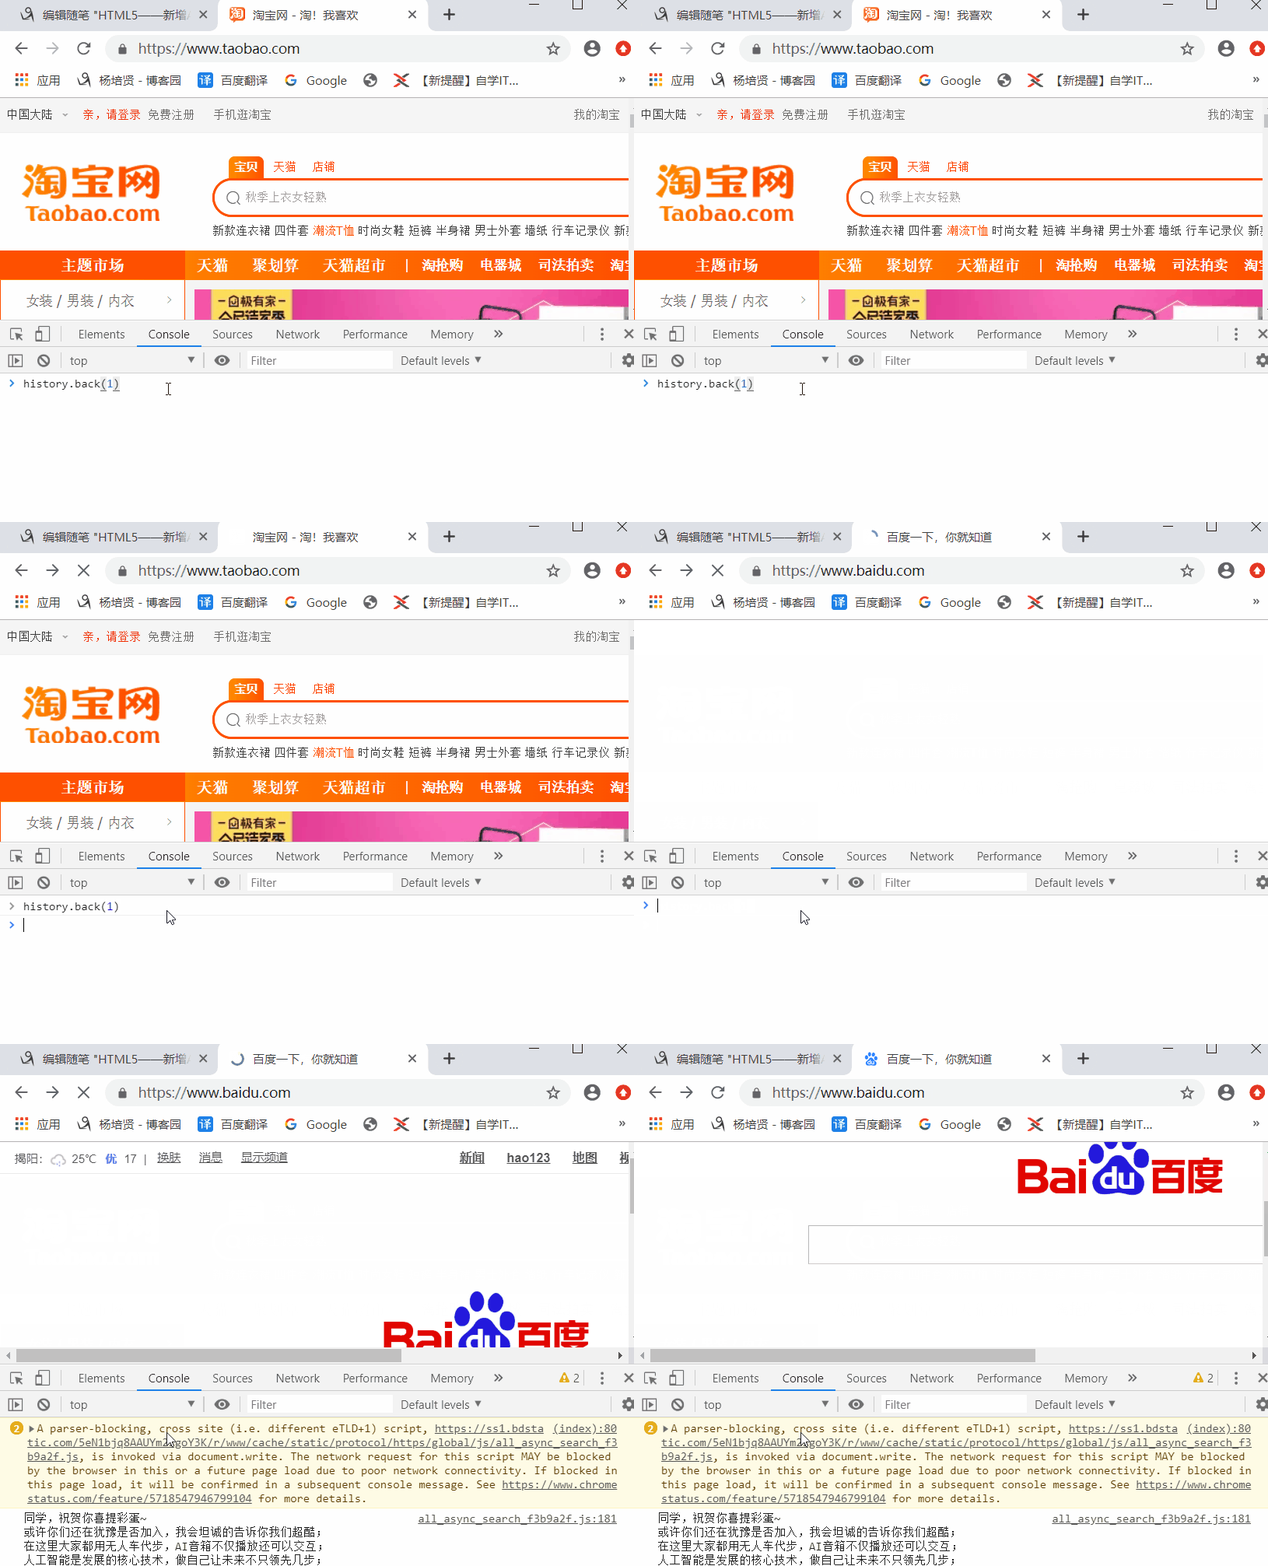
3.1history.back() 回退
当前位置在第三页(淘宝页面),回退一页就会跳转到第二页(百度页面)
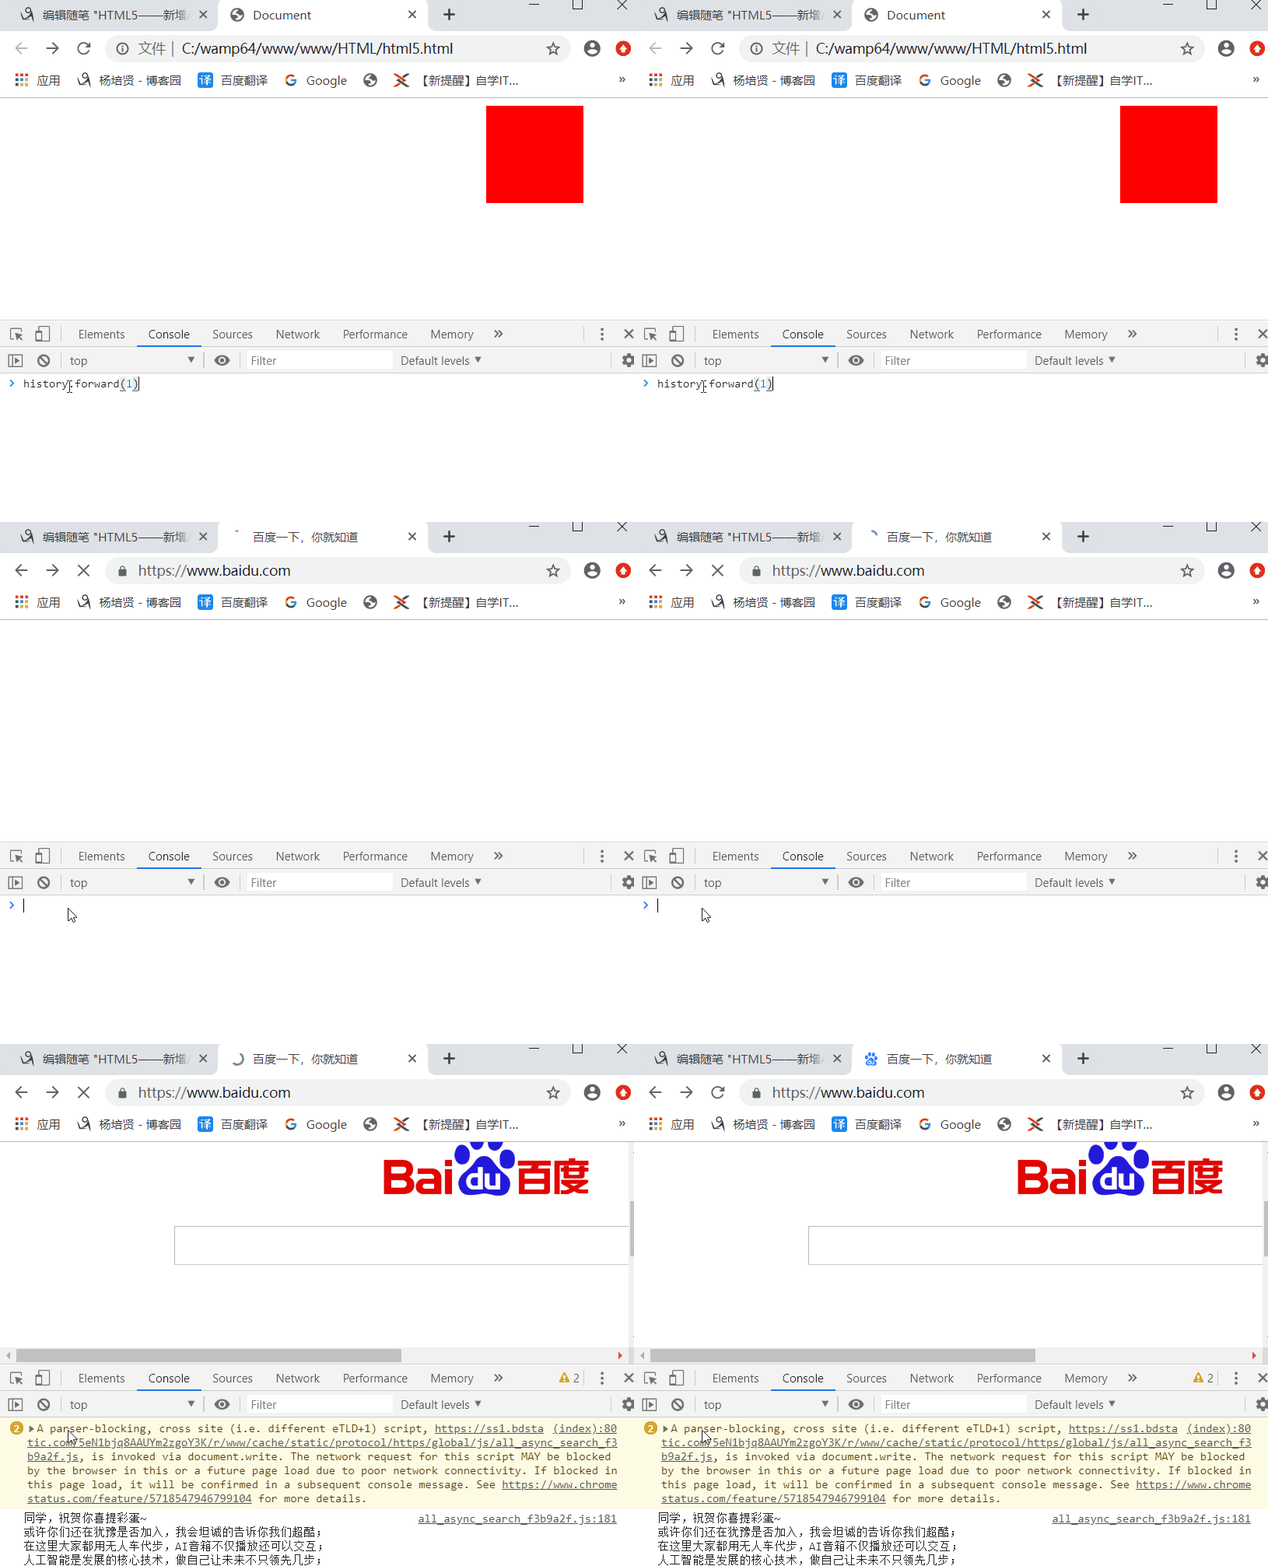
3.2 history.forward() 前进
当前在红色小方块当前页,前进一页就会跳转至第二页(百度页面)
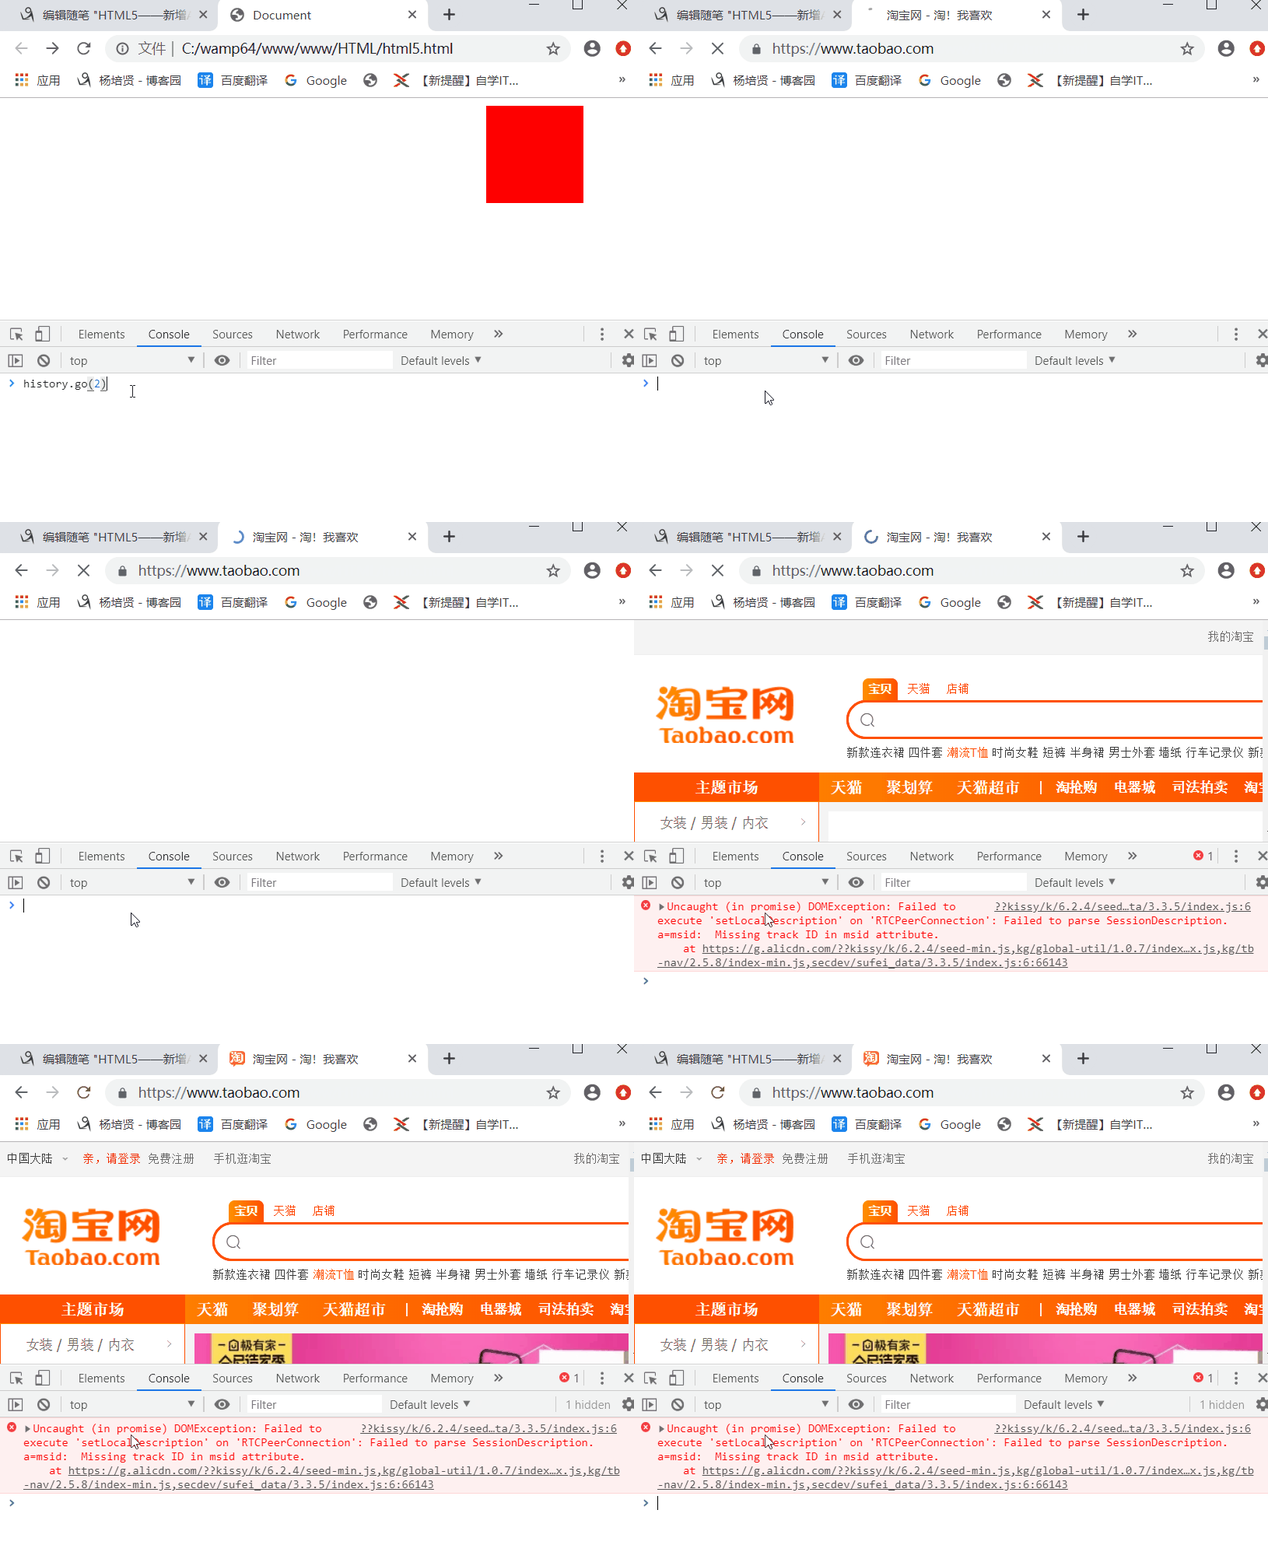
3.3 history.go(n) 跳转至指定页
当前在红色小方块页面即为第0页,go(2)就会跳转至第三页(淘宝页面)
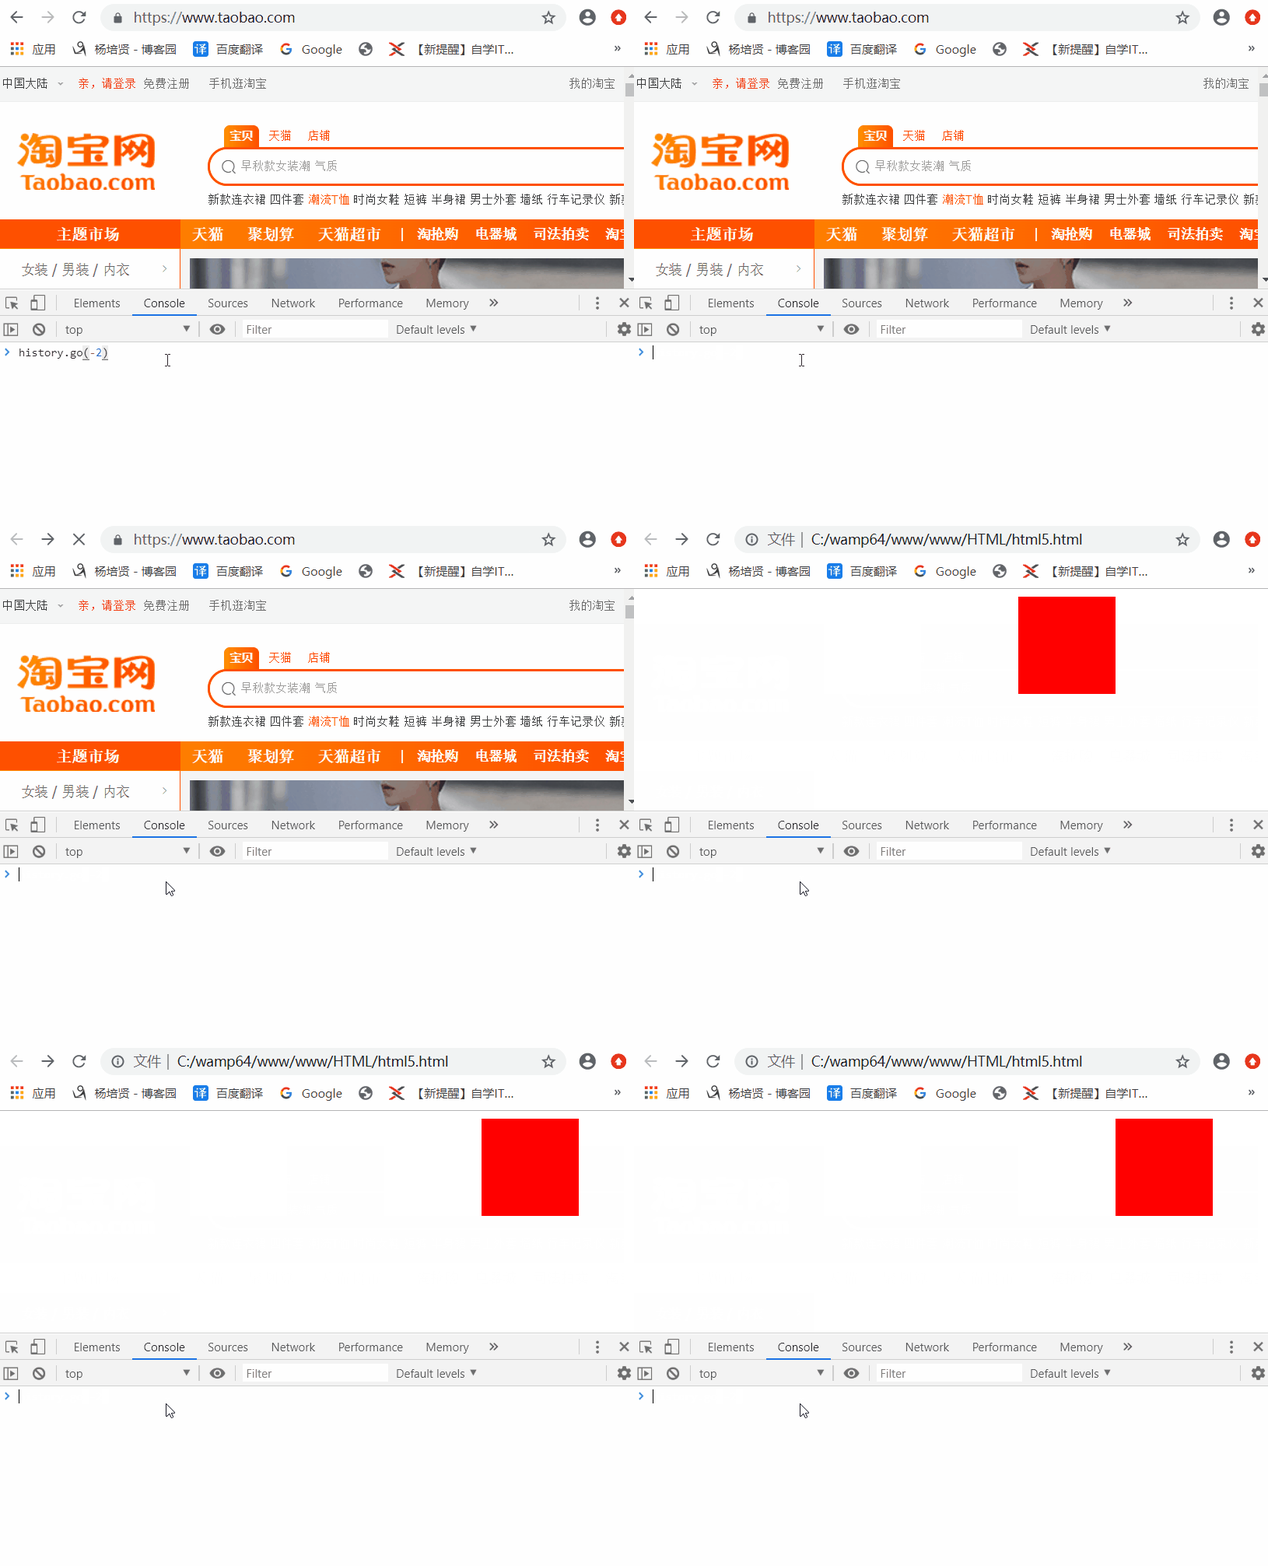
当前在淘宝页面即为第三页,go(-2)就会跳转至第一页(红色方块页面)
HTML5中新增的方法 此方法受同源策略限制,需要在服务器下操作
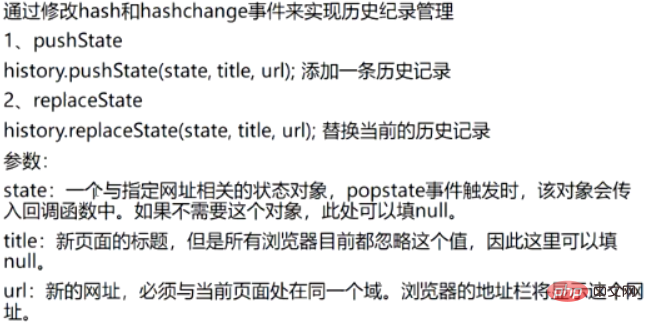
1、pushState 添加一条历史记录
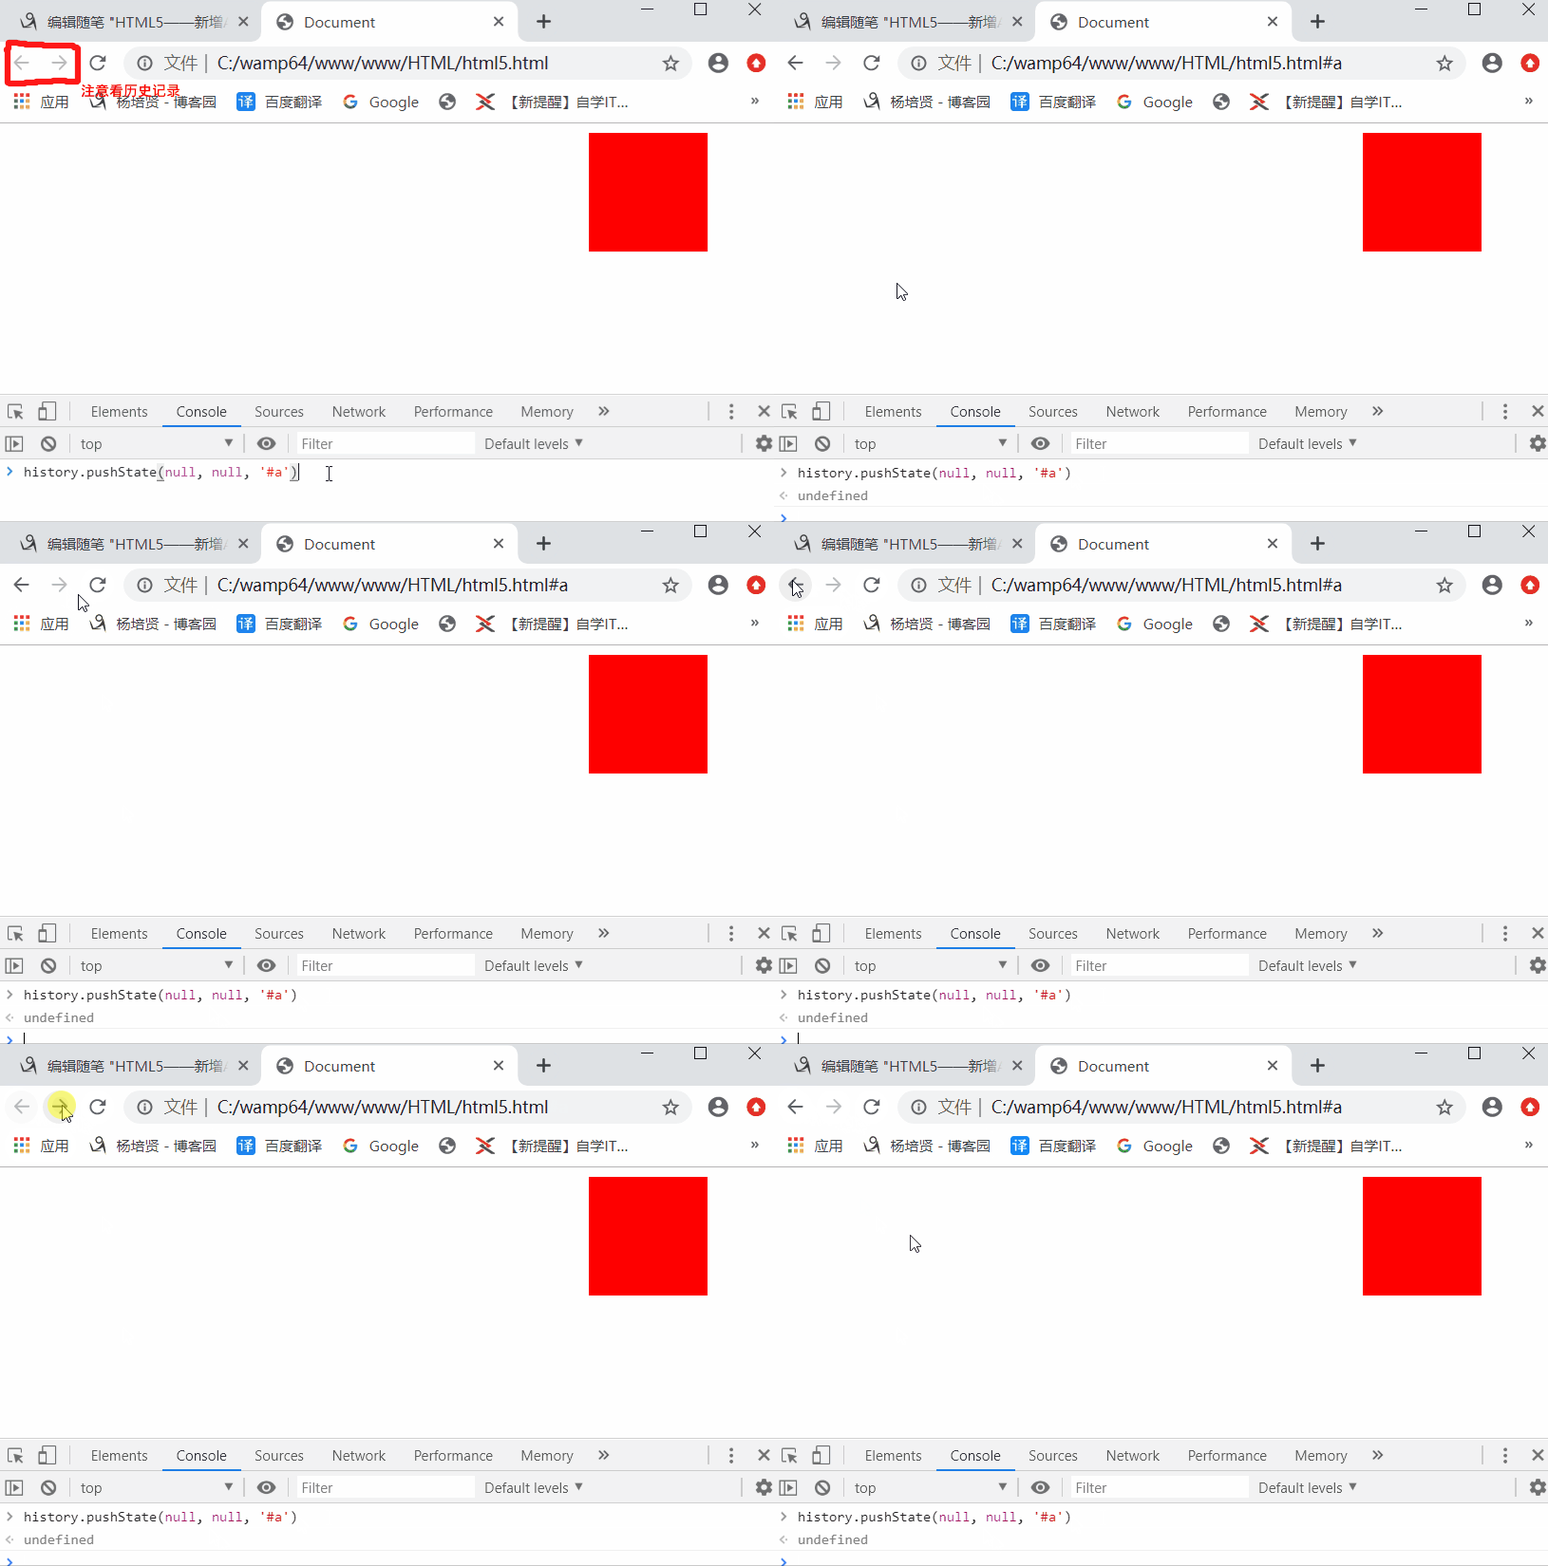
2、replaceState 替换当前的历史记录
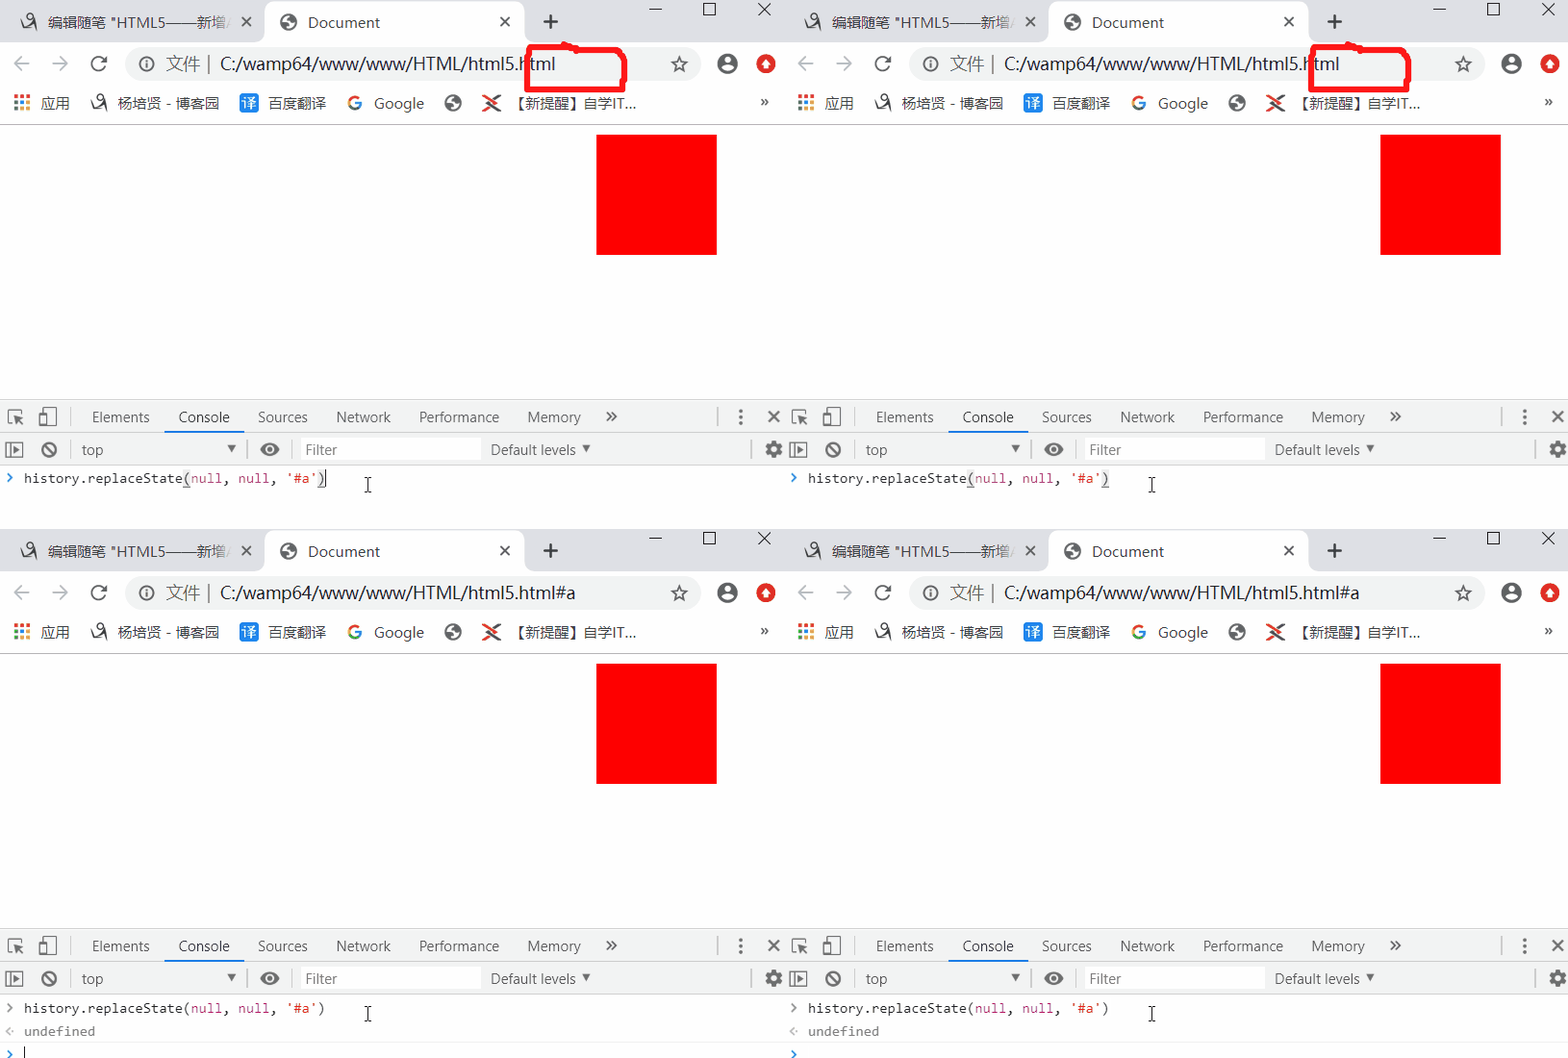
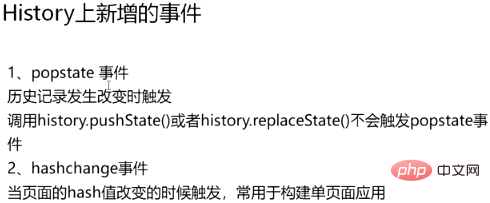
1. popstate 监听页面历史记录一旦发生改变时触发
        history.pushState(null, null, '#a');
        window.addEventListener('popstate', function(e){  //监听 popstate事件 有没有发生改变
            console.log("历史记录发生改变,我触发了");
        }, false)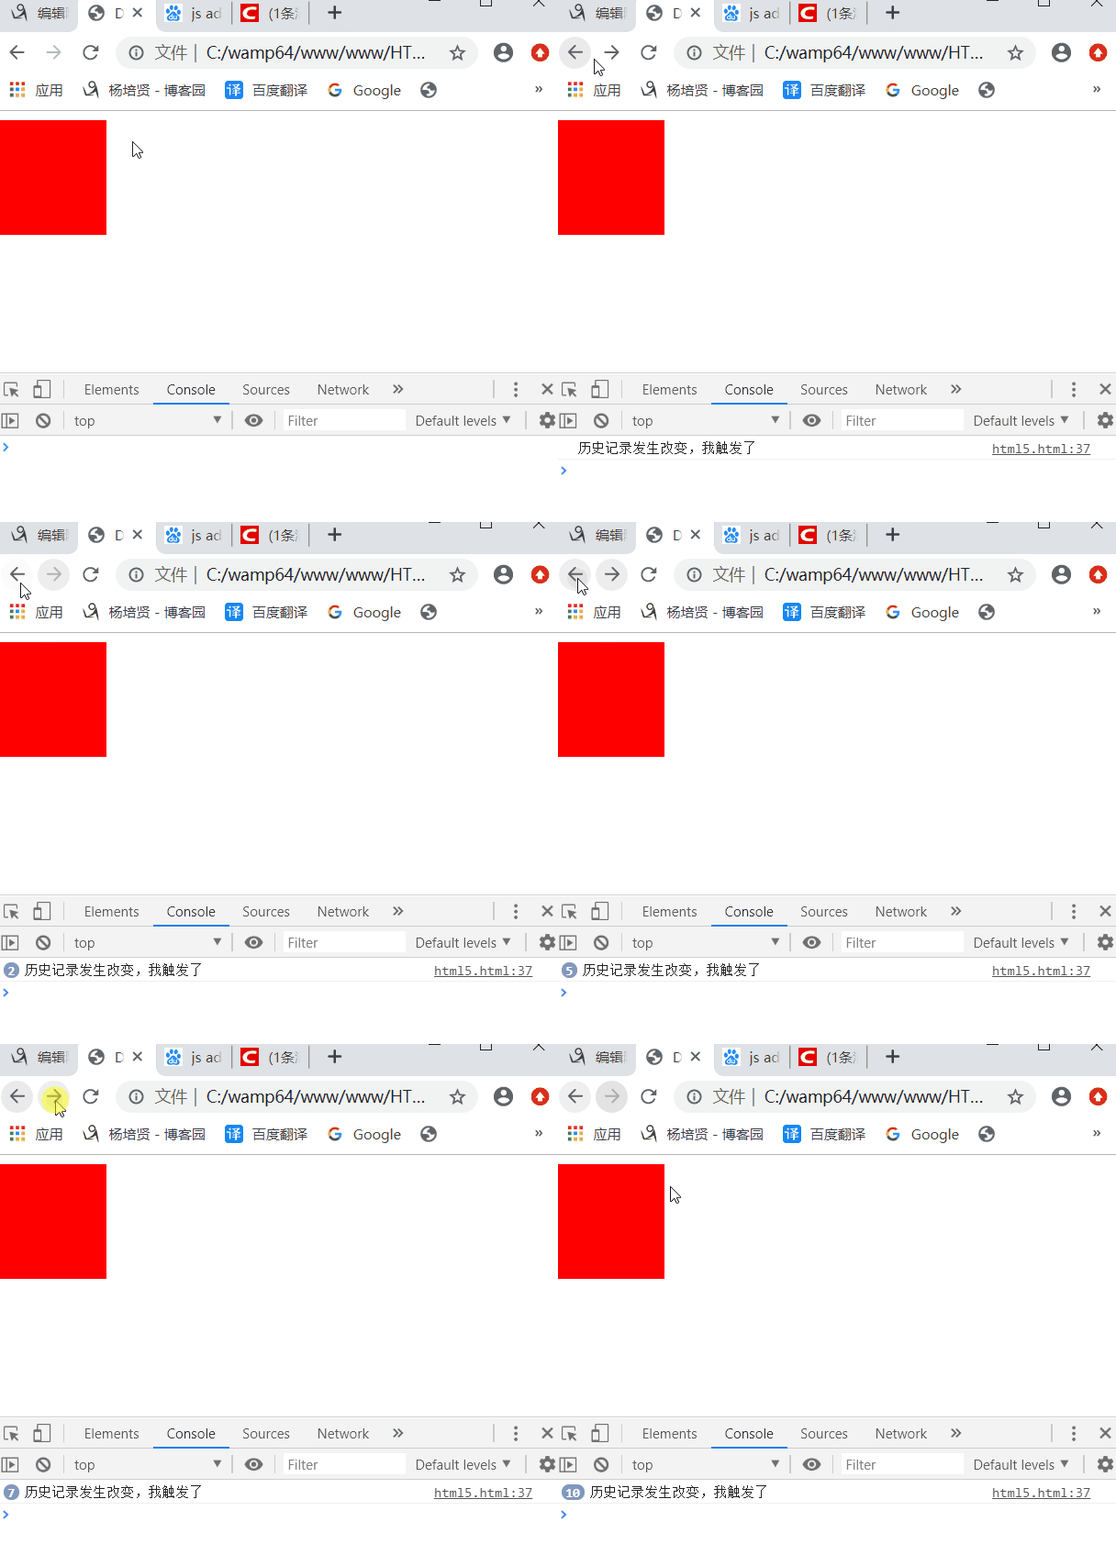
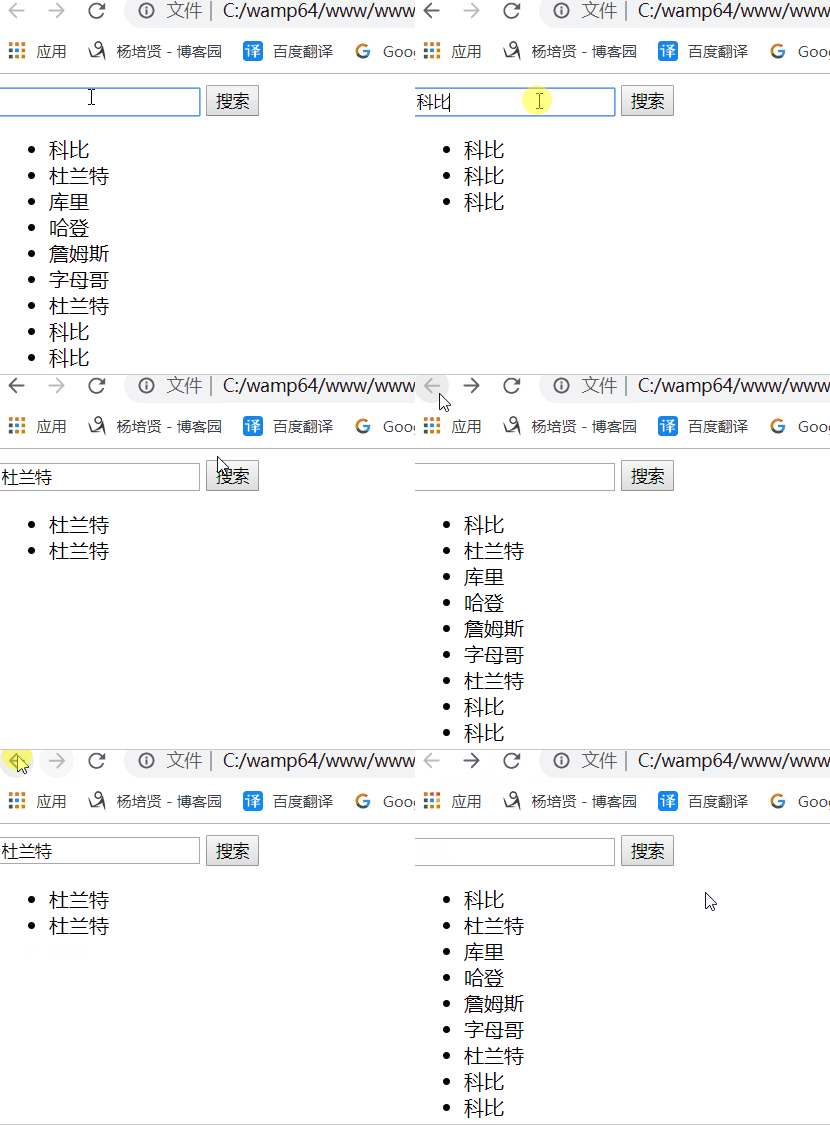
应用场景
多应用于搜索,后台管理系统,或者父子页面之间的切换(开发一个页面就够了)
<!DOCTYPE html>
<html>
<head>
<meta charset="UTF-8">
<meta name="viewport" content="width=device-width, initial-scale=1.0">
<meta http-equiv="X-UA-Compatible" content="ie=edge">
<title>Document</title>
<style>
</style>
</head>
<body>
<input type="text" id="inp">
<button id="btn">搜索</button>
<ul id="wrapper"></ul>
<script>
var wrapper = document.getElementById('wrapper');
var inp = document.getElementById('inp');
var btn = document.getElementById('btn');
var data = [{
name: '科比'
}, {
name: '杜兰特'
}, {
name: '库里'
}, {
name: '哈登'
}, {
name: '詹姆斯'
}, {
name: '字母哥'
}, {
name: '杜兰特'
}, {
name: '科比'
}, {
name: '科比'
}];
function radeDom(data) {
var str = " ";
for (var i = 0; i < data.length; i++) {
str += "<li>" + data[i].name + "</li>";
}
wrapper.innerHTML = str;
}
radeDom(data);
btn.onclick = function () {
var key = inp.value;
var dataList = data.filter(function (item, index) {
return item.name.indexOf(key) > -1;
})
radeDom(dataList);
history.pushState({ //点击后添加历史记录,key为当前的key
key: key
}, null, '#a');
}
window.addEventListener('popstate', function (e) { //当历史记录事件改变时
var key = e.state ? e.state.key : ''; //判断当前页的key是否等于当前页的key
var dataList = data.filter(function (item, index) {
return item.name.indexOf(key) > -1;
});
inp.value = key; //让输入框的value等于当前页的key
radeDom(dataList);
}, false)
</script>
</body>
</html>2. hashchange
用于监听hash值的改变触发事件,就是链接 # 这个东西的改变而触发
跟popstate的用法大同小异,都差不多。用途也都是一样的。所以大家可以自己试试
四、worker (受同源策略限制,需要在服务器下运行)
4.1 了解worker
worker字面意思是工人、雇佣员工的意思。
worker是一种异步执行JS的方式。
4.2 worker应用
   var worker = new worker('worker.js');
   // worker文件必须和主文件满足同源策略
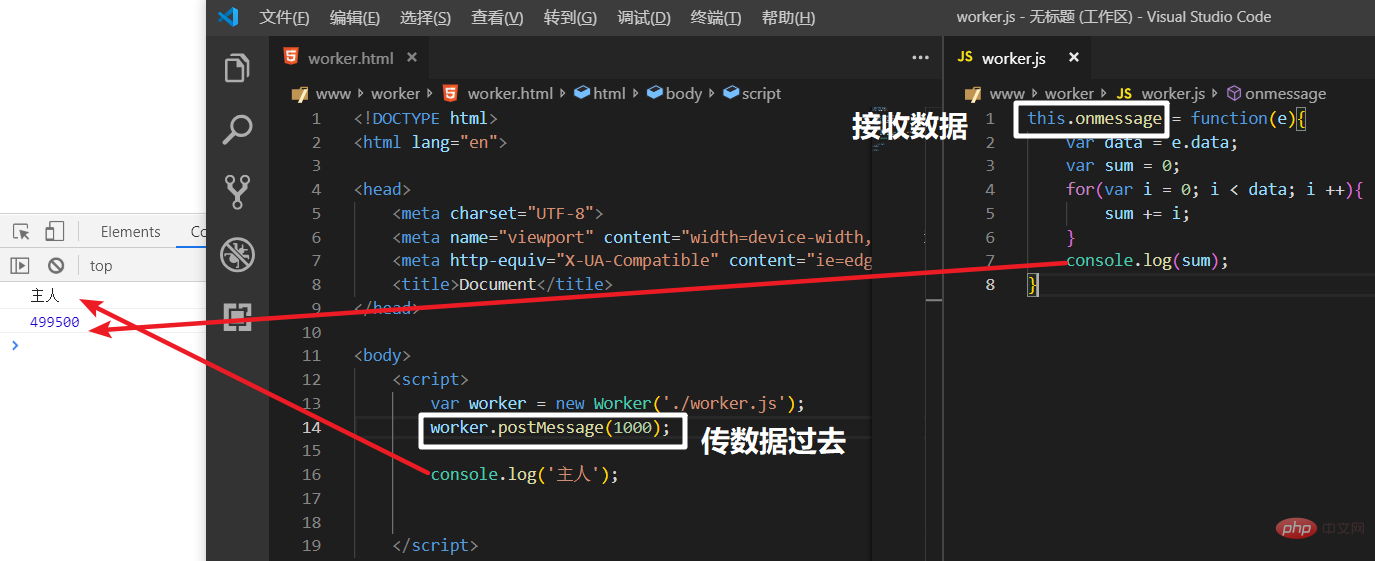
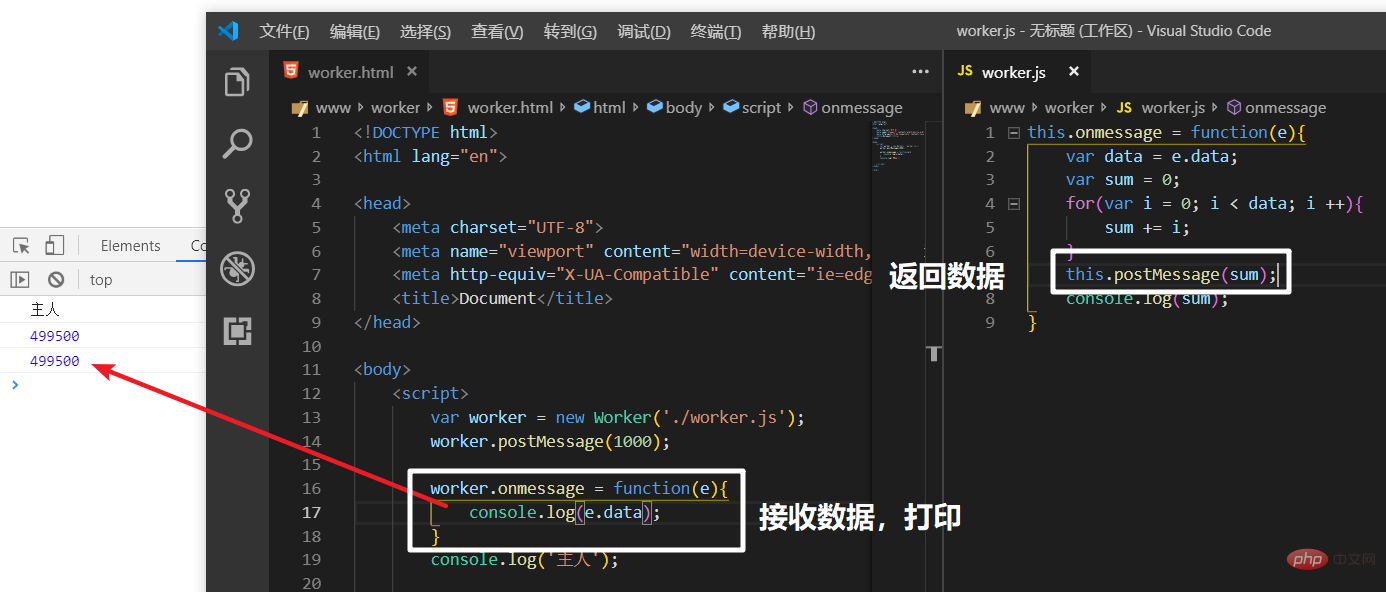
就是在执行代码前雇佣一名工人(一个JS文件),把数据交给他让他异步执行,执行完了给主人返回回来。
主人可以在执行完代码后,调用解雇工人的方法,就不能继续传数据,
工人可以在执行完代码后,调用辞职方法,就不能继续传数据。
传输数据
postMessage 、onmessage
返回数据
4.3 结束worlker

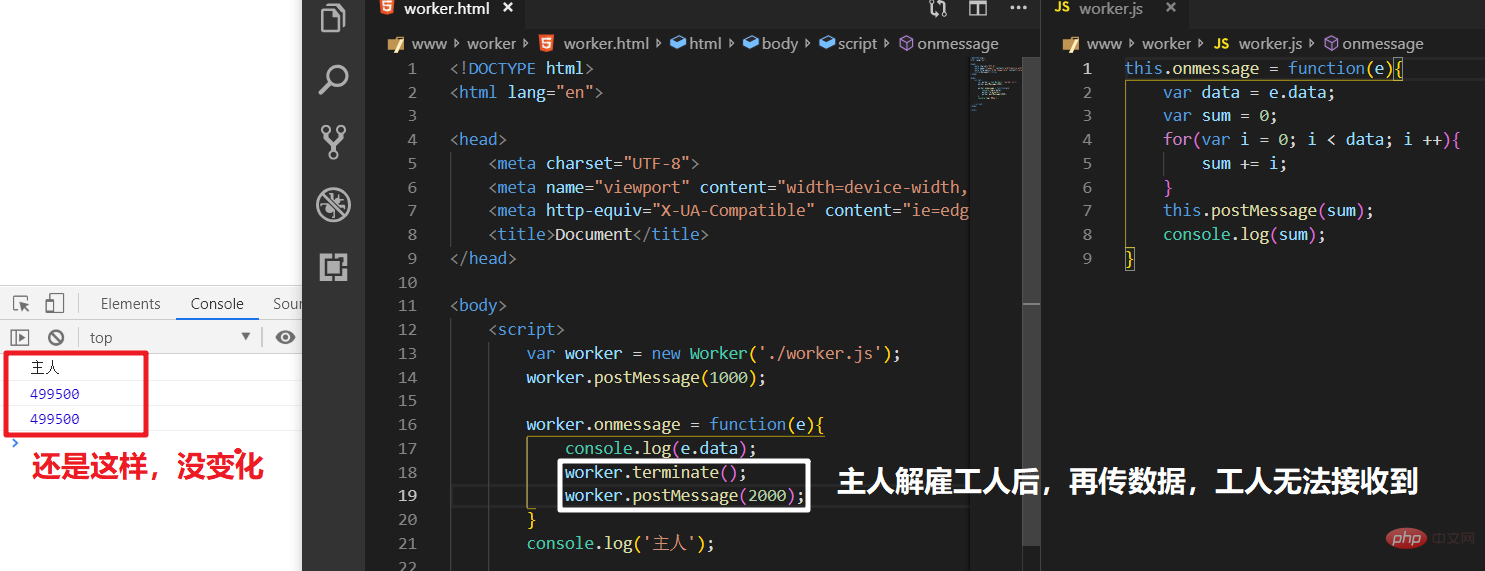
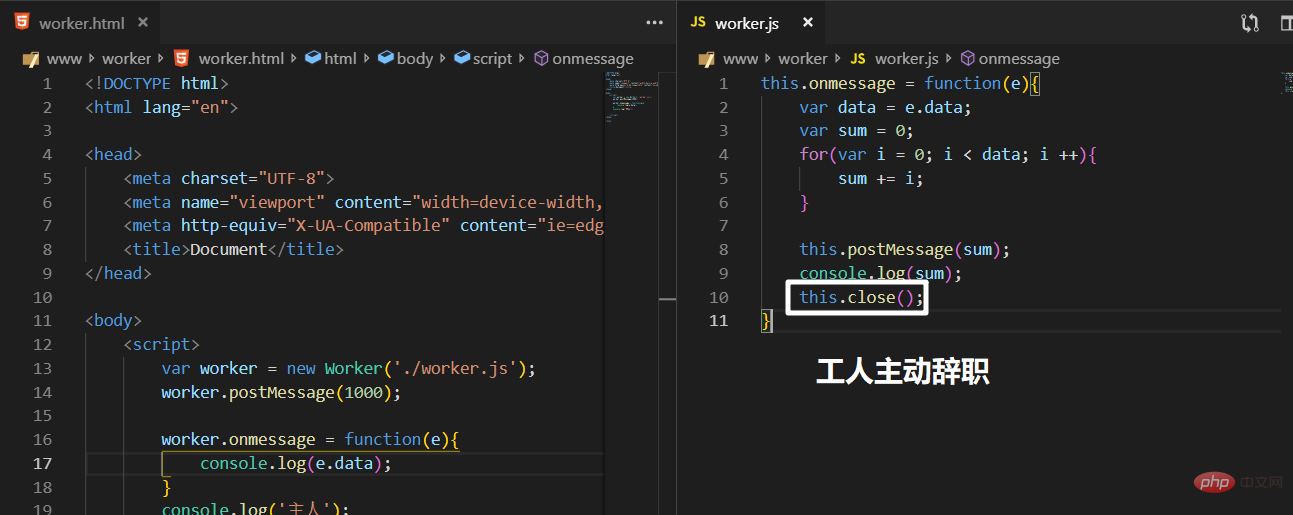
4.4woker的缺点
(1)同源限制
分配给 Worker 线程运行的脚本文件,必须与主线程的脚本文件同源。
(2)DOM 限制
Worker 线程所在的全局对象,与主线程不一样,无法读取主线程所在网页的 DOM 对象,也无法使用document、window、parent这些对象。但是,Worker 线程可以navigator对象和location对象。
(3)通信联系
Worker 线程和主线程不在同一个上下文环境,它们不能直接通信,必须通过消息完成。
(4)脚本限制
Worker 线程不能执行alert()方法和confirm()方法,但可以使用 XMLHttpRequest 对象发出 AJAX 请求。
(5)文件限制
Worker 线程无法读取本地文件,即不能打开本机的文件系统(file://),它所加载的脚本,必须来自网络。
4.5 其他特性
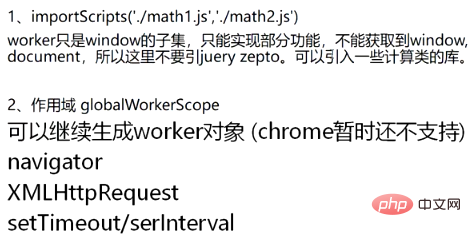
4.6主要应用场景
Ajax轮询可以使用,每隔一段时间获取一下数据(用一个定时期每隔一段时间,向后端发送一次请求)
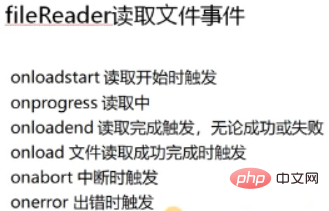
五、fileReader(上传文件,读取中的详细信息)
5.1 fileReader的使用方法
var reader = new FileReader();
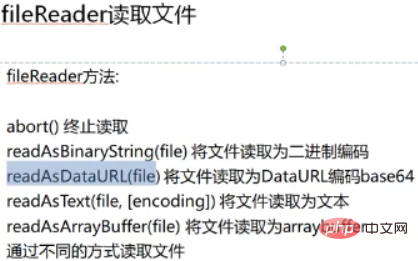
按照不同项目的需求使用不同的方法,在这里我们就用这里面的readAsDataURL( )这个方法
我们先来看怎么读取文件,我们需要先把文件发送至服务器,等他给我返回文件的URL地址,然后我拿着URL地址来渲染我的页面

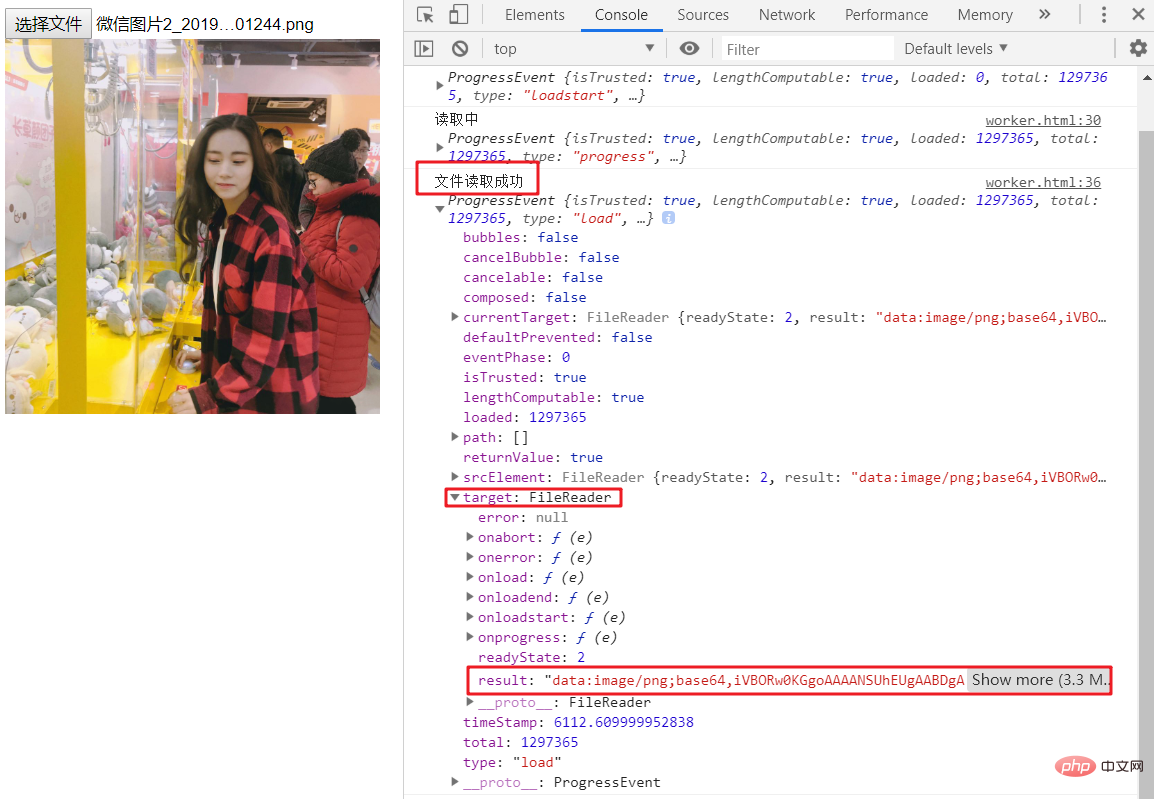
既然我们可以接收到返回的地址,那我们就可以把图片渲染到页面了
<style>
.img{
height: 300px;
}
</style>
</head>
<body>
<input type="file">
<img src="" alt="" class="img">
<script>
var reader = new FileReader(); //创建FileReader(读文件对象)
var inp = document.getElementsByTagName('input')[0];
var img = document.getElementsByClassName('img')[0];
inp.onchange = function(){ //onchange是当用户改变input输入框内容时执行一段JS代码时触发
console.log(inp.files); //flies 是你上传什么文件,他就会给你返回一个文件信息的伪数组
reader.readAsDataURL(inp.files[0]);//读取文件,伪数组中的第0项
}
reader.onloadstart = function(e){
console.log('读取开始时触发', e);
}
reader.onprogress = function(e){
console.log('读取中', e);
}
reader.onloadend = function(e){
console.log('读取完成', e);
}
reader.onload = function(e){
console.log('文件读取成功', e);
}
reader.onabort = function(e){
console.log('中断时触发', e);
}
reader.onerror = function(e){
console.log('出错时触发', e);
}
</script>
c9ccee2e6ea535a969eb3f532ad9fe89
    .img{
        height: 300px;
    }

    531ac245ce3e4fe3d50054a55f265927
9c3bca370b5104690d9ef395f2c5f8d1
6c04bd5ca3fcae76e30b72ad730ca86d
    7a42c8911ce89a27083e294835892232
    801c873412cd063ecfe29b55545e11df
    3f1c4e4b6b16bbbd69b2ee476dc4f83a
    var reader = new FileReader();   //创建FileReader(读文件对象)
    var inp = document.getElementsByTagName('input')[0];
    var img = document.getElementsByClassName('img')[0];
    inp.onchange = function(){       //onchange是当用户改变input输入框内容时执行一段JS代码时触发
        console.log(inp.files);      //flies 是你上传什么文件,他就会给你返回一个文件信息的伪数组
        reader.readAsDataURL(inp.files[0]);//读取文件,伪数组中的第0项
    }
    reader.onloadstart = function(e){
        console.log('读取开始时触发', e);
    }
    reader.onprogress = function(e){
        console.log('读取中', e);
    }
    reader.onloadend = function(e){
        console.log('读取完成', e);
    }
    reader.onload = function(e){
        console.log('文件读取成功', e);
        img.src = e.target.result;
    }
    reader.onabort = function(e){
        console.log('中断时触发', e);
    }
    reader.onerror = function(e){
        console.log('出错时触发', e);
    }
    2cacc6d41bbb37262a98f745aa00fbf0
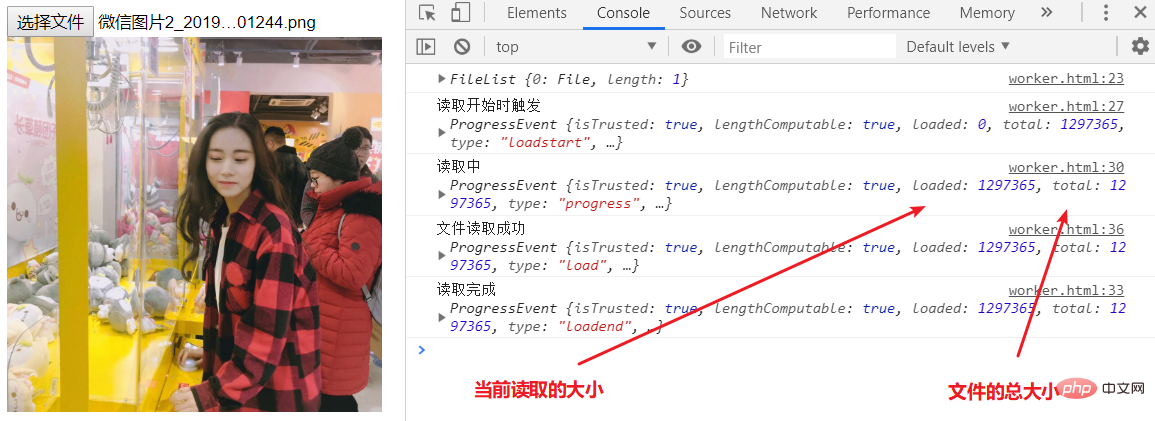
在文件读取中我们可以知道两个值 loaded、total
已知这两个值,我们就可以实现加载进度条了
c9ccee2e6ea535a969eb3f532ad9fe89
    .img{
        height: 300px;
    }
    .wrapper{
        width: 300px;
        height: 30px;
        border: 1px solid black;
    }
    .wrapper .content{
        width: 0;
        height: 30px;
        background-color:blue;
        overflow: hidden;
    }

    531ac245ce3e4fe3d50054a55f265927
9c3bca370b5104690d9ef395f2c5f8d1
6c04bd5ca3fcae76e30b72ad730ca86d
    7a42c8911ce89a27083e294835892232
    801c873412cd063ecfe29b55545e11df
    aaf411da7fde49db5a49b0a9b01f4d41
        e9167bc9137138e65423e90164dcd25116b28748ea4df4d9c2150843fecfba68
    16b28748ea4df4d9c2150843fecfba68
    3c4e0c3dfa784cf88837b55a1049004554bdf357c58b8a65c66d7c19c8e4d114
    3f1c4e4b6b16bbbd69b2ee476dc4f83a
    var reader = new FileReader();   //创建FileReader(读文件对象)
    var inp = document.getElementsByTagName('input')[0];
    var img = document.getElementsByClassName('img')[0];
    var con = document.getElementsByClassName('content')[0];
    var text = document.querySelector('.text');
    inp.onchange = function(){       //onchange是当用户改变input输入框内容时执行一段JS代码时触发
        console.log(inp.files);      //flies 是你上传什么文件,他就会给你返回一个文件信息的伪数组
        reader.readAsDataURL(inp.files[0]);//读取文件,伪数组中的第0项
    }
    reader.onloadstart = function(e){
        console.log('读取开始时触发', e);
    }
    reader.onprogress = function(e){
        // console.log('读取中', e。loaded / e.total * 100%);
        var precent = e.loaded / e.total * 100;  //当前读取的值除以文件总大小,乘以100%。在读取中会不断触发
        var width = Math.round(300 * precent / 100); //进度条长度300乘以前面得到的值,除以100%,四舍五入取整
        con.style.width = width + 'px'; //把值赋给宽度
        text.innerHTML = Math.round(precent) + '%'; //把读取中的值取整把数字赋给文字进度条
    }
    reader.onloadend = function(e){
        console.log('读取完成', e);
    }
    reader.onload = function(e){
        console.log('文件读取成功', e);
        img.src = e.target.result;
    }
    reader.onabort = function(e){
        console.log('中断时触发', e);
    }
    reader.onerror = function(e){
        console.log('出错时触发', e);
    }
    2cacc6d41bbb37262a98f745aa00fbf0
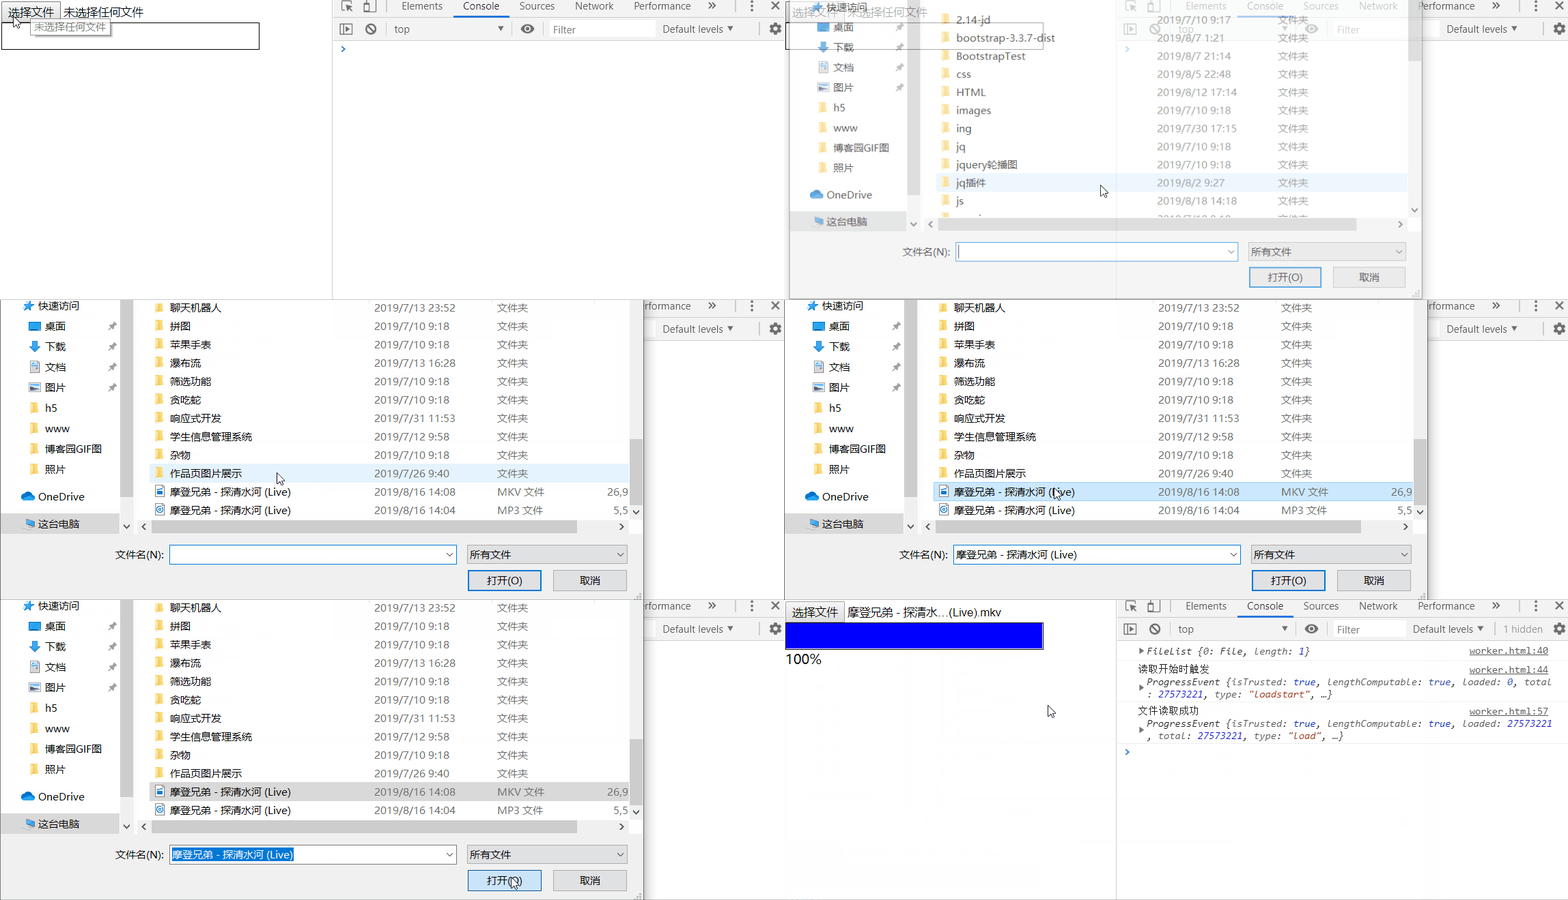
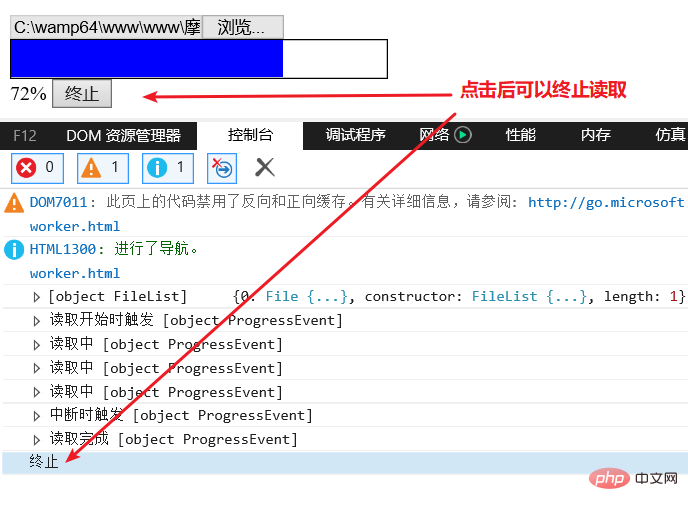
然后我们还可以添加终止读取,就是在文件上传的中途,停止上传
只需要添加一个按钮,和一个点击事件
        btn.onclick = function () {
            reader.abort();
            console.log('终止');
        }
5.2 fileReader 可实现的功能
图片预览、异步向发送服务端发送请求
六、websocket(不受同源策略限制)
websocket是一种网络协议,是在HTTP基础上做了一些优化的协议,与HTTP无直接关系。
6.1 简单回忆HTTP协议

6.2为什么有HTTP还需要websocket呢?
因为HTTP协议有一个缺陷:通信只能由客户端发起
服务器端不能实时的发送最新数据给客户端,
我想要最新的数据怎么办呢? 只能用Ajax轮询(开启一个定时器,每隔一段时间调用请求一次数据)
然而websocket呢只需要发送一次请求,只要服务器有最新数据就会自动给你发送过来,不用再次请求
比如现在做的是一个天气状况的项目,每当天气有变化就会自动更新最新天气状况了
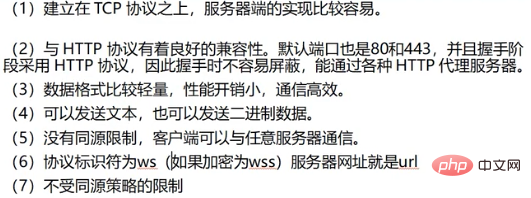
6.3 websocket的特点
6.4 websocket事件

6.5 创建websocket
ws://echo.websocket.org/ 是用来测试的地址
var socket = new WebSocket('ws://echo.websocket.org/');
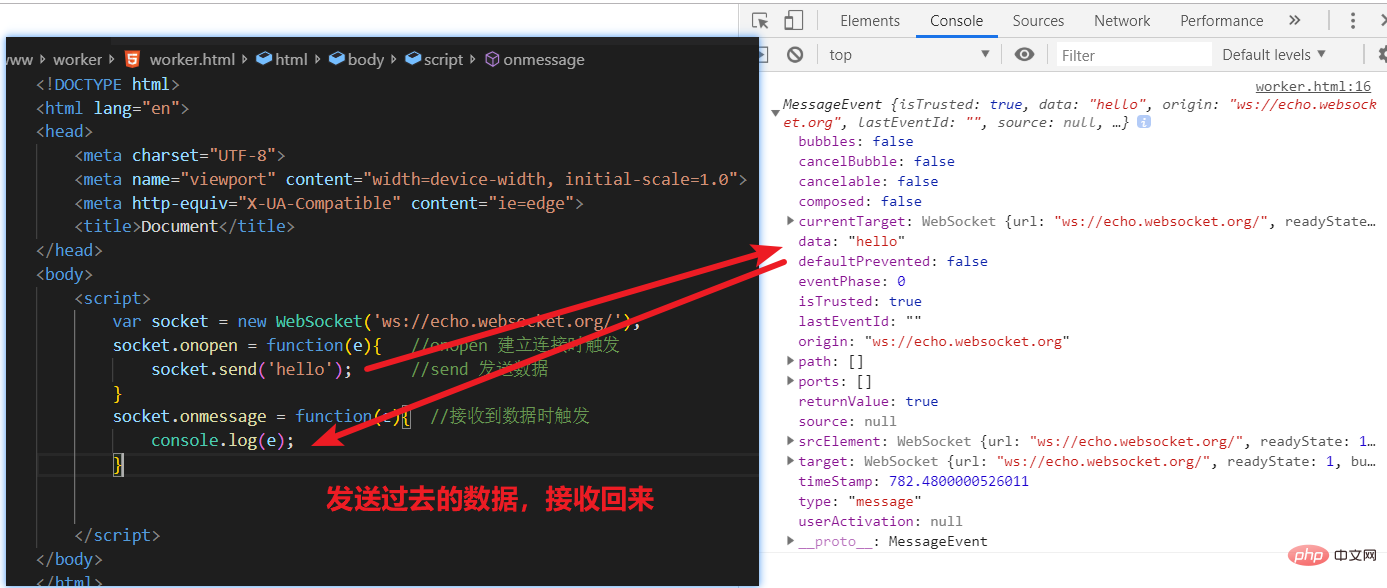
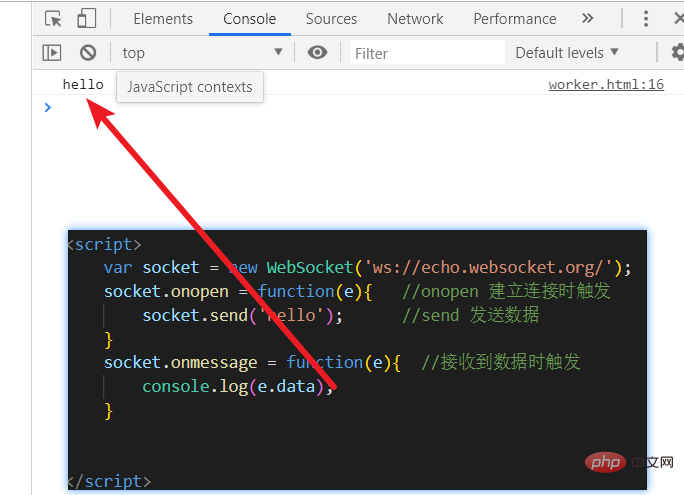
调用e.data就可以打印出来数据了
我们再来看看close这个方法
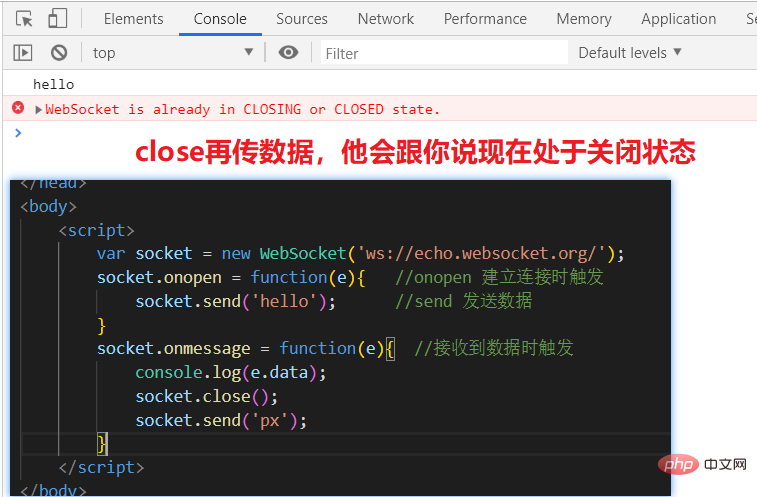
6.6 websocket属性
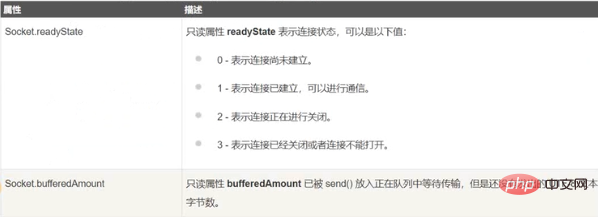
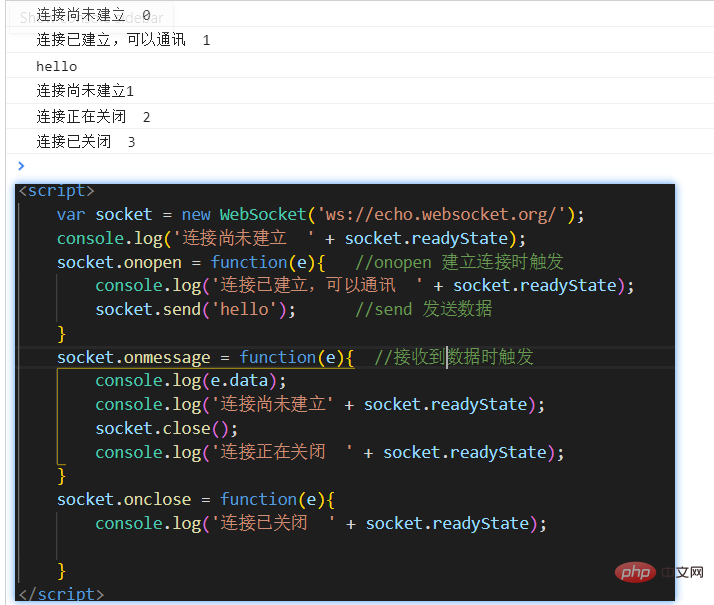
6.7 websocket的优点
客户端与服务器都可以主动传送数据给对方;
不用频率创建TCP请求及销毁请求,减少网络带宽资源的占用,同时也节省服务器资源;
可以只请求一次,就会自动更新返回
推荐教程:《html视频教程》
The above is the detailed content of What are the APIs of html5?. For more information, please follow other related articles on the PHP Chinese website!