


redis database tutorial Column introduces the tutorial of building SpringBoot2.X from scratch

Recommended (free): redis database tutorial
I don’t know what to write recently. I have written an article about Kafka integrating Springboot before. Everyone’s response is quite enthusiastic. Hehehe, I feel that it helps everyone. It's pretty good, and it can be considered that I have achieved my goal. It just so happens that today's business module is springboot integrating redis. Because I have done it before, I have ready-made code. It can be used after cv, so I have more time, so I will give it to you. Let’s sort out the code implementation of Springboot’s integration of Redis. From project construction to source code implementation, everything is included below. Read it patiently. I believe it will be helpful to you.
Okay, without further ado, let’s get started. Well, similarly, it is still recommended to implement it on your own PC.
Personal public account: Java Architect Alliance, daily updated technical articles
1. Use Spring Initializr to create project web projects
1. File→New→Project
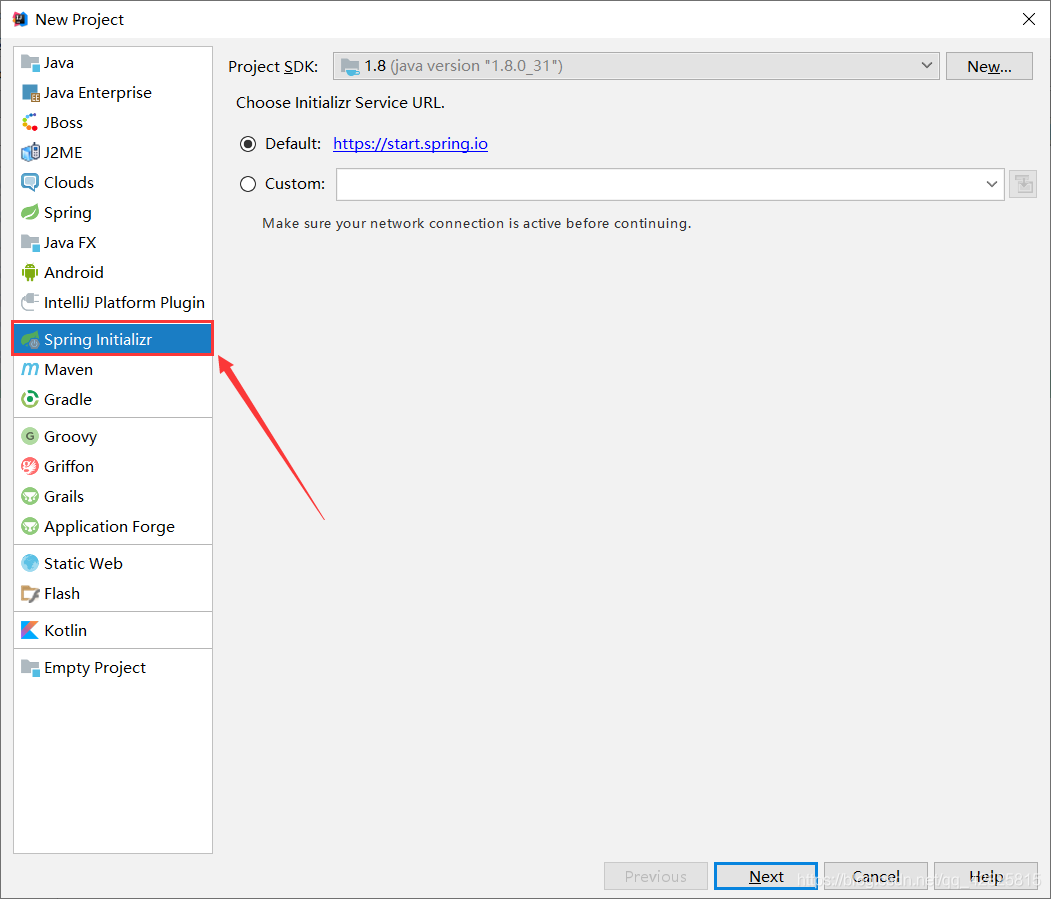
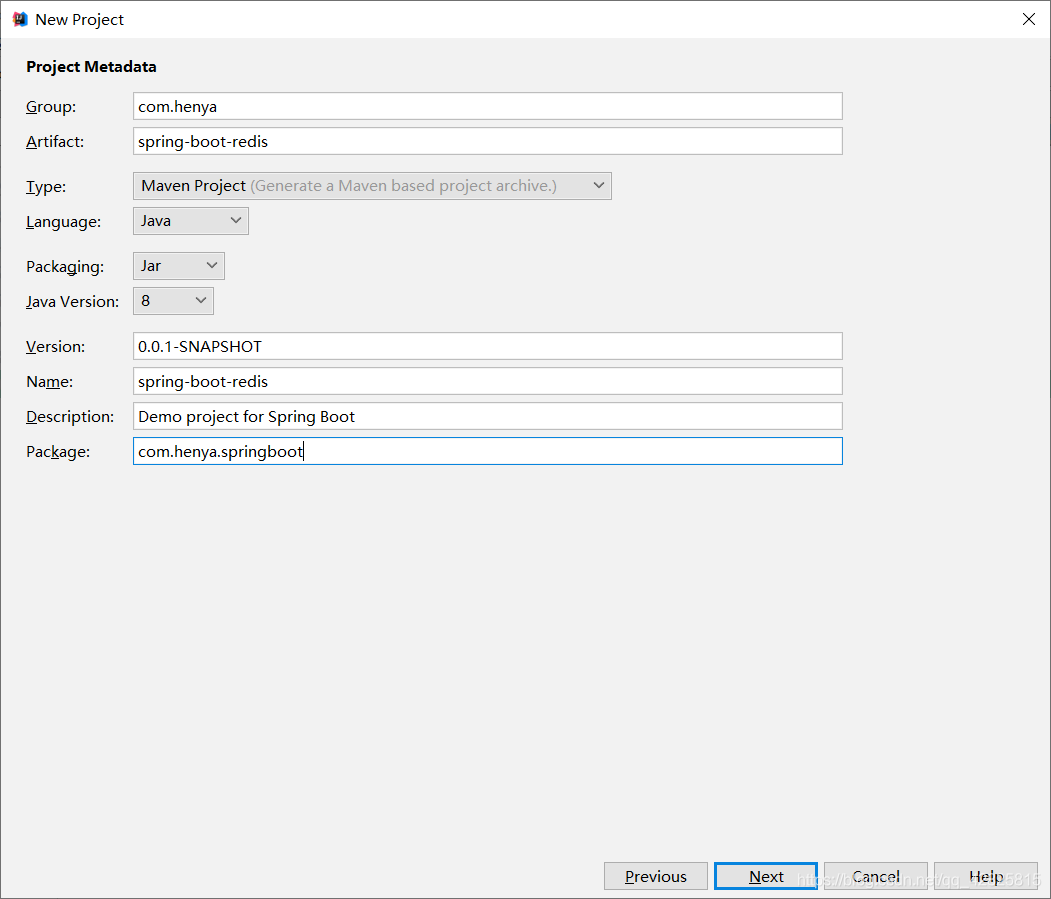
2. Click Next as shown in the picture and name the Group and Artifact
3. After Next, as shown in the figure, check the required dependencies, and Spring Initializr will automatically import the required starter
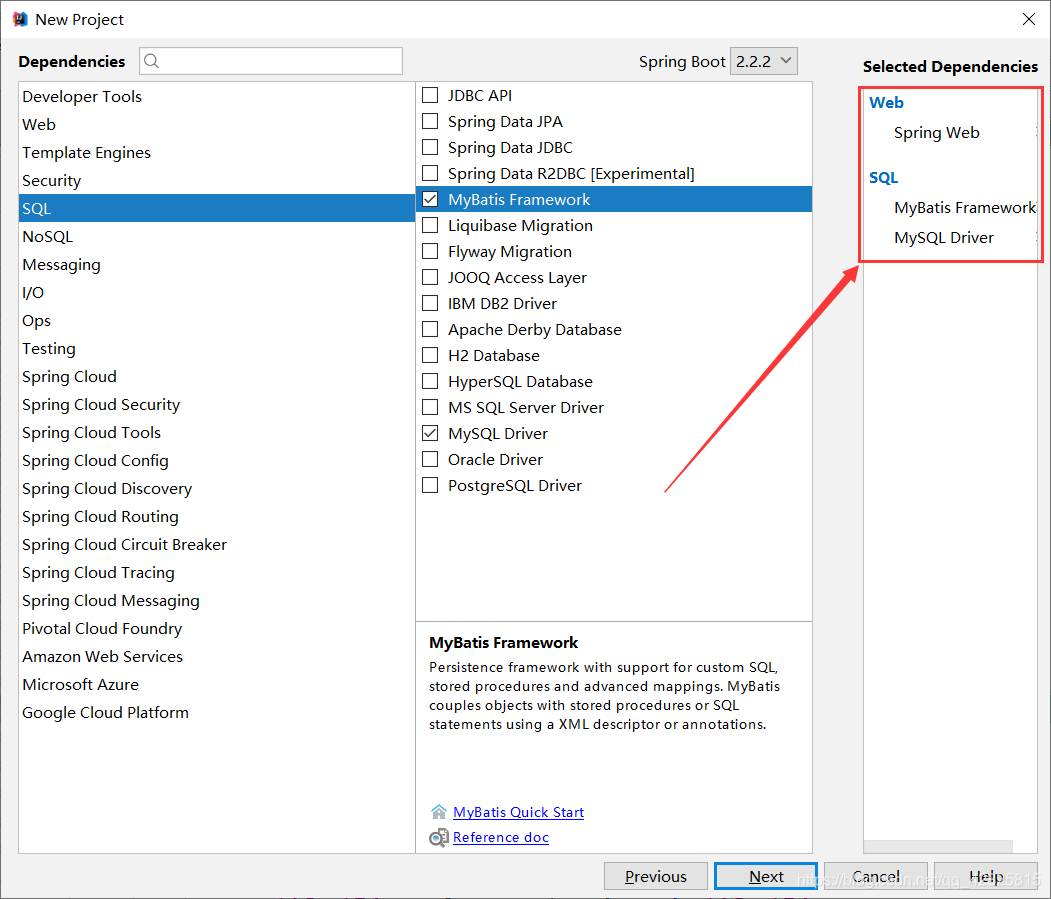
4. After the project is successfully created , the dependencies in the pom.xml file are as follows
<?xml version="1.0" encoding="UTF-8"?>
<project xmlns="http://maven.apache.org/POM/4.0.0" xmlns:xsi="http://www.w3.org/2001/XMLSchema-instance"
	xsi:schemaLocation="http://maven.apache.org/POM/4.0.0 https://maven.apache.org/xsd/maven-4.0.0.xsd">
	<modelVersion>4.0.0</modelVersion>
	<parent>
		<groupId>org.springframework.boot</groupId>
		<artifactId>spring-boot-starter-parent</artifactId>
		<version>2.2.2.RELEASE</version>
		<relativePath/> <!-- lookup parent from repository -->
	</parent>
	<groupId>com.heny</groupId>
	<artifactId>spring-boot-redis</artifactId>
	<version>0.0.1-SNAPSHOT</version>
	<name>spring-boot-redis</name>
	<description>Demo project for Spring Boot</description>

	<properties>
		<java.version>1.8</java.version>
	</properties>

	<dependencies>
		<dependency>
			<groupId>org.springframework.boot</groupId>
			<artifactId>spring-boot-starter-web</artifactId>
		</dependency>
		<dependency>
			<groupId>org.mybatis.spring.boot</groupId>
			<artifactId>mybatis-spring-boot-starter</artifactId>
			<version>2.1.1</version>
		</dependency>

		<dependency>
			<groupId>mysql</groupId>
			<artifactId>mysql-connector-java</artifactId>
			<scope>runtime</scope>
		</dependency>
		<dependency>
			<groupId>org.springframework.boot</groupId>
			<artifactId>spring-boot-starter-test</artifactId>
			<scope>test</scope>
			<exclusions>
				<exclusion>
					<groupId>org.junit.vintage</groupId>
					<artifactId>junit-vintage-engine</artifactId>
				</exclusion>
			</exclusions>
		</dependency>
	</dependencies>

	<build>
		<plugins>
			<plugin>
				<groupId>org.springframework.boot</groupId>
				<artifactId>spring-boot-maven-plugin</artifactId>
			</plugin>
		</plugins>
	</build>

</project>
5. Add the redis starter
<dependency>
		<groupId>org.springframework.boot</groupId>
		<artifactId>spring-boot-starter-data-redis</artifactId>
	</dependency>
in the pom.xml file
6. Create JavaBean to encapsulate database data and need to implement Serializable
package com.henya.springboot.bean;

import java.io.Serializable;

public class Employee implements Serializable{

	private Integer id;
	private String lastName;
	private String email;
	private Integer gender; //性别 1男 0女
	private Integer dId;


	public Employee() {
		super();
	}


	public Employee(Integer id, String lastName, String email, Integer gender, Integer dId) {
		super();
		this.id = id;
		this.lastName = lastName;
		this.email = email;
		this.gender = gender;
		this.dId = dId;
	}

	public Integer getId() {
		return id;
	}
	public void setId(Integer id) {
		this.id = id;
	}
	public String getLastName() {
		return lastName;
	}
	public void setLastName(String lastName) {
		this.lastName = lastName;
	}
	public String getEmail() {
		return email;
	}
	public void setEmail(String email) {
		this.email = email;
	}
	public Integer getGender() {
		return gender;
	}
	public void setGender(Integer gender) {
		this.gender = gender;
	}
	public Integer getdId() {
		return dId;
	}
	public void setdId(Integer dId) {
		this.dId = dId;
	}
	@Override
	public String toString() {
		return "Employee [id=" + id + ", lastName=" + lastName + ", email=" + email + ", gender=" + gender + ", dId="
				+ dId + "]";
	}
}
Note:
You need to implement the Serializable interface when writing JavaBean objects, otherwise the following will be reported Error:
Cannot deserialize; nested exception is org.springframework.core.serializer.support.SerializationFailedException
7. Integrate Mybatis operation database, in the application.properties configuration file Configure data source information in
#serverTimezone用于指定时区,不然会报错
spring.datasource.url=jdbc:mysql://localhost:3306/cache?serverTimezone=UTC
spring.datasource.username=root
spring.datasource.password=123456

# 开启驼峰命名法规则
mybatis.configuration.map-underscore-to-camel-case=true
#日志级别
logging.level.com.henya.springboot.mapper=debug
8. Use the annotated version of Mybatis to create Mapper
##
package com.henya.springboot.mapper;


import com.henya.springboot.bean.Employee;
import org.apache.ibatis.annotations.*;

@Mapper
public interface EmployeeMapper {

 @Select("SELECT * FROM employee WHERE id=#{id}")
 public Employee getEmpById(Integer id);

 @Update("UPDATE employee SET lastName=#{lastName},email=#{email},gender=#{gender},d_id=#{dId} WHERE id=#{id}")
 public void updateEmp(Employee employee);

 @Delete("DELETE FROM emlpoyee WHERE id=#{id}")
 public void delEmpById(Integer id);

 @Insert("INSERT INTO employee(lastName, email, gender, d_id) VALUES (#{lastName}, #{email}, #{gender}, #{dId})")
 public Employee insertEmp(Employee employee);

 @Select("SELECT * FROM employee WHERE lastName=#{lastName}")
 public Employee getEmpByLastName(String lastName);
}
Note: You need to use the @MapperScan annotation to scan the interface where the Mapper is located. You only need to add it to the main program class. In addition, use @EnableCaching to enable caching.
@MapperScan("com.henya.springboot.mapper")
@SpringBootApplication
@EnableCaching //开启缓存
public class SpringBootRedisApplication {

	public static void main(String[] args) {
		SpringApplication.run(SpringBootRedisApplication.class, args);
	}
}
9. Write the Service class for accessing the database or redis cache
package com.henya.springboot.service;
import com.henya.springboot.bean.Employee;
import com.henya.springboot.mapper.EmployeeMapper;
import org.springframework.beans.factory.annotation.Autowired;
import org.springframework.cache.annotation.*;
import org.springframework.stereotype.Service;

@CacheConfig(cacheNames = "emp") //抽取缓存的公共配置
@Service
public class EmployeeService {
 @Autowired
 EmployeeMapper employeeMapper;

 /**
 * @param id
 * @return
 */
 @Cacheable(cacheNames = {"emp"},keyGenerator = "myKeyGenerator")
 public Employee getEmpById(Integer id) {
 System.err.println("开始查询"+ id +"号员工");
 Employee employee = employeeMapper.getEmpById(id);
 return employee;
 }

 /**
 * @CachePut:既调用方法(这个方法必须要执行),又更新缓存数据
 * @param employee
 * @return
 */
 @CachePut(value = "emp",key = "#result.id")
 public Employee updateEmp(Employee employee){
 System.err.println("开始更新" + employee.getId() + "号员工");
 employeeMapper.updateEmp(employee);
 return employee;
 }

 /**
 * @CacheEvict:缓存清除
 * @param id
 */
 @CacheEvict(value = "emp",beforeInvocation = true)
 public void deleteEmp(Integer id){
 System.err.println("删除" + id + "员工");
 int i = 10/0;
 }
10. Write the Controller class
package com.henya.springboot.controller;


import com.henya.springboot.bean.Employee;
import com.henya.springboot.service.EmployeeService;
import org.springframework.beans.factory.annotation.Autowired;
import org.springframework.web.bind.annotation.GetMapping;
import org.springframework.web.bind.annotation.PathVariable;
import org.springframework.web.bind.annotation.RestController;

/**
 * @Description:
 * @Author:HenYa
 * @CreatTime:2019/12/1 12:44
 */
@RestController
public class EmployeeController {
 @Autowired
 EmployeeService employeeService;

 @GetMapping("/emp/{id}")
 public Employee getEmpById(@PathVariable("id") Integer id){
 Employee employee = employeeService.getEmpById(id);
 return employee;
 }

 @GetMapping("/emp")
 public Employee updateEmp(Employee employee){
 Employee emp = employeeService.updateEmp(employee);
 return emp;
 }
}
2. Test whether SpringBoot integrates Redis successfully1. Access in the browser, you can also use the test class. The author used the browser to access http ://localhost:8080/emp/1 for testing. When accessing for the first time, the console will prompt to start querying employee No. 1, as shown in the figure.


static RedisSerializer<Object> java(@Nullable ClassLoader classLoader) {
 return new JdkSerializationRedisSerializer(classLoader);
 }
Check out the following implementations of the RedisSerializer interface:

package com.henya.springboot.config;
import org.springframework.context.annotation.Bean;
import org.springframework.context.annotation.Configuration;
import org.springframework.data.redis.cache.RedisCacheConfiguration;
import org.springframework.data.redis.cache.RedisCacheManager;
import org.springframework.data.redis.cache.RedisCacheWriter;
import org.springframework.data.redis.connection.RedisConnectionFactory;
import org.springframework.data.redis.serializer.GenericJackson2JsonRedisSerializer;
import org.springframework.data.redis.serializer.RedisSerializationContext;
import org.springframework.data.redis.serializer.RedisSerializer;
/**
* @Description:
* @Author:HenYa
* @CreatTime:2019/12/6 20:50
*/
@Configuration
public class MyRedisConfig {
@Bean
public RedisCacheManager empCacheManager(RedisConnectionFactory redisConnectionFactory){
//RedisCacheManager redisCacheManager = new RedisCacheManager(redisConnectionFactory);
RedisCacheWriter redisCacheWriter = RedisCacheWriter.nonLockingRedisCacheWriter(redisConnectionFactory);
RedisSerializer<Object> redisSerializer = new GenericJackson2JsonRedisSerializer();
RedisSerializationContext.SerializationPair<Object> pair = RedisSerializationContext.SerializationPair.fromSerializer(redisSerializer);
RedisCacheConfiguration redisCacheConfiguration = RedisCacheConfiguration.defaultCacheConfig().serializeValuesWith(pair);
// 默认会将CacheName作为key的前缀
return new RedisCacheManager(redisCacheWriter, redisCacheConfiguration);
}
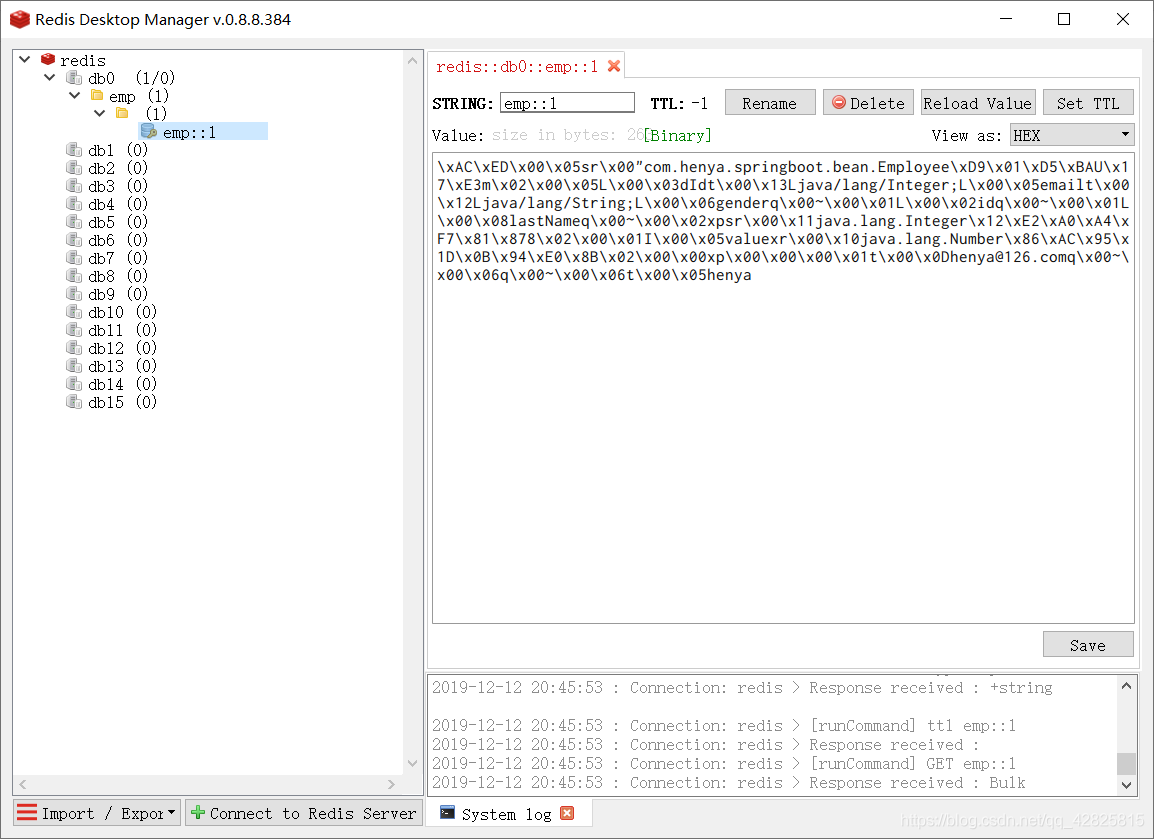
}At this time, the cached data in Redis is serialized in Json format, as shown in the figure. The above is the detailed content of Detailed tutorial on integrating the Redis framework to build SpringBoot2.X. For more information, please follow other related articles on the PHP Chinese website!

 Why Use Redis? Benefits and AdvantagesApr 14, 2025 am 12:07 AM
Redis is a powerful database solution because it provides fast performance, rich data structures, high availability and scalability, persistence capabilities, and a wide range of ecosystem support. 1) Extremely fast performance: Redis's data is stored in memory and has extremely fast read and write speeds, suitable for high concurrency and low latency applications. 2) Rich data structure: supports multiple data types, such as lists, collections, etc., which are suitable for a variety of scenarios. 3) High availability and scalability: supports master-slave replication and cluster mode to achieve high availability and horizontal scalability. 4) Persistence and data security: Data persistence is achieved through RDB and AOF to ensure data integrity and reliability. 5) Wide ecosystem and community support: with a huge ecosystem and active community,
 Understanding NoSQL: Key Features of RedisApr 13, 2025 am 12:17 AM
Key features of Redis include speed, flexibility and rich data structure support. 1) Speed: Redis is an in-memory database, and read and write operations are almost instantaneous, suitable for cache and session management. 2) Flexibility: Supports multiple data structures, such as strings, lists, collections, etc., which are suitable for complex data processing. 3) Data structure support: provides strings, lists, collections, hash tables, etc., which are suitable for different business needs.
 Redis: Identifying Its Primary FunctionApr 12, 2025 am 12:01 AM
The core function of Redis is a high-performance in-memory data storage and processing system. 1) High-speed data access: Redis stores data in memory and provides microsecond-level read and write speed. 2) Rich data structure: supports strings, lists, collections, etc., and adapts to a variety of application scenarios. 3) Persistence: Persist data to disk through RDB and AOF. 4) Publish subscription: Can be used in message queues or real-time communication systems.
 Redis: A Guide to Popular Data StructuresApr 11, 2025 am 12:04 AM
Redis supports a variety of data structures, including: 1. String, suitable for storing single-value data; 2. List, suitable for queues and stacks; 3. Set, used for storing non-duplicate data; 4. Ordered Set, suitable for ranking lists and priority queues; 5. Hash table, suitable for storing object or structured data.
 How to implement redis counterApr 10, 2025 pm 10:21 PM
Redis counter is a mechanism that uses Redis key-value pair storage to implement counting operations, including the following steps: creating counter keys, increasing counts, decreasing counts, resetting counts, and obtaining counts. The advantages of Redis counters include fast speed, high concurrency, durability and simplicity and ease of use. It can be used in scenarios such as user access counting, real-time metric tracking, game scores and rankings, and order processing counting.
 How to use the redis command lineApr 10, 2025 pm 10:18 PM
Use the Redis command line tool (redis-cli) to manage and operate Redis through the following steps: Connect to the server, specify the address and port. Send commands to the server using the command name and parameters. Use the HELP command to view help information for a specific command. Use the QUIT command to exit the command line tool.
 How to build the redis cluster modeApr 10, 2025 pm 10:15 PM
Redis cluster mode deploys Redis instances to multiple servers through sharding, improving scalability and availability. The construction steps are as follows: Create odd Redis instances with different ports; Create 3 sentinel instances, monitor Redis instances and failover; configure sentinel configuration files, add monitoring Redis instance information and failover settings; configure Redis instance configuration files, enable cluster mode and specify the cluster information file path; create nodes.conf file, containing information of each Redis instance; start the cluster, execute the create command to create a cluster and specify the number of replicas; log in to the cluster to execute the CLUSTER INFO command to verify the cluster status; make
 How to read redis queueApr 10, 2025 pm 10:12 PM
To read a queue from Redis, you need to get the queue name, read the elements using the LPOP command, and process the empty queue. The specific steps are as follows: Get the queue name: name it with the prefix of "queue:" such as "queue:my-queue". Use the LPOP command: Eject the element from the head of the queue and return its value, such as LPOP queue:my-queue. Processing empty queues: If the queue is empty, LPOP returns nil, and you can check whether the queue exists before reading the element.


Hot AI Tools

Undresser.AI Undress
AI-powered app for creating realistic nude photos

AI Clothes Remover
Online AI tool for removing clothes from photos.

Undress AI Tool
Undress images for free

Clothoff.io
AI clothes remover

AI Hentai Generator
Generate AI Hentai for free.

Hot Article
Hot Tools

DVWA
Damn Vulnerable Web App (DVWA) is a PHP/MySQL web application that is very vulnerable. Its main goals are to be an aid for security professionals to test their skills and tools in a legal environment, to help web developers better understand the process of securing web applications, and to help teachers/students teach/learn in a classroom environment Web application security. The goal of DVWA is to practice some of the most common web vulnerabilities through a simple and straightforward interface, with varying degrees of difficulty. Please note that this software

WebStorm Mac version
Useful JavaScript development tools

VSCode Windows 64-bit Download
A free and powerful IDE editor launched by Microsoft

mPDF
mPDF is a PHP library that can generate PDF files from UTF-8 encoded HTML. The original author, Ian Back, wrote mPDF to output PDF files "on the fly" from his website and handle different languages. It is slower than original scripts like HTML2FPDF and produces larger files when using Unicode fonts, but supports CSS styles etc. and has a lot of enhancements. Supports almost all languages, including RTL (Arabic and Hebrew) and CJK (Chinese, Japanese and Korean). Supports nested block-level elements (such as P, DIV),

PhpStorm Mac version
The latest (2018.2.1) professional PHP integrated development tool

