Home >Java >javaTutorial >How to confirm with message in springboot + rabbitmq
Recently, the department has called on everyone to organize more technology sharing sessions, saying that it is to activate the company's technical atmosphere, but I, who have seen through everything long ago, know that this T M is just for brushingKPI. However, having said that, this is indeed a good thing. Instead of having those boring wrangling meetings, doing more technical exchanges is still very helpful for personal growth.
So I took the initiative to sign up to participate in the sharing, cough cough cough~, it’s really not for that KPI, I just want to learn with everyone!

Related learning recommendations: Java video tutorial
What I am sharing this time isspringboot rabbitmq How to implement the message confirmation mechanism, and some pitfall experience in actual development. In fact, the overall content is relatively simple. Sometimes things are so magical, and the simpler things are. The easier it is to make mistakes.
It can be seen that after using RabbitMQ, our business links have obviously become longer. Although the decoupling between systems has been achieved, the scenarios that may cause message loss have also increased. For example:
Message producer-> rabbitmq server (message sending failed)
rabbitmq server's own failure caused message loss
Message consumer - > rabbitmq service (failed to consume messages)

So if you can’t use middleware, try not to use it. , if you use it just for the sake of use, it will only increase your troubles. After the message confirmation mechanism is turned on, although the accurate delivery of messages is guaranteed to a large extent, due to frequent confirmation interactions, rabbitmq the overall efficiency becomes low and the throughput drops seriously. Messages that are not very important are really not appreciated. It is recommended that you use the message confirmation mechanism.
Let’s first implement the springboot rabbitmq message confirmation mechanism, and then make a detailed analysis of the problems encountered.
<dependency>
    <groupId>org.springframework.boot</groupId>
<artifactId>spring-boot-starter-amqp</artifactId></dependency>In the configuration, message confirmation of sender and consumer needs to be enabled.
spring.rabbitmq.host=127.0.0.1spring.rabbitmq.port=5672spring.rabbitmq.username=guest
spring.rabbitmq.password=guest

# 发送者开启 confirm 确认机制
spring.rabbitmq.publisher-confirms=true# 发送者开启 return 确认机制
spring.rabbitmq.publisher-returns=true####################################################
# 设置消费端手动 ack
spring.rabbitmq.listener.simple.acknowledge-mode=manual
# 是否支持重试
spring.rabbitmq.listener.simple.retry.enabled=true
Define switchconfirmTestExchange and queueconfirm_test_queue, and bind the queue to on the switch.
@Configurationpublic class QueueConfig {

    @Bean(name = "confirmTestQueue")
    public Queue confirmTestQueue() {
        return new Queue("confirm_test_queue", true, false, false);
    }

    @Bean(name = "confirmTestExchange")
    public FanoutExchange confirmTestExchange() {
        return new FanoutExchange("confirmTestExchange");
    }

    @Bean    public Binding confirmTestFanoutExchangeAndQueue(
            @Qualifier("confirmTestExchange") FanoutExchange confirmTestExchange,
            @Qualifier("confirmTestQueue") Queue confirmTestQueue) {
        return BindingBuilder.bind(confirmTestQueue).to(confirmTestExchange);
    }}
rabbitmq's message confirmation is divided into two parts: message sending confirmation and message receiving confirmation.
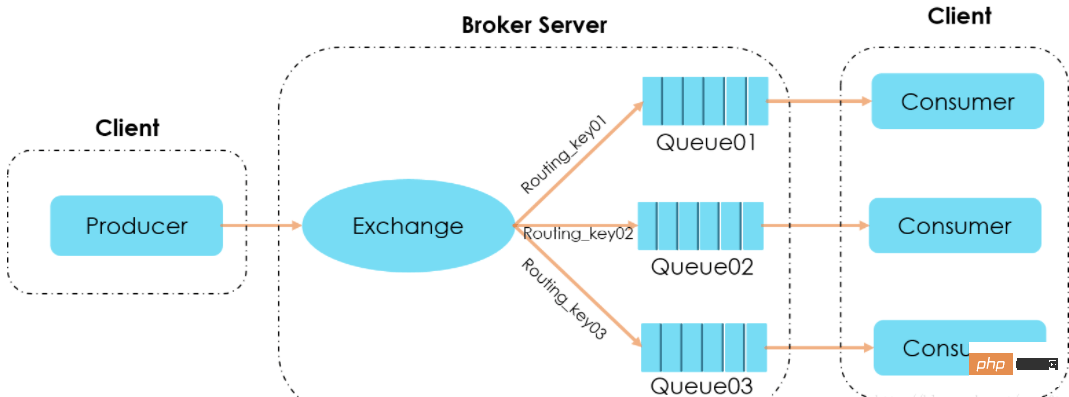
Sending message confirmation: used to confirm the producerproducer In the process of sending the message to broker, the switch exchange on broker and then delivering it to the queue queue, check whether the message is successfully delivered.
Messages from producer to rabbitmq broker have a confirmCallback confirmation mode.
There is a returnCallback fallback mode for message delivery failure from exchange to queue.
We can use these two Callback to ensure 100% delivery of the message.
As long as the message is received by rabbitmq broker, the confirmCallback callback will be triggered.
@Slf4j
@Componentpublic class ConfirmCallbackService implements RabbitTemplate.ConfirmCallback {

    @Override    public void confirm(CorrelationData correlationData, boolean ack, String cause) {

        if (!ack) {
            log.error("消息发送异常!");
        } else {
            log.info("发送者爸爸已经收到确认,correlationData={} ,ack={}, cause={}", correlationData.getId(), ack, cause);
        }
    }}
Implement the interface ConfirmCallback and rewrite its confirm() method. There are three parameters in the method correlationData, ack, cause.
correlationData: There is only one id attribute inside the object, which is used to indicate the uniqueness of the current message. ack: The status of message delivery to broker, true indicates success. cause: Indicates the reason for delivery failure. But the message being received by broker can only mean that it has arrived at the MQ server, and there is no guarantee that the message will be delivered to the target queue. So you need to use returnCallback next.
如果消息未能投递到目标 queue 里将触发回调 returnCallback ,一旦向 queue 投递消息未成功,这里一般会记录下当前消息的详细投递数据,方便后续做重发或者补偿等操作。
@Slf4j
@Componentpublic class ReturnCallbackService implements RabbitTemplate.ReturnCallback {

    @Override    public void returnedMessage(Message message, int replyCode, String replyText, String exchange, String routingKey) {
        log.info("returnedMessage ===> replyCode={} ,replyText={} ,exchange={} ,routingKey={}", replyCode, replyText, exchange, routingKey);
}}实现接口ReturnCallback,重写 returnedMessage() 方法,方法有五个参数message(消息体)、replyCode(响应code)、replyText(响应内容)、exchange(交换机)、routingKey(队列)。
下边是具体的消息发送,在rabbitTemplate中设置 Confirm 和 Return 回调,我们通过setDeliveryMode()对消息做持久化处理,为了后续测试创建一个 CorrelationData对象,添加一个id 为10000000000。
@Autowired    private RabbitTemplate rabbitTemplate;

    @Autowired    private ConfirmCallbackService confirmCallbackService;

    @Autowired    private ReturnCallbackService returnCallbackService;

    public void sendMessage(String exchange, String routingKey, Object msg) {

        /**
         * 确保消息发送失败后可以重新返回到队列中
         * 注意:yml需要配置 publisher-returns: true
         */
        rabbitTemplate.setMandatory(true);

        /**
         * 消费者确认收到消息后,手动ack回执回调处理
         */
        rabbitTemplate.setConfirmCallback(confirmCallbackService);

        /**
         * 消息投递到队列失败回调处理
         */
        rabbitTemplate.setReturnCallback(returnCallbackService);

        /**
         * 发送消息
         */
        rabbitTemplate.convertAndSend(exchange, routingKey, msg,
                message -> {
                    message.getMessageProperties().setDeliveryMode(MessageDeliveryMode.PERSISTENT);
                    return message;
                },
                new CorrelationData(UUID.randomUUID().toString()));
}消息接收确认要比消息发送确认简单一点,因为只有一个消息回执(ack)的过程。使用@RabbitHandler注解标注的方法要增加 channel(信道)、message 两个参数。
@Slf4j
@Component
@RabbitListener(queues = "confirm_test_queue")public class ReceiverMessage1 {

    @RabbitHandler    public void processHandler(String msg, Channel channel, Message message) throws IOException {

        try {
            log.info("小富收到消息:{}", msg);

            //TODO 具体业务

            channel.basicAck(message.getMessageProperties().getDeliveryTag(), false);

        }  catch (Exception e) {

            if (message.getMessageProperties().getRedelivered()) {

                log.error("消息已重复处理失败,拒绝再次接收...");

                channel.basicReject(message.getMessageProperties().getDeliveryTag(), false); // 拒绝消息
            } else {

                log.error("消息即将再次返回队列处理...");

                channel.basicNack(message.getMessageProperties().getDeliveryTag(), false, true);
            }
        }
    }}
消费消息有三种回执方法,我们来分析一下每种方法的含义。
basicAck:表示成功确认,使用此回执方法后,消息会被rabbitmq broker 删除。
void basicAck(long deliveryTag, boolean multiple)
deliveryTag:表示消息投递序号,每次消费消息或者消息重新投递后,deliveryTag都会增加。手动消息确认模式下,我们可以对指定deliveryTag的消息进行ack、nack、reject等操作。
multiple:是否批量确认,值为 true 则会一次性 ack所有小于当前消息 deliveryTag 的消息。
举个栗子: 假设我先发送三条消息deliveryTag分别是5、6、7,可它们都没有被确认,当我发第四条消息此时deliveryTag为8,multiple设置为 true,会将5、6、7、8的消息全部进行确认。
basicNack :表示失败确认,一般在消费消息业务异常时用到此方法,可以将消息重新投递入队列。
void basicNack(long deliveryTag, boolean multiple, boolean requeue)
deliveryTag:表示消息投递序号。
multiple:是否批量确认。
requeue:值为 true 消息将重新入队列。
basicReject:拒绝消息,与basicNack区别在于不能进行批量操作,其他用法很相似。
void basicReject(long deliveryTag, boolean requeue)
deliveryTag:表示消息投递序号。
requeue:值为 true 消息将重新入队列。
发送消息测试一下消息确认机制是否生效,从执行结果上看发送者发消息后成功回调,消费端成功的消费了消息。
用抓包工具Wireshark 观察一下rabbitmq amqp协议交互的变化,也多了 ack 的过程。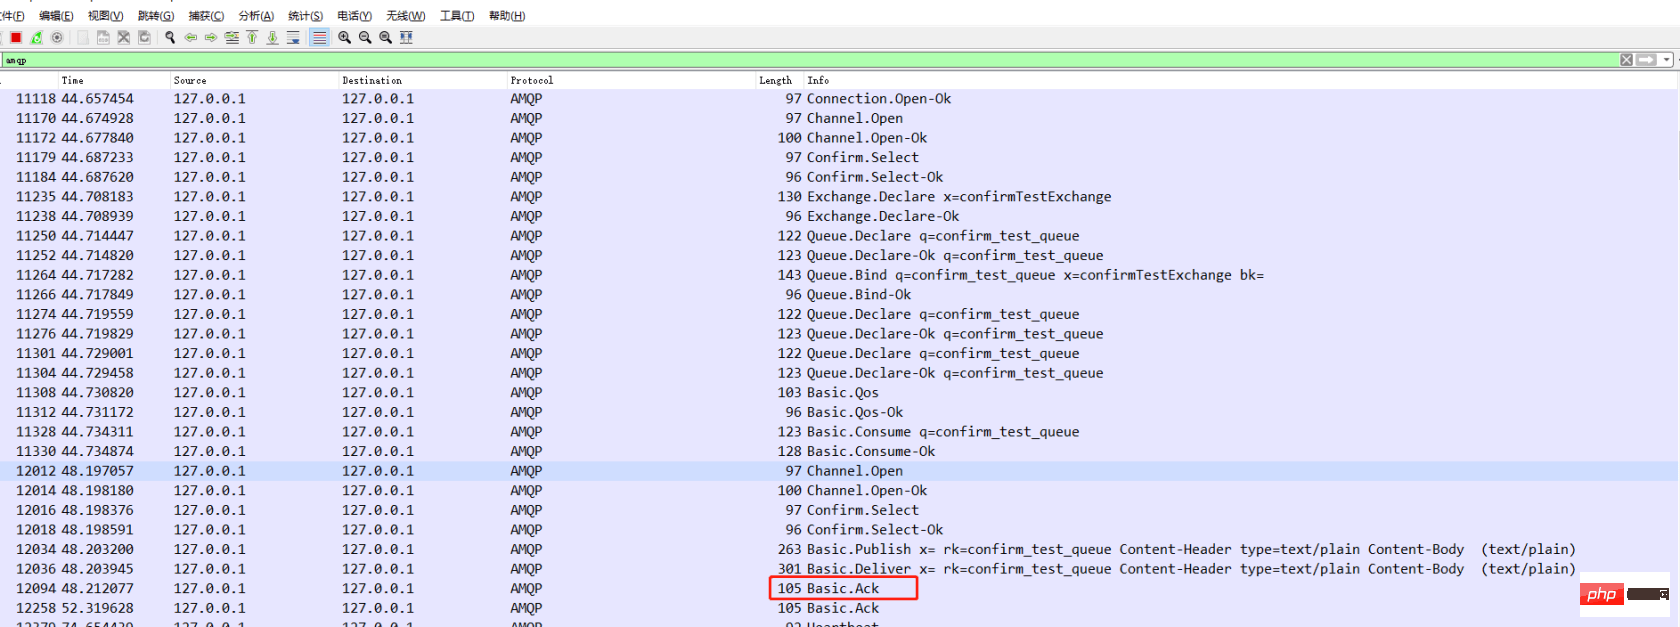
这是一个非常没技术含量的坑,但却是非常容易犯错的地方。
开启消息确认机制,消费消息别忘了channel.basicAck,否则消息会一直存在,导致重复消费。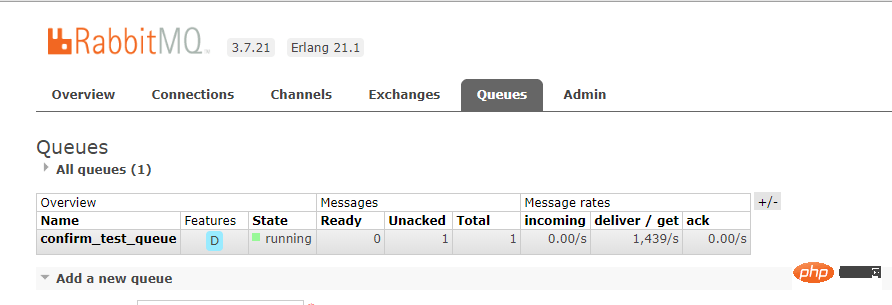
在我最开始接触消息确认机制的时候,消费端代码就像下边这样写的,思路很简单:处理完业务逻辑后确认消息, int a = 1 / 0 发生异常后将消息重新投入队列。
@RabbitHandler    public void processHandler(String msg, Channel channel, Message message) throws IOException {

        try {
            log.info("消费者 2 号收到:{}", msg);

            int a = 1 / 0;

            channel.basicAck(message.getMessageProperties().getDeliveryTag(), false);

        } catch (Exception e) {

            channel.basicNack(message.getMessageProperties().getDeliveryTag(), false, true);
        }
    }
但是有个问题是,业务代码一旦出现 bug 99.9%的情况是不会自动修复,一条消息会被无限投递进队列,消费端无限执行,导致了死循环。

本地的CPU被瞬间打满了,大家可以想象一下当时在生产环境导致服务死机,我是有多慌。
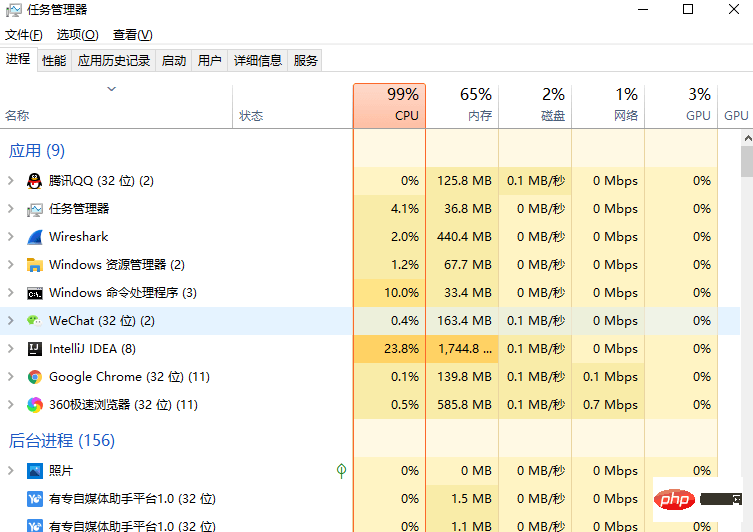
而且rabbitmq management 只有一条未被确认的消息。

经过测试分析发现,当消息重新投递到消息队列时,这条消息不会回到队列尾部,仍是在队列头部。
消费者会立刻消费这条消息,业务处理再抛出异常,消息再重新入队,如此反复进行。导致消息队列处理出现阻塞,导致正常消息也无法运行。
而我们当时的解决方案是,先将消息进行应答,此时消息队列会删除该条消息,同时我们再次发送该消息到消息队列,异常消息就放在了消息队列尾部,这样既保证消息不会丢失,又保证了正常业务的进行。
channel.basicAck(message.getMessageProperties().getDeliveryTag(), false);// 重新发送消息到队尾channel.basicPublish(message.getMessageProperties().getReceivedExchange(),
                    message.getMessageProperties().getReceivedRoutingKey(), MessageProperties.PERSISTENT_TEXT_PLAIN,
JSON.toJSONBytes(msg));但这种方法并没有解决根本问题,错误消息还是会时不时报错,后面优化设置了消息重试次数,达到了重试上限以后,手动确认,队列删除此消息,并将消息持久化入MySQL并推送报警,进行人工处理和定时任务做补偿。
如何保证 MQ 的消费是幂等性,这个需要根据具体业务而定,可以借助MySQL、或者redis 将消息持久化,通过再消息中的唯一性属性校验。
The above is the detailed content of How to confirm with message in springboot + rabbitmq. For more information, please follow other related articles on the PHP Chinese website!