Home >Database >Mysql Tutorial >MySQL high availability architecture MMM architecture
MMM (Multi-Master Replication Manager, multi-master replication management architecture)
Main role
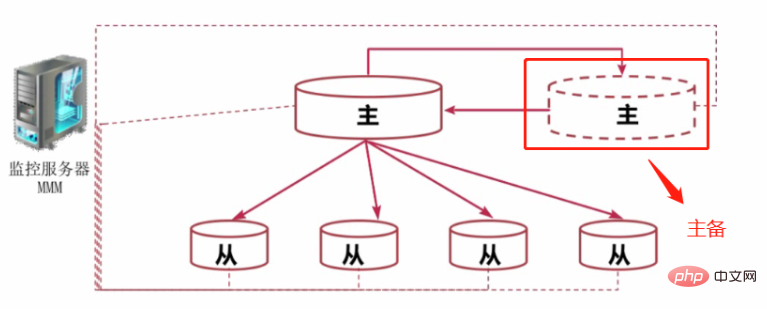
Monitor and manage MySQL The master-master replication topology is used, and when the current master server fails, master-slave switching and failover between the master and master-slave servers are performed.
Related recommendations: [mysql tutorial]
Main functions:
● Monitor the health status of MySQL master-slave replication (active Master-master replication in active mode (master-master), master-master replication in active-passive mode (master-master-standby))
● Perform failover when the master database goes down and automatically configure other slave DBs to new Replication of the master DB
● Provides a virtual IP that can be mastered, written (read), and can automatically migrate the virtual IP when there is a problem with the master and slave servers
Architecture:

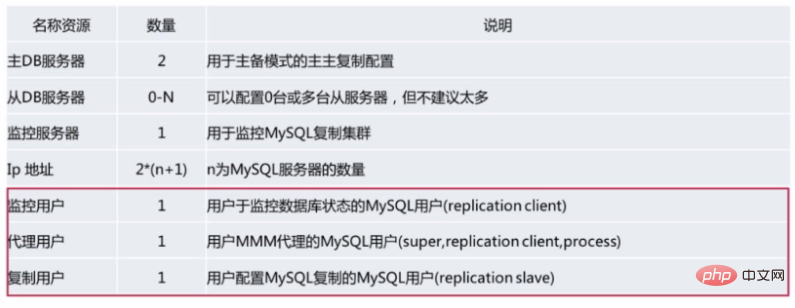
Resources:

## Deployment:
配置主主复制及主从同步集群
安装主从节点所需要的支持包(perl)
安装及配置 MMM 工具集
允许 MMM 监控服务
测试配置
Demonstration:
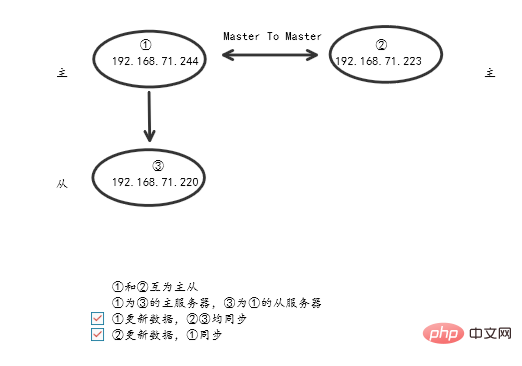
● Topology diagram (VIP: visual IP)
Steps:
1、配置主(100)<->主(101)[参考: [Tony 老师搭建 MySQL 主从服务器](https://learnku.com/articles/31832)]
2、配置主(100)<->从(102) [参考: [Tony 老师搭建 MySQL 主从服务器](https://learnku.com/articles/31832)]
3、 安装
rpm -vih <http://dl.fedoraproject.org/pub/epel/7/x86_64/Packages/e/epel-release-7-11.noarch.rpm>
rpm -Uvh <http://rpms.remirepo.net/enterprise/remi-release-7.rpm>
4、 yum clean all && yum makecache
5、更改yum源配置
yum search mmm # 查询mmm支持包
yum -y install mysql-mmm-agent.noarch #每个服务器都需要安装mmm代理
yum -y install mysql-mmm* #监控服务器安装监控服务
systemctl status mysql-mmm-agent
systemctl start mysql-mmm-agent
systemctl stop mysql-mmm-agent
systemctl restart mysql-mmm-agent
6、建立账号
CREATE USER repl@'192.168.71.%' identified by '123456'; //创建,建议从服务器IP段 ①
CREATE USER mmm_monitor@'192.168.71.%' identified by '123456'; //创建,建议从服务器IP段 ①
CREATE USER mmm_agent@'192.168.71.%' identified by '123456'; //创建,建议从服务器IP段 ①
7、账号授权
GRANT replication client on *.* to 'mmm_monitor'@'192.168.71.%' identified by '123456'; #用于MMM监控服务器使用,在master上建立
GRANT super,replication client ,process on *.* to 'mmm_agent'@'192.168.71.%' identified by '123456'; #MMM代理服务,改变故障转移和主从切换
GRANT REPLICATION SLAVE ON *.* TO repl@'192.168.71.%'; //授权 复制账号
8、配置MMM(数据库节点配置,三台均配置)
cd /etc/mysq-mmm/
vim mmm_common.conf
配置< host default >:
网口:cluster_interface
pid和bin路径:默认
replication_user:repl
replication_password:123456
agent_user:mmm_agent
agent_password:123456
配置< host db1 >:
ip :192.168.71.244
mode :master
peer:db2
配置 < host db2 > :
ip:192.168.71.223
mode:master
peer:db1
配置< host db3 >:
ip:192.168.71.220
mode:slave
配置< role writer >
hosts : db1,db2
ips:192.168.71.90
mode:exclusive( 唯一的)
配置 < role reader >
hosts:db1,db2,db3
ips:192.168.71.91,192.168.71.92,192.168.71.93
mode:balanced(平衡的)
复制配置文件到其他服务器
scp mmm_common.conf root@192.168.71.223:/etc/mysql-mmm/
scp mmm_common.conf root@192.168.71.220:/etc/mysql-mmm/
vim mysql-agent.conf (三台服务器对应设置为:db1,db2,db3)
9、监控节点配置(192.168.71.220,只配置监控节点)
vim mmm_mon.conf #监控数据文件
配置< host default >
monitor_user :mmm_monitor
monitor_password:123456
配置monitor
ping_ips:192.168.71.244,192.168.71.223,192.168.71.220
10、启动MMM服务
/etc/init.d/mysql-mmm-agent start(三台服务器均启动代理服务)
/etc/init.d/mysql-mmm-monitor start (监控服务器启动监控服务)
11、查看监控信息
mmm_control
mmm_control show #查看集群状态
mmm_control checks all #检查集群状态
mmm_control ping #检查与监控服务器连接状态
mmm_control set_online/offline #设置服务器上线/下线
mmm_control help #查看帮助
12、查看服务器虚拟IP状态
13、测试
关闭db1的数据库:/etc/init.d/mysqld stop
查看监控服务器上集群状态:mmm_control show
查看DB3的主从状态FAQ:**通过mmm_control checks all 检查服务器状态**
Q1:
UNKNOWN: Error occurred: install_driver(mysql) failed: Can't load '/usr/lib64/perl5/vendor_perl/auto/DBD/mysql/mysql.so' for module DBD::mysql: libmysqlclient.so.18: cannot open shared object file: No such file or directory at /usr/lib64/perl5/DynaLoader.pm line 190, <STDIN> line 1.
A1:
perl-DBD-MySQL安装出问题
S1:rpm -qa |grep -i DBD #查看DBD安装
S2:rpm -e --nodeps perl-DBD-MySQL-4.023-6.el7.x86_64 #卸载DBD
S3:rpm -qa |grep -i DBD #查看卸载状态
S4:wget http://dev.mysql.com/get/mysql-community-release-el7-5.noarch.rpm #下载MySQLserver,可根据系统选择具体版本
S5:rpm -ivh mysql-community-release-el7-5.noarch.rpm #rpm MySQLserver
S6:yum install mysql-community-server #yum安装
S7:yum install perl-DBD-MySQL #重新安装
S8:systemctl restart mysql-mmm-monitor #重启
S9:mmm_control checks all + mmm_control show ->正常
Q2:
当M1宕机时,MMM架构自动切换至M2,插入数据,S未更新,M1重启时,S仍未更新
A2:
插入S一条空事务,记录与M2时相同即可。
Q3:
handler error HA_ERR_KEY_NOT_FOUND; the event's master log mysql-bin.000002, end_log_pos 673 #跳过插入 | 更新 | 删除
A3:
stop slave;
insert into user(`username`) values('1');
set global sql_slave_skip_counter=1;
start slave;
Q4:
The slave I/O thread stops because master and slave have equal MySQL server ids #切换主从发现,server_id相同
A4:
show variables like '**server_id**';
vim /etc/my.cnf 修改server_id 值
**配置多线程**
stop slave #在从上,停止链路复制
set global slave_parallel_type = 'logical_clock'; #设置逻辑时钟的方式
set global slave_parallel_workers = 4; #设置并发线程数
start slave;The above is the detailed content of MySQL high availability architecture MMM architecture. For more information, please follow other related articles on the PHP Chinese website!