Home >Web Front-end >JS Tutorial >JavaScript machine learning based on TensorFlow.js
This article talks about JavaScript machine learning based on TensorFlow.js. It has certain reference value. Interested friends can learn about it.

While Python or R programming languages have a relatively easy learning curve, web developers prefer to do things within their comfort zone of JavaScript. At present, node.js has begun to apply JavaScript to every field. Under this general trend, we need to understand and use JS for machine learning. Python became popular due to the number of packages available, but the JS community followed suit. This article will help beginners learn how to build a simple classifier.
We can create a web page that uses tensorflow.js to train the model in the browser. Taking into account the "avgareanumberofrows" of a house, the model can learn to predict the "price" of the house.
What we do for this is:
Load the data and prepare it for training.
Define the architecture of the model.
Train the model and monitor its performance while training.
Evaluate the trained model by making some predictions.
Step One: Let’s start with the basics
Create an HTML page and include JavaScript. Copy the following code into an HTML file named index.html.
<!DOCTYPE html>
<html>
<head>
  <title>TensorFlow.js Tutorial</title>
  <!-- Import TensorFlow.js -->
  <script src="https://cdn.jsdelivr.net/npm/@tensorflow/tfjs@1.0.0/dist/tf.min.js"></script>
  <!-- Import tfjs-vis -->
  <script src="https://cdn.jsdelivr.net/npm/@tensorflow/tfjs-vis@1.0.2/dist/tfjs-vis.umd.min.js"></script>
  <!-- Import the main script file -->
  <script src="script.js"></script>
</head>
<body>
</body>
</html>
Create javascript file for code
In the same folder as the HTML file above, create a file called script.js and add the following code Put it in.
console.log('Hello TensorFlow');
Testing
Now that you have created the HTML and JavaScript files, let’s test them. Open the index.html file in your browser and open the devtools console.
If everything is fine, then two global variables should be created and available in the devtools console:
You should now see a message saying "Hello TensorFlow". If so, you can move on to the next step.

Note: You can use Bit to share reusable JS code
Bit (Bit on GitHub) is cross-project and The fastest and most scalable way for applications to share reusable JavaScript code. Give it a try, it's free:
Component Discovery and Collaboration·Bit
Bit is a place for developers to share components and collaborate to build amazing software. Discover shared components...
Bit.dev
For example: Ramda used as a shared component
Ramda by Ramda·Bit
A useful function for JavaScript programmers Library. -256 javascript components. For example: equal sign, multiply...
Bit.dev
Step 2: Load the data, format the data and visualize the input data
We will load the "house ” dataset, can be found here. It encompasses many different features of a particular house. For this tutorial, we only need data on the average room size and price per house.
Add the following code to the script.js file.
async function getData() {
  Const houseDataReq=await
fetch('https://raw.githubusercontent.com/meetnandu05/ml1/master/house.json');
  const houseData = await houseDataReq.json();
  const cleaned = houseData.map(house => ({
    price: house.Price,
    rooms: house.AvgAreaNumberofRooms,
  }))
  .filter(house => (house.price != null && house.rooms != null));

  return cleaned;
}
This removes any entries that do not have a price or number of rooms defined. We can plot this data into a scatter plot to see what it looks like.
Add the following code to the bottom of the script.js file.
async function run() {
  // Load and plot the original input data that we are going to train on.
  const data = await getData();
  const values = data.map(d => ({
    x: d.rooms,
    y: d.price,
  }));
  tfvis.render.scatterplot(
    {name: 'No.of rooms v Price'},
    {values},
    {
      xLabel: 'No. of rooms',
      yLabel: 'Price',
      height: 300
    }
  );
  // More code will be added below
}
document.addEventListener('DOMContentLoaded', run);
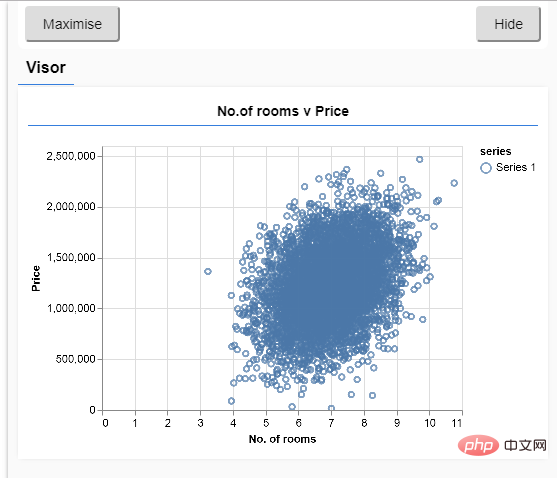
When you refresh the page, you can see a panel on the left side of the page with a scatter plot of data, as shown below.

Generally, when working with data, it's best to find ways to look at the data and clean it if necessary. Visualizing the data allows us to understand whether the model can learn any structure of the data.
As can be seen from the above figure, there is a positive correlation between the number of rooms and price, that is, as the number of rooms increases, the price of houses generally increases.
Step 3: Build the model to be trained
In this step we will write code to build the machine learning model. The model is mainly structured based on this code, so this is an important step. Machine learning models take input and produce output. For tensorflow.js, we have to build a neural network.
Add the following functions to the script.js file to define the model.
function createModel() {
  // Create a sequential model
  const model = tf.sequential();

  // Add a single hidden layer
  model.add(tf.layers.dense({inputShape: [1], units: 1, useBias: true}));

  // Add an output layer
  model.add(tf.layers.dense({units: 1, useBias: true}));
  return model;
}
This is one of the simplest models we can define in tensorflow.js. Let's try to simply break down each line.
Instantiate the model
const model = tf.sequential();
This will instantiate a tf.model object. This model is continuous because its inputs flow directly to its outputs. Other types of models can have branches and even multiple inputs and outputs, but in many cases your model is continuous.
Add layer
model.add(tf.layers.dense({inputShape: [1], units: 1, useBias: true}));这为我们的网络添加了一个隐藏层。因为这是网络的第一层,所以我们需要定义我们的输入形状。输入形状是[1],因为我们有1这个数字作为输入(给定房间的房间数)。
单位(链接)设置权重矩阵在层中的大小。在这里将其设置为1,我们可以说每个数据输入特性都有一个权重。
model.add(tf.layers.dense({units: 1}));上面的代码创建了我们的输出层。我们将单位设置为1,因为我们要输出1这个数字。
创建实例
将以下代码添加到前面定义的运行函数中。
// Create the model
const model = createModel();
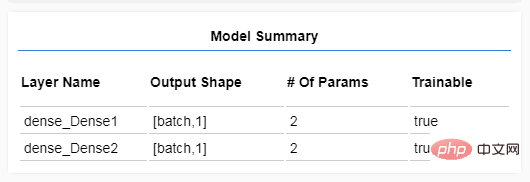
tfvis.show.modelSummary({name: 'Model Summary'}, model);
这样可以创建实例模型,并且在网页上有显示层的摘要。

步骤4:为创建准备数据
为了获得TensorFlow.js的性能优势,使培训机器学习模型实用化,我们需要将数据转换为Tensors。
将以下代码添加到script.js文件中。
function convertToTensor(data) {

  return tf.tidy(() => {
    // Step 1\. Shuffle the data
    tf.util.shuffle(data);
    // Step 2\. Convert data to Tensor
    const inputs = data.map(d => d.rooms)
    const labels = data.map(d => d.price);
    const inputTensor = tf.tensor2d(inputs, [inputs.length, 1]);
    const labelTensor = tf.tensor2d(labels, [labels.length, 1]);
    //Step 3\. Normalize the data to the range 0 - 1 using min-max scaling
    const inputMax = inputTensor.max();
    const inputMin = inputTensor.min();
    const labelMax = labelTensor.max();
    const labelMin = labelTensor.min();
    const normalizedInputs = inputTensor.sub(inputMin).p(inputMax.sub(inputMin));
    const normalizedLabels = labelTensor.sub(labelMin).p(labelMax.sub(labelMin));
    return {
      inputs: normalizedInputs,
      labels: normalizedLabels,
      // Return the min/max bounds so we can use them later.
      inputMax,
      inputMin,
      labelMax,
      labelMin,
    }
  });
}
接下来,我们可以分析一下将会出现什么情况。
随机播放数据
// Step 1\. Shuffle the data
tf.util.shuffle(data);
在训练模型的过程中,数据集被分成更小的集合,每个集合称为一个批。然后将这些批次送入模型运行。整理数据很重要,因为模型不应该一次又一次地得到相同的数据。如果模型一次又一次地得到相同的数据,那么模型将无法归纳数据,并为运行期间收到的输入提供指定的输出。洗牌将有助于在每个批次中拥有各种数据。
转换为Tensor
// Step 2\. Convert data to Tensor
const inputs = data.map(d => d.rooms)
const labels = data.map(d => d.price);
const inputTensor = tf.tensor2d(inputs, [inputs.length, 1]);
const labelTensor = tf.tensor2d(labels, [labels.length, 1]);
这里我们制作了两个数组,一个用于输入示例(房间条目数),另一个用于实际输出值(在机器学习中称为标签,在我们的例子中是每个房子的价格)。然后我们将每个数组数据转换为一个二维张量。
规范化数据
//Step 3\. Normalize the data to the range 0 - 1 using min-max scaling
const inputMax = inputTensor.max();
const inputMin = inputTensor.min();
const labelMax = labelTensor.max();
const labelMin = labelTensor.min();
const normalizedInputs = inputTensor.sub(inputMin).p(inputMax.sub(inputMin));
const normalizedLabels = labelTensor.sub(labelMin).p(labelMax.sub(labelMin));
接下来,我们规范化数据。在这里,我们使用最小-最大比例将数据规范化为数值范围0-1。规范化很重要,因为您将使用tensorflow.js构建的许多机器学习模型的内部设计都是为了使用不太大的数字。规范化数据以包括0到1或-1到1的公共范围。
返回数据和规范化界限
return {
  inputs: normalizedInputs,
  labels: normalizedLabels,
  // Return the min/max bounds so we can use them later.
  inputMax,
  inputMin,
  labelMax,
  labelMin,
}
我们可以在运行期间保留用于标准化的值,这样我们就可以取消标准化输出,使其恢复到原始规模,我们就可以用同样的方式规范化未来的输入数据。
步骤5:运行模型
通过创建模型实例、将数据表示为张量,我们可以准备开始运行模型。
将以下函数复制到script.js文件中。
async function trainModel(model, inputs, labels) {
  // Prepare the model for training.
  model.compile({
    optimizer: tf.train.adam(),
    loss: tf.losses.meanSquaredError,
    metrics: ['mse'],
  });

  const batchSize = 28;
  const epochs = 50;

  return await model.fit(inputs, labels, {
    batchSize,
    epochs,
    shuffle: true,
    callbacks: tfvis.show.fitCallbacks(
      { name: 'Training Performance' },
      ['loss', 'mse'],
      { height: 200, callbacks: ['onEpochEnd'] }
    )
  });
}
我们把它分解一下。
准备运行
// Prepare the model for training.
model.compile({
  optimizer: tf.train.adam(),
  loss: tf.losses.meanSquaredError,
  metrics: ['mse'],
});
我们必须在训练前“编译”模型。要做到这一点,我们必须明确一些非常重要的事情:
优化器:这是一个算法,它可以控制模型的更新,就像上面看到的例子一样。TensorFlow.js中有许多可用的优化器。这里我们选择了Adam优化器,因为它在实践中非常有效,不需要进行额外配置。
损失函数:这是一个函数,它用于检测模型所显示的每个批(数据子集)方面完成的情况如何。在这里,我们可以使用meansquaredrror将模型所做的预测与真实值进行比较。
度量:这是我们要在每个区块结束时用来计算的度量数组。我们可以用它计算整个训练集的准确度,这样我们就可以检查自己的运行结果了。这里我们使用mse,它是meansquaredrror的简写。这是我们用于损失函数的相同函数,也是回归任务中常用的函数。
const batchSize = 28;
const epochs = 50;
接下来,我们选择一个批量大小和一些时间段:
batchSize指的是模型在每次运行迭代时将看到的数据子集的大小。常见的批量大小通常在32-512之间。对于所有问题来说,并没有一个真正理想的批量大小,描述各种批量大小的精确方式这一知识点本教程没有相关讲解,对这些有兴趣可以通过别的渠道进行了解学习。
epochs指的是模型将查看你提供的整个数据集的次数。在这里,我们通过数据集进行50次迭代。
启动列车环路
return model.fit(inputs, labels, {
  batchSize,
  epochs,
  callbacks: tfvis.show.fitCallbacks(
    { name: 'Training Performance' },
    ['loss', 'mse'],
    {
      height: 200,
      callbacks: ['onEpochEnd']
    }
  )
});
model.fit是我们调用的启动循环的函数。它是一个异步函数,因此我们返回它给我们的特定值,以便调用者可以确定运行结束时间。
为了监控运行进度,我们将一些回调传递给model.fit。我们使用tfvis.show.fitcallbacks生成函数,这些函数可以为前面指定的“损失”和“毫秒”度量绘制图表。
把它们放在一起
现在我们必须调用从运行函数定义的函数。
将以下代码添加到运行函数的底部。
// Convert the data to a form we can use for training.
const tensorData = convertToTensor(data);
const {inputs, labels} = tensorData;

// Train the model
await trainModel(model, inputs, labels);
console.log('Done Training');
刷新页面时,几秒钟后,你应该会看到图形正在更新。
这些是由我们之前创建的回调创建的。它们在每个时代结束时显示丢失(在最近的批处理上)和毫秒(在整个数据集上)。
当训练一个模型时,我们希望看到损失减少。在这种情况下,因为我们的度量是一个误差度量,所以我们希望看到它也下降。
第6步:做出预测
既然我们的模型经过了训练,我们想做一些预测。让我们通过观察它预测的低到高数量房间的统一范围来评估模型。
将以下函数添加到script.js文件中
function testModel(model, inputData, normalizationData) {
  const {inputMax, inputMin, labelMin, labelMax} = normalizationData;

  // Generate predictions for a uniform range of numbers between 0 and 1;
  // We un-normalize the data by doing the inverse of the min-max scaling
  // that we did earlier.
  const [xs, preds] = tf.tidy(() => {

    const xs = tf.linspace(0, 1, 100);
    const preds = model.predict(xs.reshape([100, 1]));

    const unNormXs = xs
      .mul(inputMax.sub(inputMin))
      .add(inputMin);

    const unNormPreds = preds
      .mul(labelMax.sub(labelMin))
      .add(labelMin);

    // Un-normalize the data
    return [unNormXs.dataSync(), unNormPreds.dataSync()];
  });

  const predictedPoints = Array.from(xs).map((val, i) => {
    return {x: val, y: preds[i]}
  });

  const originalPoints = inputData.map(d => ({
    x: d.rooms, y: d.price,
  }));

  tfvis.render.scatterplot(
    {name: 'Model Predictions vs Original Data'},
    {values: [originalPoints, predictedPoints], series: ['original', 'predicted']},
    {
      xLabel: 'No. of rooms',
      yLabel: 'Price',
      height: 300
    }
  );
}
在上面的函数中需要注意的一些事情。
const xs = tf.linspace(0, 1, 100);
const preds = model.predict(xs.reshape([100, 1]));
我们生成100个新的“示例”以提供给模型。model.predict是我们如何将这些示例输入到模型中的。注意,他们需要有一个类似的形状([num_的例子,num_的特点每个_的例子])当我们做培训时。
// Un-normalize the data
const unNormXs = xs
  .mul(inputMax.sub(inputMin))
  .add(inputMin);

const unNormPreds = preds
  .mul(labelMax.sub(labelMin))
  .add(labelMin);
为了将数据恢复到原始范围(而不是0–1),我们使用规范化时计算的值,但只需反转操作。
return [unNormXs.dataSync(), unNormPreds.dataSync()];
.datasync()是一种方法,我们可以使用它来获取存储在张量中的值的typedarray。这允许我们在常规的javascript中处理这些值。这是通常首选的.data()方法的同步版本。
最后,我们使用tfjs-vis来绘制原始数据和模型中的预测。
将以下代码添加到运行函数中。
testModel(model, data, tensorData);
刷新页面,现在已经完成啦!
现在你已经学会使用tensorflow.js创建一个简单的机器学习模型了。
相关教程:JavaScript视频教程
The above is the detailed content of JavaScript machine learning based on TensorFlow.js. For more information, please follow other related articles on the PHP Chinese website!