Home >Web Front-end >HTML Tutorial >An easy-to-use HTML editor (UEditor) tutorial
Regarding HTML editors, I have tried FCKeditor, the upgraded version of CKeditor, and TinyMCE. Recently, I am trying to use Baidu’s UEditor. In comparison, I still feel that the configuration of UEditor is relatively simple, it is quick to get started and the documentation and examples are complete. So here we take UEditor1.2.3.0PHP version UTF-8 version as an example to sort out the usage process of UEditor.
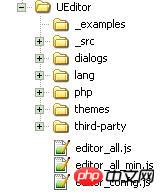
1. First is the document structure of UEditor

## _examples: Example pages of various versions of the editor
_src: JS file
##dialogs: Pop-up dialog box corresponding Resources and JS fileslang: Language pack file
PHP: File upload processing, remote image capture, online image management, screen Screenshot related files
themes: style images and style files
third-party: third-party plug-ins
editor_all.js: a packaged file of all files in the _src directory
editor_all_min.js: a compressed version of the editor_all.js file, which can be used only during formal deployment
editor_config.js: Editor configuration file
2. System configuration
UEditor's configuration can be divided into two types: system default configuration and user-defined configuration.The system default configuration is scattered in each corresponding core or plug-in file and is invisible to users. Works when user comments out custom configuration. User-defined configurations include two types, one is located in the editor_config.js file, with a higher priority than the system default configuration; the other is located in the parameters passed in when instantiating the editor, with a higher priority Highest. By default, UEditor comments out all configuration items that can be omitted in editor_congfig.js, and adopts the system default configuration. If the comment is uncommented, the configuration item shall prevail; uncommented configuration items require users to follow the actual project conditions. fill in.
The following is a simple configuration defined by myself:<script type="text/javascript">
// 自定义的编辑器配置项,此处定义的配置项将覆盖editor_config.js中的同名配置
var editorOption = {
//这里可以选择自己需要的工具按钮名称,此处仅选择如下四个
toolbars:[['FullScreen', 'Source', 'Undo', 'Redo']]
//更多其他参数,请参考editor_config.js中的配置项
};
3.引入配置文件,JS文件和主题CSS文件 4.创建编辑器实例及其DOM容器 5.设置选项并且渲染编辑器 如果需要有不同设置的ueditor,可以分别定义之后设置不同的自定义选项再渲染编辑器, 6.前后台数据交互 对于PHP可以直接用$_POST['ueditorName']获取编辑器的值,其中ueditorName的值为初始化编辑器时ueditor的name值。 以下为完整的渲染2个ueditor的代码 【相关推荐】 1. 免费html在线视频教程 2. html开发手册URL = window.UEDITOR_HOME_URL||"/t/UEditor/";
<meta http-equiv="Content-Type" content="text/html; charset=UTF-8">
<script type="text/javascript" src="UEditor/editor_config.js"></script>
<script type="text/javascript" src="UEditor/editor_all.js"></script>
<link rel="stylesheet" href="UEditor/themes/default/ueditor.css">
<form action="" method="post" name="myForm">
<!--以下引入UEditor编辑器界面-->
<script type="text/plain" id="editor" name="myContent"></script> //此处不设置name,则editor默认名字为"editorValue",可以在
 //editor_config.js中配置参数textarea,或者在此处设置
<input type="submit" name="submit" value="upload"/>
</form>
<script type="text/plain" id="myEditor" style="width:800px">
</script>
<script type="text/plain" id="myEditor1" style="width:800px">
<p>这里我可以写一些输入提示</p>
</script>
<script type="text/javascript">
var editor_a = new baidu.editor.ui.Editor();
editor_a.render( 'myEditor' ); //此处的参数值为编辑器的id值
var editor_a1 = new baidu.editor.ui.Editor({
//这里可以选择自己需要的工具按钮名称,此处仅选择如下五个
toolbars:[['FullScreen', 'Source', 'Undo', 'Redo','Bold']],
//focus时自动清空初始化时的内容
//更多其他参数,请参考editor_config.js中的配置项
});
editor_a1.render( 'myEditor1' );
</script><!DOCTYPE HTML>
<html>
<head>
<meta http-equiv="Content-Type" content="text/html; charset=UTF-8">
<title>UEditor</title>
<!--以下为引入UEditor资源部分-->
<script type="text/javascript" src="UEditor/editor_config.js"></script>
<script type="text/javascript" src="UEditor/editor_all.js"></script>
<link rel="stylesheet" href="UEditor/themes/default/ueditor.css">
<!--以上为引入UEditor资源部分-->
</head>
<body>
<form action="test.php" method="post" name="myForm">
<!--以下引入UEditor编辑器界面-->
<script type="text/plain" id="myEditor" name="myContent">这是一个测试还是一个测试</script>
<input type="submit" name="submit" value="upload"/>
</form>
<script type="text/plain" id="myEditor1"><p>这里我可以写一些输入提示</p></script>
<script type="text/javascript">
var editor_a = new baidu.editor.ui.Editor();
editor_a.render( 'myEditor' ); //此处的参数值为编辑器的id值
var editor_a1 = new baidu.editor.ui.Editor({
//这里可以选择自己需要的工具按钮名称,此处仅选择如下五个
toolbars:[['FullScreen', 'Source', 'Undo', 'Redo','Bold']],
//focus时自动清空初始化时的内容
autoClearinitialContent:true,
//更多其他参数,请参考editor_config.js中的配置项
});
editor_a1.render( 'myEditor1' );
</script>
</body>
</html
The above is the detailed content of An easy-to-use HTML editor (UEditor) tutorial. For more information, please follow other related articles on the PHP Chinese website!