Home > Article > Web Front-end > Be a front-end developer who can cut photos using PS
Classification of picture cutting methods
PhotoShop has evolved from the CS version to the current CC version. The picture cutting function has undergone relatively large changes. We can call the picture cutting function of the CS version of PhotoShop traditional picture cutting. , and starting from the PhotoShop CC version, PS has proposed precise cutting. The so-called traditional cutting means that the cutting personnel basically divide the layers and cut the drawings by themselves. The traditional cutting is divided into manual cutting and reference line cutting. Now the CC version proposes precise cutting, and the cutting personnel can rely on the computer. Cut the layer object accurately, and the layer cut out in this way will definitely be more accurate than the traditional cutting. On the other hand, the CC version can perform fully automatic cutting through scripts, which completely frees the hands of the cutting personnel.
Generally speaking, the cutting methods are divided into: traditional cutting (manual cutting, reference line cutting) and precise cutting.
Cut Tool
In the previous article, we talked about the "cutting tool" in the toolbar. In fact, the cutting tool provides us with a total of four tools. They are "Crop Tool", "Perspective Crop Tool", "Slice Tool" and "Slice Selection Tool".
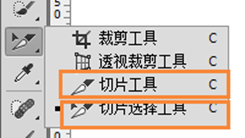
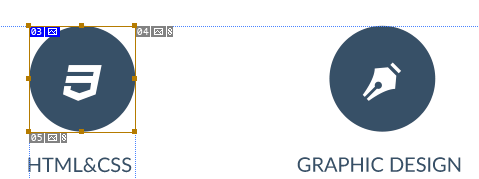
The "Slice Tool" and "Slice Selection Tool" in the picture are the two tools we need to use to cut the picture. The "Slice Tool" is somewhat similar to the "Selection Tool" in that they both select an area. The difference is that after the Slice Tool selects the area, it will be marked as a slice. For example, in the picture below, I used the slice tool to cut a small slice. The 03 in the upper left corner represents the name of the slice.
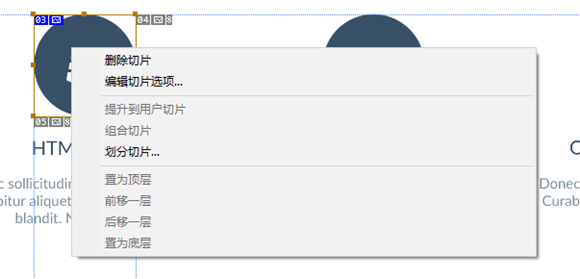
If we use the slice tool to cut more than a dozen pictures, and now feel that some of them need to be adjusted or deleted, then we can use the "slice selection tool", as the name suggests. Used to select the image we cut out previously. Then right-click the selected image to pop up a menu, which includes a "Delete" operation.
TRADITIONAL CUTTING
Whether it is a traditional cutting method or a precise cutting method, I will use the following pictures as examples. The picture design is relatively simple and contains less content for easy introduction.

Manual cutting
Manual cutting requires the cutter to completely manually use the "slicing tool" to cut the pictures one by one. First, select the "Slice Tool" and then use the "Slice Tool" on the icon that needs to be sliced to select an area that contains the icon. For example, the icon above the ADDRESS text in the picture below was selected using the "Slice Tool". Continue to cut other icons. It can also be seen from the picture that there is a number in the upper left corner of each cut image. This number is the number of the cut image, indicating which image to cut when cutting.
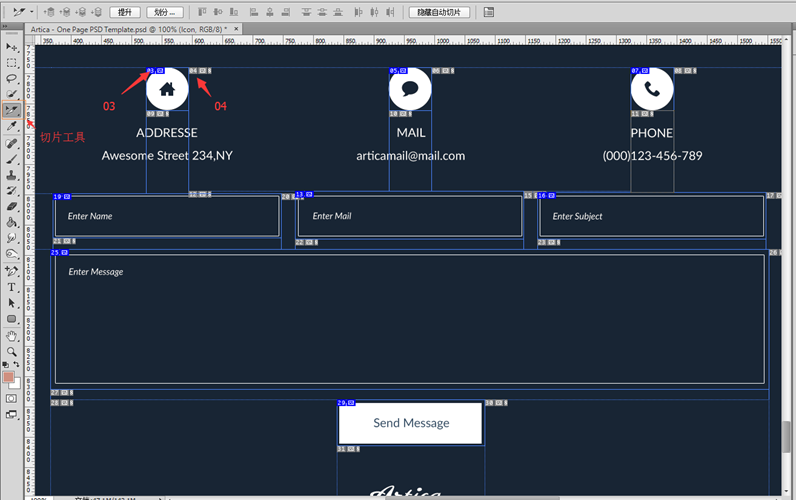
The cut picture above also exposes a few questions. I will first enlarge the bottom of the picture above to see it more clearly. There is an area in the lower right corner of the picture, and there is a number 30 in the upper left corner of the area. This area is also a cut picture. 30 is the largest number we see, which shows that we have actually cut a total of 30 pictures. Obviously we only cut 8 pictures, why did it suddenly become 30 pictures?

This is because when we cut the picture, PS automatically added some cut pictures. Let’s take cutout No. 07 as an example. When we manually cut the phone icon, a cutout will be automatically generated on the right (08) and bottom (10) of cutout No. 07. As the number of cuts increases, more and more cuts will be automatically generated, eventually including a total of 30 cuts. And we cannot delete these automatically generated cutouts.
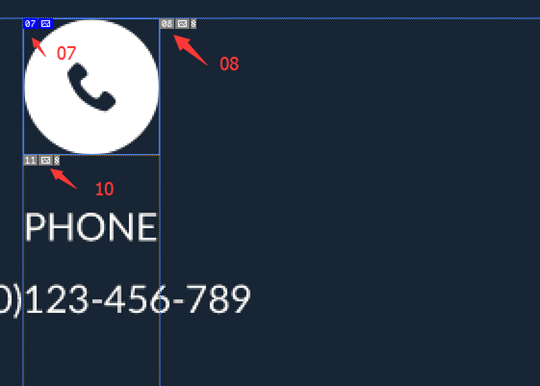
Sometimes it’s annoying to see so many cut pictures. Can we only display the pictures we cut ourselves? The answer is yes. Let's first switch the tool to the "Slice Selection Tool". There is a "Hide Automatic Slice" button in the menu bar above.
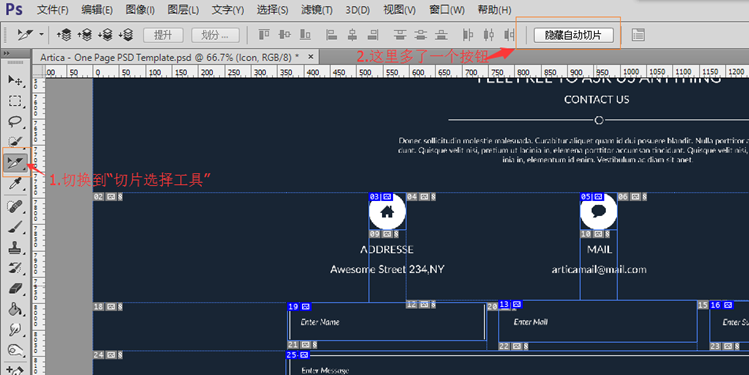
Click the "Hide Automatic Slicing" button, and then we look at the cut picture and there are only 8 cut pictures. These 8 cut pictures are really cut by us. But the more careful students saw that the number of the last slice was 29. "Hide automatic slices" only hides the automatically generated slices, rather than deleting them.
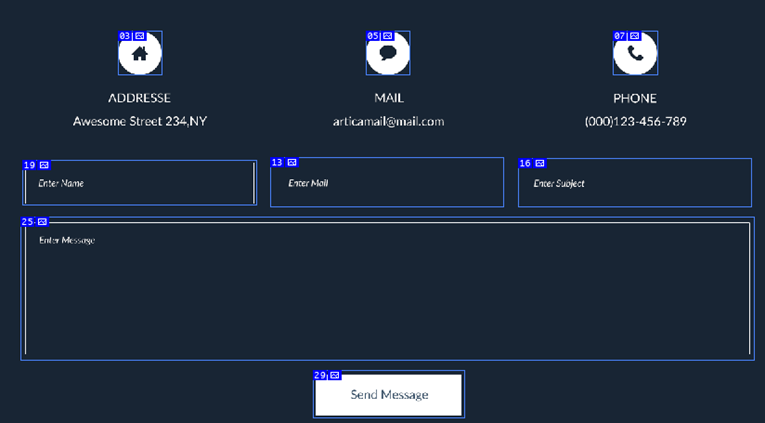
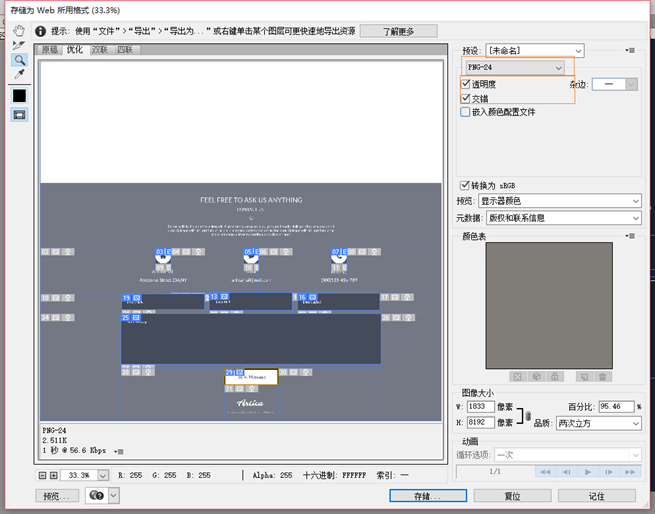
After the cutting is completed, you can export. Open "File"->"Export"->"Save for Web" (the old version opens with "File"->"Save for Web"), and the "Save for Web" window will pop up. . Several options need to be set. Select "PNG-24" from the drop-down list in the upper right corner, and check the "Transparency" and "Interlace" options. Finally, click "Save..." and select the path where we will store it. So far, the manual cutting work is basically completed.
Reference line cutting diagram
Before introducing the reference line cutting diagram, we need to understand what a reference line is. Let’s discuss a question first. Suppose we need to use PS to set up a web page, display the web content in the center, and have a width of 200 pixels on the left and right sides. Wouldn't it be very convenient if there was a reference line on both sides for reference?
There are two ways to add reference lines:
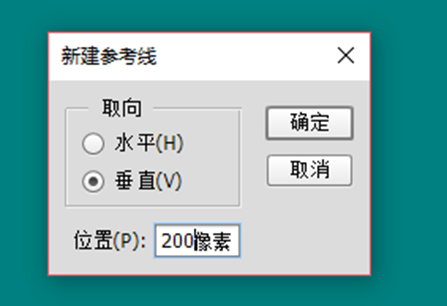
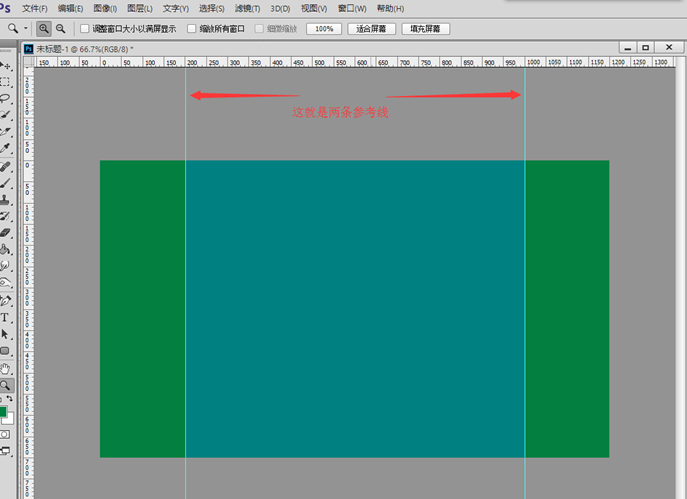
The first one: Open the menu "View" -> "New Reference Line" and the "New Reference Line" pops up. References include "orientation" (horizontal or vertical), "position". For example, if the canvas width is 1200, then you need to add two vertical guide lines at 200 and 1000 pixels in the vertical direction.
With reference lines, the layout is relatively simple. You can refer to the added guides when selecting an area with the selection tool. The layout in the picture below is completed based on reference lines.
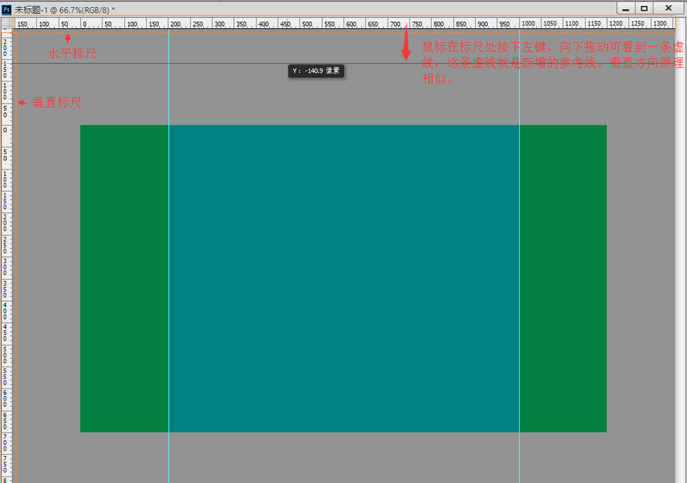
Second: If the reference lines are added according to the first method, it will be too inefficient. Especially the reference line cutting diagram that will be introduced soon. If you add dozens of reference lines according to the first method, you will have to wait until the year of the monkey and the month of the horse. The second way to add a reference line is very simple. Just hold down the left mouse button on the vertical ruler or horizontal ruler and drag it outward to draw a new reference line.
Reference line cutting is the second way to add reference lines for cutting. For example, now we need to cut the three icons ADDRESS, MAIL, and PHONE on the design drawing using reference lines, drag and add reference lines from the horizontal ruler and vertical ruler, and add them as shown in the picture below.
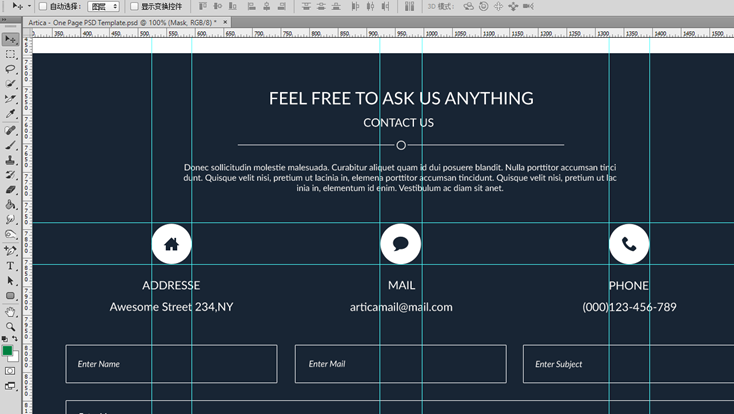
Then select the "Slice Tool" in the toolbar. Now there is a "Slice based on guide line" button in the tool menu bar. Click this button. Several slices are automatically generated in the design drawing, and the slicing tool automatically generates cut drawings based on the reference lines. This way of generating cutouts is more efficient than the traditional manual cutout one by one.
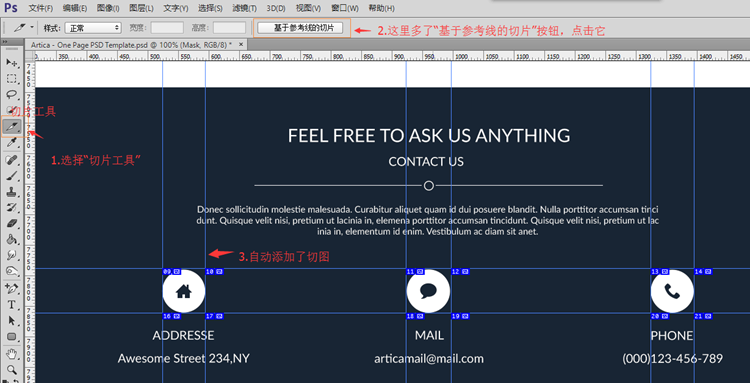
And one advantage of reference line cutting is that we can manually delete the generated cuttings. If we feel that some additional cuttings are not needed, then we can use the "Select Slice Tool" to right-click the cuttings and select Delete operate. The picture below is the final cut using the reference line cut. There are only three cuts.
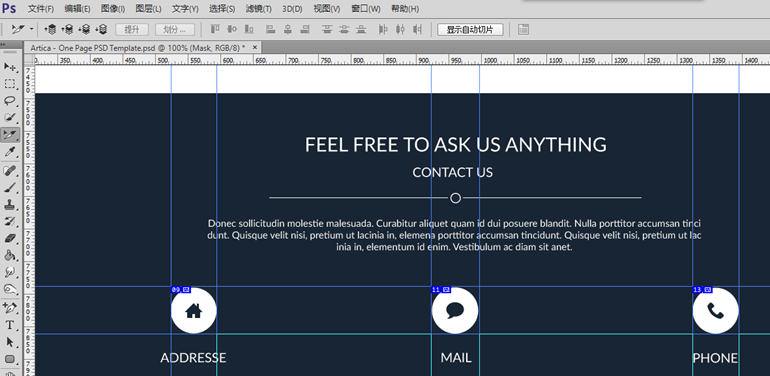
The picture cutting is completed. The next operation is the same as manual picture cutting. You can use "Save as Web Format" to export the icon, which will not be introduced here.
Precise picture cutting
Precise picture cutting is a new function introduced in the CC version. What is precise picture cutting? Precise cutting frees the hands of the cutter, and PS automatically cuts each layer through a script. The image cutting personnel only need to select a few menus to execute the image cutting command, and the remaining work is to wait for PS to execute the image cutting. On the other hand, precision cutting is based on computer cutting based on "layer objects", and the accuracy of all cut graphics is definitely higher than manual cutting.
Open the menu "File"->"Export"->"Export layer to file", the export window will pop up:
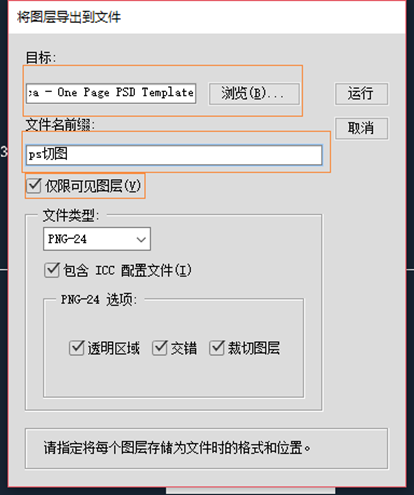
The above window Several parameters need to be filled in. "Target" refers to the directory to export to, "File name prefix" is the prefix of all exported image file names, "Visible layers only" only exports visible layers, and "File type" is the export file. Type (such as png, jpg, etc.). Finally, click the "Run" button to start automatic image cutting. The picture below is a screenshot of the automatic cutting process of PS "layer". It can be seen that PS automatically selects each layer and then performs export.
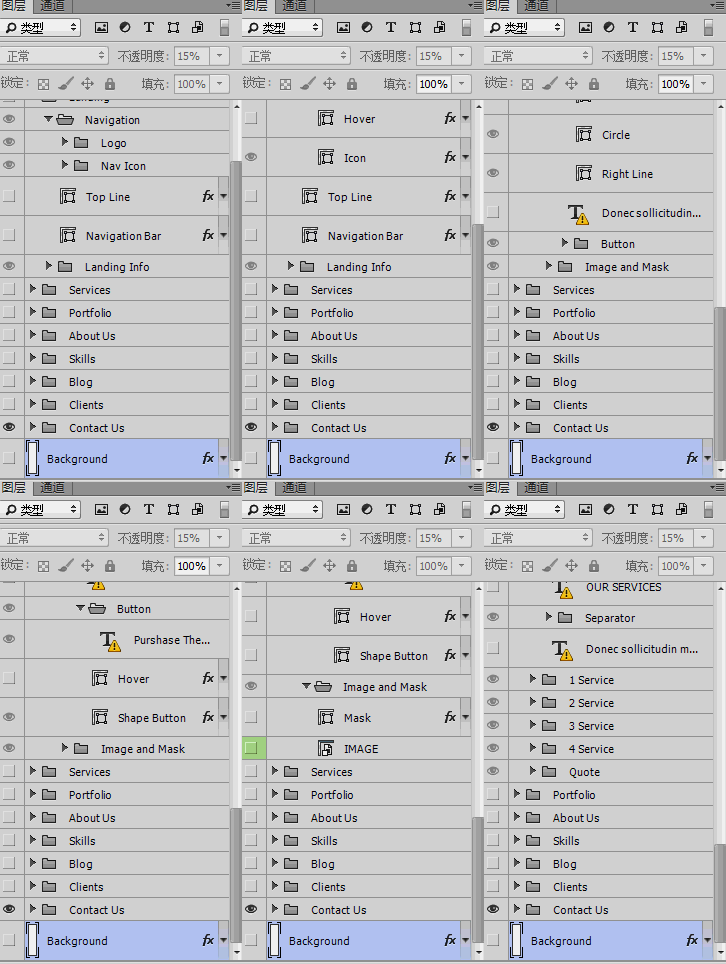
Because PS will export each layer when automatically cutting the picture, it may take a long time, so you need to wait patiently. When the automatic image cutting is completed, we can see all the exported images in the target directory.
Extension point-automatic picture cutting
Another powerful function of the CC version is called "automatic picture cutting". First, let's explain what automatic picture cutting is. With precise cutting, we can see the process of PS cutting. With automatic cutting, we cannot see the cutting process at all. When we have designed the layers, our cutting is completed.
Before using the automatic image cutting function, we need to do two operations:
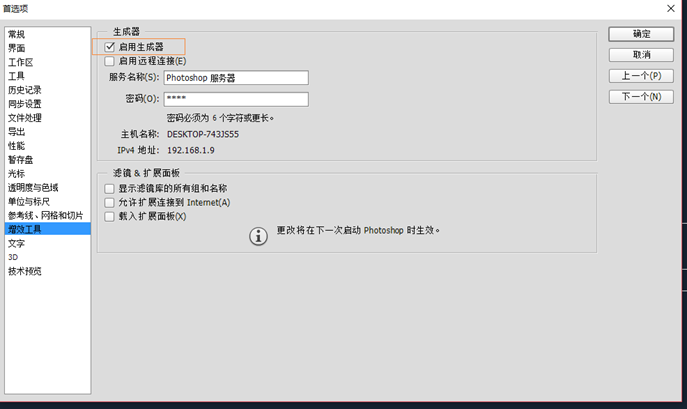
Operation one, select the menu "Edit"->"Preferences"->"Plug-in Tools" , the following window pops up. Check "Enable Generator".
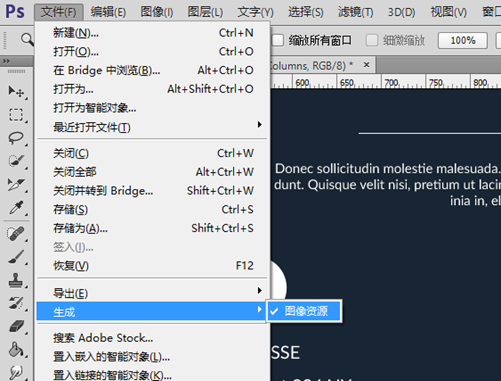
Operation 2: Check the "File"->"Generate"->"Image Resource" menu.
Now that the preparation work has been completed, let’s see how to automatically cut the picture. For example, now we need to export the layer below without including the background color.

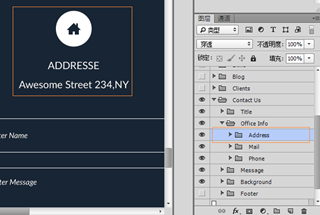
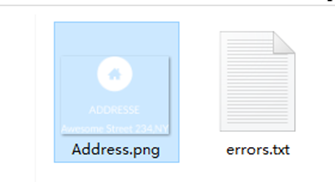
In fact, all the resources of the above picture are placed under a layer group called "Address". Now rename the group to "Address.png". Then we go to the psd file directory. The psd file name is "Artica - One Page PSD Template". You can see that another folder called "Artica - One Page PSD Template-assets" is generated in the same directory.

Then open the "Artica - One Page PSD Template-assets" folder and see a file called Address.png, which happens to be the name of our layer group, and the background of the picture is transparent. Isn’t this function very powerful?
# Automatic image cutting is also a powerful tool for generating svg. PS can not only generate layers into png files, but also supports generating svg files. Now I want to save the icon below as svg format. We only need to change the layer file name to "Icon.svg". Open the "Artica - One Page PSD Template-assets" folder and you can see that the Icon.svg file has been generated.

Use a text editor to open the Icon.svg file to see what content is generated. The file contains width, height and css styles, which is a relatively common svg file. We can change the color of the picture by modifying the css style. For example, now change "fill:#fff" to "fill:#FF3300" and then save the file. Open it with a browser and you will see that the color of the picture changes to red.

Summary: If we name the layer according to *. file type when designing the layer, then the cutting work will be completed when the layer is designed.
For more articles related to front-end development that can cut photos in PS, please pay attention to the PHP Chinese website!