
Home > Article > Web Front-end > How to write custom modules in React Native

You can see the node_modules folder in the React Native project, which is where node modules are stored. The Node.js package manager npm is the world's largest open source library ecosystem. When it comes to npm, it generally refers to two meanings: one is the Node.js open module registration and management system, and the other is the Node.js default module manager, which is a command line software used to install and manage node modules. This article aims to explore how to write a custom npm module (similar to a plug-in) in React Native and upload it to npm for others to use.
npm is a Node.js module. Installing Node.js will install npm by default. You can use the following command in the terminal to check the npm version:
npm -v
Upgrade npm:
sudo npm install npm -g
Install modules (after installation is completed, a node_modules directory will be generated, under which are the installed node modules):
npm install 2cf7af396cbd731a0491663fcec0bb14
View npm configuration:
npm config list
Set up the proxy:
//设置 http 代理
npm config set proxy http://server:port
//设置 https 代理
npm config set https-proxy http://server:port
The above introduces some basic npm commands, and then you can create a module locally.
First open a terminal and create a new folder where you want to create a custom module, and then log in to npm on the command line. Enter the following command:
npm adduser
Next, you will be prompted to enter your username, password and email address. Once completed, you can enter the following command to view the current npm user:
npm whoami
If it is displayed correctly The username you just registered indicates that the login is successful. Then use the following command to create the npm module:
npm init
After executing the above command, you will be guided to create a package.json file, including name, version, author and other information.
I would like to mention here why you should write a custom module. Because although React Native implements many Native components and provides rich APIs, some native libraries are still not supported, and there are many open source components and libraries that are native-oriented, so if you want to use these components and libraries in React Native The library needs to define a module by itself, so that it can be easily integrated by others. Next we go directly to the topic. Write a custom module that can be used in React Native. Execute
react-native init AwesomeProject
in the command line to initialize a React Native project. Here we take Android as an example. Use Android Studio to select the menu File->open to open the android folder under the AwesomeProject folder, then select File -> New -> New Module and choose to create an Android Library, as shown in the figure: 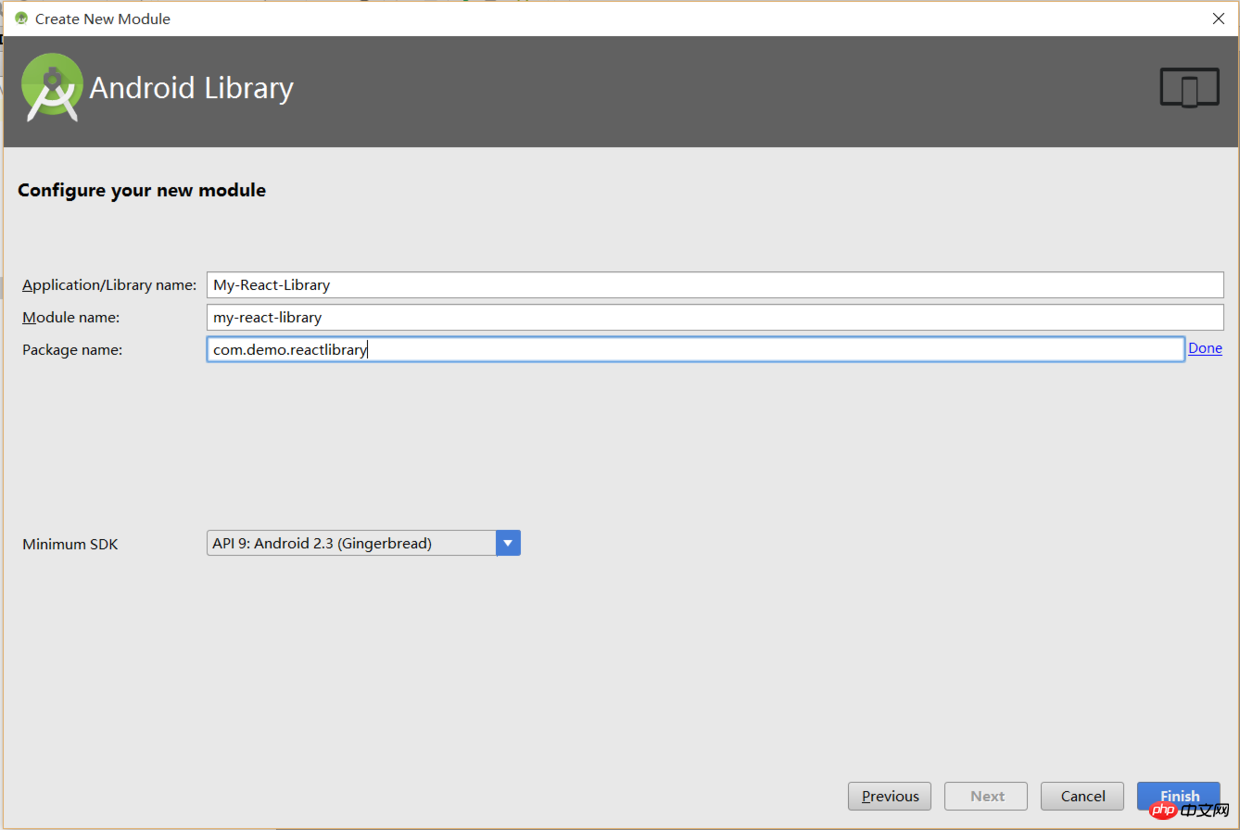
As shown in the picture, a new Library module is created here. Next, click finish to see the following directory structure:
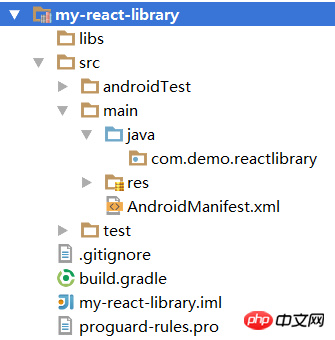
Then add all Place the dependent jars in the libs directory. Here we use jpush-sdk as an example. Copy the libs downloaded from the official website to libs, put the relevant resource files in the res folder, and then copy the contents of the AndroidManifest file. Change the package name, and finally configure it in build.gradle, as follows (note here that you change the targetSdkVersion to 22, as running on 23 may cause a crash):
apply plugin: 'com.android.library'
android {
  compileSdkVersion 23
  buildToolsVersion "23.0.2"
  defaultConfig {
    minSdkVersion 16
    targetSdkVersion 22
    versionCode 1
    versionName "1.0"
    manifestPlaceholders = [
      JPUSH_APPKEY: "yourAppKey",  //在此修改JPush的AppKey
      APP_CHANNEL: "developer-default"      //应用渠道号
    ]
  }
  lintOptions {
    abortOnError false
    warning 'InvalidPackage'
  }
  sourceSets {
    main {
      jniLibs.srcDirs = ['libs']
    }
}
}
repositories {
  mavenCentral()
}

dependencies {
  compile fileTree(dir: 'libs', include: ['*.jar'])
  compile "com.facebook.react:react-native:+"
}
So far, we have completed it After completing the first step, you need to write the code for the interaction between Native and JS. You can refer to the parts of JS calling Native and Native calling JS in this article of mine. I won’t go into details here. Assuming that we have completed the Native part of the code, how can we enable others to call our JS code through import in JS, thereby calling Native? First enter the my-react-library folder, then execute
npm init
in the terminal to generate the package.json file (note the name field here, here is the name of the module that others reference you), and then create an index. js file, which is the JS entry of the node module. It is recommended to use Sublime Text to write JS. Here is jpush-react-native as an example:
jpush-react-native/index.js Part of the code
import {NativeModules, Platform, DeviceEventEmitter} from 'react-native';

// 通过 NativeModules 找到我们在 Native 定义的 JPushModule 类
const JPushModule = NativeModules.JPushModule;

export default class JPush {

    /**
     * Android only
     * 初始化JPush 必须先初始化才能执行其他操作
    */
    static initPush() {
        JPushModule.initPush();
    }
}
The above defines an initPush method, initPush actually The initPush method defined in JPushModule is called. Other methods are similar to this. In essence, the methods provided by Native are called through NativeModules.
## Release
So far, we have completed the React Native custom module. Now it's time to publish our custom module. Execute
npm publish
in the directory where package.json is located to upload our custom module to the npm library. Each time you update the version, you need to change the version value in package.json and then execute npm publish.
In the React Native directory, execute:
npm install my-react-library --save
After the installation is completed, this module will be saved to the node_modules folder, because our module is an Android Library project, so it still needs to be configured in Native. The main thing is to add project dependencies:
someone's react-native project/some module/build.gradle
dependencies {
  compile fileTree(dir: "libs", include: ["*.jar"])
  compile "com.android.support:appcompat-v7:23.0.1"
  compile "com.facebook.react:react-native:+"  // From node_modules
  // 在 dependecies 中加入自定义模块
  compile project(':my-react-library')
}
Then also configure it in settings.gradle:
someone's react-native project/settings.gradle
include ':app', ':my-react-library'
project(':my-react-library').projectDir = new File(rootProject.projectDir, '../node_modules/my-react-library/android')
在 MainActivity 中将自定义的 Package 添加进去:
MainActivity.java
...
mReactInstanceManager = ReactInstanceManager.builder()
.setApplication(getApplication())
.setBundleAssetName("index.android.bundle")
.setJSMainModuleName("react-native-android/index.android")
.addPackage(new MainReactPackage())
//添加自定义的 package
.addPackage(new MyReactPackage())
...
如果是 RN 0.29.0 以上版本,则应在 MainApplication 中添加:
MainApplication.java
@Overrideprotected List87930413b7b9f6e3c99fdbf3dcfbbddf getPackages() {
return Arrays.87930413b7b9f6e3c99fdbf3dcfbbddfasList(
    new MainReactPackage(),
    new MyReactPackage()
  );
}
到此为止我们完成了 Native 部分的配置(完成后 sync 一下),接下来就可以使用了。
别人要使用我们的模块时,就可以这样写:
someone.js
//这里的 'my-react-library'是在 package.json 定义的 name
// 这样就可以
import MyModule from 'my-react-library'

export default class SomeClass  extends React.Component {
    componentDidMount() {
      // 调用 index.js 中定义的 doSomething()
      MyModule.doSomething();
    }
}
The above is the detailed content of How to write custom modules in React Native. For more information, please follow other related articles on the PHP Chinese website!