
Home > Article > Backend Development > Quickly deploy LNMP environment under Centos system

This article mainly talks about the rapid deployment of LNMP environment under Centos system. Interested friends can come and learn about it.
When the PHP language is running on the Linux system, it is necessary to deploy the corresponding Nginx, MySQL, PHP and other environments on the Linux system. Only when these environment parameters are set, PHP related applications The program can run normally. There are many ways to deploy the environment. You can install software environments one by one in manual mode, or you can use tools for rapid deployment. This article takes Alibaba Cloud's Centos system as an example to introduce how to quickly deploy the environment on the Centos system. Deploy LNMP environment with one click.
One-click deployment of the LNMP environment on Alibaba Cloud's Centos system requires the use of Alibaba Cloud's Alibaba Cloud Resource Orchestration Service, referred to as the ROS service. This service is free and does not require installation or download. You can use ROS to create a resource stack template file in JSON format, or use the template samples provided by ROS to create a set of Alibaba Cloud resources. In the process of this article, we will introduce the use of the LNMP_basic template in the ROS service console function to automatically create an ECS instance and deploy the LNMP environment on the instance.
One-click operation steps to deploy LNMP environment
(1) First enter the Alibaba Cloud official website and log in to ROS management console. If this is your first time using this service, you will be prompted to activate this service after logging in. This service is free and there is no need to worry about charges.
(2) After entering the ROS service management background, in the menu bar on the far left of the page, find the Key Help menu,select ECS instance related information under this menu can obtain the instance information data (such as server specifications), availability zone ID (ZoneId) and image ID (ImageId) of your Alibaba Cloud ECS server.
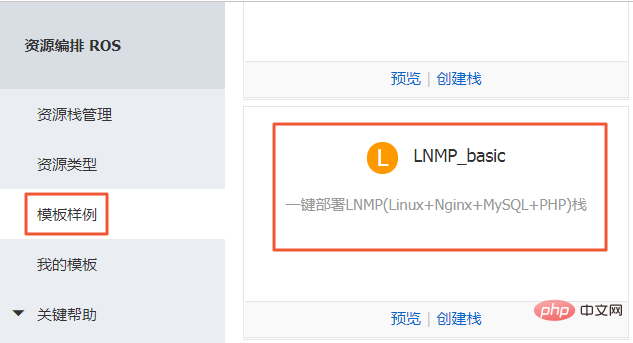
(3) Continue back to the leftmost menu bar, select the Template Sample menu, and in the opened template list data, select the LNMP_basic template.
(4) There is a preview button in the picture above. Enter the preview interface to view the JSON file configuration of the template. Here is a brief introduction Top-level field information in the JSON file:
"ROSTemplateFormatVersion" : "2015-09-01"==>Define the version information of the template.
"Description": "Deploy LNMP(Linux Nginx MySQL PHP) stack on 1 ECS instance. ***
WARNING *** Only support CentOS-7."== >Explain the template.
"Parameters" : { }==>Define some parameters of the template. In this example, the parameters defined by the template include: image ID, instance specifications, etc., and default values are specified.
"Resources" : { }==>Define the Alibaba Cloud resources to be created by this template. In this example, it is declared that an ECS instance and a security group will be created. The resource attributes declared here can refer to the parameters defined in Parameters.
"Outputs": { }: Define the resource information that the stack needs to output after the resource creation is completed. In this example, after the resource is created, the ECS instance ID, public IP address, and security group ID will be output.
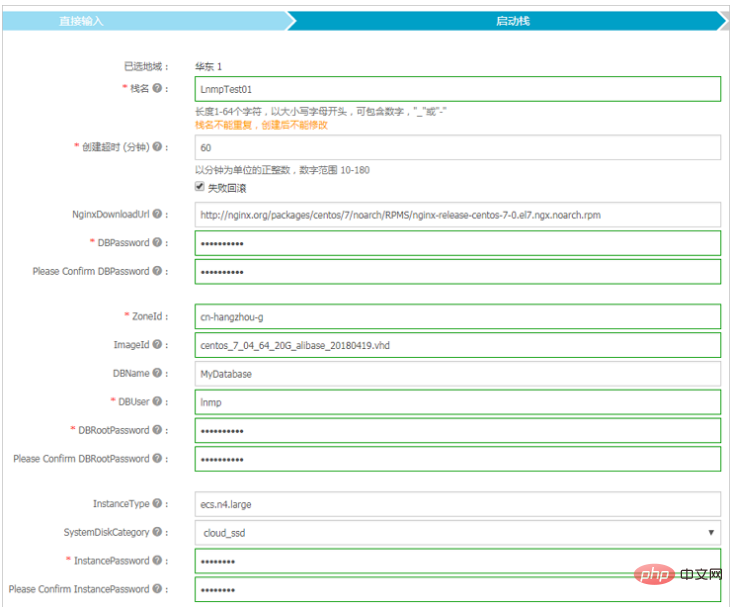
(5) Return to the picture in step 3, click the Create stack button, select the specific region in the drop-down box of region, and Click Next in the lower right corner of the page. In this example, choose China East 2. Then set some related configuration information of the stack. The relevant explanation is as follows:
(6) Return to the picture in step 3, click the Create Stack button, and select the specific region in the drop-down box of region , and click Next in the lower right corner of the page. In this example, choose China East 2. Then set some related configuration information of the stack. The relevant explanation is as follows:
(7) Click the Create button on the page, and then the page promptsRequest submitted successfully.
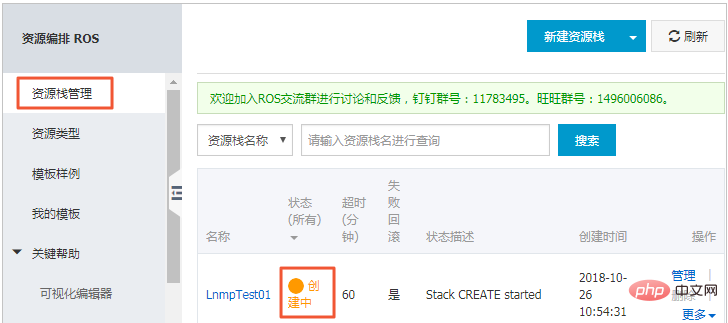
(8) Return to the picture in step 3, select Resource Stack Management on the left menu, Here you can view the creation of the stack progress etc.
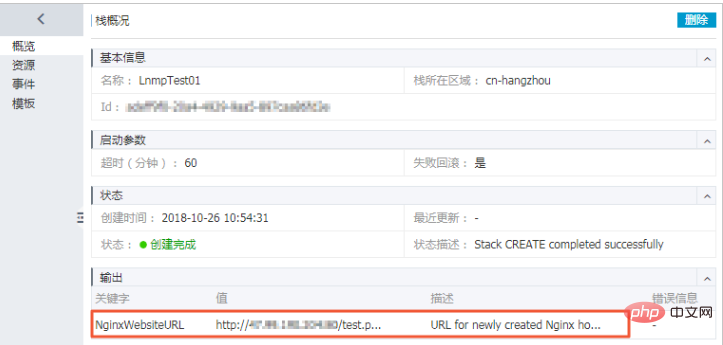
(9) After the stack is created, open the stack you just created and view in the output section of the stack overview page NginxWebsiteURL defined in Outputs. You can access the created LNMP environment through this address.
At this point, the relevant operations have been completed.
Related tutorials: PHP video tutorial
The above is the detailed content of Quickly deploy LNMP environment under Centos system. For more information, please follow other related articles on the PHP Chinese website!