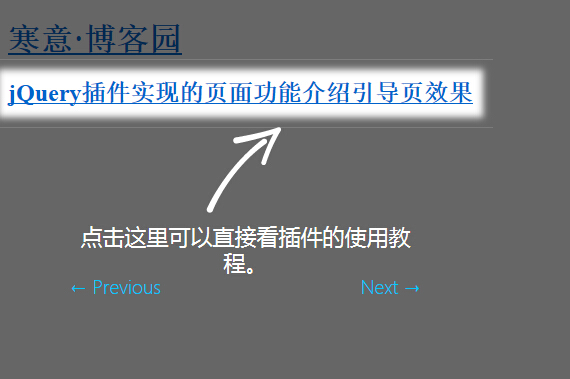
요즘에는 많은 웹사이트가 소개만 하는 것이 아니라 몇 가지 기능도 갖추고 있습니다. 어떻게 하면 웹사이트에 어떤 기능이 있는지 고객에게 빨리 알릴 수 있을까요? pagewalkthrough.js 플러그인은 이를 달성하는 데 도움이 될 수 있습니다. 페이지 기능 안내 기능을 구현하고 표시할 페이지 콘텐츠를 안내하는 마스크 안내 레이어를 생성하는 데 도움을 줄 수 있는 가벼운 jQuery 플러그인입니다.

html 코드:
<div id="walkthrough-content">
  <div id="walkthrough-1">
    <h3>欢迎来到网页引导示例DEMO演示页</h3>

    <p>页面功能介绍引导页的效果是通过一款叫做<a href="https://github.com/jwarby/jquery-pagewalkthrough" target="_blank">pagewalkthrough.js</a>的jQuery插件实现的。</p>
    <p>点击下一步了解更多...</p>
  </div>

  <div id="walkthrough-2">
    这里是网站LOGO,点击这里可以直通网站首页。
  </div>

  <div id="walkthrough-3">
    点击这里可以直接看插件的使用教程。
  </div>

  <div id="walkthrough-4">
    点击这里去下载源码,免费的哦。。
  </div>

  <div id="walkthrough-5">
    这是页脚和版权信息。
  </div>
</div>
js 파일 및 코드:
<script type="text/javascript" src="jquery.min.js"></script>
<script type="text/javascript" src="jquery.pagewalkthrough.min.js"></script>
<script>
$(function() {
  // Set up tour
  $('body').pagewalkthrough({
    name: 'introduction',
    steps: [
    { popup: {content: '#walkthrough-1',type: 'modal' }
    }, {wrapper: '#logo',popup: {content: '#walkthrough-2',type: 'tooltip',position: 'bottom'}
    }, {wrapper: 'h2.top_title a',popup: {content: '#walkthrough-3',type: 'tooltip',position: 'bottom'}
    }, {wrapper: 'a[href="http://files.cnblogs.com/files/hnyei/jq_zhezhaoyd.rar"]', popup: {content: '#walkthrough-4',type: 'tooltip',position: 'right'}
    }, {wrapper: '#footer p',popup: {content: '#walkthrough-5',type: 'tooltip',position: 'top'}
    }]
  });
  // Show the tour
  $('body').pagewalkthrough('show');
});
</script>
css 파일:
<link rel="stylesheet" href="css/jquery.pagewalkthrough.css">
<!--[if lt IE 9]>
<script src="html5.js"></script>
<![endif]-->
<style type="text/css">
.demo{text-align:center}
.button {display: inline-block;outline: none;cursor: pointer;text-align: center;text-decoration: none;font: 22px/100% 'Microsoft yahei',Arial, Helvetica, sans-serif;padding: .5em 2em .55em;text-shadow: 0 1px 1px rgba(0,0,0,.3);-webkit-border-radius: .5em; -moz-border-radius: .5em;border-radius: .5em;-webkit-box-shadow: 0 1px 2px rgba(0,0,0,.2);-moz-box-shadow: 0 1px 2px rgba(0,0,0,.2);box-shadow: 0 1px 2px rgba(0,0,0,.2); }
.button:hover {text-decoration: none;}
.button:active {position: relative;top: 1px;}
/* green */
.green {color: #e8f0de;border: solid 1px #538312;background: #64991e;background: -webkit-gradient(linear, left top, left bottom, from(#7db72f), to(#4e7d0e));background: -moz-linear-gradient(top, #7db72f, #4e7d0e);filter: progid:DXImageTransform.Microsoft.gradient(startColorstr='#7db72f', endColorstr='#4e7d0e');}
.green:hover {background: #538018;background: -webkit-gradient(linear, left top, left bottom, from(#6b9d28), to(#436b0c));background: -moz-linear-gradient(top, #6b9d28, #436b0c);filter: progid:DXImageTransform.Microsoft.gradient(startColorstr='#6b9d28', endColorstr='#436b0c');color:#fff}
.green:active {color: #a9c08c;background: -webkit-gradient(linear, left top, left bottom, from(#4e7d0e), to(#7db72f));background: -moz-linear-gradient(top, #4e7d0e, #7db72f);filter: progid:DXImageTransform.Microsoft.gradient(startColorstr='#4e7d0e', endColorstr='#7db72f');}
#walkthrough-content{display:none}
#walkthrough-content h3{height:30px; line-height:30px}
#walkthrough-content p{line-height:28px}
</style>
위 내용은 이 글의 전체 내용입니다. 모두 마음에 드셨으면 좋겠습니다.