실험 환경: windows
실험 도구: nginx, tomcat
Windows에서 nginx를 설치하는 방법은 매우 간단합니다. 공식 웹사이트에 가서 압축 패키지를 다운로드하고 압축을 푼 후 압축이 풀린 파일에서 nginx.exe 프로그램을 두 번 클릭하세요. 예배 규칙서. 그런 다음 브라우저에 localhost를 입력하면 다음 그림이 나타납니다. 이는 nginx가 이미 작동 중임을 의미합니다.

nginx의 작업 흐름은 다음과 같습니다. 외부적으로 nginx는 서버입니다. 모든 요청은 먼저 nginx에 요청되고, nginx는 요청을 인트라넷으로 tomcat에 배포한 다음 tomcat이 요청을 처리하고 데이터를 nginx로 보냅니다. 그런 다음 nginx는 이를 사용자에게 보냅니다. 전체 프로세스는 nginx가 사용자 요청을 처리하고 있음을 사용자에게 느낍니다. 이 경우 반드시 nginx를 구성해야 합니다. 기본 구성 파일은 conf 폴더에 nginx.conf입니다. 주로 정적 파일과 동적 파일을 분리했기 때문에 정적 파일을 캐시하거나 로드 밸런싱을 구성하지 않았습니다.
#user nobody;
worker_processes 2;

#error_log logs/error.log;
#error_log logs/error.log notice;
#error_log logs/error.log info;

#pid    logs/nginx.pid;


events {
  #nginx默认最大并发数是1024个用户线程
  worker_connections 1024;
}


http {
  include    mime.types;
  default_type application/octet-stream;

  #log_format main '$remote_addr - $remote_user [$time_local] "$request" '
  #         '$status $body_bytes_sent "$http_referer" '
  #         '"$http_user_agent" "$http_x_forwarded_for"';

  #access_log logs/access.log main;

  sendfile    on;
  #tcp_nopush   on;

  #keepalive_timeout 0;
  #http1.1在请求完之后还会保留一段时间的连接,所以这里的timeout时长不能太大,也不能太小,
  #太小每次都要建立连接,太大会浪费系统资源(用户不再请求服务器)
  keepalive_timeout 65;

  #gzip on;

  server {
  #nginx监听80端口
    listen    80;
    server_name localhost;

    #charset koi8-r;

    #access_log logs/host.access.log main;
  #这里的/表示所有的请求
    #location / {
    #将80端口的所有请求都转发到8080端口去处理,proxy_pass代表的是代理路径
   #  proxy_pass http://localhost:8080;
     # root  html;
      # index index.html index.htm;
    #}

  #对项目名进行访问就去访问tomcat服务
  location /student_vote {
      proxy_pass http://localhost:8080;
  }

  #对jsp和do结尾的url也去访问tomcat服务
  location ~ \.(jsp|do)$ {
      proxy_pass http://localhost:8080;
  }

  #对js、css、png、gif结尾的都去访问根目录下查找
  location ~ \.(js|css|png|gif)$ {
      root f:/javaweb;
  }


    #error_page 404       /404.html;

    # redirect server error pages to the static page /50x.html
    #
    error_page  500 502 503 504 /50x.html;
    location = /50x.html {
      root  html;
    }

    # proxy the php scripts to apache listening on 127.0.0.1:80
    #
    #location ~ \.php$ {
    #  proxy_pass  http://127.0.0.1;
    #}

    # pass the php scripts to fastcgi server listening on 127.0.0.1:9000
    #
    #location ~ \.php$ {
    #  root      html;
    #  fastcgi_pass  127.0.0.1:9000;
    #  fastcgi_index index.php;
    #  fastcgi_param script_filename /scripts$fastcgi_script_name;
    #  include    fastcgi_params;
    #}

    # deny access to .htaccess files, if apache's document root
    # concurs with nginx's one
    #
    #location ~ /\.ht {
    #  deny all;
    #}
  }


  # another virtual host using mix of ip-, name-, and port-based configuration
  #
  #server {
  #  listen    8000;
  #  listen    somename:8080;
  #  server_name somename alias another.alias;

  #  location / {
  #    root  html;
  #    index index.html index.htm;
  #  }
  #}


  # https server
  #
  #server {
  #  listen    443 ssl;
  #  server_name localhost;

  #  ssl_certificate   cert.pem;
  #  ssl_certificate_key cert.key;

  #  ssl_session_cache  shared:ssl:1m;
  #  ssl_session_timeout 5m;

  #  ssl_ciphers high:!anull:!md5;
  #  ssl_prefer_server_ciphers on;

  #  location / {
  #    root  html;
  #    index index.html index.htm;
  #  }
  #}

}위 구성에서 /는 동적이든 정적이든 모든 요청을 가로채기 때문에 주석 처리했고, 다른 하나는 정적 파일의 구성이므로 javaweb 작업 공간으로 구성했습니다. 다음에 설명합니다.
전에 작성한 프로젝트에서는 항상 디렉토리 파일 액세스를 위해 jsp 내장 개체를 사용했지만 nginx를 사용하면 모든 것을 변경해야 하기 때문에 프로젝트에서 경로를 수정하지 않으면 항상 정적 로드가 실패합니다. 파일을 다운로드하고 로그를 확인하여 이 오류를 찾으세요: 2016/05/20 18:27:30 [error] 6748#6936: *225 createfile() "f:/javaweb/student_vote/lib/images/username.png" failed ( 3: 시스템이 지정된 경로를 찾을 수 없음), 클라이언트: 127.0.0.1, 서버: localhost, 요청: "get /student_vote/lib/images/username.png http/1.1", 호스트: "localhost", 리퍼러: " http //localhost/student_vote/index.jsp", 일반적인 정보는 jsp의 파일 구성에 따라 nginx가 /stdent_vote(내 프로젝트 이름)/lib/images 패키지에서 정적 파일을 찾는다는 것입니다. 그리고 프로젝트 파일을 너무 많이 변경하고 싶지 않습니다. 실제로 jsp의 내장 개체를 사용하지 않고 http://localhost/username.png를 직접 사용하여 정적 파일에 액세스하는 또 다른 방법이 있습니다. 그런데 이번 변경은 많은 변경이 필요해서 web-inf 폴더 아래의 lib 폴더를 이전 폴더에 직접 복사했는데, 이는 폴더와 web-inf 폴더가 형제라는 뜻입니다. 폴더.
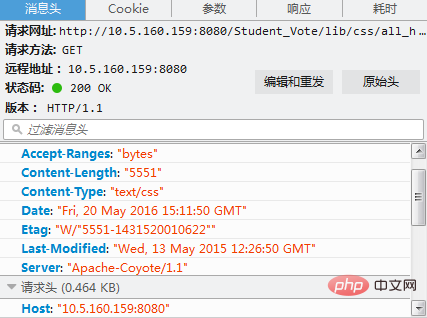
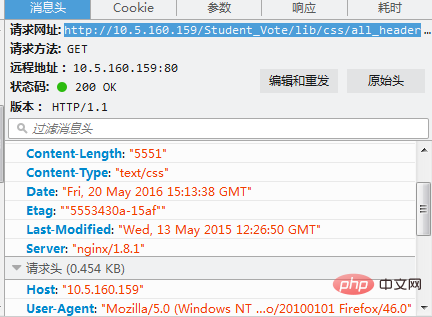
위의 작업을 통해 동적과 정적의 분리가 이루어집니다. 그림이 없으면 진실이 없습니다.

위 그림을 보면 서버가 "apache-coyote/1.1"임을 알 수 있습니다. Tomcat용 커넥터입니다.

위의 서버가 nginx임을 알 수 있는데, 이는 요청을 받는 외부 서버가 nginx라는 의미입니다.
위 내용은 nginx+tomcat을 사용하여 정적 페이지와 동적 페이지를 분리하는 방법의 상세 내용입니다. 자세한 내용은 PHP 중국어 웹사이트의 기타 관련 기사를 참조하세요!