

Flowchart
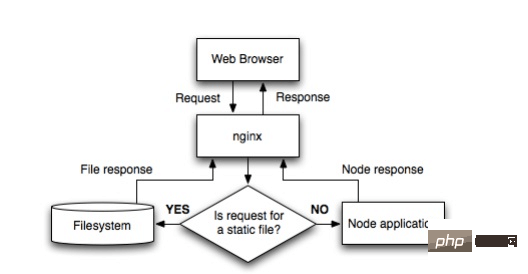
nginx 구성은 다음과 같습니다.
 http {
  proxy_cache_path /var/cache/nginx levels=1:2 keys_zone=one:8m max_size=3000m inactive=600m;
  proxy_temp_path /var/tmp;
  include    mime.types;
  default_type application/octet-stream;
  sendfile    on;
  keepalive_timeout 65;

  gzip on;
  gzip_comp_level 6;
  gzip_vary on;
  gzip_min_length 1000;
  gzip_proxied any;
  gzip_types text/plain text/html text/css application/json application/x-javascript text/xml application/xml application/xml+rss text/javascript;
  gzip_buffers 16 8k;

  ssl_certificate /some/location/sillyfacesociety.com.bundle.crt;
  ssl_certificate_key /some/location/sillyfacesociety.com.key;
  ssl_protocols    sslv3 tlsv1;
  ssl_ciphers high:!anull:!md5;

  upstream silly_face_society_upstream {
   server 127.0.0.1:61337;
   server 127.0.0.1:61338;
   keepalive 64;
  }

  server {
   listen 80;
   listen 443 ssl;

   server_name sillyfacesociety.com;
   return 301 $scheme://www.sillyfacesociety.com$request_uri;
  }

  server {
    listen 80;
    listen 443 ssl;

    server_name www.sillyfacesociety.com;

    error_page 502 /errors/502.html;

    location ~ ^/(images/|img/|javascript/|js/|css/|stylesheets/|flash/|media/|static/|robots.txt|humans.txt|favicon.ico) {
     root /usr/local/silly_face_society/node/public;
     access_log off;
     expires max;
    }

    location /errors {
     internal;
     alias /usr/local/silly_face_society/node/public/errors;
    }

    location / {
     proxy_redirect off;
     proxy_set_header  x-real-ip      $remote_addr;
     proxy_set_header  x-forwarded-for $proxy_add_x_forwarded_for;
     proxy_set_header  x-forwarded-proto $scheme;
     proxy_set_header  host          $http_host;
     proxy_set_header  x-nginx-proxy  true;
     proxy_set_header  connection "";
     proxy_http_version 1.1;
     proxy_cache one;
     proxy_cache_key sfs$request_uri$scheme;
     proxy_pass     http://silly_face_society_upstream;
    }
  }
}구성 섹션 설명
http {
  ...
  upstream silly_face_society_upstream {
   server 127.0.0.1:61337;
   server 127.0.0.1:61338;
   keepalive 64;
  }
  ...
}nginx는 여러 nodo.js 인스턴스의 부하를 분산합니다. keepalive 64는 nginx에게 언제든지 프록시 서버에 대한 최소 64개의 http/1.1 연결을 유지하도록 지시합니다. 트래픽이 더 많으면 nginx는 더 많은 연결을 엽니다.
http {
  ...
  server {
    ...
    location / {
     proxy_redirect off;
     proxy_set_header  x-real-ip      $remote_addr;
     proxy_set_header  x-forwarded-for $proxy_add_x_forwarded_for;
     proxy_set_header  host          $http_host;
     proxy_set_header  x-nginx-proxy  true;
     ...
     proxy_set_header  connection "";
     proxy_http_version 1.1;
     proxy_pass     http://silly_face_society_upstream;
    }
    ...
  }
} 일치하는 요청을 프록시에 보냅니다. nginx의 일치 규칙에 대해서는 이전 기사를 읽을 수 있습니다.
nginx는 정적 콘텐츠를 처리합니다
http {
  ...
  server {
    ...
    location ~ ^/(images/|img/|javascript/|js/|css/|stylesheets/|flash/|media/|static/|robots.txt|humans.txt|favicon.ico) {
     root /usr/local/silly_face_society/node/public;
     access_log off;
     expires max;
    }
    ...
  }
}캐시 설정
http {
  ...
  proxy_cache_path /var/cache/nginx levels=1:2 keys_zone=one:8m max_size=3000m inactive=600m;
  proxy_temp_path /var/tmp;
  ...
}


http {
 server {
   ...
   location / {
     ...
     proxy_cache one;
     proxy_cache_key sfs$request_uri$scheme;
     ...
   }
   ...
 }
}캐시는 http 헤더를 통해 제어됩니다.
helloworld
한번 시도해 보겠습니다. helloworld.js
var http = require('http');


http.createserver(function (request, response) {

 response.writehead(200, {'content-type': 'text/plain'});
 response.end('hello world\n');
}).listen(61337);


console.log('server running at http://127.0.0.1:61337/');를 작성하고 node helloworld.js 명령을 사용하여 열어보겠습니다. 이렇게 하면 로컬 머신에서 실행 중인 nodejs 프로그램이 열리고 차지하게 됩니다. 포트 8000. 직접 수정할 수 있습니다.
이 시점에서 nginx의 vhost.conf 설정이 다음과 같아야 합니다:
server {
  listen 80;
  server_name jb51.net.jb51.net;
  location / {
  proxy_pass http://127.0.0.1:61337;
  }
}웹사이트 도메인 이름을 설정한 다음 포트를 80으로 설정하고 마지막으로 Proxy_pass를 http://127.0.0.1:61337로 설정합니다. , 그리고 jb51.net:80의 요청이 nodejs 프로그램으로 전달됩니다.
nginx를 다시 시작하고 도메인 이름에 액세스하면 helloworld를 볼 수 있습니다.
node.js 자체가 서버로 사용될 수 있는 것은 사실이지만, 예를 들어 Welcome.js에 포트 80을 설정하면 됩니다.
그러나 하나의 기계가 여러 웹사이트를 운영하고 다른 웹사이트는 다른 서버를 사용합니다. 포트 80이 이미 사용 중이면 다른 포트로 프록시를 통해 처리될 수 있습니다.
위 내용은 Nginx 서버를 사용하도록 Node.js를 구성하는 방법의 상세 내용입니다. 자세한 내용은 PHP 중국어 웹사이트의 기타 관련 기사를 참조하세요!


![[웹 프런트엔드] Node.js 빠른 시작](https://img.php.cn/upload/course/000/000/067/662b5d34ba7c0227.png)


