spring-boot: 2.1.4.RELEASE
spring-security-oauth3: 2.3.3.RELEASE (소스코드를 사용하고 싶다면 이 버전번호를 임의로 바꾸지 마세요. 작성방법이 다음과 같기 때문입니다) 2.4 이후부터 다름)
mysql: 5.7
여기서는 postman만 테스트에 사용됩니다. 당분간 프런트 엔드 페이지는 도킹에 사용되지 않습니다. 페이지 표시
1. 공개 인터페이스 http://localhost:7000/open/hello
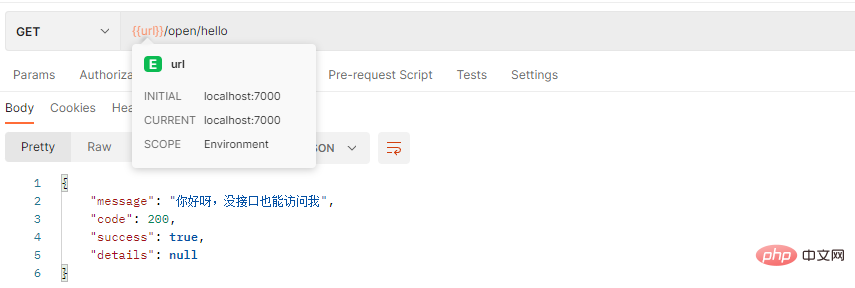
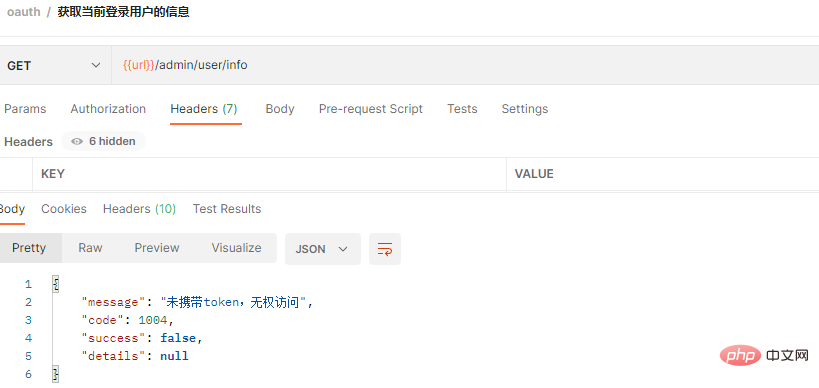
2에 액세스합니다. 토큰 없이 http://localhost:7000/admin/user/info에 액세스합니다.
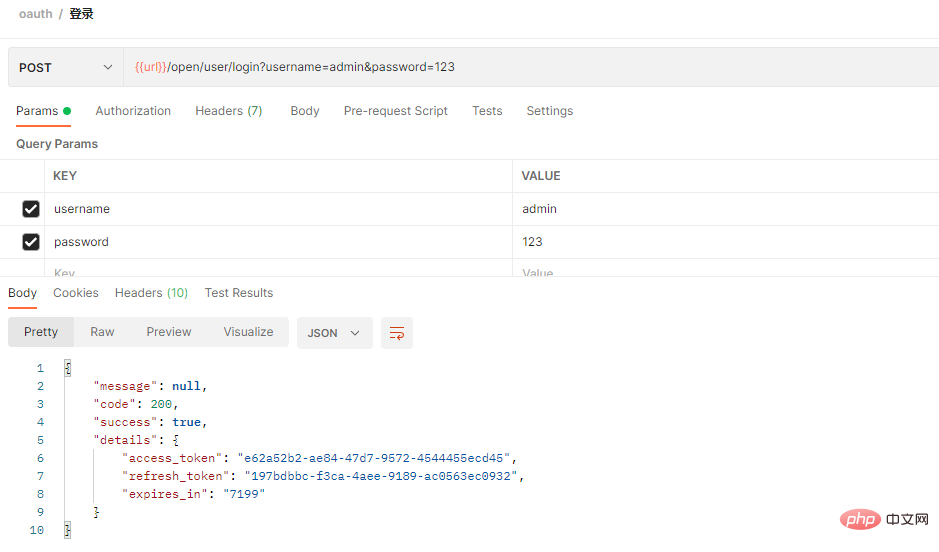
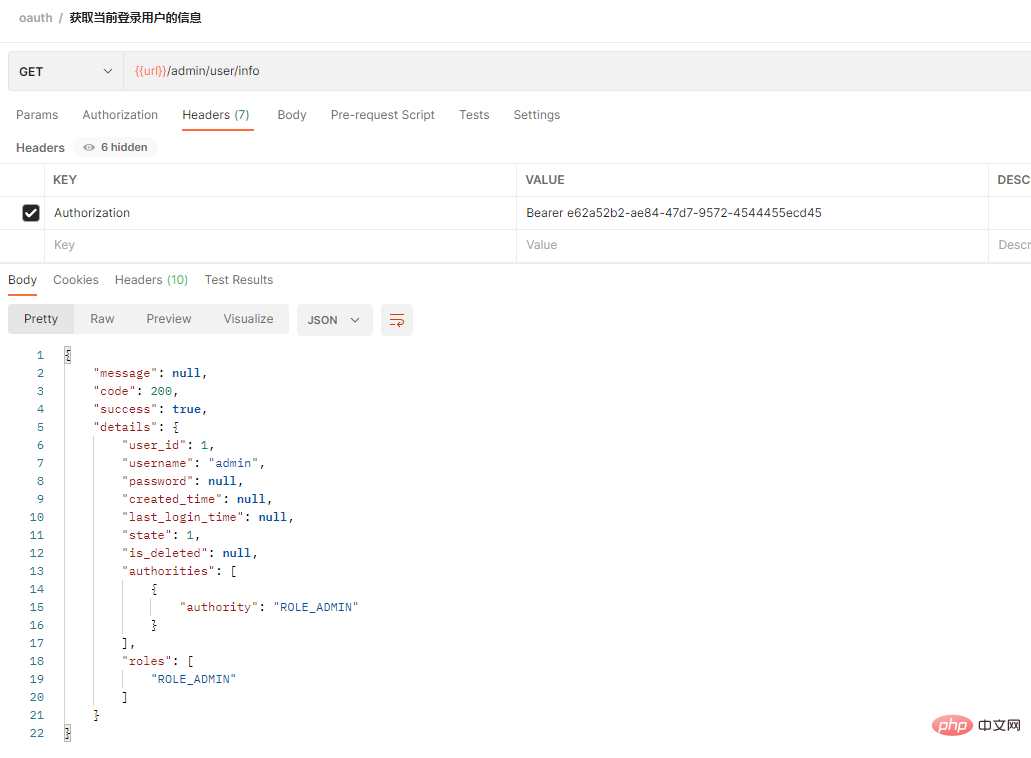
 3. 로그인 후 토큰 가져오기 접속 후 현재 로그인된 사용자 정보가 성공적으로 반환되었습니다
 implementation
이제 우리는 단방향 거래만 고려하므로 비밀번호 모드가 사용됩니다.
나중에 SpringCloud+Oauth3, 게이트웨이 인증에 관한 기사가 나올 예정입니다.
몇 가지 사항에 대해 이야기해 보겠습니다.
1. 인터셉터 구성 동적 권한
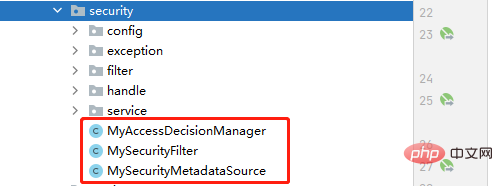 새 MySecurityFilter 클래스를 생성하고 AbstractSecurityInterceptor를 상속하고 필터 인터페이스를 구현합니다.
초기화, 사용자 정의 액세스 결정 관리자
@PostConstruct
 public void init(){
        super.setAuthenticationManager(authenticationManager);
        super.setAccessDecisionManager(myAccessDecisionManager);
}사용자 정의 필터 호출 보안 메타데이터 소스
@Override
public SecurityMetadataSource obtainSecurityMetadataSource() {
    return this.mySecurityMetadataSource;
}먼저 보안 메타데이터 소스를 호출하는 사용자 정의 필터의 핵심 코드를 살펴보겠습니다
다음 코드는 권한(역할)을 얻는 데 사용됩니다. )가 현재 요청이 들어오기 위해 필요합니다
/**
     * 获得当前请求所需要的角色
     * @param object
     * @return
     * @throws IllegalArgumentException
     */
    @Override
    public Collection<ConfigAttribute> getAttributes(Object object) throws IllegalArgumentException {
        String requestUrl = ((FilterInvocation) object).getRequestUrl();

        if (IS_CHANGE_SECURITY) {
            loadResourceDefine();
        }
        if (requestUrl.indexOf("?") > -1) {
            requestUrl = requestUrl.substring(0, requestUrl.indexOf("?"));
        }
        UrlPathMatcher matcher = new UrlPathMatcher();
        List<Object> list = new ArrayList<>();  //无需权限的,直接返回
        list.add("/oauth/**");
        list.add("/open/**");
        if(matcher.pathsMatchesUrl(list,requestUrl))
            return null;

        Set<String> roleNames = new HashSet();
        for (Resc resc: resources) {
            String rescUrl = resc.getResc_url();
            if (matcher.pathMatchesUrl(rescUrl, requestUrl)) {
                if(resc.getParent_resc_id() != null && resc.getParent_resc_id().intValue() == 1){   //默认权限的则只要登录了,无需权限匹配都可访问
                    roleNames = new HashSet();
                    break;
                }
                Map map = new HashMap();
                map.put("resc_id", resc.getResc_id());
                // 获取能访问该资源的所有权限(角色)
                List<RoleRescDTO> roles = roleRescMapper.findAll(map);
                for (RoleRescDTO rr : roles)
                    roleNames.add(rr.getRole_name());
            }
        }

        Set<ConfigAttribute> configAttributes = new HashSet();
        for(String roleName:roleNames)
            configAttributes.add(new SecurityConfig(roleName));

        log.debug("【所需的权限(角色)】:" + configAttributes);

        return configAttributes;
}사용자 정의 액세스 결정 관리자의 핵심 코드를 살펴보겠습니다. 이 코드는 주로 현재 로그인된 사용자를 확인하는 데 사용됩니다(현재 로그인한 사용자가 소유한 역할은 마지막 항목에 기재) 권한 역할이 있나요?
@Override
    public void decide(Authentication authentication, Object o, Collection<ConfigAttribute> configAttributes) throws AccessDeniedException, InsufficientAuthenticationException {
        if(configAttributes == null){   //属于白名单的,不需要权限
            return;
        }
        Iterator<ConfigAttribute> iterator = configAttributes.iterator();
        while (iterator.hasNext()){
            ConfigAttribute configAttribute = iterator.next();
            String needPermission = configAttribute.getAttribute();
            for (GrantedAuthority ga: authentication.getAuthorities()) {
                if(needPermission.equals(ga.getAuthority())){   //有权限,可访问
                    return;
                }
            }
        }
        throw new AccessDeniedException("没有权限访问");

}2. 맞춤 인증 예외가 공통 결과를 반환합니다.
이것이 필요한 이유는 무엇입니까? -end 인증 실패로 인해 반환된 내용을 이해하기 위해서는 획일적으로 해석할 수 없으므로 더 이상 고민하지 않고 구성 및 구성 없이 반환 상황을 살펴보겠습니다.
(1) 커스터마이징 전, 토큰을 소지하지 않는 경우 보호된 API 인터페이스에 액세스하기 위해 반환된 결과는 다음과 같습니다
 (2) 인증 실패 인터페이스가 인터페이스로 반환된 후 다음과 같이 처리하고 사용자에게 메시지를 표시하는 것이 더 낫다고 규정합시다.
 어디로 갈지 살펴보겠습니다. 구성
리소스 서버 OautyResourceConfig, 코드의 다음 부분을 다시 작성하여 인증 예외에서 반환된 결과를 맞춤설정하세요
이 https를 참조할 수 있습니다. //www.yisu.com/article/131668.htm
@Override
    public void configure(ResourceServerSecurityConfigurer resources) throws Exception {
        resources.authenticationEntryPoint(authenticationEntryPoint)    //token失效或没携带token时
                .accessDeniedHandler(requestAccessDeniedHandler);   //权限不足时
} 3. 현재 로그인된 사용자를 가져옵니다
첫 번째: JWT를 사용하여 사용자 정보를 가져온 다음 토큰을 가져온 후 구문 분석합니다
지금은 설명이 없습니다
두 번째: UserDetails 인터페이스를 구현하기 위해 SecurityUser를 작성합니다(이 프로젝트는 에서 사용된 것입니다)
원래 UserDetails 인터페이스에는 사용자 이름과 비밀번호만 있습니다. 여기서는 시스템에 사용자를 추가합니다.
protected User user;
    public SecurityUser(User user) {
        this.user = user;
    }

    public User getUser() {
        return user;
}protected User getUser() {
try {
SecurityUser userDetails = (SecurityUser) SecurityContextHolder.getContext().getAuthentication()
.getPrincipal();
User user = userDetails.getUser();
log.debug("【用户:】:" + user);
return user;
} catch (Exception e) {
}
return null;
}
@Service
public class TokenUserDetailsService implements UserDetailsService{

    @Autowired
    private LoginService loginService;

    @Override
    public UserDetails loadUserByUsername(String username) throws UsernameNotFoundException {
        User user = loginService.loadUserByUsername(username);  //这个我们拎出来处理
        if(Objects.isNull(user))
            throw new UsernameNotFoundException("用户名不存在");
        return new SecurityUser(user);
    }
}그런 다음 보안 구성 클래스에서 UserDetailsService를 위에서 작성한 것과 같이 설정합니다
@Override
    protected void configure(AuthenticationManagerBuilder auth) throws Exception {
        auth.userDetailsService(userDetailsService).passwordEncoder(passwordEncoder());
}마지막으로 loginService에서 메소드를 구현하고 실제 비즈니스 처리를 기반으로 사용자 존재 여부 등을 판단하면 됩니다.
@Override
    public User loadUserByUsername(String username){
        log.debug(username);
        Map map = new HashMap();
        map.put("username",username);
        map.put("is_deleted",-1);
        User user = userMapper.findByUsername(map);
        if(user != null){
            map = new HashMap();
            map.put("user_id",user.getUser_id());
            //查询用户的角色
            List<UserRoleDTO> userRoles = userRoleMapper.findAll(map);
            user.setRoles(listRoles(userRoles));
            //权限集合
            Collection<? extends GrantedAuthority> authorities = merge(userRoles);
            user.setAuthorities(authorities);
            return user;
        }
        return null;

    }
위 내용은 SpringBoot는 SpringSecurityOauth2를 어떻게 통합하여 인증을 위한 동적 권한 문제를 구현합니까?의 상세 내용입니다. 자세한 내용은 PHP 중국어 웹사이트의 기타 관련 기사를 참조하세요!