Python은 크롤러, 예측 분석, GUI, 자동화, 이미지 처리, 시각화 등 다양한 방향으로 사용될 수 있습니다. 멋진 기능을 구현하려면 12줄의 코드만 필요할 수도 있습니다.
Python은 동적 스크립팅 언어이기 때문에 코드 논리가 Java보다 훨씬 간단하고 동일한 기능을 달성하기 위해 작성해야 하는 코드가 훨씬 적습니다. 게다가 Python 생태계에는 함수를 패키지로 캡슐화하는 타사 도구 라이브러리가 많이 있습니다. 복잡한 함수를 사용하려면 인터페이스를 호출하기만 하면 됩니다.
다음은 초보자가 코드를 따라가고 Python 구문을 빠르게 익힐 수 있는 몇 가지 간단하고 재미있는 스크립트 예제입니다.

import numpy as np
import matplotlib.pyplot as plt
from PIL import Image
import os.path

img_path = "E:\test.jpg"
img = Image.open(img_path)


img = np.asarray(img)
flat = img.flatten()


def get_histogram(image, bins):

histogram = np.zeros(bins)

for pixel in image:
histogram[pixel] += 1

return histogram


hist = get_histogram(flat, 256)


cs = np.cumsum(hist)


nj = (cs - cs.min()) * 255
N = cs.max() - cs.min()


cs = nj / N


cs = cs.astype('uint8')


img_new = cs[flat]


img_new = np.reshape(img_new, img.shape)


fig = plt.figure()
fig.set_figheight(15)
fig.set_figwidth(15)


fig.add_subplot(1, 2, 1)
plt.imshow(img, cmap='gray')
plt.title("Image 'Before' Contrast Adjustment")


fig.add_subplot(1, 2, 2)
plt.imshow(img_new, cmap='gray')
plt.title("Image 'After' Contrast Adjustment")
filename = os.path.basename(img_path)


plt.show()import os
import zipfile
from random import randrange
def zip_dir(path, zip_handler):
for root, dirs, files in os.walk(path):
for file in files:
zip_handler.write(os.path.join(root, file))
if __name__ == '__main__':
to_zip = input("""
Enter the name of the folder you want to zip
(N.B.: The folder name should not contain blank spaces)
>
""")
to_zip = to_zip.strip() + "/"
zip_file_name = f'zip{randrange(0,10000)}.zip'
zip_file = zipfile.ZipFile(zip_file_name, 'w', zipfile.ZIP_DEFLATED)
zip_dir(to_zip, zip_file)
zip_file.close()
print(f'File Saved as {zip_file_name}')tkinter가 함께 제공됩니다. 초보자가 작은 소프트웨어 만들기 연습에 적합한 python GUI 라이브러리
import tkinter as tk

root = tk.Tk()
root.title("Standard Calculator")
root.resizable(0, 0)


e = tk.Entry(root,
 width=35,
 bg='#f0ffff',
 fg='black',
 borderwidth=5,
 justify='right',
 font='Calibri 15')
e.grid(row=0, column=0, columnspan=3, padx=12, pady=12)


def buttonClick(num):
temp = e.get(
)
e.delete(0, tk.END)
e.insert(0, temp + num)


def buttonClear():
e.delete(0, tk.END)pdf2docx 라이브러리를 사용하여 PDF 파일을 Word 형식으로 변환

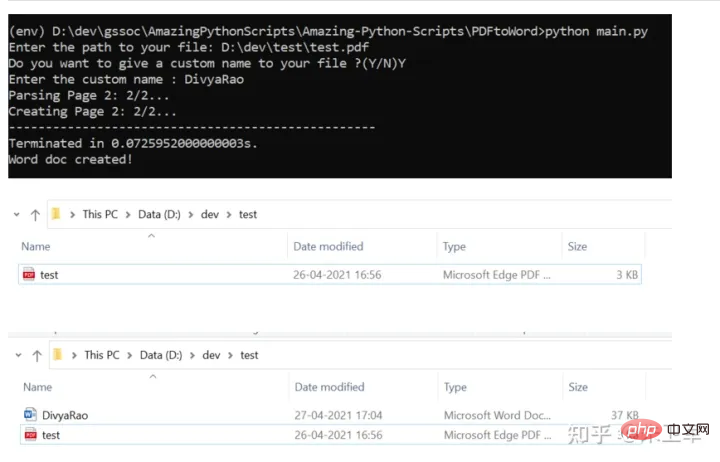
from pdf2docx import Converter
import os
import sys


pdf = input("Enter the path to your file: ")
assert os.path.exists(pdf), "File not found at, "+str(pdf)
f = open(pdf,'r+')


doc_name_choice = input("Do you want to give a custom name to your file ?(Y/N)")

if(doc_name_choice == 'Y' or doc_name_choice == 'y'):

doc_name = input("Enter the custom name : ")+".docx"

else:


pdf_name = os.path.basename(pdf)

doc_name =os.path.splitext(pdf_name)[0] + ".docx"


cv = Converter(pdf)


path = os.path.dirname(pdf)

cv.convert(os.path.join(path, "", doc_name) , start=0, end=None)
print("Word doc created!")
cv.close()
import smtplib
import email

from email.mime.text import MIMEText

from email.mime.image import MIMEImage

from email.mime.multipart import MIMEMultipart
from email.header import Header


mail_host = "smtp.163.com"

mail_sender = "******@163.com"

mail_license = "********"

mail_receivers = ["******@qq.com","******@outlook.com"]

mm = MIMEMultipart('related')


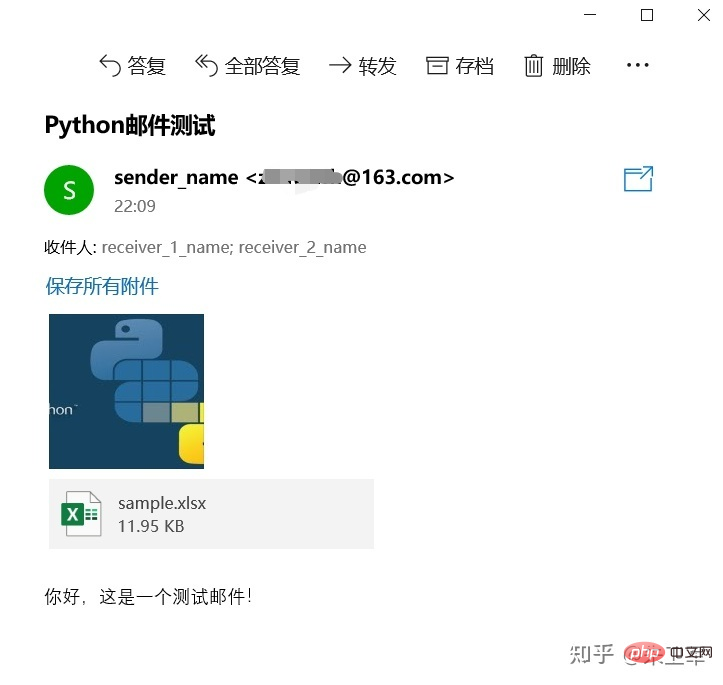
subject_content = """Python邮件测试"""

mm["From"] = "sender_name<******@163.com>"

mm["To"] = "receiver_1_name<******@qq.com>,receiver_2_name<******@outlook.com>"

mm["Subject"] = Header(subject_content,'utf-8')


body_content = """你好,这是一个测试邮件!"""

message_text = MIMEText(body_content,"plain","utf-8")

mm.attach(message_text)


image_data = open('a.jpg','rb')

message_image = MIMEImage(image_data.read())

image_data.close()

mm.attach(message_image)


atta = MIMEText(open('sample.xlsx', 'rb').read(), 'base64', 'utf-8')

atta["Content-Disposition"] = 'attachment; filename="sample.xlsx"'

mm.attach(atta)


stp = smtplib.SMTP()

stp.connect(mail_host, 25)

stp.set_debuglevel(1)

stp.login(mail_sender,mail_license)

stp.sendmail(mail_sender, mail_receivers, mm.as_string())
print("邮件发送成功")

stp.quit()위 내용은 다섯 가지 흥미로운 Python 스크립트의 상세 내용입니다. 자세한 내용은 PHP 중국어 웹사이트의 기타 관련 기사를 참조하세요!