비디오 작업을 사용자 정의하는 방법은 무엇입니까? 맞춤형 비디오 플레이어? 다음 글에서는 Angular에서 비디오 작업을 사용자 정의하는 방법을 소개하겠습니다. 도움이 되길 바랍니다!

이전 글은 Angular 프로젝트에 대한 권한 제어 구현입니다. 최근에는 인터넷에서 video를 사용자 정의하기 위해 vue를 사용하는 다른 사람들을 보았습니다. 게다가 동영상을 사용자 정의하는 angular 관련 요구 사항이 구현된 지 얼마 되지 않아서 소통과 반성으로 기록해보겠습니다. [관련 튜토리얼 추천: "vue 进行自定义 video 的操作。加上不久前实现了 angular 自定义 video 的相关需求, 遂来记录一下,作为交流思考。【相关教程推荐:《angular教程》】
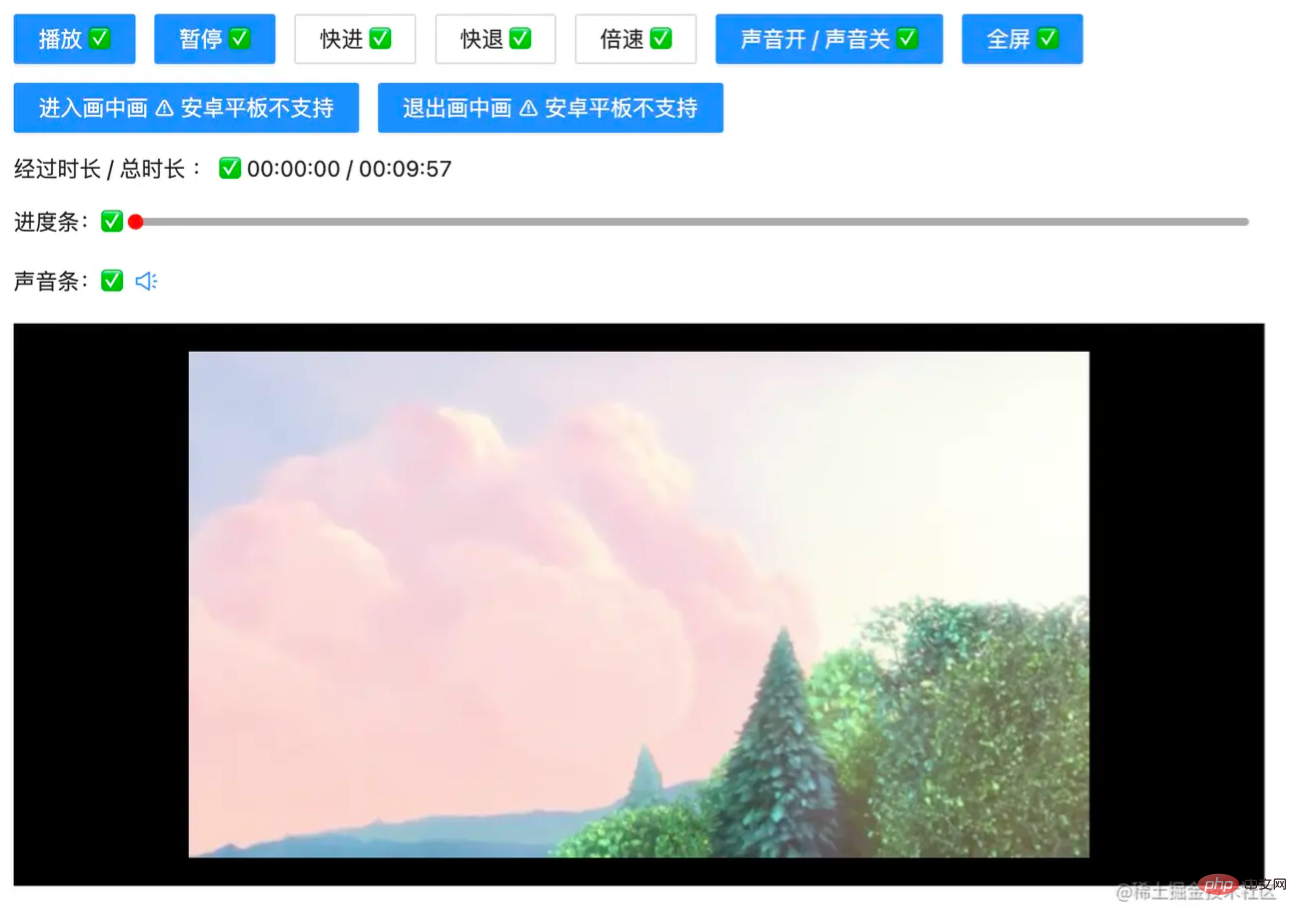
实现的功能如下:
如图:

下面我们来一一实现:
这里的重点不在布局,我们简单来定义一下:
<!-- app.component.html -->
<div class="video-page">
<div class="video-tools">
<button nz-button nzType="primary" (click)="play('btn')" style="margin-right: 12px;">播放 ✅</button>
<button nz-button nzType="primary" (click)="pause('btn')">暂停 ✅</button>
<ng-container>
<button nz-button nz-dropdown [nzDropdownMenu]="menuForward" nzPlacement="bottomCenter" style="margin: 0 12px;">快进 ✅</button>
<nz-dropdown-menu #menuForward="nzDropdownMenu">
<ul nz-menu>
<li nz-menu-item (click)="forwardSecond(10)">快进 10 s</li>
<li nz-menu-item (click)="forwardSecond(20)">快进 20 s</li>
</ul>
</nz-dropdown-menu>
</ng-container>
<ng-container>
<button nz-button nz-dropdown [nzDropdownMenu]="menuBack" nzPlacement="bottomCenter">快退 ✅</button>
<nz-dropdown-menu #menuBack="nzDropdownMenu">
<ul nz-menu>
<li nz-menu-item (click)="retreatSecond(10)">快退 10 s</li>
<li nz-menu-item (click)="retreatSecond(20)">快退 20 s</li>
</ul>
</nz-dropdown-menu>
</ng-container>
<ng-container>
<button nz-button nz-dropdown [nzDropdownMenu]="speedUp" nzPlacement="bottomCenter" style="margin: 0 12px;">倍速 ✅</button>
<nz-dropdown-menu #speedUp="nzDropdownMenu">
<ul nz-menu>
<li nz-menu-item (click)="speedUpVideo(1)">正常</li>
<li nz-menu-item (click)="speedUpVideo(2)">2 倍</li>
<li nz-menu-item (click)="speedUpVideo(4)">4 倍</li>
</ul>
</nz-dropdown-menu>
</ng-container>
<button nz-button nzType="primary" (click)="openOrCloseVoice()">声音开 / 声音关 ✅</button>
<button nz-button nzType="primary" style="margin: 0 12px;" (click)="toFullScreen()">全屏 ✅</button>
<br />
<button nz-button nzType="primary" style="margin-top: 12px;" (click)="entryInPicture()">进入画中画 ⚠️ 安卓平板不支持</button>
<button nz-button nzType="primary" style="margin: 12px 12px 0 12px;" (click)="exitInPicture()">退出画中画 ⚠️ 安卓平板不支持</button>
<br />
<div style="display: flex; justify-content: flex-start; align-items: center; margin: 12px 0;">
经过时长 / 总时长 : ✅ {{ currentTime }} / {{ totalTime }}
</div>
<!-- 进度条 -->
<div style="display: flex; justify-content: flex-start; align-items: center; margin: 12px 0;">
进度条:✅
<div
class="custom-video_control-bg"
(mousedown)="handleProgressDown($event)"
(mousemove)="handleProgressMove($event)"
(mouseup)="handleProgressUp($event)"
>
<div
class="custom-video_control-bg-outside"
id="custom-video_control-bg-outside"
>
<span
class="custom-video_control-bg-inside"
id="custom-video_control-bg-inside"
></span>
<span
class="custom-video_control-bg-inside-point"
id="custom-video_control-bg-inside-point"
></span>
</div>
</div>
</div>
<div style="display: flex; justify-content: flex-start; align-items: center; margin: 12px 0;">
声音条:✅
<div class="custom-video_control-voice">
<span class="custom-video_control-voice-play">
<i nz-icon nzType="sound" nzTheme="outline"></i>
</span>
<div
class="custom-video_control-voice-bg"
id="custom-video_control-voice-bg"
(mousedown)="handleVolProgressDown($event)"
(mousemove)="handleVolProgressMove($event)"
(mouseup)="handleVolProgressUp($event)"
>
<div
class="custom-video_control-voice-bg-outside"
id="custom-video_control-voice-bg-outside"
>
<span
class="custom-video_control-voice-bg-inside"
id="custom-video_control-voice-bg-inside"
></span>
<span
class="custom-video_control-voice-bg-point"
id="custom-video_control-voice-bg-point"
></span>
</div>
</div>
</div>
</div>
</div>
<div class="video-content">
<video id="video" class="video" style="width: 100%" poster="assets/poster.png">
<source type="video/mp4" src="assets/demo.mp4">
Sorry, your browser doesn't support.
</video>
</div>
</div>这里使用了
angular ant design,之前写了一篇相关文章,还不熟悉的读者可前往 Angular 结合 NG-ZORRO 快速开发
这里直接调用 video 对象的方法 play() 和 pause():
// app.component.ts

// 播放按钮事件
play(flag: string | undefined) {
  if(flag) this.videoState.playState = true
  this.videoState.play = true
  this.video.play()
}
// 暂停按钮事件
pause(flag: string | undefined): void {
  if(flag) this.videoState.playState = false
  this.video.pause()
  this.videoState.play = false
}这里自定义的 play 和 pause 方法加上了一个标志,对下下面要讲的进度条的控制有帮助,上面的代码可以更加简洁,读者可以简写下。
这里的快退,快进和倍速设置了不同的选项,通过参数进行传递:
// app.component.ts

// 快进指定的时间
forwardSecond(second: number): void {
  this.video.currentTime += second; // 定位到当前的播放时间 currentTime
}

// 后退指定的时间
retreatSecond(second: number): void {
  this.video.currentTime -= second
}

// 倍速
speedUpVideo(multiple: number): void {
  this.video.playbackRate = multiple; // 设定当前的倍速 playbackRate
}
声音的开关使用 video 的 muted 属性即可:
// app.component.ts

// 开或关声音
openOrCloseVoice(): void {
  this.video.muted = !this.video.muted;
}全屏的操作也是很简单,使用 webkitRequestFullScreen
// app.component.ts

// 全屏操作
toFullScreen(): void {
  this.video.webkitRequestFullScreen()
}全屏后,按
esc可退出全屏
画中画相当于弹窗缩小视频~
// app.component.ts

// 进入画中画
entryInPicture(): void {
  this.video.requestPictureInPicture()
  this.video.style.display = "none"
}

// 退出画中画
exitInPicture(): void {
  if(this.document.pictureInPictureElement) {
    this.document.exitPictureInPicture()
    this.video.style.display = "block"
  }
}设置 video 的样式,是为了看起来不突兀...
记录视频的总时长和视频当前的播放时长。我们已经来组件的时候就获取视频的元信息,得到总时长;在视频播放的过程中,更新当前时长。
// app.component.ts

// 初始化 video 的相关的事件
initVideoData(): void {
  // 获取视频的总时长
  this.video.addEventListener('loadedmetadata', () => {
    this.totalTime = this.formatTime(this.video.duration)
  })
  // 监听时间发生更改
  this.video.addEventListener('timeupdate', () => {
    this.currentTime = this.formatTime(this.video.currentTime) // 当前播放的时间
  })
}formatTime 是格式化函数
监听鼠标的点击,移动,松开的事件,对视频的播放时间和总事件进行相除,计算百分比。
// app.component.ts

// 进度条鼠标按下
handleProgressDown(event: any): void {
  this.videoState.downState = true
  this.pause(undefined);
  this.videoState.distance = event.clientX + document.documentElement.scrollLeft - this.videoState.leftInit;
}
// 进度条 滚动条移动
handleProgressMove(event: any): void {
  if(!this.videoState.downState) return
  let distanceX = (event.clientX + document.documentElement.scrollLeft) - this.videoState.leftInit
  if(distanceX > this.processWidth) { // 容错处理
    distanceX = this.processWidth;
  }
  if(distanceX < 0) { // 容错处理
    distanceX = 0
  }
  this.videoState.distance = distanceX
  this.video.currentTime = this.videoState.distance / this.processWidth * this.video.duration
}
// 进度条 鼠标抬起
handleProgressUp(event: any): void {
  this.videoState.downState = false
  // 视频播放
  this.video.currentTime = this.videoState.distance / this.processWidth * this.video.duration
  this.currentTime = this.formatTime(this.video.currentTime)
  if(this.videoState.playState) {
    this.play(undefined)
  }
}这里需要计算进度条的位置,来获取点击进度条的百分比,之后更新视频的当前播放时间。当然,我们还得有容错处理,比如进度条为负数时候,当前播放时间为0。
我们实现了播放进度条的操作,对声音进度条的实现就很容易上手了。声音进度条也是监听鼠标的点击,移动,松开。不过,这次我们处理的是已知声音 div 的高度。
// app.component.ts

// 声音条 鼠标按下
handleVolProgressDown(event: any) {
  this.voiceState.topInit = this.getOffset(this.voiceProOut, undefined).top
  this.volProcessHeight = this.voiceProOut.clientHeight
  this.voiceState.downState = true //按下鼠标标志
  this.voiceState.distance = this.volProcessHeight - (event.clientY + document.documentElement.scrollTop - this.voiceState.topInit)
}
// 声音 滚动条移动
handleVolProgressMove(event: any) {
  if(!this.voiceState.downState) return
    let disY = this.voiceState.topInit + this.volProcessHeight - (event.clientY + document.documentElement.scrollTop)
    if(disY > this.volProcessHeight - 2) { // 容错处理
      disY = this.volProcessHeight - 2
    }
    if(disY < 0) { // 容错处理
      disY = 0
    }
    this.voiceState.distance = disY
    this.video.volume = this.voiceState.distance / this.volProcessHeight
    this.videoOption.volume = Math.round(this.video.volume * 100)
}
// 声音 鼠标抬起
handleVolProgressUp(event: any) {
  this.voiceState.downState = false //按下鼠标标志
  let voiceRate =  this.voiceState.distance / this.volProcessHeight
  if(voiceRate > 1) {
    voiceRate = 1
  }
  if(voiceRate < 0) {
    voiceRate = 0
  }
  this.video.volume = voiceRate
  this.videoOption.volume = Math.round(this.video.volume * 100); // 赋值给视频声音
}如图:
完成了上面的内容,我们以一个 gif 图来展示效果:
全屏,声音和画中画比较难截图,
"] 🎜🎜에서 구현한 기능은 다음과 같습니다: 🎜Gifangular tutorial🎜 그림과 같이: 🎜🎜
- 재생/정지
- 빨리 되감기/빨리 감기/2배속
- 사운드 켜기/사운드 끄기
- 전체 화면 시작/전체 화면 종료
- PIP 시작/PIP 종료 [Android 태블릿은 지원되지 않으며 권장하지 않음]
- 경과 시간/총 시간
- 재생 진행률 표시줄 기능: 클릭 및 드래그 진행 지원
- 사운드 진행률 표시줄 기능: 클릭 및 드래그 진행 지원
🎜🎜 하나씩 구현해 보겠습니다. 🎜🎜 여기서 초점은 레이아웃이 아니라 간단히 정의해 보겠습니다. 🎜rrreee
🎜angular ant 디자인 code> 를 여기서 사용하는데, 예전에 관련 글을 쓴 적이 있는데, 익숙하지 않은 독자분들은 <a href="//m.sbmmt.com/js-tutorial-491122.html" target=" 으로 가보시면 됩니다. _blank" textvalue=" Angular와 NG-ZORRO의 빠른 개발"> Angular의 결합 NG-ZORRO 빠른 개발🎜🎜</a>Play/Stop
🎜여기에서 직접video객체 메소드play( )및pause()를 호출하세요.🎜rrreee🎜사용자 정의된play및pause메소드는 여기에 다음과 같이 플래그를 추가합니다. 아래에서 논의할 진행률 표시줄 제어는 더 간결할 수 있으며 독자는 이를 약어로 작성할 수 있습니다. 🎜빨리 되감기/빨리 감기/2배속
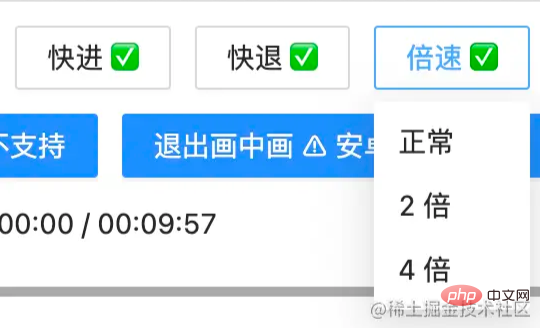
🎜여기에서 빨리 되감기, 빨리 감기 및 2배속으로 제어할 수 있는 다양한 옵션을 설정하세요. 매개변수를 통해 전달: 🎜rrreee🎜🎜
소리 켜기/소리 끄기
🎜소리를 켜거나 끄려면videomuted속성을 사용하세요. /code>: 🎜rrreee전체 화면 진입/전체 화면 종료
🎜전체 화면 작동도 매우 간단합니다.webkitRequestFullScreen🎜을 사용하세요. rrreee🎜전체 화면 후에esc를 누르면 전체 화면을 종료할 수 있습니다🎜picture-in-picture 입력/picture-in 종료 -picture
🎜picture-in-picture는 동영상을 축소하는 팝업창과 같습니다~ 🎜rrreee🎜동영상스타일을 눈에 띄지 않게 설정하세요...🎜경과 시간/총 재생 시간🎜동영상 녹화 동영상의 총 재생 시간과 현재 재생 시간입니다. 구성 요소에 오면 비디오의 메타 정보를 얻고 비디오 재생 프로세스 중에 총 지속 시간을 가져와 현재 지속 시간을 업데이트합니다. 🎜rrreee🎜formatTime은 서식 지정 기능입니다🎜재생 진행률 표시줄 기능
🎜마우스의 클릭, 이동, 놓기이벤트, 동영상 재생 시간과 전체 이벤트를 나누어 백분율을 계산합니다. 🎜rrreee🎜여기서 진행률 표시줄의 클릭 비율을 얻기 위해 진행률 표시줄의 위치를 계산한 다음 비디오의 현재 재생 시간을 업데이트해야 합니다. 물론 내결함성 처리도 필요합니다. 예를 들어 진행률 표시줄이 음수이면 현재 재생 시간은 0입니다. 🎜사운드 진행률 표시줄
🎜재생 진행률 표시줄 작업을 구현했으며, 사운드 진행률 표시줄 구현으로 쉽게 시작할 수 있습니다. 사운드 진행률 표시줄은 마우스의 클릭, 이동 및 놓기도 모니터링합니다. 그러나 이번에는 알려진 사운드div의 높이를 다루고 있습니다. 🎜rrreee🎜그림과 같이: 🎜🎜🎜
효과 시연
🎜위 콘텐츠를 완료한 후gif사진을 사용하여 효과를 보여줍니다. 🎜 🎜🎜
🎜전체 화면, 사운드, PIP(Picture-in-Picture)는 캡처하기 어렵고Gif에 반영될 수 없습니다🎜자세한 코드는 video-ng에서 확인하세요.
【끝】
더 많은 프로그래밍 관련 지식을 보려면 프로그래밍 입문을 방문하세요! !
위 내용은 Angular에서 비디오 플레이어를 사용자 정의하는 방법의 상세 내용입니다. 자세한 내용은 PHP 중국어 웹사이트의 기타 관련 기사를 참조하세요!