이 글은 springboot 2.0.8(코드 포함)에서 jsp 페이지로 점프하는 방법을 소개합니다. 필요한 친구들이 참고할 수 있기를 바랍니다.
jsp 페이지만으로 점프하기 위한 튜토리얼입니다. 나중에 html과 jsp의 공존에 대해 소개하겠습니다. thymeleaf 템플릿과 구성에 임시로 주석을 달았습니다.
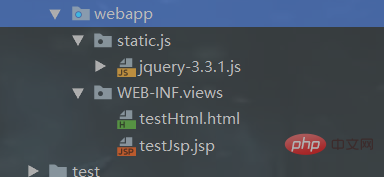
1 디렉토리 결과 및 jsp 파일 생성

2 구성 return 템플릿 및 코드로 돌아가기
@RequestMapping(value = "/testJsp", produces = "application/json;charset=UTF-8", method = {RequestMethod.POST, RequestMethod.GET})
    public String testJsp(Model m, HttpServletRequest request, HttpServletResponse response){
        List<Map<String,Object>> list=userService.userQueryAll();
        request.setAttribute("list",list);
        log.info("进入了testJsp方法!");
        return "views/testJsp";
}3.application.yml 파일 구성 thymeleaf 템플릿 매개변수
spring:
  dataSource:
    type: com.alibaba.druid.pool.DruidDataSource
    url: jdbc:mysql://localhost:3306/db-test?useUnicode=true&characterEncoding=utf8&tinyInt1isBit=false&usessl=false
    username: root
    password: 123456
    driverClassName: com.mysql.jdbc.Driver
  mvc:
    view: #新版本 1.3后可以使用
      suffix: .jsp
      prefix: /WEB-INF/
  view: #老版本 1.4后被抛弃
    suffix: .jsp
prefix: /WEB-INF/4. pom.xml 파일은 tomcat 및 jsp 지원을 추가합니다. thymeleaf 랙 패키지가 있으면 여기에서 일시적으로 주석 처리됩니다. jsp 점프만 작성됩니다. ( yes thymeleaf가 패키지를 빌드할 때 반환 템플릿은 html 페이지로 점프하는 것을 우선시합니다)
<!--tomcat支持-->
        <dependency>
            <groupId>org.springframework.boot</groupId>
            <artifactId>spring-boot-starter-tomcat</artifactId>
            <scope>provided</scope>
        </dependency>
        <dependency>
            <groupId>org.apache.tomcat.embed</groupId>
            <artifactId>tomcat-embed-jasper</artifactId>
            <scope>provided</scope>
        </dependency>
        <!--servlet依赖.-->
        <dependency>
            <groupId>javax.servlet</groupId>
            <artifactId>javax.servlet-api</artifactId>
            <version>4.0.1</version>
            <scope>provided</scope>
        </dependency>
        <!--jsp标签库-->
        <dependency>
            <groupId>javax.servlet</groupId>
            <artifactId>jstl</artifactId>
</dependency>5. jsp 페이지는 EL 표현식을 직접 사용합니다
<%@ page contentType="text/html;charset=UTF-8" isELIgnored="false" pageEncoding="UTF-8" %>
<%@ taglib uri="http://java.sun.com/jstl/core_rt" prefix="c" %>
<%
    String path = request.getContextPath();
    String basePath = request.getScheme() + "://" + request.getServerName() + ":" + request.getServerPort() + path + "/";
%>
<!DOCTYPE html >
<html lang="zh-CN">
<head>
    <title>Title</title>
    <meta http-equiv="Content-Type" content="text/html; charset=utf-8"/>
    <script src="<%=basePath%>static/js/jquery-3.3.1.js" charset="utf-8"></script>
</head>
<body>
<table border="1">
    <thead>
    <tr>
        <th>序号</th>
        <th>名字</th>
        <th>号码</th>
        <th>创建时间</th>
    </tr>
    </thead>
    <tbody>
    <c:forEach items="${list}" var="listv" varStatus="status">
        <tr>
            <td>${listv.id}</td>
            <td>${listv.name}</td>
            <td>${listv.phone}</td>
            <td>${listv.create_time}</td>
        </tr>
    </c:forEach>
    </tbody>
</table>

</body>
<script type="text/javascript" charset="utf-8">

</script>
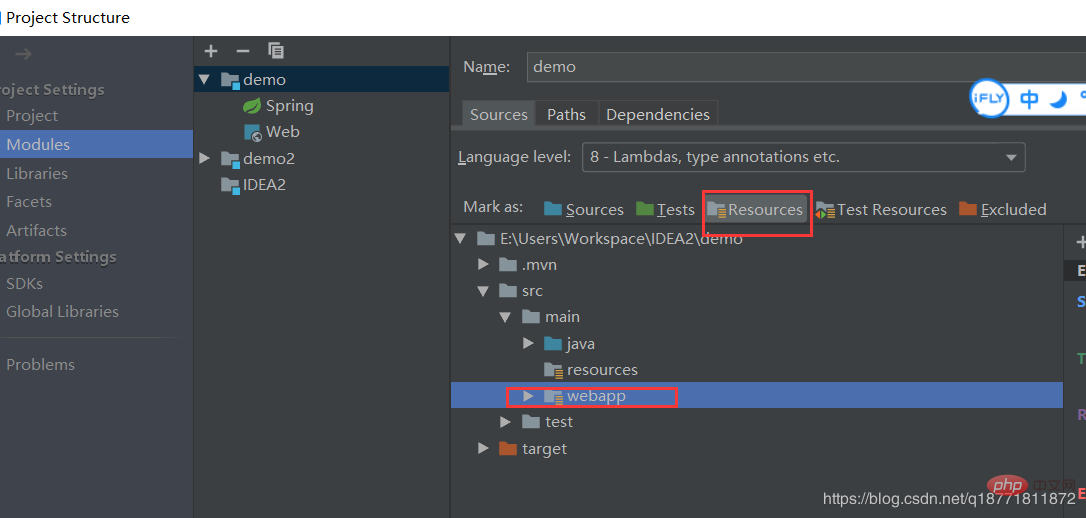
</html>6. 프로젝트 구조에 기본이 없으면 추가해야 합니다

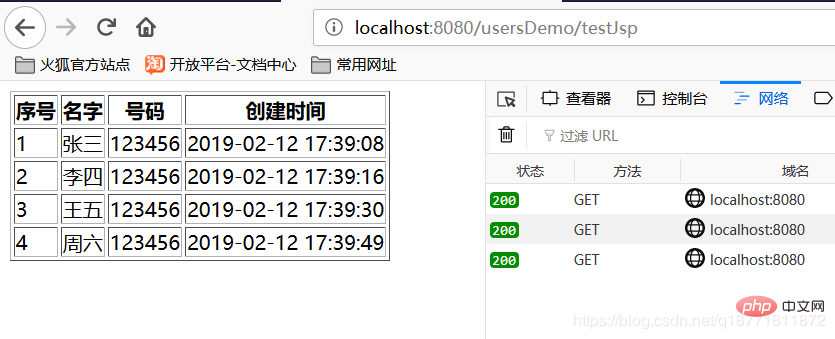
이렇게 시작하면 효과 그림은 다음과 같습니다

위 내용은 Springboot 2.0.8 jsp 페이지로 점프하는 방법 소개(코드 포함)의 상세 내용입니다. 자세한 내용은 PHP 중국어 웹사이트의 기타 관련 기사를 참조하세요!