이 기사의 내용은 Maven을 사용하여 springboot를 패키징하고 릴리스하는 방법에 대한 것입니다. 필요한 친구들이 참고할 수 있기를 바랍니다.
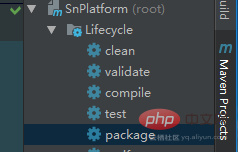
이 기사에서는 springboot 릴리스 패키지를 쉽게 구축하기 위해 maven을 사용하는 방법을 설명합니다. 먼저 그림과 같이 여러 모듈의 프로젝트 구조를 만듭니다. 여러 모듈을 관리하려면 프로젝트를 패키징할 때 일반적으로 패키징된 플러그인을 상위 pom에 구성합니다. 다른 모듈의 pom은 구성이 완료된 후 아이디어에서 Maven 도구의 패키지를 클릭하여 수행합니다. 일련의 패키징 작업

여기에서는 먼저 maven-jar-plugin 플러그인을 사용하고 다음과 같이 상위 pom에 구성을 추가합니다.

<!--通过maven-jar-plugin插件打jar包-->
<plugin>
    <groupId>org.apache.maven.plugins</groupId>
    <artifactId>maven-jar-plugin</artifactId>
    <version>2.4</version>
    <configuration>
        <archive>
            <manifest>
                <addClasspath>true</addClasspath>
                <classpathPrefix>lib/</classpathPrefix>
                <!--main入口-->
                <mainClass>com.platform.WebApplication</mainClass>
            </manifest>
        </archive>
        <!--包含的配置文件-->
        <includes>
        </includes>
        <excludes>
        </excludes>
    </configuration>
</plugin>일반적으로 dev, test, uat, pro 및 기타 환경입니다. 이러한 환경에는 서로 다른 구성이 필요합니다. springboot에서는 application-dev|test|...yml로 구분할 수 있습니다. 다른 구성의 경우 spring만 추가하면 됩니다. profiles.active=dev|test...를 기본 application.yml로
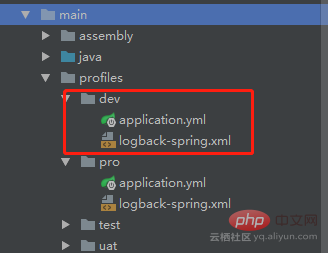
이 방법은 로컬 디버깅이나 게시 등의 불편함이 있으며 온라인에서 active 값을 앞뒤로 수정해야 합니다(물론 시작 시). jar의 경우 명령줄 활성 매개변수를 설정할 수도 있습니다. 아래에서는 그다지 편리하지 않습니다. pom에서 프로필을 구성한 다음 먼저 메인 레이어에서 아이디어 인터페이스를 클릭하여 시작에 사용되는 구성을 선택합니다. 
테스트를 구별하기 위해 서로 다른 환경 구성 파일에 대해 server.port가 설정되어 서로 다른 포트(dev:3082, pro: 3182)를 지정합니다.
그런 다음 상위에서 구성합니다. pom은 다음과 같습니다. 프로필 정보:
<profiles>
        <profile>
            <id>dev</id>
            <!--默认运行配置-->
            <activation>
                <activeByDefault>true</activeByDefault>
            </activation>
            <properties>
                <activeProfile>dev</activeProfile>
            </properties>
        </profile>
        <profile>
            <id>test</id>
            <properties>
                <activeProfile>test</activeProfile>
            </properties>
        </profile>
        <profile>
            <id>uat</id>
            <properties>
                <activeProfile>uat</activeProfile>
            </properties>
        </profile>
        <profile>
            <id>pro</id>
            <properties>
                <activeProfile>pro</activeProfile>
            </properties>
        </profile>
</profiles><resources>
<!--指定所使用的配置文件目录-->
<resource>
<directory>src/main/profiles/${activeProfile}</directory>
</resource>
</resources>이때 이 버튼만 확인하면 됩니다. 디버깅이든 최종 패키징이든 이에 따라 필요한 구성 파일을 얻으세요.
위 내용은 Maven을 사용하여 springboot를 패키징하고 릴리스하는 방법의 상세 내용입니다. 자세한 내용은 PHP 중국어 웹사이트의 기타 관련 기사를 참조하세요!


