이 기사의 내용은 가상 돔 원리 프로세스의 분석 및 구현에 관한 것입니다. 이는 특정 참고 가치가 있습니다. 도움이 필요한 친구들이 참고할 수 있기를 바랍니다.
우리 모두 알고 있듯이 DOM 노드는 웹 페이지에서 가장 비싼 브라우저 리소스입니다. DOM은 매우 느리고 크기가 매우 큽니다. 대부분의 웹 페이지 성능 문제는 DOM을 수정하는 JavaScript로 인해 발생합니다. DOM을 조작하기 위해 Javascript를 사용하는데, DOM이 트리 구조로 표현되기 때문에 DOM에 있는 내용이 매번 바뀌기 때문에 DOM에 대한 변경은 매우 빠르지만 변경된 요소와 자식은 리플로우/레이아웃 단계를 거쳐야 하며, 그런 다음 브라우저가 변경 사항을 다시 그려야 하는데 이는 속도가 느립니다. 따라서 리플로우/다시 그리기 횟수가 많아질수록 애플리케이션의 지연이 커집니다. 그러나 Javascript는 매우 빠르게 실행되며 가상 DOM은 JS와 HTML 사이에 배치되는 레이어입니다. 이전 DOM과 새 DOM을 비교하여 비교 후 차이 개체를 얻은 다음 실제로 타겟 방식으로 차이 부분을 페이지에 렌더링함으로써 실제 DOM 작업을 줄이고 궁극적으로 성능 최적화 목적을 달성할 수 있습니다.
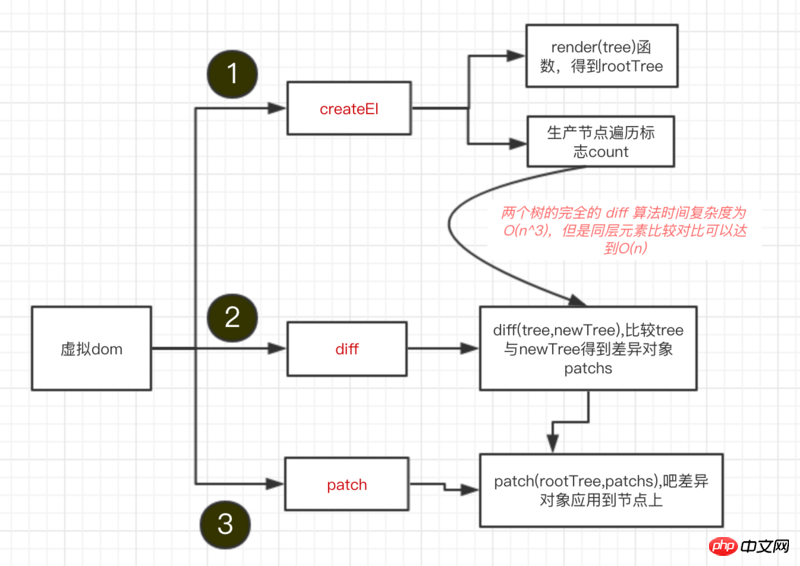
세 가지 간단한 요약 사항이 있습니다.
JavaScript를 사용하여 DOM 트리를 시뮬레이션하고 DOM 트리를 렌더링합니다.
이전 DOM 트리와 새 DOM 트리를 비교하여 차이 객체를 얻습니다
렌더링된 DOM 트리에 차이점 개체를 적용합니다.
다음은 순서도입니다.

아래에서는 코드를 사용하여 순서도를 단계별로 구현합니다.
실제로, virtual DOM은 JS 객체 구조 일종의 매핑입니다. 아래에서는 이 프로세스를 단계별로 구현합니다.
JS를 사용하면 DOM 트리의 구조를 쉽게 시뮬레이션할 수 있습니다. 예를 들어 createEl(tagName, props, children) 함수를 사용하여 DOM 구조를 만들 수 있습니다.
tagName은 태그 이름이고 props는 속성의 객체이며 children은 하위 노드입니다.
그런 다음 페이지에 렌더링하면 코드는 다음과 같습니다.
const createEl = (tagName, props, children) => new CreactEl(tagName, props, children)

const vdom = createEl('p', { 'id': 'box' }, [
  createEl('h1', { style: 'color: pink' }, ['I am H1']),
  createEl('ul', {class: 'list'}, [createEl('li', ['#list1']), createEl('li', ['#list2'])]),
  createEl('p', ['I am p'])
])

const rootnode = vdom.render()
document.body.appendChild(rootnode)위 함수를 통해 vdom.render()를 호출하면 아래와 같이 DOM 트리를 구성한 후 페이지에 렌더링할 수 있습니다.
<div id="box">
  <h1 style="color: pink;">I am H1</h1>
  <ul class="list">
    <li>#list1</li>
    <li>#list2</li>
  </ul>
  <p>I am p</p>
</div>CreactEl.js 코드 프로세스를 살펴보겠습니다.
import { setAttr } from './utils'
class CreateEl {
  constructor (tagName, props, children) {
    // 当只有两个参数的时候 例如 celement(el, [123])
    if (Array.isArray(props)) {
      children = props
      props = {}
    }
    // tagName, props, children数据保存到this对象上
    this.tagName = tagName
    this.props = props || {}
    this.children = children || []
    this.key = props ? props.key : undefined

    let count = 0
    this.children.forEach(child => {
      if (child instanceof CreateEl) {
        count += child.count
      } else {
        child = '' + child
      }
      count++
    })
    // 给每一个节点设置一个count
    this.count = count
  }
  // 构建一个 dom 树
  render () {
    // 创建dom
    const el = document.createElement(this.tagName)
    const props = this.props
    // 循环所有属性,然后设置属性
    for (let [key, val] of Object.entries(props)) {
      setAttr(el, key, val)
    }
    this.children.forEach(child => {
      // 递归循环 构建tree
      let childEl = (child instanceof CreateEl) ? child.render() : document.createTextNode(child)
      el.appendChild(childEl)
    })
    return el
  }
}위 render 함수의 기능은 노드를 생성한 다음 노드 속성을 설정하고 마지막으로 재귀적으로 생성하는 것입니다. 이런 방식으로 우리는 DOM 트리를 얻은 다음 페이지에 삽입(appendChild)합니다. render函数的功能是把节点创建好,然后设置节点属性,最后递归创建。这样子我们就得到一个DOM树,然后插入(appendChild)到页面上。
上面,我们已经创建了一个DOM树,然后在创建一个不同的DOM树,然后做比较,得到比较的差异对象。
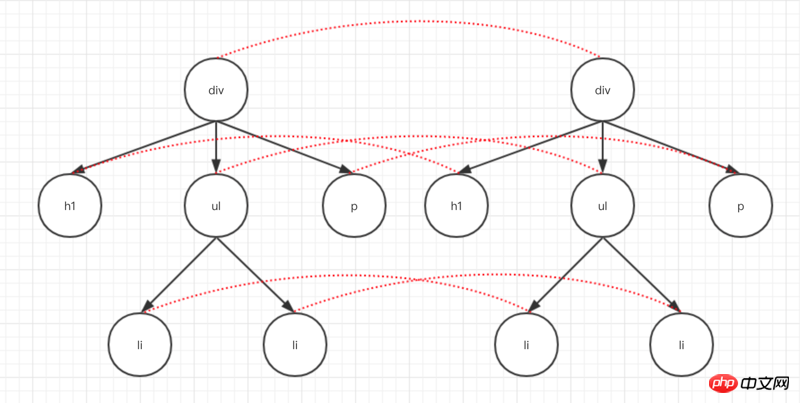
比较两棵DOM树的差异,是虚拟DOM的最核心部分,这也是人们常说的虚拟DOM的diff算法,两颗完全的树差异比较一个时间复杂度为 O(n^3)。但是在我们的web中很少用到跨层级DOM树的比较,所以一个层级跟一个层级对比,这样算法复杂度就可以达到 O(n)。如下图

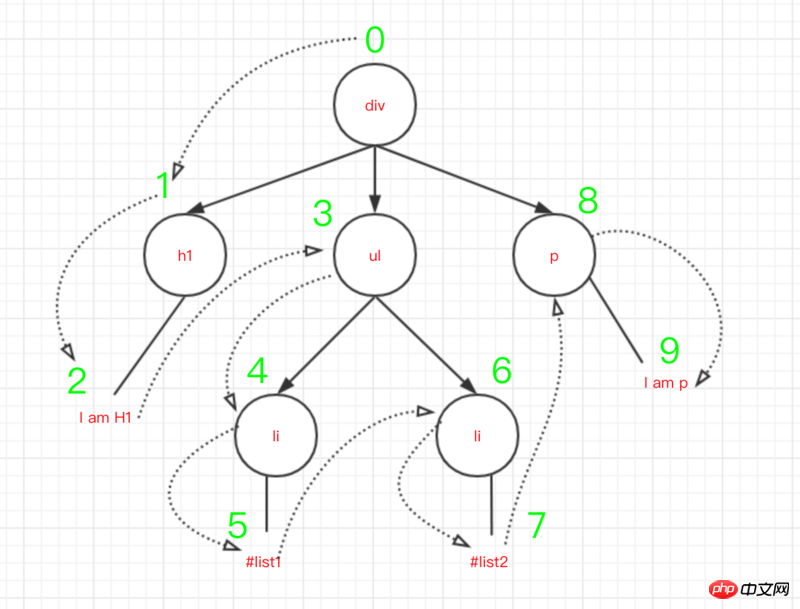
其实在代码中,我们会从根节点开始标志遍历,遍历的时候把每个节点的差异(包括文本不同,属性不同,节点不同)记录保存起来。如下图:

两个节点之间的差异有总结起来有下面4种
0 直接替换原有节点
1 调整子节点,包括移动、删除等
2 修改节点属性
3 修改节点文本内容
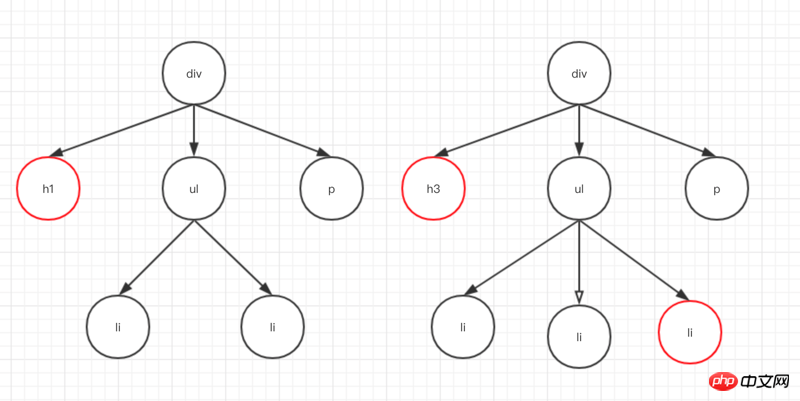
如下面两棵树比较,把差异记录下来。

主要是简历一个遍历index(看图3),然后从根节点开始比较,比较万之后记录差异对象,继续从左子树比较,记录差异,一直遍历下去。主要流程如下
// 这是比较两个树找到最小移动量的算法是Levenshtein距离,即O(n * m)
// 具体请看 https://www.npmjs.com/package/list-diff2
import listDiff from 'list-diff2'
// 比较两棵树
function diff (oldTree, newTree) {
  // 节点的遍历顺序
  let index = 0
  // 在遍历过程中记录节点的差异
  let patches = {}
  // 深度优先遍历两棵树
  deepTraversal(oldTree, newTree, index, patches)
  // 得到的差异对象返回出去
  return patches
}

function deepTraversal(oldNode, newNode, index, patches) {
  let currentPatch = []
  // ...中间有很多对patches的处理
  // 递归比较子节点是否相同
  diffChildren(oldNode.children, newNode.children, index, patches, currentPatch)
  if (currentPatch.length) {
    // 那个index节点的差异记录下来
    patches[index] = currentPatch
  }
}

// 子数的diff
function diffChildren (oldChildren, newChildren, index, patches, currentPatch) {
  const diffs = listDiff(oldChildren, newChildren)
  newChildren = diffs.children
  // ...省略记录差异对象
  let leftNode = null
  let currentNodeIndex = index
  oldChildren.forEach((child, i) => {
    const newChild = newChildren[i]
    // index相加
    currentNodeIndex = (leftNode && leftNode.count) ? currentNodeIndex + leftNode.count + 1 : currentNodeIndex + 1
    // 深度遍历,递归
    deepTraversal(child, newChild, currentNodeIndex, patches)
    // 从左树开始
    leftNode = child
  })
}然后我们调用完diff(tree, newTree)等到最后的差异对象是这样子的。
{
  "1": [
    {
      "type": 0,
      "node": {
        "tagName": "h3",
        "props": {
          "style": "color: green"
        },
        "children": [
          "I am H1"
        ],
        "count": 1
      }
    }
  ]
  ...
}key是代表那个节点,这里我们是第二个,也就是h1会改变成h3

사실 코드에서는 루트 노드부터 순회를 시작하고 순회 중 각 노드의 차이점(다른 텍스트, 다른 속성, 다른 노드 포함)을 기록합니다. 아래에 표시된대로 :
 🎜두 노드의 차이점은 다음 네 가지로 요약할 수 있습니다🎜
import listDiff from 'list-diff2'
// 每个节点有四种变动
export const REPLACE = 0 // 替换原有节点
export const REORDER = 1 // 调整子节点,包括移动、删除等
export const PROPS = 2 // 修改节点属性
export const TEXT = 3 // 修改节点文本内容

export function diff (oldTree, newTree) {
  // 节点的遍历顺序
  let index = 0
  // 在遍历过程中记录节点的差异
  let patches = {}
  // 深度优先遍历两棵树
  deepTraversal(oldTree, newTree, index, patches)
  // 得到的差异对象返回出去
  return patches
}

function deepTraversal(oldNode, newNode, index, patches) {
  let currentPatch = []
  if (newNode === null) { // 如果新节点没有的话直接不用比较了
    return
  }
  if (typeof oldNode === 'string' && typeof newNode === 'string') {
    // 比较文本节点
    if (oldNode !== newNode) {
      currentPatch.push({
        type: TEXT,
        content: newNode
      })
    }
  } else if (oldNode.tagName === newNode.tagName && oldNode.key === newNode.key) {
    // 节点类型相同
    // 比较节点的属性是否相同
    let propasPatches = diffProps(oldNode, newNode)
    if (propasPatches) {
      currentPatch.push({
        type: PROPS,
        props: propsPatches
      })
    }
    // 递归比较子节点是否相同
    diffChildren(oldNode.children, newNode.children, index, patches, currentPatch)
  } else {
    // 节点不一样,直接替换
    currentPatch.push({ type: REPLACE, node: newNode })
  }

  if (currentPatch.length) {
    // 那个index节点的差异记录下来
    patches[index] = currentPatch
  }

}

// 子数的diff
function diffChildren (oldChildren, newChildren, index, patches, currentPatch) {
  var diffs = listDiff(oldChildren, newChildren)
  newChildren = diffs.children
  // 如果调整子节点,包括移动、删除等的话
  if (diffs.moves.length) {
    var reorderPatch = {
      type: REORDER,
      moves: diffs.moves
    }
    currentPatch.push(reorderPatch)
  }

  var leftNode = null
  var currentNodeIndex = index
  oldChildren.forEach((child, i) => {
    var newChild = newChildren[i]
    // index相加
    currentNodeIndex = (leftNode && leftNode.count) ? currentNodeIndex + leftNode.count + 1 : currentNodeIndex + 1
    // 深度遍历,从左树开始
    deepTraversal(child, newChild, currentNodeIndex, patches)
    // 从左树开始
    leftNode = child
  })
}

// 记录属性的差异
function diffProps (oldNode, newNode) {
  let count = 0 // 声明一个有没没有属性变更的标志
  const oldProps = oldNode.props
  const newProps = newNode.props
  const propsPatches = {}

  // 找出不同的属性
  for (let [key, val] of Object.entries(oldProps)) {
    // 新的不等于旧的
    if (newProps[key] !== val) {
      count++
      propsPatches[key] = newProps[key]
    }
  }
  // 找出新增的属性
  for (let [key, val] of Object.entries(newProps)) {
    if (!oldProps.hasOwnProperty(key)) {
      count++
      propsPatches[key] = val
    }
  }
  // 没有新增 也没有不同的属性 直接返回null
  if (count === 0) {
    return null
  }

  return propsPatches
}
function patch (node, patches) {
  // 也是从0开始
  const step = {
    index: 0
  }
  // 深度遍历
  deepTraversal(node, step, patches)
}

// 深度优先遍历dom结构
function deepTraversal(node, step, patches) {
  // 拿到当前差异对象
  const currentPatches = patches[step.index]
  const len = node.childNodes ? node.childNodes.length : 0
  for (let i = 0; i < len; i++) {
    const child = node.childNodes[i]
    step.index++
    deepTraversal(child, step, patches)
  }
  //如果当前节点存在差异
  if (currentPatches) {
    // 把差异对象应用到当前节点上
    applyPatches(node, currentPatches)
  }
}diff(tree, newTree)를 호출하고 최종 차이 개체가 다음과 같을 때까지 기다립니다. 🎜import {REPLACE, REORDER, PROPS, TEXT} from './diff'
import { setAttr } from './utils'
export function patch (node, patches) {
// 也是从0开始
const step = {
index: 0
}
// 深度遍历
deepTraversal(node, step, patches)
}
// 深度优先遍历dom结构
function deepTraversal(node, step, patches) {
// 拿到当前差异对象
const currentPatches = patches[step.index]
const len = node.childNodes ? node.childNodes.length : 0
for (let i = 0; i < len; i++) {
const child = node.childNodes[i]
step.index++
deepTraversal(child, step, patches)
}
//如果当前节点存在差异
if (currentPatches) {
// 把差异对象应用到当前节点上
applyPatches(node, currentPatches)
}
}
// 把差异对象应用到当前节点上
function applyPatches(node, currentPatches) {
currentPatches.forEach(currentPatch => {
switch (currentPatch.type) {
// 0: 替换原有节点
case REPLACE:
var newNode = (typeof currentPatch.node === 'string') ? document.createTextNode(currentPatch.node) : currentPatch.node.render()
node.parentNode.replaceChild(newNode, node)
break
// 1: 调整子节点,包括移动、删除等
case REORDER:
moveChildren(node, currentPatch.moves)
break
// 2: 修改节点属性
case PROPS:
for (let [key, val] of Object.entries(currentPatch.props)) {
if (val === undefined) {
node.removeAttribute(key)
} else {
setAttr(node, key, val)
}
}
break;
// 3:修改节点文本内容
case TEXT:
if (node.textContent) {
node.textContent = currentPatch.content
} else {
node.nodeValue = currentPatch.content
}
break;
default:
throw new Error('Unknow patch type ' + currentPatch.type);
}
})
}
// 调整子节点,包括移动、删除等
function moveChildren (node, moves) {
let staticNodelist = Array.from(node.childNodes)
const maps = {}
staticNodelist.forEach(node => {
if (node.nodeType === 1) {
const key = node.getAttribute('key')
if (key) {
maps[key] = node
}
}
})
moves.forEach(move => {
const index = move.index
if (move.type === 0) { // 变动类型为删除的节点
if (staticNodeList[index] === node.childNodes[index]) {
node.removeChild(node.childNodes[index]);
}
staticNodeList.splice(index, 1);
} else {
let insertNode = maps[move.item.key]
? maps[move.item.key] : (typeof move.item === 'object')
? move.item.render() : document.createTextNode(move.item)
staticNodelist.splice(index, 0, insertNode);
node.insertBefore(insertNode, node.childNodes[index] || null)
}
})
}key는 해당 노드를 나타냅니다. 여기서는 두 번째 노드입니다. 즉, h1이 h3으로 변경되며 두 개가 있습니다. 생략 차이점 객체 코드가 게시되지 않았습니다~~🎜🎜그럼 다음과 같이 diff.js의 전체 코드를 살펴보세요🎜rrreee🎜차이 객체를 얻은 후 남은 것은 차이점 객체를 우리 dom 노드에 적용하는 것뿐입니다. . 🎜🎜렌더링된 DOM 트리에 차이 개체를 적용합니다.🎜🎜이 시점에서는 실제로 훨씬 간단합니다. 위에서 얻은 차이 객체 이후 동일한 깊이 순회를 선택합니다. 해당 노드에 차이가 있으면 위의 네 가지 유형 중 어느 것인지 결정하고 차이 객체에 따라 노드를 직접 수정합니다. 🎜rrreee🎜이런 식으로 patch(rootnode, patch)를 호출하면 타겟 방식으로 다른 노드를 직접 변경할 수 있습니다. 🎜🎜path.js의 전체 코드는 다음과 같습니다. 🎜import {REPLACE, REORDER, PROPS, TEXT} from './diff'
import { setAttr } from './utils'
export function patch (node, patches) {
// 也是从0开始
const step = {
index: 0
}
// 深度遍历
deepTraversal(node, step, patches)
}
// 深度优先遍历dom结构
function deepTraversal(node, step, patches) {
// 拿到当前差异对象
const currentPatches = patches[step.index]
const len = node.childNodes ? node.childNodes.length : 0
for (let i = 0; i < len; i++) {
const child = node.childNodes[i]
step.index++
deepTraversal(child, step, patches)
}
//如果当前节点存在差异
if (currentPatches) {
// 把差异对象应用到当前节点上
applyPatches(node, currentPatches)
}
}
// 把差异对象应用到当前节点上
function applyPatches(node, currentPatches) {
currentPatches.forEach(currentPatch => {
switch (currentPatch.type) {
// 0: 替换原有节点
case REPLACE:
var newNode = (typeof currentPatch.node === 'string') ? document.createTextNode(currentPatch.node) : currentPatch.node.render()
node.parentNode.replaceChild(newNode, node)
break
// 1: 调整子节点,包括移动、删除等
case REORDER:
moveChildren(node, currentPatch.moves)
break
// 2: 修改节点属性
case PROPS:
for (let [key, val] of Object.entries(currentPatch.props)) {
if (val === undefined) {
node.removeAttribute(key)
} else {
setAttr(node, key, val)
}
}
break;
// 3:修改节点文本内容
case TEXT:
if (node.textContent) {
node.textContent = currentPatch.content
} else {
node.nodeValue = currentPatch.content
}
break;
default:
throw new Error('Unknow patch type ' + currentPatch.type);
}
})
}
// 调整子节点,包括移动、删除等
function moveChildren (node, moves) {
let staticNodelist = Array.from(node.childNodes)
const maps = {}
staticNodelist.forEach(node => {
if (node.nodeType === 1) {
const key = node.getAttribute('key')
if (key) {
maps[key] = node
}
}
})
moves.forEach(move => {
const index = move.index
if (move.type === 0) { // 变动类型为删除的节点
if (staticNodeList[index] === node.childNodes[index]) {
node.removeChild(node.childNodes[index]);
}
staticNodeList.splice(index, 1);
} else {
let insertNode = maps[move.item.key]
? maps[move.item.key] : (typeof move.item === 'object')
? move.item.render() : document.createTextNode(move.item)
staticNodelist.splice(index, 0, insertNode);
node.insertBefore(insertNode, node.childNodes[index] || null)
}
})
}到这里,最基本的虚拟DOM原理已经讲完了,也简单了实现了一个虚拟DOM.
위 내용은 가상 돔 원리 프로세스 분석 및 구현의 상세 내용입니다. 자세한 내용은 PHP 중국어 웹사이트의 기타 관련 기사를 참조하세요!