이 글에서는 주로 nodejs+mongodb+vue의 프론트엔드와 백엔드에 있는 ueditor를 구성하기 위한 샘플 코드를 소개합니다. 내용이 꽤 좋아서 지금 공유하고 참고하겠습니다.
개인 블로그 프로젝트를 할 때 배경과 상호작용하기 위한 리치 텍스트 박스 입력 컴포넌트가 필요했는데 nodejs에 대한 공식적인 구성이 없어서 직접 정보를 확인하고 조사해서 최종적으로 적용했습니다. 시스템.
1. 백엔드 구성
우선 이 프로젝트를 찾았습니다: https://github.com/netpi/ueditor 해당 오픈 소스 코드를 사용하여 노드에 ueditor를 적용할 수 있습니다. 다음:
1. 먼저 종속성을 설치합니다.
npm install ueditor --save
2. 노드 설정 구성
//引入接口文件
const api = require('./api');
//引入文件模块
const fs = require('fs');
//引入处理路径模块
const path = require('path');
//引入处理post数据模块
var bodyParser = require('body-parser');

//引入express
const express = require('express');
const app = express();
//引入ueditor
const ueditor = require("ueditor")

// parse application/x-www-form-urlencoded
app.use(bodyParser.urlencoded({ extended: false }))

//更改限定大小
app.use(bodyParser.json({ limit: '50mb' }));
app.use(bodyParser.urlencoded({ limit: '50mb', extended: true }));
// parse application/json
app.use(bodyParser.json())
app.use(api)

app.use("/ueditor/ue", ueditor(path.join(__dirname, 'public'), function(req, res, next) {
  //客户端上传文件设置
  var imgDir = '/img/ueditor/'
  var ActionType = req.query.action;
  if (ActionType === 'uploadimage' || ActionType === 'uploadfile' || ActionType === 'uploadvideo') {
    var file_url = imgDir; //默认图片上传地址
    /*其他上传格式的地址*/
    if (ActionType === 'uploadfile') {
      file_url = '/file/ueditor/'; //附件
    }
    if (ActionType === 'uploadvideo') {
      file_url = '/video/ueditor/'; //视频
    }
    res.ue_up(file_url); //你只要输入要保存的地址 。保存操作交给ueditor来做
    res.setHeader('Content-Type', 'text/html');
  }
  // 客户端发起图片列表请求
  else if (req.query.action === 'listimage') {
    var dir_url = imgDir;
    res.ue_list(dir_url); // 客户端会列出 dir_url 目录下的所有图片
  }
  // 客户端发起其它请求
  else {
    // console.log('config.json')
    res.setHeader('Content-Type', 'application/json');
    res.redirect('../nodejs/config.json');
  }
}));

//处理静态文件 todo
// 访问静态资源文件 这里是访问所有dist目录下的静态资源文件
app.use(express.static(path.resolve(__dirname, 'public/')))
app.use('/ueditor', function(req, res) {
  res.render('views/');
});

//监听8888端口
app.listen(8888);
console.log('sucess listen......')여기서는 ueditor가 필요하므로 플러그인이 다음 위치에 설치되었습니다. node_module이므로 추가 파일을 복사할 필요가 없으며 백엔드로 반환된 데이터를 저장하기 위해 이 디렉터리 아래에 새 공용 폴더를 생성하기만 하면 됩니다. 또한 구성 파일 config.json
도 도입해야 합니다. 2. 프런트 엔드 구성
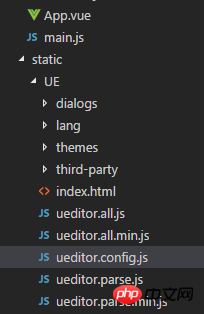
Vue의 프런트 엔드 구성에는 ueditor 파일을 다운로드해야 합니다. 디렉토리에 넣고 static 폴더에 넣은 다음 vue 항목 파일에 ueditor 파일을 도입했습니다:
import '../static/UE/ueditor.config.js'
import '../static/UE/ueditor.all.min.js'
import '../static/UE/lang/zh-cn/zh-cn.js'
import '../static/UE/ueditor.parse.min.js'
ueditor.config.js 파일의 디렉터리 구성은 플러그인이 있는 디렉터리:
window.UEDITOR_HOME_URL = "/static/UE/"

그런 다음 구성 요소에서 구성하면 됩니다.
My UE.vue 컴포넌트:
<template>
<script :id=id type="text/plain"></script>
</template>
<script>
export default {
name: 'UE',
data () {
return {
editor: null
}
},
props: {
defaultMsg: {
type: String
},
config: {
type: Object
},
id: {
type: String
},
},
mounted() {
const _this = this;
this.editor = UE.getEditor(this.id, this.config); // 初始化UE
this.editor.addListener("ready", function () {
_this.editor.setContent(_this.defaultMsg); // 确保UE加载完成后,放入内容。
});
},
methods: {
getUEContent() { // 获取内容方法
return this.editor.getContent()
}
},
destroyed() {
this.editor.destroy();
}
}
</script>소개 방법:
<UE :defaultMsg=defaultMsg :config=config :id=ue1 ref="ue"></UE>

data() {
  return {
   defaultMsg: "",
   image: "",
   config: {
    initialFrameWidth: null,
    initialFrameHeight: 350
   },
   ue1: "ue1"
  };
 },
ueditor
3의 기본 기능을 성공적으로 구성할 수 있습니다.3 프론트 및 백엔드 요청 프록시
vue dev 환경에서, 백엔드 요청 프록시를 전달하도록 webpack의 ProxyTable을 설정할 수 있으며, 같은 방식으로 vue 빌드 이후의 파일은 정적 파일을 백엔드와 동일한 포트로 프록시하기 위해 Node를 사용해야 합니다. 백엔드 포트를 요청하기 전에 공간이 제한되어 기사가 충분히 명확하지 않을 수 있습니다. 자세한 내용은 내 프로젝트 코드를 참조하세요: https://github.com/cheer4chai/myBlog
위는 이 기사의 전체 내용입니다. . 더 많은 관련 내용을 보시려면 PHP 중국어 홈페이지를 주목해주세요!
관련 권장사항:
node.js는 스트림을 사용하여 읽기와 쓰기의 동기화, 동시에 읽기와 쓰기 기능을 달성합니다.ajax가 jquery에서 도메인 간 처리를 처리하는 방식에 대해angular2 및 nodejs는 이미지 업로드를 구현합니다.기능
위 내용은 nodejs+mongodb+vue 프론트 및 백엔드에서 ueditor를 구성하는 코드 정보의 상세 내용입니다. 자세한 내용은 PHP 중국어 웹사이트의 기타 관련 기사를 참조하세요!