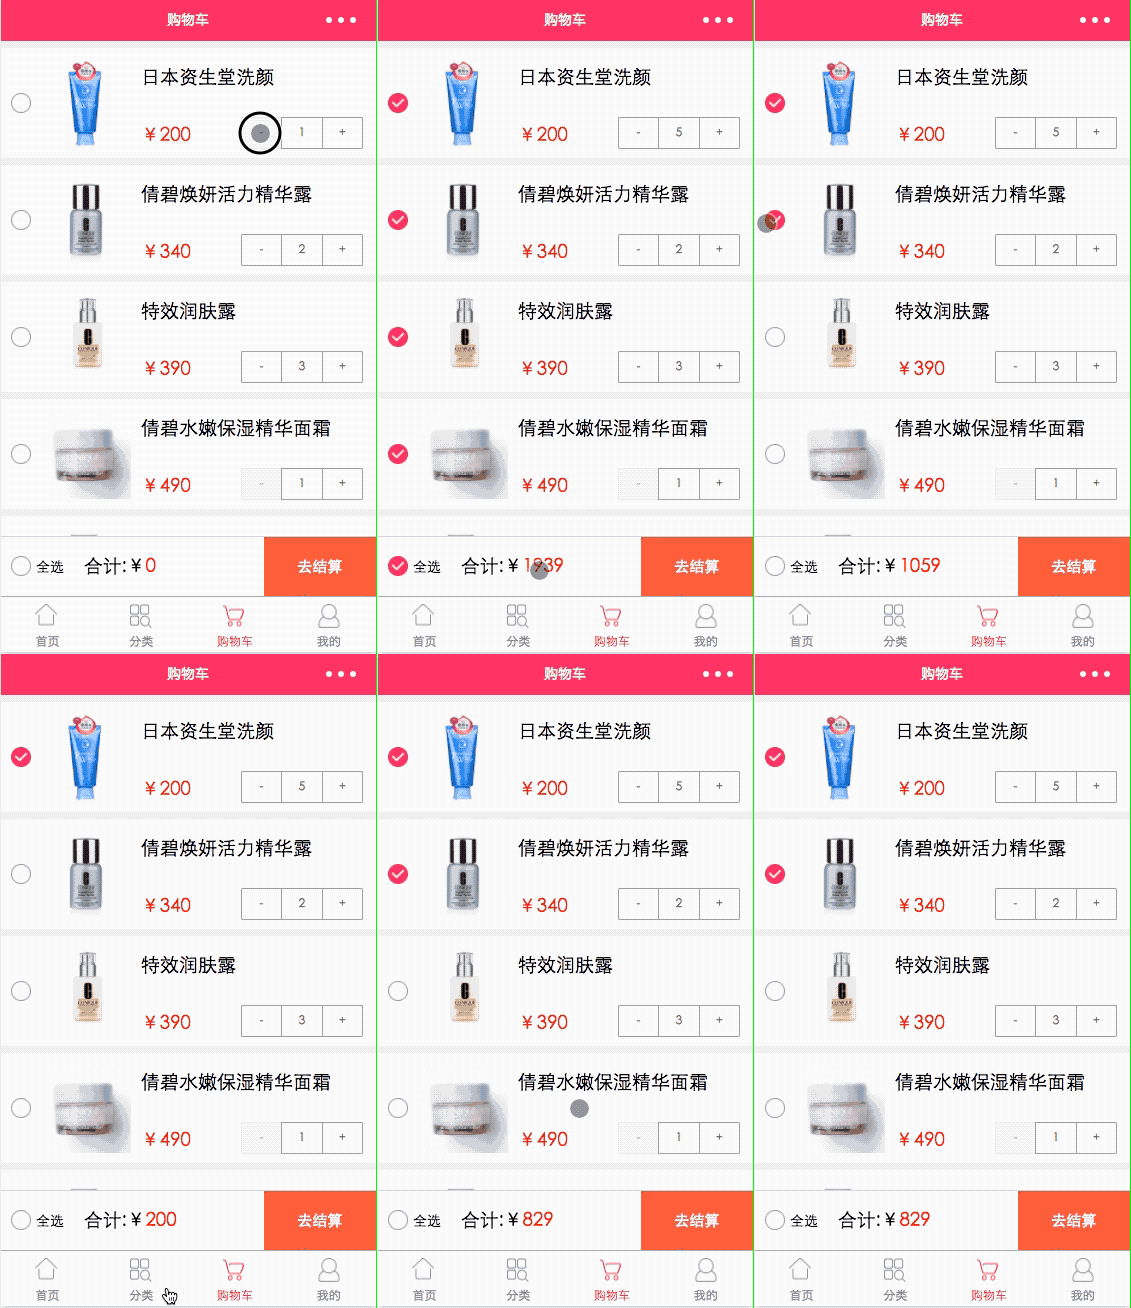
이 글에서는 WeChat Mini 프로그램 실습 장에서 장바구니 구현 코드 예제를 주로 소개합니다. 장바구니의 기능적 구현에 대해 자세히 소개합니다. 관심 있는 분들은 자세히 알아보세요. 여러분, 거의 반달 동안 글을 쓰지 못했는데, 이제 글을 쓸 때 조금 뻐근한 느낌이 듭니다. 최근에는 글을 쓰는 일이 인정받지 못해서 의욕이 없어 다시 창작을 시작했는데, 그때는 정말 버티지 못하고 포기할 뻔 했던 독자분들께 감사 인사를 전하고 싶습니다. 저를 응원해주시고 격려해주신 한국 대학원생 카오밍님. 다음 업데이트도 기대됩니다. 정말 감동받았고, 바로 전투력을 회복했습니다. 사실 여러분의 단순한 좋아요와 댓글이 저에게 가장 큰 힘이 됩니다. 자, 선정주의는 끝났습니다. 이제 오늘의 초점인 장바구니에 대해 이야기할 시간입니다. 장바구니 인터페이스는 구현하기 어렵지 않지만 작은 프로그램이든 APP이든 내부 논리를 다루는 것이 어렵습니다. , 장바구니의 논리가 가장 어렵습니다. 이제 장바구니 구현 방법을 알려드리겠습니다. 먼저 렌더링을 살펴보겠습니다.
 장바구니 구현
cart.wxml
<import src="/template/quantity/index.wxml" />
<scroll-view class="scroll" scroll-y="true">
<view class="separate"></view>
<view wx:for="{{carts}}">
<view class="cart_container">
<image class="item-select" bindtap="switchSelect" data-index="{{index}}" data-id="{{index}}" src="{{item.isSelect?'../../images/cart/comment_select.png':'../../images/cart/comment_normal.png'}}" />
<image class="item-image" src="{{item.pic}}"></image>
<view class="column">
<text class="title">{{item.name}}</text>
<view class="row">
<text class="sku-price">¥</text>
<text class="sku-price">{{item.price}}</text>
<view class="sku">
<template is="quantity" data="{{ ...item.count, componentId: index }}" />
</view>
</view>
</view>
</view>
<view class="separate"></view>
</view>
</scroll-view>
<view class="bottom_total">
<view class="bottom_line"></view>
<view class="row">
<image class="item-allselect" bindtap="allSelect" src="{{isAllSelect?'../../images/cart/comment_select.png':'../../images/cart/comment_normal.png'}}" />
<text class="small_text">全选</text>
<text>合计:¥ </text>
<text class="price">{{totalMoney}}</text>
<button class="button-red" bindtap="toBuy" formType="submit">去结算</button>
</view>
</view>레이아웃은 매우 복잡하지 않습니다. 이는 장바구니 항목을 반복하는 원형 목록과 결제를 위한 하단 컨트롤입니다. 또한 원형 목록 외부에 스크롤 보기를 추가해야 한다는 점을 상기시켜 드리고 싶습니다. 데이터가 많아서 스크롤 할 수 있습니다. 스크롤, -뷰에 익숙하지 않은 경우 이전 기사를 직접 읽어 보시기 바랍니다. 그 안에 설명이 있습니다.
cat.wxss
/* pages/cart/cart.wxss */
.cart_container {
 display: flex;
 flex-direction: row;
}
.scroll {
 margin-bottom: 120rpx;
}
.column {
 display: flex;
 flex-direction: column;
}
.row {
 display: flex;
 flex-direction: row;
 align-items: center;
}
.sku {
 margin-top: 60rpx;
 margin-left: 100rpx;
}
.sku-price {
 color: red;
 position: relative;
 margin-top: 70rpx;
}
.price {
 color: red;
 position: relative;
}
.title {
 font-size: 38rpx;
 margin-top: 40rpx;
}
.small_text {
 font-size: 28rpx;
 margin-right: 40rpx;
 margin-left: 10rpx;
}
.item-select {
 width: 40rpx;
 height: 40rpx;
 margin-top: 90rpx;
 margin-left: 20rpx;
}
.item-allselect {
 width: 40rpx;
 height: 40rpx;
 margin-left: 20rpx;
}
.item-image {
 width: 180rpx;
 height: 180rpx;
 margin: 20rpx;
}
.bottom_line {
 width: 100%;
 height: 2rpx;
 background: lightgray;
}
.bottom_total {
 position: fixed;
 display: flex;
 flex-direction: column;
 bottom: 0;
 width: 100%;
 height: 120rpx;
 line-height: 120rpx;
 background: white;
}
.button-red {
 background-color: #f44336; /* 红色 */
}
button {
 position: fixed;
 right: 0;
 color: white;
 text-align: center;
 display: inline-block;
 font-size: 30rpx;
 border-radius: 0rpx;
 width: 30%;
 height: 120rpx;
 line-height: 120rpx;
}wxss 스타일 할 말이 없습니다. 속성을 이해하고 클래스를 호출하고 cart.js에 집중하세요. 전체 기사 Logic은 여기에 있습니다 arCart.js
// pages/cart/cart.js
var Temp = require('../../template/contract.js');
Page(Object.assign({}, Temp.Quantity, {
data: {
isAllSelect:false,
totalMoney:0,
// 商品详情介绍
carts: [
{
pic: "http://mz.djmall.xmisp.cn/files/product/20161201/148058328876.jpg",
name:"日本资生堂洗颜",
price:200,
isSelect:false,
// 数据设定
count: {
quantity: 2,
min: 1,
max: 20
},
},
{
pic: 'http://mz.djmall.xmisp.cn/files/product/20161201/148058301941.jpg',
name: "倩碧焕妍活力精华露",
price: 340,
isSelect: false,
// 数据设定
count: {
quantity: 1,
min: 1,
max: 20
},
},
{
pic: 'http://mz.djmall.xmisp.cn/files/product/20161201/14805828016.jpg',
name: "特效润肤露",
price: 390,
isSelect: false,
// 数据设定
count: {
quantity: 3,
min: 1,
max: 20
},
},
{
pic: 'http://mz.djmall.xmisp.cn/files/product/20161201/148058228431.jpg',
name: "倩碧水嫩保湿精华面霜",
price: 490,
isSelect: false,
// 数据设定
count: {
quantity: 1,
min: 1,
max: 20
},
},
{
pic: 'http://mz.djmall.xmisp.cn/files/product/20161201/148057953326.jpg',
name: "兰蔻清莹柔肤爽肤水",
price: 289,
isSelect: false,
// 数据设定
count: {
quantity: 10,
min: 1,
max: 20
},
},
{
pic: "http://mz.djmall.xmisp.cn/files/product/20161201/148057921620_middle.jpg",
name: "LANCOME兰蔻小黑瓶精华",
price: 230,
isSelect: false,
// 数据设定
count: {
quantity: 1,
min: 1,
max: 20
},
},
],
},
//勾选事件处理函数
switchSelect: function (e) {
// 获取item项的id,和数组的下标值
var Allprice = 0,i=0;
let id = e.target.dataset.id,
index = parseInt(e.target.dataset.index);
this.data.carts[index].isSelect = !this.data.carts[index].isSelect;
//价钱统计
if (this.data.carts[index].isSelect) {
this.data.totalMoney = this.data.totalMoney + this.data.carts[index].price;
}
else {
this.data.totalMoney = this.data.totalMoney - this.data.carts[index].price;
}
//是否全选判断
for (i = 0; i < this.data.carts.length; i++) {
Allprice = Allprice + this.data.carts[i].price;
}
if (Allprice == this.data.totalMoney)
{
this.data.isAllSelect=true;
}
else
{
this.data.isAllSelect = false;
}
this.setData({
carts: this.data.carts,
totalMoney: this.data.totalMoney,
isAllSelect: this.data.isAllSelect,
})
},
//全选
allSelect: function (e) {
//处理全选逻辑
let i = 0;
if (!this.data.isAllSelect)
{
for (i = 0; i < this.data.carts.length; i++) {
this.data.carts[i].isSelect = true;
this.data.totalMoney = this.data.totalMoney + this.data.carts[i].price;
}
}
else
{
for (i = 0; i < this.data.carts.length; i++) {
this.data.carts[i].isSelect = false;
}
this.data.totalMoney=0;
}
this.setData({
carts: this.data.carts,
isAllSelect: !this.data.isAllSelect,
totalMoney: this.data.totalMoney,
})
},
// 去结算
toBuy() {
wx.showToast({
title: '去结算',
icon: 'success',
duration: 3000
});
this.setData({
showDialog: !this.data.showDialog
});
},
//数量变化处理
handleQuantityChange(e) {
var componentId = e.componentId;
var quantity = e.quantity;
this.data.carts[componentId].count.quantity = quantity;
this.setData({
carts: this.data.carts,
});
}
}));는 사용된 매개변수를 소개합니다
isallSelect: 선택 여부
TotalMoney: 총 금액
Carts: 쇼핑카 제품 데이터
스위치선택 체크버튼
에 필요한 로직 처리가 모두 체크되면 하단의 전체선택 버튼이 켜집니다. 물론 이는 단지 판단일 뿐이며, 독자들은 수표의 수에 따라 판단할 수도 있습니다.
수표에 대한 총 가격의 덧셈과 뺄셈을 수행합니다. 또는 취소된 버튼
this.setData, 데이터 업데이트, 이것이 핵심입니다, 각 처리 데이터가 완료된 후 데이터를 업데이트해야 합니다
allSelect 전체 선택 버튼의 논리적 처리
Select 모두 선택하면 각 항목의 체크 아이콘이 켜지고 총 가격이 계산됩니다. 모두 선택하지 않은 경우 회색으로 표시되고 총 가격이 계산됩니다. 0
this.setData
1. 데이터 방법 수정
data:{
 name:'我是初始化的name'
}1, this.data.namethis.data.name='我是代码君data'
 this.setData({
   name:'我是代码君setData'
})두 가지 방법 모두 데이터를 변경할 수 있다는 장점이 있습니다. 즉, 실시간으로 데이터를 업데이트할 수 있다는 것입니다
둘째, 객체 배열을 수정합니다data:{
person:{
name:'代码君',
city:'厦门'
}
}모든 객체를 수정합니다this.setData({
person:{
name:'新代码君',
city:'湖南'
}
})
this.setData({
   'person.name': '代码君只修改名字'
  })
//多个数组用这个
this.setData({
   'person[0].name': '代码君只修改名字'
})1. 데이터 추가 concat//假设这一段是我们要新增的数组
var newarray = [{
name:'增加的数据--'+new Date().getTime() ,
}];
//向前--用newarray与this.data.list合拼
this.data.list = newarray.concat(this.data.list);
//向后--用this.data.list与newarray合拼
this.data.list = this.data.list.concat(newarray);
//删除
 remove:function (e){
  var dataset = e.target.dataset;
  var Index = dataset.index;
  //通过index识别要删除第几条数据,第二个数据为要删除的项目数量,通常为1
  this.data.list.splice(Index,1);
  //渲染数据
  this.setData({
    list:this.data.list
  });
}3. 데이터 지우기
//清空
 clear:function (){
  //其实就是让数组变成一个空数组即可
   this.setData({
     list:{}
   });
}위 내용은 제가 모두를 위해 작성한 것입니다. 앞으로는 모두에게 도움이 되세요.
관련 기사:
데이터세트를 사용하여 이미지 지연 로드를 구현하는 방법WeChat에서 프로그램에서 시간 함수를 구현하는 방법
위 내용은 WeChat 애플릿을 사용하여 장바구니 기능을 구현하는 방법의 상세 내용입니다. 자세한 내용은 PHP 중국어 웹사이트의 기타 관련 기사를 참조하세요!