이 글은 주로 HTML5 모바일 개발을 통한 이미지 압축 및 업로드 기능을 소개합니다. 이제 공유합니다. 필요한 친구들이 참고할 수 있습니다.
일반적으로 모바일 단말기에서 이미지를 업로드합니다. 휴대폰에 있는 사진, 그리고 이제 휴대폰의 사진 품질이 점점 더 높아지고 있습니다. 일반적으로 단일 사진의 크기는 약 3M이므로 업로드하기 전에 로컬로 압축해야 합니다.
H5 활동은 매우 보편화되었으며 그 중 하나는 사용자가 참여할 사진을 업로드하는 것입니다. 모바일 단말기에 사진을 업로드할 때 사용자는 일반적으로 휴대전화 앨범에서 사진을 업로드합니다. 요즘 휴대전화의 촬영 품질이 점점 더 높아지고 있으며 사진 한 장의 크기는 일반적으로 3M 정도입니다. 직접 업로드하면 트래픽이 많이 소모되고 경험이 좋지 않습니다. 따라서 업로드하기 전에 로컬 압축을 수행해야 합니다.
다음으로 h5 활동 개발 중 이미지 압축 및 업로드 기능을 요약하고 우리가 직면한 몇 가지 함정을 표시하고 모두와 공유하겠습니다.
샤오바이 지역에서 꼭 봐야 할 곳
모바일 이미지 업로드를 위해서는 FileReader, Blob, FormData의 세 가지 개념을 추가해야 합니다.
1.FileReader
Definition
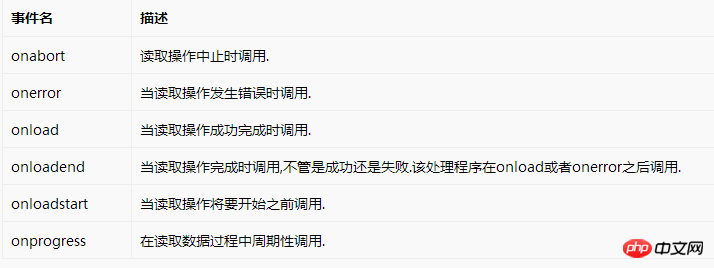
FileReader 개체를 사용하면 웹 애플리케이션은 사용자 컴퓨터에 저장된 파일(또는 원시 데이터 버퍼)의 내용을 비동기적으로 읽을 수 있습니다. File 개체 또는 Blob 개체를 사용하여 프로세스를 지정할 수 있습니다. 처리하려면 파일 또는 데이터. OK 바이너리 파일을 저장하는 컨테이너입니다.
3.FormData

모바일 이미지 압축 업로드 프로세스:
1) 이미지 업로드를 위한 파일 입력, FileReader를 사용하여 사용자가 업로드한 이미지 읽기
2) 이미지 데이터를 img 개체에 전달하고 img를 캔버스에 그립니다. 그런 다음 압축을 위해 canvas.toDataURL을 사용합니다. 3) 압축된 base64 형식 이미지 데이터를 가져와서 바이너리로 변환하고 이를 formdata에 넣은 다음 마지막으로 xmlHttpRequest를 통해 formdata를 제출합니다.
1.
var fileReader = new FileReader();
fileReader.onload = function() {
    var url = this.result;
}
//or
fileReader.onload = function(e) {
    var url = e.target.result;
}2. 이미지 압축
fileEle.onchange = function() {
    if (!this.files.length) return;
    //以下考虑的是单图情况
    var _ua = window.navigator.userAgent;
    var _simpleFile = this.files[0];
    //判断是否为图片
    if (!/\/(?:jpeg|png|gif)/i.test(_simpleFile.type)) return;
    //插件exif.js获取ios图片的方向信息
    var _orientation;
    if(_ua.indexOf('iphone') > 0) {
        EXIF.getData(_simpleFile,function(){
            _orientation=EXIF.getTag(this,'Orientation');
        });
    }
    //1.读取文件,通过FileReader,将图片文件转化为DataURL,即data:img/png;base64,开头的url,可以直接放在image.src中;
    var _reader = new FileReader(),
        _img = new Image(),
        _url;
    _reader.onload = function() {
        _url = this.result;
        _img.url = _url;
        _img.onload = function () {
            var _data = compress(_img);
            uploadPhoto(_data, _orientation);
        };
    };
    _reader.readAsDataURL(_simpleFile);
};/**
* 计算图片的尺寸,根据尺寸压缩
* 1. iphone手机html5上传图片方向问题,借助exif.js
* 2. 安卓UC浏览器不支持 new Blob(),使用BlobBuilder
* @param {Object} _img 图片
* @param {Number} _orientation 照片信息
* @return {String} 压缩后base64格式的图片
*/
function compress(_img, _orientation) {
//2.计算符合目标尺寸宽高值,若上传图片的宽高都大于目标图,对目标图等比压缩;如果有一边小于,对上传图片等比放大。
var _goalWidth = 750, //目标宽度
_goalHeight = 750, //目标高度
_imgWidth = _img.naturalWidth, //图片宽度
_imgHeight = _img.naturalHeight, //图片高度
_tempWidth = _imgWidth, //放大或缩小后的临时宽度
_tempHeight = _imgHeight, //放大或缩小后的临时宽度
_r = 0; //压缩比
if(_imgWidth === _goalWidth && _imgHeight === _goalHeight) {
} else if(_imgWidth > _goalWidth && _imgHeight > _goalHeight) {//宽高都大于目标图,需等比压缩
_r = _imgWidth / _goalWidth;
if(_imgHeight / _goalHeight < _r) {
_r = _imgHeight / _goalHeight;
}
_tempWidth = Math.ceil(_imgWidth / _r);
_tempHeight = Math.ceil(_imgHeight / _r);
} else {
if(_imgWidth < _goalWidth && _imgHeight < _goalHeight) {//宽高都小于
_r = _goalWidth / _imgWidth;
if(_goalHeight / _imgHeight < _r) {
_r = _goalHeight / _imgHeight;
}
} else {
if(_imgWidth < _goalWidth) { //宽小于
_r = _goalWidth / _imgWidth;
} else{ //高小于
_r = _goalHeight / _imgHeight;
}
}
_tempWidth = Math.ceil(_imgWidth * _r);
_tempHeight = Math.ceil(_imgHeight * _r);
}
//3.利用canvas对图片进行裁剪,等比放大或缩小后进行居中裁剪
var _canvas = e._$get('canvas-clip');
if(!_canvas.getContext) return;
var _context = _canvas.getContext('2d');
_canvas.width = _tempWidth;
_canvas.height = _tempHeight;
var _degree;
//ios bug,iphone手机上可能会遇到图片方向错误问题
switch(_orientation){
//iphone横屏拍摄,此时home键在左侧
case 3:
_degree=180;
_tempWidth=-_imgWidth;
_tempHeight=-_imgHeight;
break;
//iphone竖屏拍摄,此时home键在下方(正常拿手机的方向)
case 6:
_canvas.width=_imgHeight;
_canvas.height=_imgWidth;
_degree=90;
_tempWidth=_imgWidth;
_tempHeight=-_imgHeight;
break;
//iphone竖屏拍摄,此时home键在上方
case 8:
_canvas.width=_imgHeight;
_canvas.height=_imgWidth;
_degree=270;
_tempWidth=-_imgWidth;
_tempHeight=_imgHeight;
break;
}
if(window.navigator.userAgent.indexOf('iphone') > 0 && !!_degree) {
_context.rotate(_degree*Math.PI/180);
_context.drawImage(_img, 0, 0, _tempWidth, _tempHeight);
} else {
_context.drawImage(_img, 0, 0, _tempWidth, _tempHeight);
}
//toDataURL方法,可以获取格式为"data:image/png;base64,***"的base64图片信息;
var _data = _canvas.toDataURL('image/jpeg');
return _data;
}The 이상이 이 글의 전체 내용입니다. 모든 분들의 학습에 도움이 되기를 바랍니다. 더 많은 관련 내용을 주목해주세요!
관련 권장사항:html5 사용 Canvas는 echart가 구현할 수 없는 원형 차트를 캡슐화합니다.
HTML5 정보 입력 자리 표시자 색상 수정
위 내용은 HTML5 모바일 개발을 통한 이미지 압축 및 업로드 기능 구현의 상세 내용입니다. 자세한 내용은 PHP 중국어 웹사이트의 기타 관련 기사를 참조하세요!