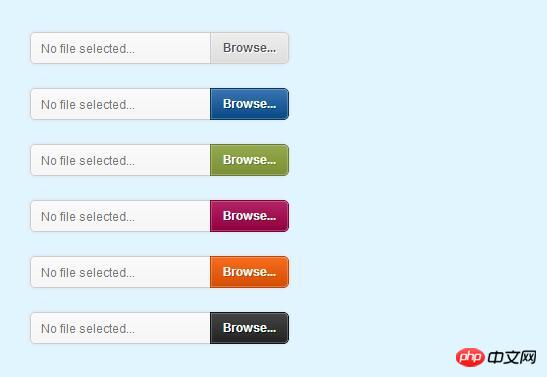
이번에는 jquery 업로드 양식 스타일을 가져오겠습니다. jquery 업로드 양식 스타일의 주의사항은 무엇인가요? 실제 사례를 살펴보겠습니다.
이 기사는 간단한 파일 업로드양식 스타일을 구현하기 위해 jquery를 만드는 방법에 대한 간단한 튜토리얼을 설명하는 것으로 시작됩니다.
렌더링:

페이지 구조:
<p class="uploader white">
<input type="text" class="filename" readonly="readonly"/>
<input type="button" name="file" class="button" value="Browse..."/>
<input type="file" size="30"/>
</p>
css 파일 스타일:
.uploader{
position:relative;
display:inline-block;
overflow:hidden;
cursor:default;
padding:0;
margin:10px 0px;
-moz-box-shadow:0px 0px 5px #ddd;
-webkit-box-shadow:0px 0px 5px #ddd;
box-shadow:0px 0px 5px #ddd;
-moz-border-radius:5px;
-webkit-border-radius:5px;
border-radius:5px;
}
.filename{
float:left;
display:inline-block;
outline:0 none;
height:32px;
width:180px;
margin:0;
padding:8px 10px;
overflow:hidden;
cursor:default;
border:1px solid;
border-right:0;
font:9pt/100% Arial, Helvetica, sans-serif; color:#777;
text-shadow:1px 1px 0px #fff;
text-overflow:ellipsis;
white-space:nowrap;
-moz-border-radius:5px 0px 0px 5px;
-webkit-border-radius:5px 0px 0px 5px;
border-radius:5px 0px 0px 5px;
background:#f5f5f5;
background:-moz-linear-gradient(top, #fafafa 0%, #eee 100%);
background:-webkit-gradient(linear, left top, left bottom, color-stop(0%,#fafafa), color-stop(100%,#f5f5f5));
filter:progid:DXImageTransform.Microsoft.gradient(startColorstr='#fafafa', endColorstr='#f5f5f5',GradientType=0);
border-color:#ccc;
-moz-box-shadow:0px 0px 1px #fff inset;
-webkit-box-shadow:0px 0px 1px #fff inset;
box-shadow:0px 0px 1px #fff inset;
-moz-box-sizing:border-box;
-webkit-box-sizing:border-box;
box-sizing:border-box;
}
.button{
float:left;
height:32px;
display:inline-block;
outline:0 none;
padding:8px 12px;
margin:0;
cursor:pointer;
border:1px solid;
font:bold 9pt/100% Arial, Helvetica, sans-serif;
-moz-border-radius:0px 5px 5px 0px;
-webkit-border-radius:0px 5px 5px 0px;
border-radius:0px 5px 5px 0px;
-moz-box-shadow:0px 0px 1px #fff inset;
-webkit-box-shadow:0px 0px 1px #fff inset;
box-shadow:0px 0px 1px #fff inset;
}
.uploader input[type=file]{
position:absolute;
top:0; right:0; bottom:0;
border:0;
padding:0; margin:0;
height:30px;
cursor:pointer;
filter:alpha(opacity=0);
-moz-opacity:0;
-khtml-opacity: 0;
opacity:0;
}
input[type=button]::-moz-focus-inner{padding:0; border:0 none; -moz-box-sizing:content-box;}
input[type=button]::-webkit-focus-inner{padding:0; border:0 none; -webkit-box-sizing:content-box;}
input[type=text]::-moz-focus-inner{padding:0; border:0 none; -moz-box-sizing:content-box;}
input[type=text]::-webkit-focus-inner{padding:0; border:0 none; -webkit-box-sizing:content-box;}javascript 부품 코드:
<script>$(function(){
 $("input[type=file]").change(function(){$(this).parents(".uploader").find(".filename").val($(this).val());});
 $("input[type=file]").each(function(){
 if($(this).val()==""){$(this).parents(".uploader").find(".filename").val("No file selected...");}
 });
});
</script>이 기사의 사례를 읽은 후 방법을 마스터했다고 믿습니다. 다른 PHP 중국어 웹사이트 관련 기사를 주목하세요!
추천 도서:
파일 업로드를 위해 jquery 플러그인 ajaxupload 사용
jQuery 플러그인 Tocify 동적 노드를 사용하여 디렉토리 메뉴 구현
위 내용은 jquery 업로드 양식 스타일의 상세 내용입니다. 자세한 내용은 PHP 중국어 웹사이트의 기타 관련 기사를 참조하세요!