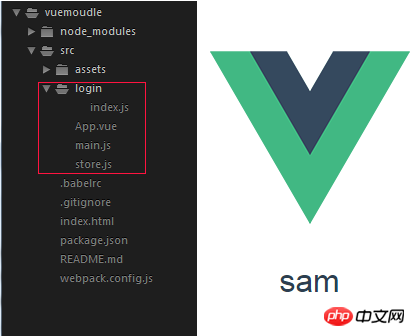
이 글은 주로 vuex2.0의 모듈을 소개하는데, 편집자는 꽤 좋다고 생각해서 공유하고 참고하겠습니다. 편집자를 따라 살펴보겠습니다. 모두에게 도움이 되기를 바랍니다.
모듈이란 무엇인가요?
배경: Vue의 State는 단일 상태 트리 구조를 사용하며 필요한 모든 상태는 상태에 배치됩니다. 프로젝트가 더 복잡하면 상태는 매우 큰 개체가 되며 저장소 개체도 매우 커집니다. 크고 관리가 어렵다.
모듈: 각 모듈에는 고유한 상태, 돌연변이, 동작 및 게터가 있을 수 있으므로 구조가 매우 명확하고 관리하기 쉽습니다.
모듈은 어떻게 사용하나요?
일반 구조
const moduleA = {
 state: { ... },
 mutations: { ... },
 actions: { ... },
 getters: { ... }
 }
const moduleB = {
 state: { ... },
 mutations: { ... },
 actions: { ... }
 }

const store = new Vuex.Store({
 modules: {
  a: moduleA,
b: moduleB})모듈 내부 데이터: ①내부 상태, 모듈 내부 상태는 로컬입니다. 즉, car.js 모듈 상태의 목록 데이터와 같이 모듈에 대해 비공개입니다. this.$store.state.car.list를 통해 얻길 원합니다. ② 내부 getter, 변이 및 액션은 여전히 전역 네임스페이스에 등록되어 있습니다. 이는 여러 모듈이 동시에 동일한 변이에 응답할 수 있도록 하기 위한 것입니다. store.state.car.carGetter 결과는 정의되지 않았으며 this.$store.state.carGetter를 통해 얻을 수 있습니다.
매개변수 전달: getters====({state(local state),getters(global getters object),roosState(root state)}) actions====({state(local state),commit,roosState (Root state)}).
새 프로젝트를 생성하여 vue –cli를 통해 새 프로젝트를 생성하세요.
1. src 디렉터리에 새 로그인 폴더를 생성하세요. 로그인 모듈의 상태를 저장하기 위한 새로운 index.js입니다. 단순화를 위해 모든 상태, 작업, 변형 및 getter를 index.js 파일의 모듈 아래에 배치했습니다.
먼저 userName: “sam”
const state = {
  useName: "sam"
};
const mutations = {

};
const actions = {

};
const getters = {

};

// 不要忘记把state, mutations等暴露出去。
export default {
  state,
  mutations,
  actions,
  getters
}import Vue from "vue";
import Vuex from "Vuex";
Vue.use(Vuex);
// 引入login 模块
import login from "./login"
export default new Vuex.Store({
// 通过modules属性引入login 模块。
modules: {
login: login
}
})import Vue from 'vue'
import App from './App.vue'
// 引入store
import store from "./store"
new Vue({
el: '#app',
store, // 注入到根实例中。
render: h => h(App)
})<template>
<p id="app">
<img src="./assets/logo.png">
<h1>{{useName}}</h1>
</p>
</template>
<script>
export default {
// computed属性,从store 中获取状态state,不要忘记login命名空间。
computed: {
useName: function() {
return this.$store.state.login.useName
}
}
}
</script> 4. 액션과 변이를 통해 이름을 변경합니다. 여기에는 상태 변경을 위한 디스패치 액션, 커밋 변이, 변이가 포함됩니다.
먼저 로그인 폴더에 ChangeName 액션과 CHANGE_NAME 변이를 추가합니다. index.js .
const mutations = {
  CHANGE_NAME (state, anotherName) {
    state.useName = anotherName;
  }
};

const actions = {
  changeName ({commit},anotherName) {
    commit("CHANGE_NAME", anotherName)
  }
};모듈에서 상태는 모듈의 네임스페이스로 제한되며 액세스하려면 네임스페이스가 필요합니다. 그러나 액션, 변이, 실제 getter는 기본적으로 전역 네임스페이스에 등록됩니다. 소위 전역 네임스페이스에 등록된다는 것은 실제로 우리가 모듈 없이 액세스하는 방식이 동일하다는 것을 의미합니다. 시대는 동일합니다. 예를 들어 this.$store.dispatch("actions")라는 모듈이 없었을 때 이제 모듈이 있으므로 작업도 모듈 아래에 기록됩니다(changeName은 로그인 디렉터리의 index.js에 기록됩니다). this.$store.dispatch("changeName")와 같이 계속 작성할 수 있지만 구성 요소의 getter도 this.$store.getters.module의 getter를 통해 가져옵니다.
<template>
 <p id="app">
  <img src="./assets/logo.png">
  <h1>{{useName}}</h1>
  <!-- 添加按钮 -->
  <p>
   <button @click="changeName"> change to json</button>
  </p>
 </p>
</template>

<script>
export default {
 // computed属性,从store 中获取状态state,不要忘记login命名空间。
 computed: {
  useName: function() {
   return this.$store.state.login.useName
  }
 },
 methods: {

  // 和没有modules的时候一样,同样的方式dispatch action
  changeName() {
   this.$store.dispatch("changeName", "Jason")
  }
 }
}디스패치 액션과 커밋 변이는 전역적으로 사용될 수 있지만, 모듈에 작성된 액션, 변이, 게터는 그들이 얻는 기본 매개변수가 전역적이지 않고 모두 로컬이며 제한적입니다. 그들이 위치한 모듈에. 예를 들어, 변이와 게터는 첫 번째 기본 매개변수로 상태를 가져옵니다. 이 상태 매개변수는 변이와 게터가 있는 모듈로 제한되는 상태 개체입니다. 로그인 폴더의 변이와 게터는 현재 상태만 가져옵니다. index.js를 매개변수로 사용합니다. 액션은 컨텍스트 개체를 매개변수로 가져옵니다. 이 컨텍스트 개체는 현재 모듈의 인스턴스입니다. 모듈은 작은 저장소와 동일합니다.
그렇다면 루트 저장소에서 상태와 게터를 어떻게 얻을 수 있을까요? Vuex는 모듈의 getter에서 기본 매개변수로 rootState 및 rootGetters를 제공합니다. 또한 작업의 컨텍스트 객체에는 context.getters 및 context.rootState라는 두 가지 속성이 추가로 포함됩니다.
store.js에 상태를 추가합니다. getters:
export default new Vuex.Store({
  // 通过modules属性引入login 模块。
  modules: {
    login: login
  },

  // 新增state, getters
  state: {
    job: "web"
  },
  getters: {
    jobTitle (state){
      return state.job + "developer"
    }
  }
})const actions = {
// actions 中的context参数对象多了 rootState 参数
changeName ({commit, rootState},anotherName) {
if(rootState.job =="web") {
commit("CHANGE_NAME", anotherName)
}
}
};
const getters = {
// getters 获取到 rootState, rootGetters 作为参数。
// rootState和 rootGetter参数顺序不要写反,一定是state在前,getter在后面,这是vuex的默认参数传递顺序, 可以打印出来看一下。
localJobTitle (state,getters,rootState,rootGetters) {
console.log(rootState);
console.log(rootGetters);
return rootGetters.jobTitle + " aka " + rootState.job
}
};app.vue 增加h2 展示 loacaJobTitle, 这个同时证明了getters 也是被注册到全局中的。
<template>
 <p id="app">
  <img src="./assets/logo.png">
  <h1>{{useName}}</h1>

  <!-- 增加h2 展示 localJobTitle -->
  <h2>{{localJobTitle}}</h2>
  <!-- 添加按钮 -->
  <p>
   <button @click="changeName"> change to json</button>
  </p>
 </p>
</template>

<script>
import {mapActions, mapState,mapGetters} from "vuex";
export default {
 // computed属性,从store 中获取状态state,不要忘记login命名空间。
 computed: {
  ...mapState({
   useName: state => state.login.useName
  }),

  // mapGeter 直接获得全局注册的getters
  ...mapGetters(["localJobTitle"])
 },
 methods: {
  changeName() {
   this.$store.dispatch("changeName", "Jason")
  }
 }
}
</script>6, 其实actions, mutations, getters, 也可以限定在当前模块的命名空间中。只要给我们的模块加一个namespaced 属性:
const state = {
  useName: "sam"
};
const mutations = {
  CHANGE_NAME (state, anotherName) {
    state.useName = anotherName;
  }
};
const actions = {
  changeName ({commit, rootState},anotherName) {
    if(rootState.job =="web") {
      commit("CHANGE_NAME", anotherName)
    }
  },
  alertName({state}) {
    alert(state.useName)
  }
};
const getters = {
  localJobTitle (state,getters,rootState,rootGetters) {
    return rootGetters.jobTitle + " aka " + rootState.job
  }
};
// namespaced 属性,限定命名空间
export default {
  namespaced:true,
  state,
  mutations,
  actions,
  getters
}当所有的actions, mutations, getters 都被限定到模块的命名空间下,我们dispatch actions, commit mutations 都需要用到命名空间。如 dispacth("changeName"), 就要变成 dispatch("login/changeName"); getters.localJobTitle 就要变成 getters["login/localJobTitle"]
app.vue 如下:
<template>
 <p id="app">
  <img src="./assets/logo.png">
  <h1 @click ="alertName">{{useName}}</h1>

  <!-- 增加h2 展示 localJobTitle -->
  <h2>{{localJobTitle}}</h2>
  <!-- 添加按钮 -->
  <p>
   <button @click="changeName"> change to json</button>
  </p>
 </p>
</template>

<script>
import {mapActions, mapState,mapGetters} from "vuex";
export default {
 // computed属性,从store 中获取状态state,不要忘记login命名空间。
 computed: {
  ...mapState("login",{
   useName: state => state.useName
  }),

   localJobTitle() {
    return this.$store.getters["login/localJobTitle"]
   }
 },
 methods: {
  changeName() {
   this.$store.dispatch("login/changeName", "Jason")
  },
  alertName() {
   this.$store.dispatch("login/alertName")
  }
 }
}
</script>有了命名空间之后,mapState, mapGetters, mapActions 函数也都有了一个参数,用于限定命名空间,每二个参数对象或数组中的属性,都映射到了当前命名空间中。
<script>
import {mapActions, mapState,mapGetters} from "vuex";
export default {
computed: {
// 对象中的state 和数组中的localJobTitle 都是和login中的参数一一对应。
...mapState("login",{
useName: state => state.useName
}),
...mapGetters("login", ["localJobTitle"])
},
methods: {
changeName() {
this.$store.dispatch("login/changeName", "Jason")
},
...mapActions('login', ['alertName'])
}
}
</script>相关推荐:
css modules的几种技术方案_html/css_WEB-ITnose
위 내용은 vuex2.0의 모듈 인스턴스에 대한 자세한 설명의 상세 내용입니다. 자세한 내용은 PHP 중국어 웹사이트의 기타 관련 기사를 참조하세요!