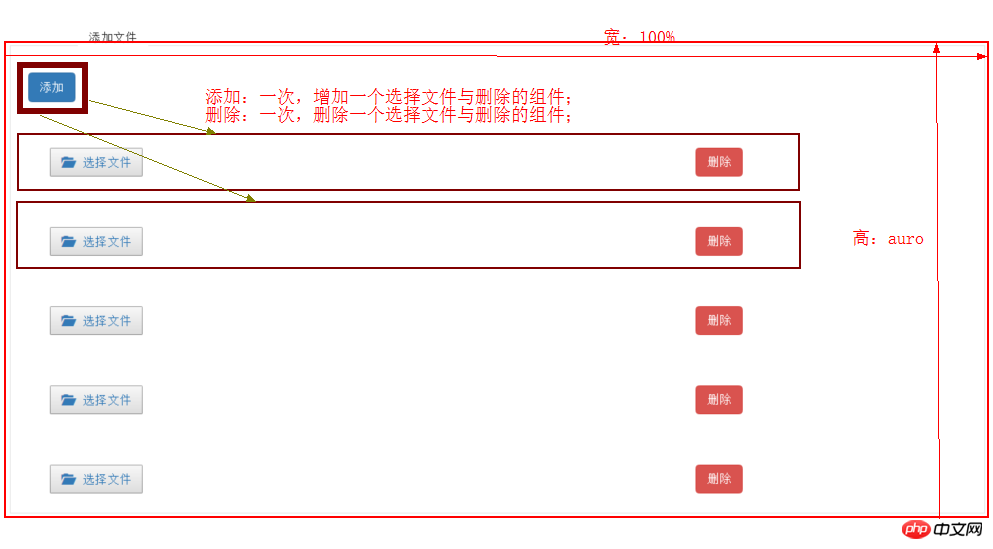
다음 에디터는 React.js의 일괄 추가 및 삭제 기능에 대한 기사를 가져올 것입니다. 에디터가 꽤 좋다고 생각해서 지금 공유해서 참고용으로 올려보겠습니다. 편집기를 따라가서 살펴보겠습니다.
최근 제가 구축한 CMS에는 이미지를 일괄 추가하는 기능이 필요합니다. 파일 추가용 컨테이너 상자에는 다음과 같은 두 가지 콘텐츠가 있습니다. 버튼 추가 및 파일 선택 구성 요소가 추가되었습니다.

구조 분석:
추가된 구성 요소는 UploadQiNiuFiles( Qiniu 파일 업로드 컴포넌트), 현재 컴포넌트를 삭제하는 삭제 버튼
추가 버튼 이벤트
추가된 컴포넌트가 저장되는 컨테이너
이 효과를 얻으려면 세 가지 방법의 목적만 이해하면 됩니다.
직접 바인딩 필요 삭제 컴포넌트의 deleteType()은 컴포넌트가 추가된 컨테이너에서 RemoveContent()
//删除{qiniu}与{deleteQiNiu}内容,是把页面上的这两个内容一起删除
  deleteType(){
    let index = this.props.index;
    this.props.callbackParent(index);
}를 호출하는 메소드입니다
< ;/ p>addContent() 추가 및 추가 버튼에 작성된 RemoveContent() 삭제
//批量添加
  addContent(event) {
    if (this.state.number.length >= this.state.maxNum) {
      return;
    }
    console.log("this.state.number:" + this.state.number);
    this.state.number.push(this.state.number[this.state.number.length - 1] + 1);
    let temp = this.state.number;
    this.setState({
      number: temp
    })
  }

  //删除
  removeContent(index) {
    if (this.state.number.length <= 1) {
      return;
    }
    this.state.number.splice(index, 1);
    this.setState({
      number: this.state.number
    })
}코드 분석:
추가 구성 요소 저장용 컨테이너
<p className="pBorder">
   {addToBtn} //添加按钮
   {items}   //被添加的组件
</p>.pBorder {
position: relative;
width: 100%;
height: auto;
margin-top: 5%;
border: 1px solid #e3e3e3;
padding: 30px 10px;
margin-bottom: 5%;
-moz-position: relative;
-moz-width: 100%;
-moz-height: auto;
-moz-border: 1px solid #e3e3e3;
-moz-padding: 30px 10px;
-moz-margin-bottom: 5%;
-webkit-position: relative;
-webkit-width: 100%;
-webkit-height: auto;
-webkit-border: 1px solid #e3e3e3;
-webkit-padding: 30px 10px;
-webkit-margin-bottom: 5%;
}추가된 구성 요소: 구성 요소 삭제 방법이 포함된 UploadQiNiuFiles deleteType ()
/**
 * Created by wf on 2016/5/16.
 */
import React,{Component} from 'react';
import {render} from 'react-dom';
import ReactBootstrap , {Input,Button,ButtonToolbar} from 'react-bootstrap';
import style from '../../../../css/meeting_data.css';

//七牛上传公共组件
import QiniuUpload from 'qiniu_uploader';

export default class UploadQiNiuFiles extends Component {
  constructor(props){
    super(props);
  }

  //获取qiniukey
  getQiniuKey(qiniuKey){
    this.props.setQiniuKey(qiniuKey);
  }

  //获取qiniutoken
  getQiniuUptoken() {
    this.props.acquireToken();
  };

  //删除{qiniu}与{deleteQiNiu}内容,是把页面上的这两个内容一起删除,直接绑定要删除的组件
  //这个方法调用的是removeContent(),在下面有介绍
  deleteType(){
    let index = this.props.index;
    this.props.callbackParent(index);
  }

  render(){

    const qiniu = (
      <p className="col-md-8 qiNiuBtn">
        <QiniuUpload containerId="containerId" pickfilesId="pickfilesId" qiniuToken={this.props.meetingState.token} callback={this.getQiniuKey.bind(this)} getQiniuUptoken={this.getQiniuUptoken.bind(this)} />
      </p>
    );

    const deleteQiNiu = (
      <p className="col-md-4">
        <Button bsStyle="danger" className="deleteQiniu" onClick={this.deleteType.bind(this)}>删除</Button>
      </p>

    );

    return(
      <p>
        <p className="uploadBox">
          {qiniu}
          {deleteQiNiu}
        </p>
      </p>
    );
  }
}Qiniu 업로드 컴포넌트가 도입되었는데, 이 컴포넌트를 만들 때 With state in 감속기의 액션 메소드를 사용해야 합니다. 이 링크로. 주황색 글꼴로 매개변수를 얻으려면
p가 pBorder인 컨테이너에 이벤트를 추가해야 합니다.
첫 번째 로드, Qiniu 업로드 구성 요소: UploadQiNiuFiles, 로딩 경로는 webpack의 메소드입니다:
/**常用组件路径简写为:
  *
  * 例:config: path.join(__dirname,"./build/config.js")
  * config 变量名
  * path.join(__dirname,"./build/config.js") config的路径
  *
  * 使用方法: import {变量} from 'config'
  * //七牛上传公共组件
   import QiniuUpload from 'qiniu_uploader';
  * **/
 resolve: {
  alias: {
   qiniu_uploader: path.join(__dirname,"./public_component/qiniu_upload/QiniuUpload.js"),
   storage: path.join(__dirname,"./utils/Storage.js"),
   config: path.join(__dirname,"./build/config.js")
  }
}import React,{Component} from 'react';
import {render} from 'react-dom';
import ReactBootstrap , {Input,Button,ButtonToolbar} from 'react-bootstrap';
import { Link } from 'react-router';
//
import UploadQiNiuFiles from './UploadQiNiuFiles.js';일괄 업로드 파일의 구성 요소 이름은 다음과 같이 정의합니다. UploadFileToFolde
기본 매개변수는 다음과 같습니다:
constructor(props){
    super(props);
    this.state = {number: [1], maxNum: 10} //最大数据为10条,默认显示1条
}/*获取上个页面传过来的值 let local = this.props.location;
如果从(row,query)中跳转过来的页面,从query中传值过来要这么写:let query = local.query;
如果这个页面是包含在某个大的页面下的,要把query与对应的ID传过去
*/
componentDidMount(){
let local = this.props.location;
let query = local.query;
this.props.setActivityId(query.activityId);
}데이터 렌더링이 완료된 후, componentDidUpdate()를 실행해야 합니다. 이 상태의 모든 데이터는 다음과 같습니다.
this.props.meetingState.addUploadFolderToFileList; 해당 데이터가 비어 있는지 또는 정의되지 않았는지 확인합니다. 이 상태에 값이 있고 성공적으로 추가되면 다음에 이 페이지를 방문할 때 모든 데이터가 지워지고 저장 버튼을 클릭하면 원래 페이지로 돌아갑니다. ClearInvitation() 메소드는 모든 비즈니스 데이터를 삭제하는 것입니다. 해당 메소드는 실제 상황에 따라
/* 清空*/

export const CLEAR_INVITATION = 'CLEAR_INVITATION';
 export function clearInvitation(){
  return {
    type: CLEAR_INVITATION,
    data:{
      addInvitationResponse:{},
      Invitations:[],
      deleteInvitationsResponse:{},
      invitationName:'',
      folderName: ''
    }
  }
}라고 작성합니다.
componentDidUpdate(){
    let addFileToFolderList = this.props.meetingState.addUploadFolderToFileList;
    if (typeof(addFileToFolderList) != 'undefined') {
      let status = addFileToFolderList.status;
      if (200 == status) {
        //如果新增成功,则下次添加前清空所有
        this.props.clearInvitation();
        //点击保存按钮,返回原来的页面
        this.props.history.goBack();
      }
    }
}//批量添加,直接拿来使用
addContent(event) {
if (this.state.number.length >= this.state.maxNum) {
return;
}
console.log("this.state.number:" + this.state.number);
this.state.number.push(this.state.number[this.state.number.length - 1] + 1);
let temp = this.state.number;
this.setState({
number: temp
})
}//删除,直接拿来使用
removeContent(index) {
if (this.state.number.length <= 1) {
return;
}
this.state.number.splice(index, 1);
this.setState({
number: this.state.number
})
}Qiniu 업로드 구성 요소에 deleteType() 삭제 메소드가 있으며, 이 메소드는 RemoveContent()를 호출합니다. 모두 누락되었습니다. 여기에 deleteType() 메소드 코드도 넣었습니다.
//绑定被删除的组件,直接拿来使用
  deleteType(){
    let index = this.props.index;
    this.props.callbackParent(index); //调用removeContent()方法
}render(){
//将要添加的组件定义为变量为一个数组 items
let items = [];
//从添加的组件数量中遍历,
for(let i = 0; i < this.state.number.length; i++){
//给这个items推送组件
items.push(<UploadQiNiuFiles index={i}
callbackParent={this.removeContent.bind(this)}
key={this.state.number[i]} {...this.props} />)
}
const addToBtn = (
<Button bsStyle="primary" onClick={this.addContent.bind(this)}>添加</Button>
);return (
<p>
<p>
<p className="pTitle">添加文件</p>
<p className="pBorder">
{addToBtn}
{items}
</p>
</p></p>
);
}위 내용은 React.js의 일괄 추가 및 삭제 기능의 상세 내용입니다. 자세한 내용은 PHP 중국어 웹사이트의 기타 관련 기사를 참조하세요!