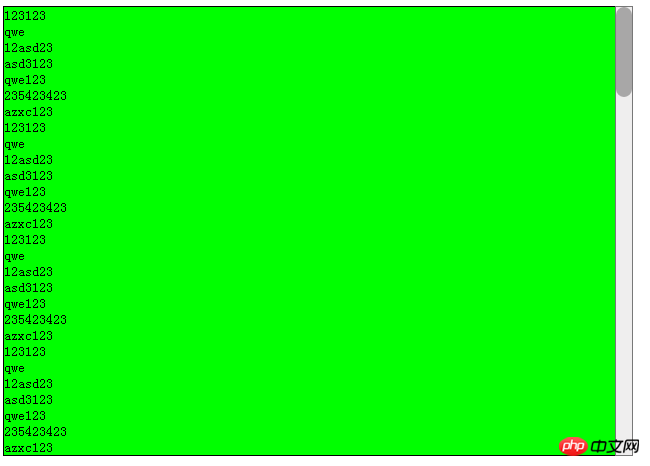
이 글에서는 사용자 정의 스크롤바를 캡슐화하는 네이티브 js 관련 지식을 주로 소개합니다. 매우 좋은 참조 값을 가지고 있습니다. 아래 에디터와 함께 살펴보겠습니다
최근 온라인 뮤직 플레이어를 만드는 프로젝트가 있었는데 스크롤바를 사용해야 하는데 내장된 스크롤바가 너무 보기 흉해서 직접 생각해 봤습니다.
원리를 온라인에서 읽었지만 솔직히 잘 이해가 되지 않아서 오늘 아침에 안드로이드를 사용하면서 공부했는데 결과는 꽤 만족스럽습니다. 그런 다음 객체 를 래핑합니다.
사용 방법은 매우 간단합니다. p를 사용자 정의하고 이 개체를 매개변수로 가져온 다음 새로 만들기를 클릭하면 됩니다. 스크롤 막대의 스타일을 직접 정의할 수도 있습니다. 스타일 시트를 직접 수정하세요.
렌더링:

코드는 다음과 같습니다:
<!doctype html>
<html>
<head>
<meta charset="utf-8">
<title></title>
</head>
<style type="text/css">
p{
padding:0px;
box-sizing:border-box;
margin:0px;
border:0px;
}
#p-5{
width: 700px;
height: 500px;
border:1px solid black;
position: relative;
overflow: hidden;
}
.ribbit-OF-p1{
width: 20px;
background-color: rgb(239, 238, 238);
border:1px solid rgba(0,0,0,0.5);
position: absolute;
right:0px;
top: 0px;
cursor:default;
}
.ribbit-OF-p2{
position: absolute;
top:0px;
right: 0px;
width: 100%;
height: 100px;
background-color:rgba(0,0,0,0.3);
border-radius: 10px;
}
.ribbit-OF-p3{
width: 100%;
height:auto;
background-color: lime;
}
</style>
<body>
<p id="p-1">
<p id="p-2">
</p>
</p>
<p id="p-3"><p id="p-4"></p></p>
<p id="p-5">
123123<br/>
qwe<br/>
12asd23<br/>
asd3123<br/>
qwe123<br/>
235423423<br/>
azxc123<br/>
123123<br/>
qwe<br/>
12asd23<br/>
asd3123<br/>
qwe123<br/>
235423423<br/>
azxc123<br/>
123123<br/>
qwe<br/>
12asd23<br/>
asd3123<br/>
qwe123<br/>
235423423<br/>
azxc123<br/>
123123<br/>
qwe<br/>
12asd23<br/>
asd3123<br/>
qwe123<br/>
235423423<br/>
azxc123<br/>
123123<br/>
qwe<br/>
12asd23<br/>
asd3123<br/>
qwe123<br/>
235423423<br/>
azxc123<br/>
123123<br/>
qwe<br/>
12asd23<br/>
asd3123<br/>
qwe123<br/>
235423423<br/>
azxc123<br/>123123<br/>
qwe<br/>
12asd23<br/>
asd3123<br/>
qwe123<br/>
235423423<br/>
azxc123<br/>
123123<br/>
qwe<br/>
12asd23<br/>
asd3123<br/>
qwe123<br/>
235423423<br/>
azxc123<br/>
123123<br/>
qwe<br/>
12asd23<br/>
asd3123<br/>
qwe123<br/>
235423423<br/>
azxc123<br/>
</p>
</body>
<script type="text/javascript">
var p_5 = document.getElementById('p-5');
function OverFlow(element){
this.element = element;
this.ribbit_OF_p1 = document.createElement("p");
this.ribbit_OF_p2 = document.createElement("p");
this.ribbit_OF_p3 = document.createElement("p");
this.createp = function(){
this.ribbit_OF_p1.className = "ribbit-OF-p1";
this.ribbit_OF_p2.className = "ribbit-OF-p2";
this.ribbit_OF_p3.className = "ribbit-OF-p3";
this.ribbit_OF_p3.innerHTML = this.element.innerHTML;
this.element.innerHTML="";
this.element.appendChild(this.ribbit_OF_p3);
this.ribbit_OF_p1.appendChild(this.ribbit_OF_p2);
document.body.appendChild(this.ribbit_OF_p1);
this.ribbit_OF_p1.style.height = getComputedStyle(this.element,null).height;
this.ribbit_OF_p1.style.left = (this.element.offsetLeft+(parseInt(getComputedStyle(this.element,null).width)
-parseInt(getComputedStyle(this.ribbit_OF_p1,null).width)))+"px";
this.ribbit_OF_p1.style.top = this.element.offsetTop+"px";
this.ribbit_OF_p2.style.top = "0px";
}
this.addAudo=function(){
var YY=null;//前鼠标位置
var topXX = 0;//前top位置
var topX = 0;//后top值
var vherght = parseInt(getComputedStyle(this.ribbit_OF_p3,null).height)-parseInt(getComputedStyle(this.element,null).height);//可移动
var dst = 0;
//最大top移动位置
var top_x = parseInt(getComputedStyle(this.ribbit_OF_p1,null).height)-parseInt(getComputedStyle(this.ribbit_OF_p2,null).height);
var thio = this;
window.onmousemove = function(e){
fun(e.clientY);
};
this.ribbit_OF_p2.onmousedown=function(e){
YY = e.clientY;
topXX =parseInt(this.style.top);
return false;
}
window.onmouseup=function(){
YY = null;
return true;
}
function fun(y){
if(top_x>=topX&&topX>=0&&YY!=null){
topX = y-YY+topXX;
if(topX<0)topX=0;
if(topX>top_x)topX=top_x-1;
thio.ribbit_OF_p2.style.top = (topX-1)+"px";
dst = topX*vherght/top_x;
thio.element.scrollTop = dst;
}
}
}
this.createp();
this.addAudo();
}
new OverFlow(p_5);
</script>
</html>위 내용은 사용자 정의 스크롤 막대의 기본 JS 캡슐화를 위한 코드 사례 공유의 상세 내용입니다. 자세한 내용은 PHP 중국어 웹사이트의 기타 관련 기사를 참조하세요!