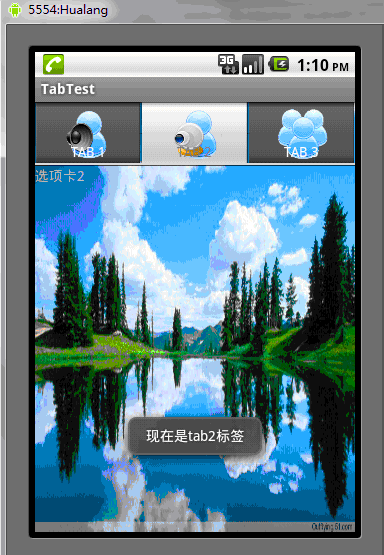
탭 탭은 여러 탭을 통해 서로 다른 내용을 전환하는 전화번호부의 인터페이스와 유사합니다. 이 효과를 얻으려면 먼저 TabHost를 알아야 합니다. 각 탭이 대응할 수 있는 컨테이너입니다. 예를 들어 전화번호부의 Tab 레이아웃은 선형 레이아웃입니다.
TabHost를 사용하려면 먼저 getTabHost 메서드를 통해 TabHost 개체를 얻은 다음 다음을 통해 TabHost에 Tab을 추가해야 합니다. 물론 addTab 메소드는 전환 시 모든 탭에서 이벤트를 생성합니다. 이 이벤트를 캡처하려면 TabActivity setOnTabChangedListener의 이벤트 리스너를 설정해야 합니다
다음은 간단한 예입니다.
TabTest.java
package org.hualang.tab;

import android.app.Activity;
import android.app.TabActivity;
import android.graphics.Color;
import android.os.Bundle;
import android.widget.TabHost;
import android.widget.Toast;
import android.widget.TabHost.OnTabChangeListener;

public class TabTest extends TabActivity {
    /** Called when the activity is first created. */
        TabHost tabhost;
    @Override
    public void onCreate(Bundle savedInstanceState) {
        super.onCreate(savedInstanceState);
        setContentView(R.layout.main);
        //取得TabHost对象
        tabhost = getTabHost();
        //为TabHost添加标签
        //新建一个newTabSpec(newTabSpec)
        //设置其标签和图标(setIndicator)
        //设置内容(setContent)
        tabhost.addTab(tabhost.newTabSpec("tab1")
                        .setIndicator("TAB 1",getResources().getDrawable(R.drawable.img1))
                        .setContent(R.id.text1));
        tabhost.addTab(tabhost.newTabSpec("tab2")
                .setIndicator("TAB 2",getResources().getDrawable(R.drawable.img2))
                .setContent(R.id.text2));
        tabhost.addTab(tabhost.newTabSpec("tab3")
                .setIndicator("TAB 3",getResources().getDrawable(R.drawable.img3))
                .setContent(R.id.text3));
        //设置TabHost的背景颜色
        //tabhost.setBackgroundColor(Color.argb(150,22,70,150));
        //设置TabHost的背景图片资源
        tabhost.setBackgroundResource(R.drawable.bg0);
        //设置当前显示哪个标签
        tabhost.setCurrentTab(0);
        //标签切换事件处理,setOnTabChangedListener
        tabhost.setOnTabChangedListener(new OnTabChangeListener()
        {
                public void onTabChanged(String tabId)
                {
                        Toast toast=Toast.makeText(getApplicationContext(), "现在是"+tabId+"标签", Toast.LENGTH_SHORT);
                        toast.show();
                }
        });

    }
}main .xml
<?xml version="1.0" encoding="utf-8"?>
<TabHost xmlns:android="http://schemas.android.com/apk/res/android"
    android:id="@android:id/tabhost"
    android:layout_width="fill_parent"
    android:layout_height="fill_parent">
    <LinearLayout
        android:orientation="vertical"
        android:layout_width="fill_parent"
        android:layout_height="fill_parent">
        <TabWidget
            android:id="@android:id/tabs"
            android:layout_width="fill_parent"
            android:layout_height="wrap_content" />
        <FrameLayout
            android:id="@android:id/tabcontent"
            android:layout_width="fill_parent"
            android:layout_height="fill_parent">
            <TextView
                android:id="@+id/text1"
                android:layout_width="fill_parent"
                android:layout_height="fill_parent"
                android:text="选项卡1" />
            <TextView
                android:id="@+id/text2"
                android:layout_width="fill_parent"
                android:layout_height="fill_parent"
                android:text="选项卡2" />
            <TextView
                android:id="@+id/text3"
                android:layout_width="fill_parent"
                android:layout_height="fill_parent"
                android:text="选项卡3" />
            </FrameLayout>
    </LinearLayout>
</TabHost>실행 효과는 다음과 같습니다.

위는 Android UI 제어 시리즈 콘텐츠: TabWidget(스위치 카드), 기타 관련 콘텐츠 PHP 중국어 웹사이트(m.sbmmt.com)를 주목하세요!