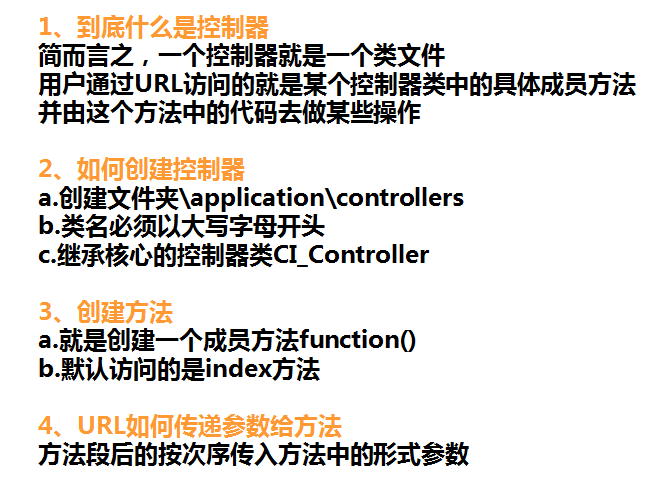
1. CI의 컨트롤러
CI를 통해 자신만의 프로젝트를 생성하려면 CI 압축 패키지에 있는 애플리케이션 디렉토리, 시스템 디렉토리, index.php 파일을 자신의 프로젝트 디렉토리에 복사하기만 하면 됩니다. 애플리케이션 디렉토리에서 전체 코드를 편집하십시오. 시스템 디렉토리를 수정하지 마십시오. 향후 CI의 새 버전이 출시되면 시스템 파일의 내용만 바꾸면 됩니다. 업그레이드에 문제가 있습니다.

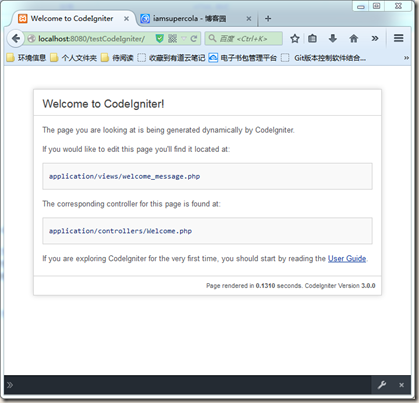
복사가 완료된 후 다음 URL을 통해 새 프로젝트의 홈페이지를 엽니다: http://localhost:8080/testCodeIgniter/

이 페이지를 통해 CI는 현재 표시된 뷰가 Welcome_message.php 파일에 정의되어 있고 현재 사용되는 컨트롤러가 Welcome.php라는 메시지를 표시합니다
열기
/application/controllers/Welcome.php
파일인 경우, 이 파일에는 뷰를 로드하는 인덱스 방법이 하나만 있습니다.
welcome_message
[code]<?php
defined('BASEPATH') OR exit('No direct script access allowed');
class Welcome extends CI_Controller
{
/**
* Index Page for this controller.
*
* Maps to the following URL
* http://example.com/index.php/welcome * - or -
* http://example.com/index.php/welcome/index * - or -
* Since this controller is set as the default controller in
* config/routes.php, it's displayed at http://example.com/ *
* So any other public methods not prefixed with an underscore will
* map to /index.php/welcome/<method_name>
* @see http://codeigniter.com/user_guide/general/urls.html */
public function index()
{
$this->load->view('welcome_message');
}
}
?>파일 보기
welcome_message.php
/application/views
디렉토리
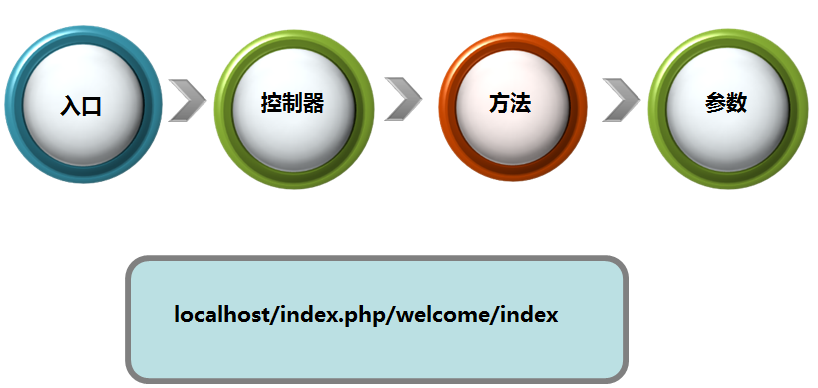
에서 pathinfo를 사용하여 URL을 통해 컨트롤러에 액세스합니다. 형식은 다음과 같습니다. 프로토콜:// 도메인 이름/항목 파일/컨트롤러/메서드 이름, 비공개 메서드의 경우 보호된 메서드 또는 밑줄로 시작하는 메서드는 pathinfo를 통해 액세스할 수 없습니다.
위에 새 테스트 메서드 추가 제어 파일 Welcome.php:
[code]public function test()
{
    echo "这是Welcome控制器的test方法";
}pathinfo(http://localhost:8080/testCodeIgniter/index.php/Welcome/test)
를 통해 Welcome 컨트롤러의 테스트 메소드를 호출할 수 있습니다. 인덱스를 포함한 새 사용자 컨트롤러 생성 메소드
[code]<?php
class User extends CI_Controller
{
public function index()
{
echo 'user---index';
}
}
?>컨트롤러는 CI_Controller 클래스에서 상속해야 합니다.
사용자 컨트롤러의 인덱스 메소드는 pathinfo: http://localhost:8080/testCodeIgniter/index를 통해 액세스할 수 있습니다. php/user/index

참고: pathinfo는 CI3.0 버전으로 테스트한 후 대소문자를 구분합니다
2. in CI
Controller 뷰
CI가 컨트롤러를 통해 뷰를 로드할 때, 이때
[code]$this->load->view('/user/index');
을 호출하여 뷰 파일 이름은 index.php입니다. , 파일 접미사를 추가할 필요가 없습니다. 파일 경로는 뷰 디렉터리에 대한 애플리케이션/상대 경로를 기반으로 합니다.
뷰 파일은 PHP 네이티브 코드일 수 있으며 HTML 코드는 필요하지 않습니다
컨트롤러에는 여러 개의 뷰를 불러올 수 있으며, 문서의 구조에 따라 위에서 아래로 순차적으로 불러올 수 있습니다
[code]<?php
    echo "这是user视图";
?>컨트롤러가 변수를 할당합니다
두 가지 방법:
1. 단일 변수
[code]$this->load->vars('title', '这是标题');
2. 변수 배치
[code]$data['title'] = '这是标题';
$data['list'] = $list;
$this->load->vars($data);
이 두 가지 할당 방법의 경우
$title
$list
을 사용하여 변수에 액세스할 수 있습니다. 여기에는 실제 프로젝트의 예가 나와 있습니다. 데이터는 모델에서 얻어야 합니다.
3. CI
의 모델 파일 이름은 소문자여야 합니다.
system/core/loader.php
的model方法中,会将传入的模型名称转成小写再去寻找对应的文件,但是类名必须是首字母大写并且拼装“
_model
”,拼装后的结果应与模型文件的文件名一致,只是首字母大写,例如:文件名是
user_model.php
,类名应该是
User_model
。
– user_model.php文件
[code]<?php
class User_model extends CI_Model
{
function __construct()
{
parent::__construct();
}
function getAllUser()
{
$this->load->database();
$result = $this->db->get('blog_user');
return $result->result();
}
}
?>在控制器中这样调用
[code]// 加载模型,通过第二个参数还可以指定别名,后面的代码使用别名访问
$this->load->model('user_model');
// 加载完成后,超级对象就生成了user_model属性,它是User_model类型的对象
$list = $this->user_model->getAllUser();
// 将数据传给视图
$this->load->view('user_view', array('list'=>$list));
原则上,除了关系表,每张实体表都应该对应一个模型
以上就是CodeIgniter学习笔记 Item2--CI中的MVC的内容,更多相关内容请关注PHP中文网(m.sbmmt.com)!