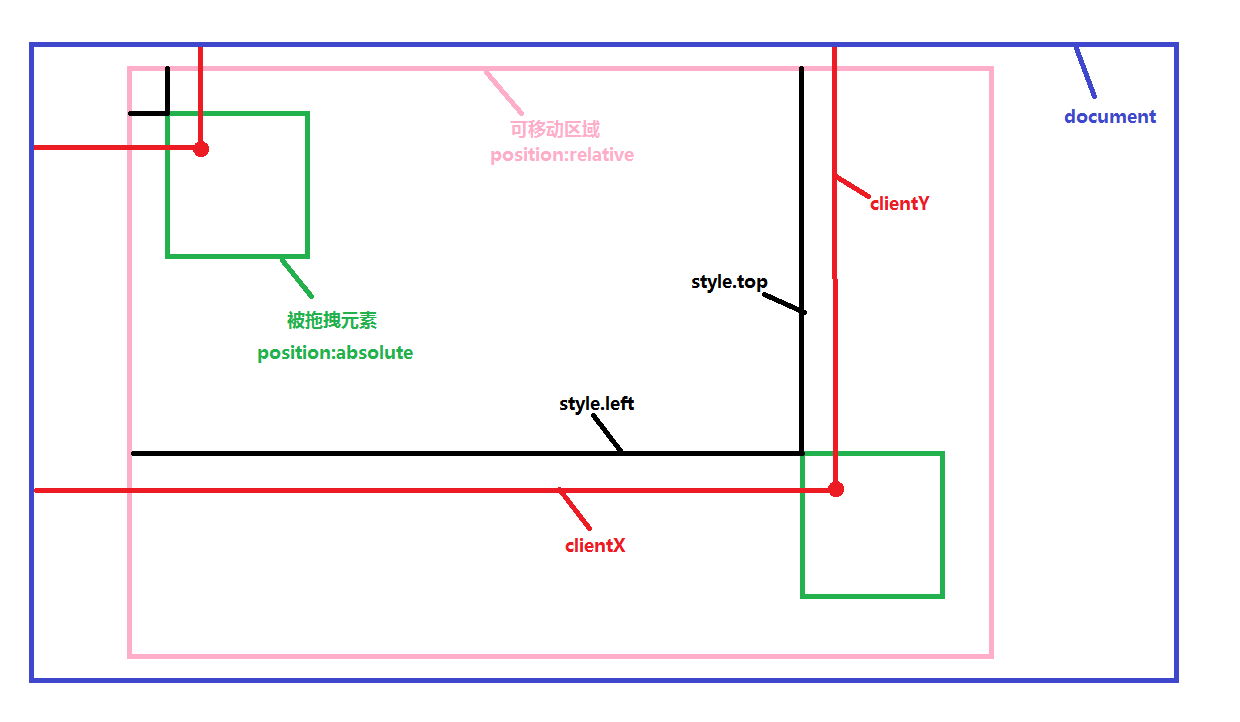
JS 코드는 자주 작성해야 합니다. 그렇지 않으면 녹슬기 쉽습니다. 최근 JS 프로토타입, 행동 위임 및 기타 지식 포인트를 살펴봤지만 실습 코드 작성량이 약간 줄었습니다. . 이 글은 참고용으로 드래그 앤 드롭 구성 요소를 공유합니다.
먼저 드래그의 원리를 살펴보겠습니다.

드래그된 요소의 위치 변화와 왼쪽 값은 실제로 마우스 왼쪽 버튼을 눌렀을 때 마우스 위치의 가로 방향 e.clientX - e.clientX의 변화입니다.
상단 값의 변화는 실제로 마우스 왼쪽 버튼을 눌렀을 때 마우스 위치의 수직 방향 e.clientY - e.clientY의 변화입니다.
다른 하나는 드래그 범위를 설정하는 것입니다. 상하좌우가 상위 요소가 위치한 영역을 초과해서는 안 됩니다.
  function Drag (config){
      this.moveTarget = document.getElementById(config.id);
      if(config.parentId){
        this.targetParent = document.getElementById(config.parentId);
        this.max_left = this.targetParent.clientWidth - this.moveTarget.offsetWidth;
        this.max_top = this.targetParent.clientHeight - this.moveTarget.offsetHeight;
      }else{
        console.log(document.documentElement.clientHeight + "||" + this.moveTarget.offsetHeight)
        this.max_left = document.documentElement.clientWidth - this.moveTarget.offsetWidth -
          parseInt(this.getStyle(document.body, "border-width"));
        this.max_top = document.documentElement.clientHeight - this.moveTarget.offsetHeight-
          parseInt(this.getStyle(document.body, "border-width"));
      }
      this.lock = true;
    }
    Drag.prototype.getStyle = function(element, attr){
      if(element.currentStyle){
        return element.currentStyle[attr];
      }else{
        return window.getComputedStyle(element,null).getPropertyValue(attr)
      }
    }
    Drag.prototype.moDown = function(e){
      e = e || window.event;
      this.clientX = e.clientX;
      this.clientY = e.clientY;
      //鼠标按下时,drag的left值,top值(写在style中或者是css中)
      this.startLeft = parseInt(this.moveTarget.style.left || this.getStyle(this.moveTarget, "left"));
      this.startTop = parseInt(this.moveTarget.style.top || this.getStyle(this.moveTarget, "top"));
      //鼠标按下时,鼠标的clientX值,clientY值
      this.startClientX = e.clientX;
      this.startClientY = e.clientY;
      this.lock = false;
    };
    Drag.prototype.moMove = function(e){
      e = e || window.event;
      if(e.which != 1){
        this.lock = true;
      }
      if(!this.lock){
        var realLeft = this.startLeft + e.clientX - this.startClientX;//实际的移动范围
        var realTop = this.startTop + e.clientY - this.startClientY;
          //rightLeft , rightTop; //left, top 取值(在可移动范围内)
        var rightLeft = realLeft > this.max_left ? this.max_left : ( realLeft > 0 ? realLeft : 0 );
        var rightTop = realTop > this.max_top ? this.max_top : ( realTop > 0 ? realTop : 0 );
        this.moveTarget.style.left = rightLeft + "px";
        this.moveTarget.style.top = rightTop + "px";
      }
    };
    Drag.prototype.moUp = function(e){
      e = e || window.event;
      this.lock = true;
    };
    Drag.prototype.startDrag = function(){
      console.log(this)
      this.moveTarget.onmousedown = function(e){this.moDown(e)}.bind(this);
      this.moveTarget.onmousemove = function(e){this.moMove(e)}.bind(this);
      this.moveTarget.onmouseup = function(e){this.moUp(e)}.bind(this);
}설명: moDown은 마우스 왼쪽 버튼 누르기 동작에 응답하고, moMove는 마우스 이동 동작에 응답하며, MoUp은 마우스 들어올리기 동작에 응답합니다.
moMove에 e.which 판단을 추가했습니다. e.which ==1은 마우스 왼쪽 버튼을 눌렀다는 의미입니다. 이는 마우스가 드래그 가능한 범위 밖으로 이동할 때 왼쪽 버튼을 누를 필요가 없는 문제를 해결하기 위한 것입니다. 버튼을 누르면 드래그한 요소가 그에 맞춰 이동하는 버그가 있습니다.
사용 지침:
사용시 드래그되는 요소의 id는 필수 파라미터이고, 상위 요소의 id가 이면, 상위 요소(즉, 드래그하여 이동할 수 있는 범위)의 id는 선택 파라미터입니다. 전달되지 않은 경우 documentElement는 기본적으로 드래그 가능하도록 사용됩니다.
상위 요소를 전달하는 경우 상위 요소의 위치를 position:relative 또는 position:absolute로 설정하는 것을 잊지 마세요.
사용시 먼저 드래그 앤 드롭 플러그인의 js 파일을 소개해주세요.
<!doctype html>
<html lang="en">
<head>
<meta charset="UTF-8">
<meta name="Generator" content="EditPlus®">
<meta name="Author" content="刘艳">
<meta name="Keywords" content="关键字">
<meta name="Description" content="描述">
<title>Document</title>
<style>
*{
margin:0px;
padding:0px;
}
#content{
width:600px;
height:500px;
position:relative;
border:5px solid green;
}
#drag{
position:absolute;
height:100px;
width:100px;
top:50px;left:0px;
background:pink;
cursor:pointer;
}
</style>
</head>
<body>
<div id = "content">
<div id = "drag" >
</div>
</div>
</body>
</html>
<script src = "url/drag.js"></script>
<script>
window.onload = function(){
var drag = new Drag({id: "drag", parentId: "content"});
drag.startDrag();
}
</script>
창 전체를 드래그하고 싶다면 드래그한 요소의 상위 요소 위치, 즉 본문을 기준으로 위치를 설정하지 마세요.
본문의 위치를 지정해야 하지만 상위 요소의 위치도 비정적으로 설정해야 하는 경우 이 플러그인을 확장할 수 있습니다.
이 기사가 자바스크립트 프로그래밍을 배우는 모든 사람에게 도움이 되기를 바랍니다.