컴퓨터 시계를 보면서 더 높은 수준의 정확성을 원하는 적이 있습니까? 음, Microsoft는 마침내 초기 릴리스에는 없었던 기능인 작업 표시줄 시계에 초를 표시하는 기능을 추가했습니다. 이 글은 Windows 11 시계에 초를 빠르고 효과적으로 표시하는 방법을 안내합니다.

시간에 민감한 작업을 조정하든, 정확한 녹음을 동기화하든, 보다 세부적인 시간 보기를 선호하든, 몇 초만 사용하면 놀라울 정도로 유익할 수 있습니다. 더 원활하고 효율적인 컴퓨팅 환경을 만드는 것은 작은 것들입니다. 이러한 이해를 바탕으로 단계부터 시작하겠습니다.
이것은 Windows 11 시계에 초를 추가하는 가장 일반적이고 쉬운 방법 중 하나입니다. 아래 단계를 따르세요.
1단계: 키보드에서 Windows 키를 누르고 설정을 입력한 다음 열기를 클릭합니다.

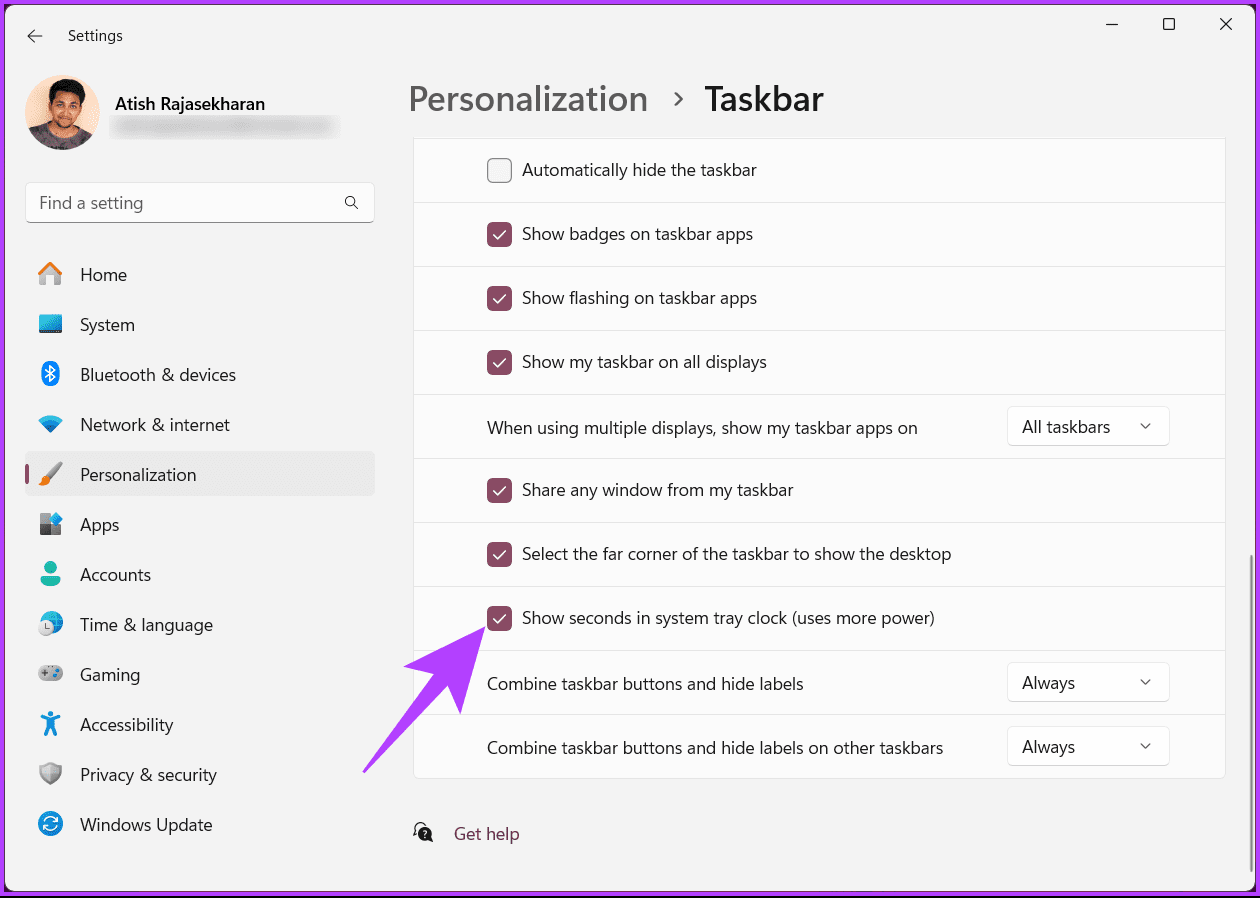
2단계: 개인 설정으로 이동하여 작업 표시줄 옵션을 선택합니다.

3단계: 작업 표시줄 설정에서 작업 표시줄 동작을 클릭합니다.

4단계: 마지막으로 확장 메뉴에서 '시스템 트레이 시계에 초 표시' 옆의 확인란을 선택합니다.

옵션이 활성화되면 작업 표시줄 오른쪽 하단에 있는 시계에 초가 표시됩니다. Windows 11 시계에 초를 추가하는 또 다른 방법은 명령줄 도구를 사용하는 것입니다. 계속 읽어보세요.
Windows 터미널을 사용하여 시스템 트레이에 초가 표시된 시계를 추가할 수도 있습니다. 아래 지침을 따르세요.
1단계: 키보드에서 Windows 키를 누르고 터미널을 입력한 후 열기 또는 '관리자 권한으로 실행'을 클릭합니다.

2단계: 이제 아래 명령을 입력하고 Enter 키를 누르세요.
Set-ItemProperty -Path HKCU:\Software\Microsoft\Windows\CurrentVersion\Explorer\Advanced -Name ShowSecondsInSystemClock -Value 1 -Force

명령이 실행되면 작업 표시줄에 초가 표시된 시계가 표시됩니다.
또한 읽어 보세요: Windows PC에 여러 시계를 추가하는 방법
이는 터미널을 통해 표시하고 싶지 않은 경우 시스템 트레이 아이콘에 초를 표시하는 대체 방법입니다. 아래에 언급된 단계를 따르세요.
1단계: 키보드에서 Windows 키를 누르고 실행을 입력한 다음 열기를 클릭합니다.

2단계: 텍스트 상자에 아래 명령을 입력하고 확인을 클릭하세요.
cmd /c powershell.exe Set-ItemProperty -Path HKCU:\Software\Microsoft\Windows\CurrentVersion\Explorer\Advanced -Name ShowSecondsInSystemClock -Value 1 -Force

그렇습니다. 이 명령이 실행되면 Windows가 시스템 트레이 시계에 초를 표시할 수 있습니다. Windows 11에서 시계를 초 단위로 허용하는 또 다른 방법이 있습니다. 계속 읽어보세요.
이 방법은 위의 방법보다 더 복잡하지만 단계를 따르고 실행하는 것은 간단합니다. 하지만 우리는 레지스트리 편집기를 사용할 것이므로 아래 단계를 진행하기 전에 Windows 레지스트리를 백업하는 것이 좋습니다.
1단계: 키보드에서 Windows 키를 누르고 레지스트리 편집기를 입력한 후 '관리자 권한으로 실행'을 클릭하세요.
참고: 또는 Windows 키 R을 눌러 실행 대화 상자를 열고 regedit.exe를 입력한 다음 확인을 클릭하여 레지스트리 편집기를 엽니다.

In the prompt, select Yes.
Step 2: In the top address bar, enter the following path.
HKEY_CURRENT_USER\Software\Microsoft\Windows\CurrentVersion\Explorer\Advanced
Note: You can manually navigate to the section too.

Step 3: Find and double-click on the ShowSecondInSystemClock key.

Step 4: Now, type 1 in the Value Data field and press OK.

Finally, reboot the system to implement the changes. And that’s it! After booting your PC again, you will have turned on a clock with seconds on the taskbar.
If this method is too much to follow, you can use available third-party applications to get the seconds clock in the system tray; keep reading.
Also Read: How to set, edit, and delete an alarm in Windows 11
Multiple third-party applications are available that add seconds to the Windows 11 clock; some popular ones are ElevenClock and T-Clock Redux. We will use ElevenClock for the demonstration; let’s begin with the steps.
Step 1: Go to the Microsoft Store, search ElevenClock, and click the Install button. Or you can click on the below link and navigate to the download page directly.

Step 2: Once installed, launch the application and go to ‘Date & Time Settings.’

Step 3: From the drop-down menu, find ‘Show seconds on the clock,’ and check the box next to it.
Note: You may have additional customization options, such as fading in the seconds or adjusting the font size.

Once you’ve completed these steps, you should see the seconds displayed in the system tray clock, providing more precise timekeeping for your Windows 11 experience.
While third-party tools can provide additional customization options, they may have limitations or compatibility issues with future Windows updates.
Yes, you can use screensavers or desktop widgets that display the time with seconds.
The ability to show seconds on your Windows 11 clock might seem like a minor adjustment, but it can significantly impact your day-to-day activities. Now that you know how to show seconds on the Windows 11 clock, you can have that extra precision. You may also want to read how to synchronize Windows clock with Internet Time Server.
위 내용은 Windows 11 시계에 초를 표시하는 방법의 상세 내용입니다. 자세한 내용은 PHP 중국어 웹사이트의 기타 관련 기사를 참조하세요!