

안녕하세요. Arsey님, Python 사용자입니다. 이것은 제 첫 번째 블로그이며 Flet을 사용하여 이 간단한 계산기 앱을 구축하는 방법을 안내해 드리겠습니다. 이 소식을 여러분과 공유하게 되어 매우 기쁩니다.
오늘날의 디지털 시대에는 크로스 플랫폼 애플리케이션을 만드는 것이 필수입니다. 사용 가능한 프레임워크가 너무 많아서 올바른 프레임워크를 선택하는 것이 어려울 수 있습니다. 그러한 프레임워크 중 하나는 개발자가 Flutter를 사용하여 Python용으로 웹, 데스크톱 및 모바일 앱을 쉽게 구축할 수 있게 해주는 Python 라이브러리인 Flet입니다.
이 블로그에서는 Flet을 사용하여 기본 계산기 앱을 만드는 방법을 살펴보고 이 프레임워크가 얼마나 간단하고 효율적인지 보여드리겠습니다.
프로그래밍을 시작했을 때 제 목표는 모바일 애플리케이션을 구축하는 것이었습니다. 명확한 가이드 없이 저는 Python을 첫 번째 언어로 선택했습니다. 배우는 것은 즐거웠지만 경험이 쌓이면서 Python은 전통적으로 앱 개발에 적합하지 않고 데이터 분석 및 관련 작업에 더 일반적으로 사용된다는 것을 깨달았습니다.
네이티브 개발을 위해 Kotlin으로 Android 개발을 배우고 크로스 플랫폼을 위해 Flutter로 Dart를 배우는 이제 이 라이브러리 플릿 덕분에 제 목표가 한 단계 더 가까워졌습니다.
Python을 앱 구축에 사용할 수 있게 해주는 Kivy, Tkinter, Flet 등과 같은 프레임워크를 발견하기 전까지 이러한 깨달음은 실망스러웠습니다. Kivy 또는 Tkinter와 달리 이러한 프레임워크는 훌륭하지만 Android 및 iOS에서 잘 작동하는 멋진 모바일 애플리케이션을 개발하려면 많은 사용자 정의가 필요합니다. 그리고 바로 여기가 바로 플렛이 빛을 발하는 곳입니다.
Flet은 Google의 인기 UI 툴킷인 Flutter에서 영감을 받은 Python 프레임워크입니다. flet으로 달성할 수 있는 결과는 인상적이며 더 많은 정보를 공유하게 되어 기쁩니다.
Flet은 개발자가 Flutter의 UI 툴킷을 사용하여 직접 사용자 인터페이스를 구축할 수 있는 Python 패키지입니다.
Flet의 주요 장점은 Python의 단순성과 Flutter의 풍부한 UI 기능을 결합하여 광범위한 프런트엔드 경험 없이도 크로스 플랫폼 애플리케이션을 빠르게 개발할 수 있다는 것입니다.
Flet은 배터리가 포함된 라이브러리이므로 SDK가 필요 없으며 Flutter의 SDK로 쉽게 확장할 수 있습니다.
참고: 박스 모델, Flexbox 및 Grid와 같은 레이아웃 구조, 위치 지정과 같은 일부 프런트엔드 개념에 대한 기본적인 이해가 있으면 도움이 됩니다. 이 지식 없이도 따라갈 수 있지만 이러한 개념을 익히는 것이 좋습니다.
이제 그 일을 마치고 계산기를 만드는 방법을 살펴보겠습니다!
코딩을 시작하기 전에 컴퓨터에 Python이 설치되어 있는지 확인하세요. 그런 다음 다음 단계에 따라 Flet 환경을 설정하세요.
pip 설치 플릿
Python 파일에 다음 코드를 입력하세요
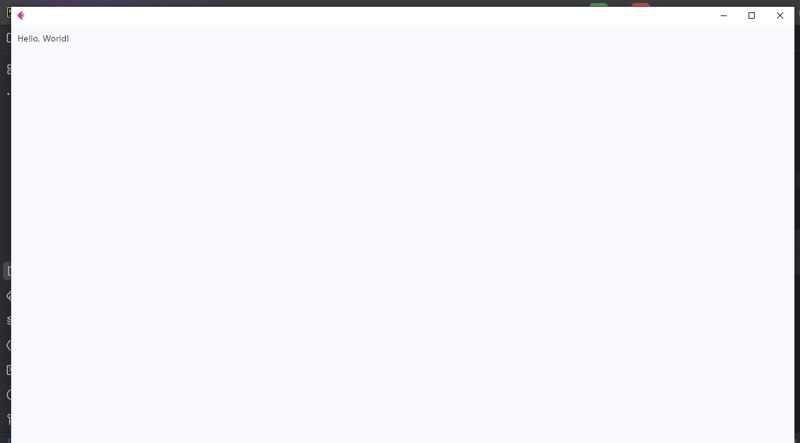
코드를 실행하여 모든 것이 작동하는지 확인하세요. “Hello, World!”가 보이면 표시되면 계산기를 만들 준비가 된 것입니다.
출력
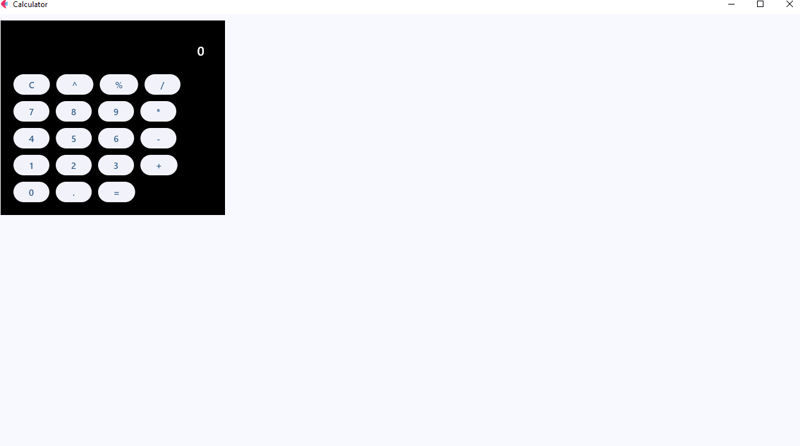
이 섹션에서는 계산기의 구조에 중점을 둘 것입니다. 여기서는 열 위젯을 사용하여 디스플레이와 버튼을 쌓겠습니다. 디스플레이에는 현재 입력이 표시되고 버튼을 사용하면 사용자 상호 작용이 가능합니다. UI가 사용자 상호 작용에 대한 사용자 인터페이스를 의미할 수 있다는 사실을 전혀 알아차리지 못한 것이 이상합니다.
이제 아래 코드를 아래와 같이 작성해 보세요.
위 코드를 실행하면 계산기 레이아웃의 출력이 표시됩니다. 보기에는 좋지 않을 수도 있지만 괜찮습니다! 계산기를 더욱 세련되게 보이도록 컨테이너에 간격, 반경, 테마를 추가하여 기능을 향상하겠습니다.
출력
자, 레이아웃은 다 만들었죠? 글쎄요, 아직도 우리가 방금 한 일을 이해하지 못한 분들이 계시다는 것을 알고 있습니다. 질문 없이 그냥 앉아서 코드의 기능을 설명해 드리겠습니다.
In the first line, we import our controls. Flet controls are widgets used to lay out our application into a meaningful User Interface. But here we have importedapp,Page,Container,Column,Row,
TextField,colors,border_radius,ElevatedButton,TextAlign,TextStyle.
Even though some of them are not entire widgets, likeapp,colors,border_radius,TextAlign, andTextStyle. These are classes and methods that provide us with extra functionalities of our application, for example
Theapp, allows us to launch our app in a standalone mode targeting to the main instance of our application.* colors* allow us to style our controls that support the color andbgcolorattribute without us struggling to define their names andborder_radiusallows us to curve the corners of our containers.
In line 7 we define the main app instance to Page; a page is a container for View Controls. So here I won’t go deep into views since it’s beyond the scope of this tutorial, but you reference here.
We now give the title to our page, with the page.titleattribute, the title on the title bar of our app.
In lines 9-16 is the result control with its required attributes, though it has many, we are gonna use these ones for this project, as you can see we have add a place holder of 0, giving it a size of 20, color to white, align text to right, and the read-only to true so we don’t allow external of soft keyboards to work directly in it.
Line 18 we defined our event handler, button_click this is where we will apply the logic to function our application, eventually making it a working calculator, but for now I just used a pass statement as a placeholder.
From lines 21 – 59, we defined our rows using the Row Widget, the row widget is a control that displays its children in a horizontal array or layout from left to right, similar to the linear layout in Android development, or inline elements in CSS the row controls works in the same way as them, it lays out controls in a horizontal axis or linearly.
Then theElevatedButton_will represent buttons on the calculator’s UI, but notice we have given it the text and _onclickattributes, the text defines the data that will be displayed on the results when clicked using the onclick attribute that will call for the function button_click to handle events accordingly.
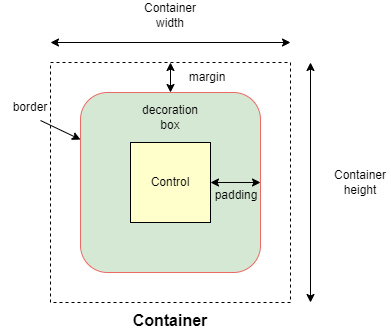
We have the container, the container is a control that will allow us to decorate a control with background color, spacing, applying borders andborder radius, and position it with padding, margin, and alignment.
A container follows the box-model concept like the one for CSS as in the figure below,
The column control, like the Row control, this one displays its children in a vertical array or layout from top to bottom, this will allow us to vertically lay our buttons in the right order.
Now after defining our UI elements, we need to display them to our application and then call it. We do that by using the page.add() method which allows us to add and build our UI logically.
Then we have to call our app in the stand-alone mode, and that’s what lines 74-75 accomplished.
Update your button click function to match this code below.
def button_click(e): if e.control.text == "=": try: result.value = str(eval(result.value)) except Exception: result.value = "Error" elif e.control.text == "C": result.value = "" # elif e.control.text == "^": # logic for powers # pass else: result.value += e.control.text result.update()
Okay, what does this code do under the hood; the button_click function is designed to handle various button click events within our calculator app.
Save to apply our current changes then run the calculator and see the results.
Here is a breakdown of how the code works
NOTE: The eval() function is a quick way to evaluate expression but it can be risky with un-trusted input because it executes/evaluates any Python code. In a more secure app, you’d use a safer method for evaluating mathematical expressions.
Exercise: test your knowledge, of how would you handle the exponent ‘^’ expression so that if the user clicks the exponent button it returns the required output. For example, if the user inputs 2^2 the output will be 4, 5^5=25, and 3^4=81. You get the idea.
Let me know how you approached to this problem in the comments, okay, all done, let’s continue.
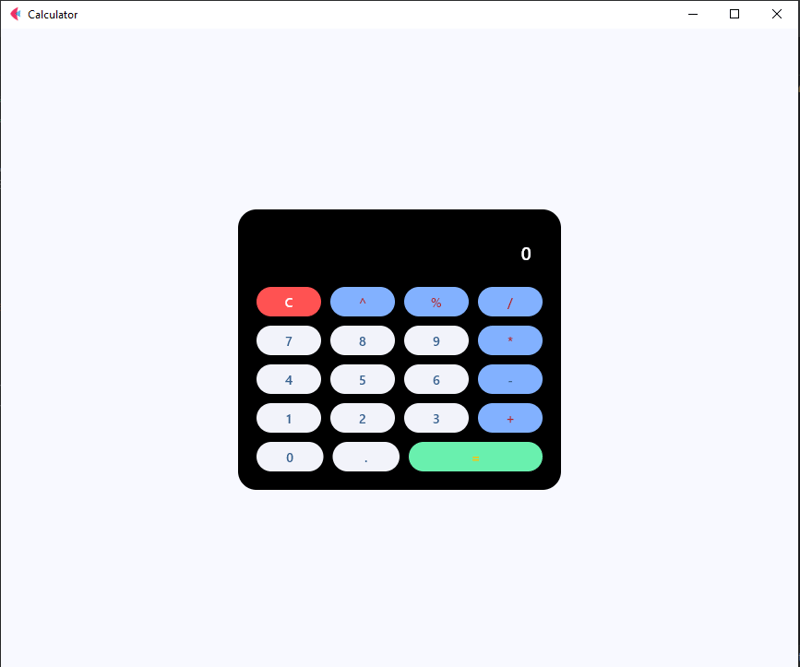
Previously the user interface did not look that catchy and awesome, so let’s improve it, and update the buttons to match the following code.
button_row0 = Row( [ ElevatedButton(text='C', expand=1, on_click=button_click, bgcolor=colors.RED_ACCENT, color=colors.WHITE), ElevatedButton(text='^', expand=1, on_click=button_click, bgcolor=colors.BLUE_ACCENT_100, color=colors.RED_900 ), ElevatedButton(text='%', expand=1, on_click=button_click, bgcolor=colors.BLUE_ACCENT_100, color=colors.RED_900 ), ElevatedButton(text='/', expand=1, on_click=button_click, bgcolor=colors.BLUE_ACCENT_100, color=colors.RED_900 ), ] ) button_row1 = Row( [ ElevatedButton(text='7', expand=1, on_click=button_click), ElevatedButton(text='8', expand=1, on_click=button_click), ElevatedButton(text='9', expand=1, on_click=button_click), ElevatedButton(text='*', expand=1, on_click=button_click, bgcolor=colors.BLUE_ACCENT_100, color=colors.RED_900 ), ] ) button_row2 = Row( [ ElevatedButton(text='4', expand=1, on_click=button_click), ElevatedButton(text='5', expand=1, on_click=button_click), ElevatedButton(text='6', expand=1, on_click=button_click), ElevatedButton(text='-', expand=1, on_click=button_click, bgcolor=colors.BLUE_ACCENT_100 ), ] ) button_row3 = Row( [ ElevatedButton(text='1', expand=1, on_click=button_click), ElevatedButton(text='2', expand=1, on_click=button_click), ElevatedButton(text='3', expand=1, on_click=button_click), ElevatedButton(text='+', expand=1, on_click=button_click, bgcolor=colors.BLUE_ACCENT_100, color=colors.RED_900), ] ) button_row4 = Row( [ ElevatedButton(text='0', expand=1, on_click=button_click), ElevatedButton(text='.', expand=1, on_click=button_click), ElevatedButton( text='=', expand=2, on_click=button_click, bgcolor=colors.GREEN_ACCENT, color=colors.AMBER ), ] )
What have we changed exactly, hmm!
For the buttons, we could have used the width attribute but that won’t work as we want it would break the UI, feel free to test it.
But we have this expand attribute which allows only aBooleanand anintdata type value.
For the normal buttons like the operators, numbers, and the clear button we expanded them to 1, and for the equals button, we expanded it by 2.
Now what does the expand attribute do, the expand attribute allows a control to fill the available space in a given container.
So the buttons with expand 1 will have an equal size of width and for the equals button it will expand 2, or in simple terms span two buttons or will equal two buttons in width.
Notice that we have added colors and background colors to some of our buttons to make them stand out from the numbers buttons.
Understand, great.
In the container add these attributes, just after the padding attribute to make it look more appealing and user friendly.
border_radius=border_radius.all(20),
Output
Now, you have a fully functional calculator built with Flet! Feel free to customize it to your liking or add more features. You can even package it as a standalone APK, AAB to launch on Google Play Store or Apple App Store
Here is the full code,
from flet import ( app, Page, Container, Column, Row, TextField, colors, border_radius, ElevatedButton, TextAlign, TextStyle ) from flet_core import ThemeMode def main(page: Page): page.title = "Calculator" page.theme_mode = ThemeMode.DARK page.horizontal_alignment = page.vertical_alignment = 'center' result = TextField( hint_text='0', text_size=20, color='white', text_align=TextAlign.RIGHT, hint_style=TextStyle( color=colors.WHITE, size=20 ), read_only=True ) def button_click(e): if e.control.text == "=": try: result.value = str(eval(result.value)) except Exception: result.value = "Error" elif e.control.text == "C": result.value = "" # elif e.control.text == "^": # logic for powers # pass else: result.value += e.control.text result.update() button_row0 = Row( [ ElevatedButton(text='C', expand=1, on_click=button_click, bgcolor=colors.RED_ACCENT, color=colors.WHITE), ElevatedButton(text='^', expand=1, on_click=button_click, bgcolor=colors.BLUE_ACCENT_100, color=colors.RED_900 ), ElevatedButton(text='%', expand=1, on_click=button_click, bgcolor=colors.BLUE_ACCENT_100, color=colors.RED_900 ), ElevatedButton(text='/', expand=1, on_click=button_click, bgcolor=colors.BLUE_ACCENT_100, color=colors.RED_900 ), ] ) button_row1 = Row( [ ElevatedButton(text='7', expand=1, on_click=button_click), ElevatedButton(text='8', expand=1, on_click=button_click), ElevatedButton(text='9', expand=1, on_click=button_click), ElevatedButton(text='*', expand=1, on_click=button_click, bgcolor=colors.BLUE_ACCENT_100, color=colors.RED_900 ), ] ) button_row2 = Row( [ ElevatedButton(text='4', expand=1, on_click=button_click), ElevatedButton(text='5', expand=1, on_click=button_click), ElevatedButton(text='6', expand=1, on_click=button_click), ElevatedButton(text='-', expand=1, on_click=button_click, bgcolor=colors.BLUE_ACCENT_100 ), ] ) button_row3 = Row( [ ElevatedButton(text='1', expand=1, on_click=button_click), ElevatedButton(text='2', expand=1, on_click=button_click), ElevatedButton(text='3', expand=1, on_click=button_click), ElevatedButton(text='+', expand=1, on_click=button_click, bgcolor=colors.BLUE_ACCENT_100, color=colors.RED_900), ] ) button_row4 = Row( [ ElevatedButton(text='0', expand=1, on_click=button_click), ElevatedButton(text='.', expand=1, on_click=button_click), ElevatedButton( text='=', expand=2, on_click=button_click, bgcolor=colors.GREEN_ACCENT, color=colors.AMBER ), ] ) container = Container( width=350, padding=20, bgcolor=colors.BLACK, border_radius=border_radius.all(20), content=Column( [ result, button_row0, button_row1, button_row2, button_row3, button_row4 ] ) ) page.add(container) if __name__ == '__main__': app(target=main)
Building this calculator has been a fun experience for me and a learning experience for you, and I hope you enjoyed it too.
Let me know what kind of project you’d like to build using this framework or any other likePyQt,Kivy, orTkinter. I’d be glad to make a tutorial on it. Or even web design and development tutorials, also are allowed.
Feel free to ask questions, I’ll do my best to answer them.
If you've read this far, thank you—I appreciate it!
위 내용은 Python과 Flet을 사용하여 계산기 만들기의 상세 내용입니다. 자세한 내용은 PHP 중국어 웹사이트의 기타 관련 기사를 참조하세요!


![[웹 프런트엔드] Node.js 빠른 시작](https://img.php.cn/upload/course/000/000/067/662b5d34ba7c0227.png)


