

JWT(JSON 웹 토큰)는 두 당사자(예: 클라이언트와 서버) 간에 정보를 JSON 개체로 안전하게 전송하는 방법입니다. 컴팩트하고 URL 안전하도록 설계되어 URL, 헤더에서 쉽게 전달할 수 있습니다.
헤더
헤더는 일반적으로 토큰 유형(JWT)과 사용되는 서명 알고리즘(예: HMAC SHA256 또는 RSA)의 두 부분으로 구성됩니다.
{
"alg":"HS256",
"일반":"JWT"
}
페이로드
실제 데이터가 저장되는 곳입니다. 여기에는 사용자 ID, 역할, 만료 시간 및 기타 클레임(사용자 또는 세션에 대한 데이터)과 같은 정보가 포함될 수 있습니다.
{
"이메일":"ayushstwt@gmail.com",
"이름":"아유쉬"
}
서명
토큰의 무결성을 보장합니다. 이는 토큰이 변경되지 않았는지 확인하는 보안 기능입니다. 지정된 알고리즘을 사용하여 인코딩된 헤더와 페이로드를 비밀 키와 결합하여 생성됩니다. 서명은 서버가 토큰이 합법적이고 변조되지 않았는지 확인하는 데 도움이 됩니다.
자격 증명을 반복적으로 보낼 필요 없음:JWT를 사용하면 요청할 때마다 사용자 이름과 비밀번호를 보낼 필요가 없습니다. 대신, 한 번 로그인하면 서버가 토큰을 제공합니다. 그런 다음 귀하의 신원을 증명하기 위해 요청할 때마다 이 토큰을 보내 프로세스를 더욱 안전하고 효율적으로 만듭니다.
내장된 만료:각 JWT에는 만료 시간이 있습니다. 즉, 특정 기간 동안만 유효합니다. 이렇게 하면 토큰이 어떻게든 가로채는 경우 장기간 오용될 위험이 줄어듭니다. 만료된 후에는 사용자가 다시 로그인하여 새 토큰을 받아야 보안이 강화됩니다.
Spring Boot를 사용하는 JWT는 로그인 후 토큰을 발급하여 사용자 인증을 안전하게 관리합니다. 이러한 토큰은 각 요청과 함께 전송되므로 자격 증명을 반복적으로 보내지 않고도 안전한 상태 비저장 통신을 보장합니다.
상태 비저장 통신은 서버가 과거 요청을 기억하지 않는다는 것을 의미합니다. 각 요청에는 필요한 모든 것(예: JWT)이 전달되므로 서버는 세션 정보를 저장하지 않습니다.
Java Spring Boot 애플리케이션에서 JWT를 구현하려면 여러 단계가 필요합니다. 시작하기 위한 간단한 개요는 다음과 같습니다.
1. 종속성 추가
pom.xml 파일에 필요한 종속성을 포함하세요
JWT를 사용하여 스프링 부트 애플리케이션을 만드는 데 필요한 모든 종속성
우리는 다음과 같은 다양한 유형의 종속성을 사용하고 있습니다
*2. 프로젝트 구조 *

3. application.properties 파일에 구성을 추가하세요
4. USER 엔터티 만들기
** 5. 서비스, 저장소 클래스 및 인터페이스 생성**
Repository.java
service.java
6. 로그인, 로그인 요청 및 응답을 위한 DTO 생성
CreateloginDTO.java
loginResponse.java
RegisterDTO.java
RegisterResponse.java
*7. API에서 사용자 정의 응답을 보내기 위해 ResponseHandler.java *
를 사용합니다.
package com.tier3Hub.user_auth_service.utils; import org.springframework.http.HttpStatus; import org.springframework.http.ResponseEntity; import java.util.HashMap; import java.util.Map; public class ResponseHandler { public static ResponseEntity
8. for storing some constants we create the class inside the utils package that is ApplicationConstants.java
package com.tier3Hub.user_auth_service.utils; public class AppConstants { public static final String[] PUBLIC_URLS = { "/v3/api-docs/**", "/swagger-ui/**", "/api/auth/register/**", "/api/auth/login/**","/api/auth/registerAdmin/**" }; }
9. for converting the object one to another we use the dependency that is model mapper for configuration that we create the class inside the config package that is ApplicationConfigs.java
package com.tier3Hub.user_auth_service.config; import org.modelmapper.ModelMapper; import org.springframework.context.annotation.Bean; import org.springframework.context.annotation.Configuration; @Configuration public class ApplicationConfigs { @Bean public ModelMapper modelMapper() { return new ModelMapper(); } }
**
This is the basic setup that we do for every spring-boot application we create now securing the rest endpoint with JWT we started.
**
now inside the security package we create the class called JWTFilter.java
The JWTFilter is a custom Spring Security filter that intercepts HTTP requests to validate JWTs. It checks for the "Authorization" header, extracts the token, and retrieves the username. If the token is valid, it creates an authentication token with user details and sets it in the security context, allowing the application to recognize the authenticated user for further processing.
package com.tier3Hub.user_auth_service.security; import jakarta.servlet.FilterChain; import jakarta.servlet.ServletException; import jakarta.servlet.http.HttpServletRequest; import jakarta.servlet.http.HttpServletResponse; import org.springframework.beans.factory.annotation.Autowired; import org.springframework.security.authentication.UsernamePasswordAuthenticationToken; import org.springframework.security.core.context.SecurityContextHolder; import org.springframework.security.core.userdetails.UserDetails; import org.springframework.security.core.userdetails.UserDetailsService; import org.springframework.security.web.authentication.WebAuthenticationDetailsSource; import org.springframework.stereotype.Service; import org.springframework.web.filter.OncePerRequestFilter; import java.io.IOException; @Service public class JWTFilter extends OncePerRequestFilter { @Autowired private UserDetailsService userDetailsService; @Autowired private JWTUtil jwtUtil; @Override protected void doFilterInternal(HttpServletRequest request, HttpServletResponse response, FilterChain chain) throws ServletException, IOException { String authorizationHeader = request.getHeader("Authorization"); String username = null; String jwt = null; if (authorizationHeader != null && authorizationHeader.startsWith("Bearer ")) { jwt = authorizationHeader.substring(7); username = jwtUtil.extractUsername(jwt); } if (username != null) { UserDetails userDetails = userDetailsService.loadUserByUsername(username); if (jwtUtil.validateToken(jwt)) { UsernamePasswordAuthenticationToken auth = new UsernamePasswordAuthenticationToken(userDetails, null, userDetails.getAuthorities()); auth.setDetails(new WebAuthenticationDetailsSource().buildDetails(request)); SecurityContextHolder.getContext().setAuthentication(auth); } } chain.doFilter(request, response); } }
create the class JWTUtil.java
The JWTUtil class manages JWT operations, including extracting usernames and expiration dates from tokens. It generates new tokens using a secret key and validates existing tokens by checking their expiration. The class uses HMAC for signing and includes methods to parse claims and determine if tokens are expired, ensuring secure authentication and authorization in the application.
package com.tier3Hub.user_auth_service.security; import io.jsonwebtoken.Claims; import io.jsonwebtoken.Jwts; import io.jsonwebtoken.security.Keys; import org.springframework.stereotype.Service; import javax.crypto.SecretKey; import java.util.Date; import java.util.HashMap; import java.util.Map; @Service public class JWTUtil { private String SECRET_KEY = "TaK+HaV^uvCHEFsEVfypW#7g9^k*Z8$V"; private SecretKey getSigningKey() { return Keys.hmacShaKeyFor(SECRET_KEY.getBytes()); } public String extractUsername(String token) { Claims claims = extractAllClaims(token); return claims.getSubject(); } public Date extractExpiration(String token) { return extractAllClaims(token).getExpiration(); } private Claims extractAllClaims(String token) { return Jwts.parser() .verifyWith(getSigningKey()) .build() .parseSignedClaims(token) .getPayload(); } private Boolean isTokenExpired(String token) { return extractExpiration(token).before(new Date()); } public String generateToken(String username) { Map claims = new HashMap<>(); return createToken(claims, username); } private String createToken(Map claims, String subject) { return Jwts.builder() .claims(claims) .subject(subject) .header().empty().add("typ","JWT") .and() .issuedAt(new Date(System.currentTimeMillis())) .expiration(new Date(System.currentTimeMillis() + 1000 * 60 * 50)) // 5 minutes expiration time .signWith(getSigningKey()) .compact(); } public Boolean validateToken(String token) { return !isTokenExpired(token); } }
*configure the Spring security and add some modifictaion we create the class SecurityConfig.java *
The SecurityConfig class sets up security for the application using Spring Security. It defines access rules, allowing public endpoints while restricting others based on user roles. The class incorporates a JWT filter to validate tokens and uses BCrypt for password encoding. It also configures an authentication manager with a custom user details service for secure user authentication.
package com.tier3Hub.user_auth_service.config; import com.tier3Hub.user_auth_service.security.JWTFilter; import com.tier3Hub.user_auth_service.service.UserInfoConfigManager; import com.tier3Hub.user_auth_service.utils.AppConstants; import org.springframework.beans.factory.annotation.Autowired; import org.springframework.context.annotation.Bean; import org.springframework.context.annotation.Configuration; import org.springframework.security.authentication.AuthenticationManager; import org.springframework.security.config.annotation.authentication.builders.AuthenticationManagerBuilder; import org.springframework.security.config.annotation.authentication.configuration.AuthenticationConfiguration; import org.springframework.security.config.annotation.web.builders.HttpSecurity; import org.springframework.security.config.annotation.web.configuration.EnableWebSecurity; import org.springframework.security.config.annotation.web.configurers.AbstractHttpConfigurer; import org.springframework.security.crypto.bcrypt.BCryptPasswordEncoder; import org.springframework.security.crypto.password.PasswordEncoder; import org.springframework.security.web.SecurityFilterChain; import org.springframework.security.web.authentication.UsernamePasswordAuthenticationFilter; @Configuration @EnableWebSecurity public class SecurityConfig { @Autowired private JWTFilter jwtFilter; @Autowired private UserInfoConfigManager userInfoConfigManager; @Bean public SecurityFilterChain securityFilterChain(HttpSecurity http) throws Exception { return http.authorizeHttpRequests(request -> request .requestMatchers(AppConstants.PUBLIC_URLS).permitAll() .requestMatchers("/api/test/public/hello/**").hasAnyRole("USER","ADMIN") .requestMatchers("/api/test/private/**").hasRole("ADMIN") .anyRequest() .authenticated()) .csrf(AbstractHttpConfigurer::disable) .addFilterBefore(jwtFilter, UsernamePasswordAuthenticationFilter.class) .build(); } @Autowired public void configureGlobal(AuthenticationManagerBuilder auth) throws Exception { auth.userDetailsService(userInfoConfigManager).passwordEncoder(passwordEncoder()); } @Bean public PasswordEncoder passwordEncoder() { return new BCryptPasswordEncoder(); } @Bean public AuthenticationManager authenticationManager(AuthenticationConfiguration auth) throws Exception { return auth.getAuthenticationManager(); } }
The securityFilterChain method configures access rules for different API endpoints in the Spring application. It permits public URLs and applies role-based access control for user and admin roles. Role-based authentication restricts resource access based on user roles (e.g., USER, ADMIN). In Spring Boot, you define roles and configure security settings in the SecurityConfig class to specify access permissions. During user registration, assign roles, and use annotations like @PreAuthorize to enforce role checks in controllers. This approach enhances security, allows easy permission management, and simplifies user access rights as the application scales. Implementing role-based auth provides flexibility and maintainability for your user management system. CSRF protection is disabled, and a custom JWT filter is added to authenticate requests based on JSON Web Tokens, ensuring secure and controlled access to resources.
configureGlobal method handle configures global authentication settings in a Spring application. It uses a custom user details service for loading user data and a BCrypt password encoder for secure password hashing. Additionally, it provides an AuthenticationManager bean for handling authentication processes, ensuring a secure and efficient user authentication system that leverages strong password management practices.
create the endpoints for register and login
package com.tier3Hub.user_auth_service.Controller; import com.tier3Hub.user_auth_service.dto.LoginDTO; import com.tier3Hub.user_auth_service.dto.LoginResponse; import com.tier3Hub.user_auth_service.dto.RegisterDTO; import com.tier3Hub.user_auth_service.security.JWTUtil; import com.tier3Hub.user_auth_service.service.AuthService; import com.tier3Hub.user_auth_service.service.UserInfoConfigManager; import com.tier3Hub.user_auth_service.utils.ResponseHandler; import jakarta.validation.Valid; import org.springframework.beans.factory.annotation.Autowired; import org.springframework.http.HttpStatus; import org.springframework.http.ResponseEntity; import org.springframework.security.authentication.AuthenticationManager; import org.springframework.security.authentication.UsernamePasswordAuthenticationToken; import org.springframework.security.core.Authentication; import org.springframework.security.core.context.SecurityContext; import org.springframework.security.core.userdetails.UserDetails; import org.springframework.web.bind.annotation.PostMapping; import org.springframework.web.bind.annotation.RequestBody; import org.springframework.web.bind.annotation.RequestMapping; import org.springframework.web.bind.annotation.RestController; @RestController @RequestMapping("/api/auth") public class AuthController { @Autowired JWTUtil jwtUtil; @Autowired AuthService authService; @Autowired AuthenticationManager authenticationManager; @Autowired private UserInfoConfigManager userInfoConfigManager; @PostMapping("/register") public ResponseEntity
This login method in the AuthController handles user login requests. It takes a LoginDTO containing the username and password, validates them, and attempts authentication using the AuthenticationManager. Upon successful authentication, it retrieves user details and generates a JWT token using the JWTUtil class. The token is then included in a LoginResponse object and returned with a success message. If authentication fails, it catches the exception and returns a "Incorrect username or password" response with a 400 status code.
generateToken(String username):This method creates an empty claims map and calls the createToken method with the username as the subject. It serves as the entry point for token generation.
c*reateToken(Map claims, String subject):* This method builds the JWT using the Jwts.builder(). It sets the claims, subject, and token metadata, such as issue date and expiration time (set to 5 minutes). The token is then signed with a secret key and compacted into a string format for transmission.
now we run the application
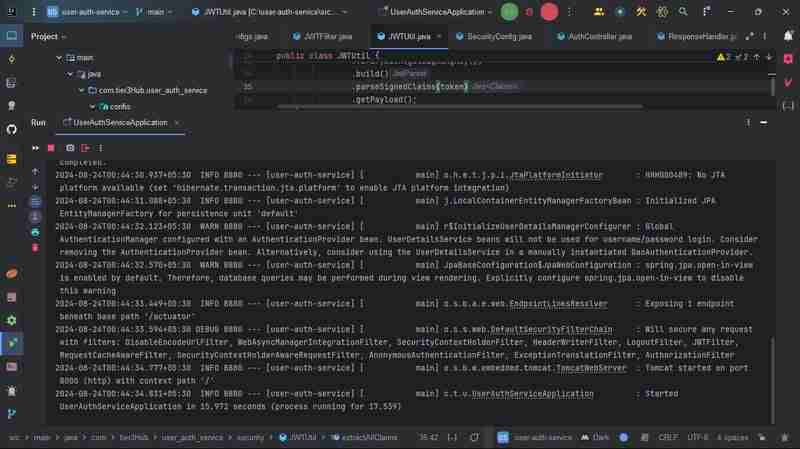
and hit the URL here our application is runing on 8000 port
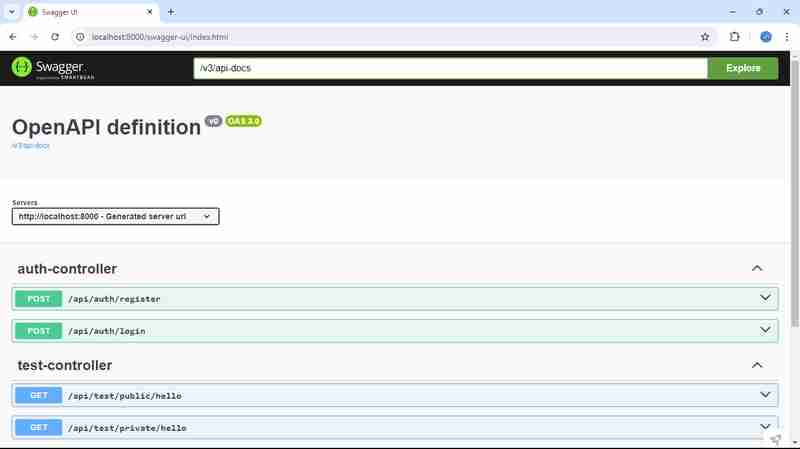
http://localhost:8000/swagger-ui/index.html
在项目中使用 Swagger 可以增强 API 文档和测试。它为开发人员提供了一个用户友好的界面,以探索您的 API、了解请求/响应结构并直接从文档测试端点。通过集成Swagger,您可以根据代码注释自动生成API文档,使前端和后端开发人员更轻松地高效协作。
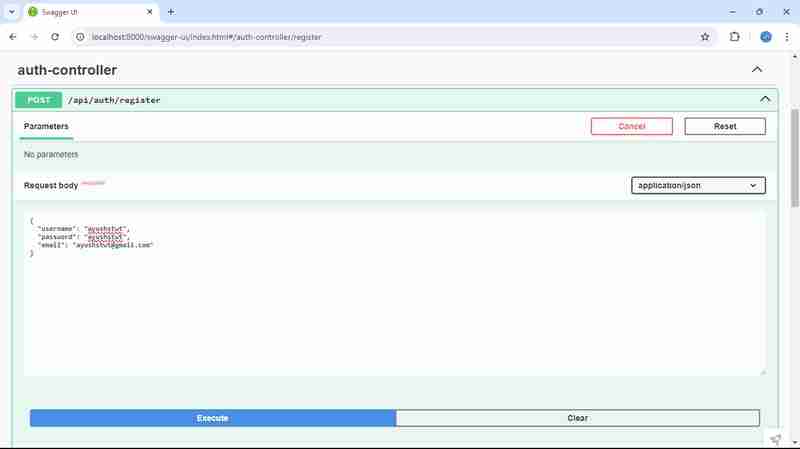
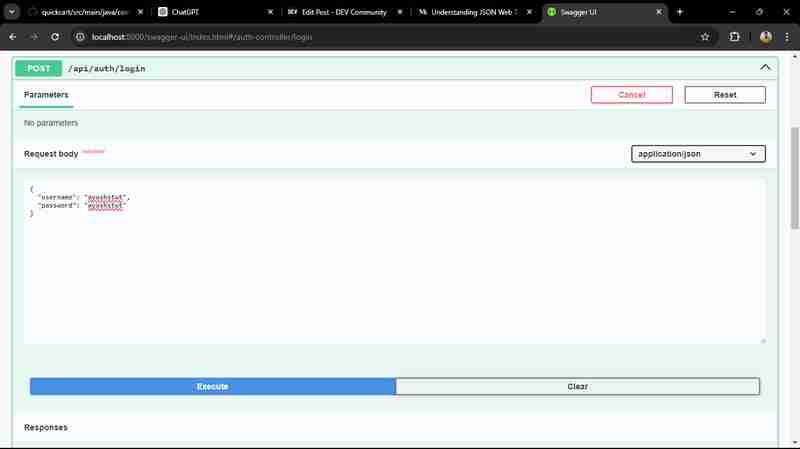
首先我们注册用户
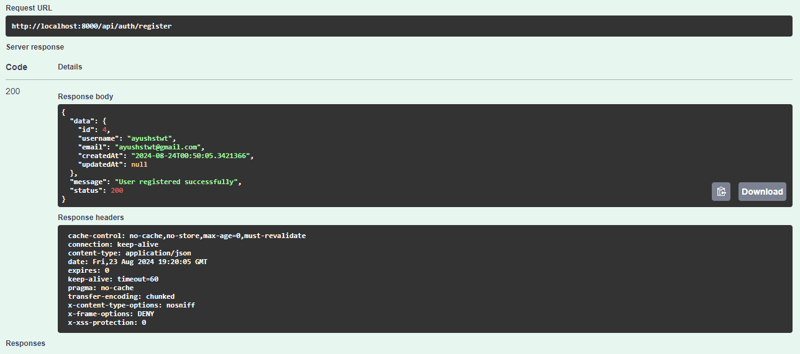
我们得到这样的回复
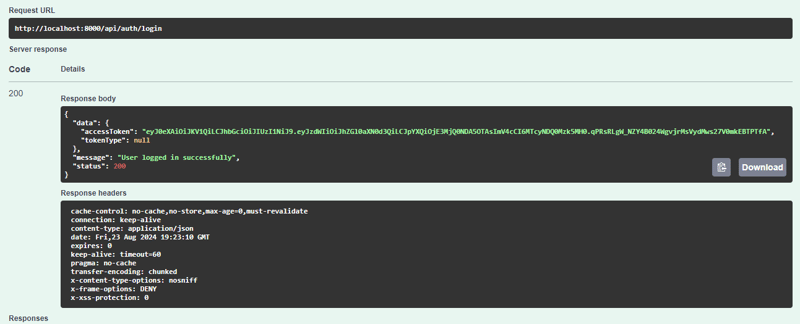
之后我们登录用户
我们得到这样的回应
该项目在 Spring Boot 应用程序中使用 JWT(JSON Web Tokens)实现基于角色的身份验证。它具有安全的身份验证机制,用户可以注册和登录,接收根据分配的角色(例如 USER 或 ADMIN)授予访问权限的 JWT。 SecurityConfig 类配置访问权限,确保每个人都可以访问公共端点,同时将敏感操作仅限于授权用户。 JWTUtil 类处理令牌创建、验证和用户提取。总体而言,此设置增强了安全性,实现了跨应用程序的无缝且强大的访问控制。
该项目采用了一个全面的安全框架,利用 Spring Security 进行用户身份验证和授权。 AuthController 方便用户注册和登录,在身份验证成功后生成 JWT。该应用程序使用 JWTFilter 拦截请求并验证令牌,确保只有经过身份验证的用户才能访问受保护的资源。通过集成基于角色的访问控制,该项目提供了灵活且安全的用户管理系统。这种设计不仅提高了安全性,还通过最大限度地减少重复登录的需要来增强用户体验。总的来说,它为构建可扩展且安全的微服务奠定了坚实的基础。
您可以在我的 GitHub 存储库上探索用户身份验证服务的完整源代码。该项目展示了各种功能,例如用户注册、登录和使用 JWT 进行身份验证的安全访问。请随意查看、贡献或将其用作您自己的项目的参考!
GitHub 存储库:https://github.com/ishrivasayush/user-auth-service
对于那些有兴趣深入研究 JSON Web Tokens (JWT) 的人,我建议访问 jwt.io。该资源提供了有关 JWT 的全面信息,包括其工作原理、结构和实际示例。这是理解基于令牌的身份验证和授权的一个很好的起点,这对于现代 Web 应用程序至关重要。无论您是初学者还是想要刷新知识,jwt.io 都提供了有关安全管理用户会话的宝贵见解。
위 내용은 Spring Security로 마이크로서비스 보호: JWT 구현의 상세 내용입니다. 자세한 내용은 PHP 중국어 웹사이트의 기타 관련 기사를 참조하세요!


![[웹 프런트엔드] Node.js 빠른 시작](https://img.php.cn/upload/course/000/000/067/662b5d34ba7c0227.png)


