

애플리케이션 인증은 시스템에서 매우 중요하지만 매우 민감하므로 고려해야 할 다양한 구현, 보안, 유효성 검사가 있습니다.
저는 많은 사람들이 모르는 웹 및 모바일 애플리케이션에 대한 사용자 인증 및 검증에 도움을 줄 수 있는 AWS의 매우 훌륭한 도구인 Cognito에 대해 시연하는 게시물을 작성하기로 결정했습니다.
Cognito는 OAuth 토큰 생성 외에도 사용자 액세스 데이터 생성 및 검증은 물론 사용자 등록 및 정보 저장을 담당하는 AWS 플랫폼이며, Cognito는 모든 사용자 검증도 제공할 수 있습니다.
이메일, 이름, 전화번호, 생년월일, 닉네임, 성별, 웹사이트 등 일부 사용자 데이터를 생성할 수 있으며 사용자 정의 필드를 배치할 수도 있습니다.
Cognito를 사용하면 Google, Facebook, GitHub 등 소셜 로그인으로 알려진 "연합 공급자"와 작업할 수 있습니다. 이 게시물에서는 다루지 않지만 cognito를 사용하면 가능합니다.
우리는 cognito의 작동 방식을 보여주기 위해 몇 가지 엔드포인트를 만들 예정이며, 사용자 생성, 이메일 확인, 로그인, cognito에서 제공하는 토큰을 사용하여 사용자 검색, 정보 업데이트 등을 할 것입니다.
우리는 매우 간단한 일을 할 것입니다. 프로젝트 아버지에 대해 걱정하지 않고 지식의 사용만을 다루고 싶습니다.
엔드포인트를 생성하기 위해 gin을 사용할 것입니다.
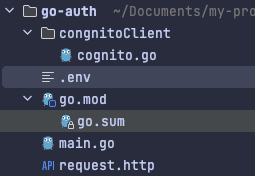
다음 파일을 만들어 보겠습니다.
프로젝트 루트에 있는 main.go 애플리케이션의 진입점
.env 인지 자격 증명을 저장하려면
cognitoClient라는 붙여넣기와 cognito.go
요청을 완료하기 위한 request.http라는 파일이 있습니다.
구조는 다음과 같습니다:
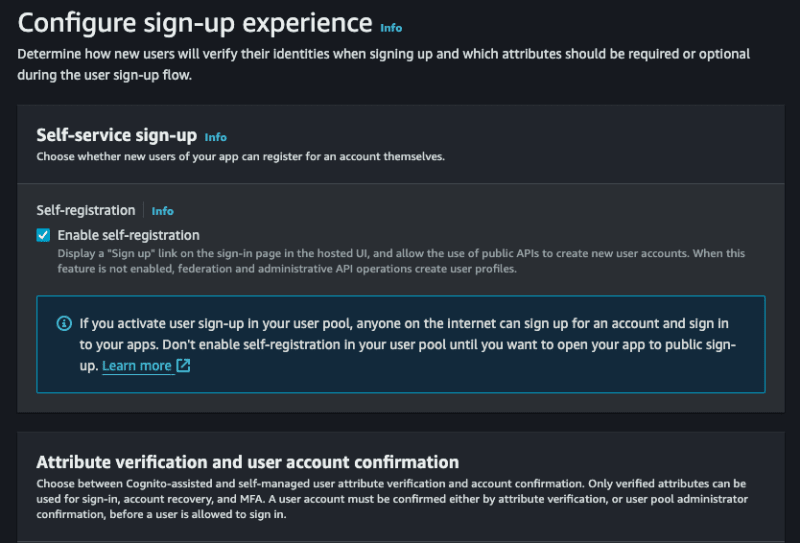
코드를 시작하기 전에 패널에 액세스하고 cognito로 검색하도록 AWS에서 cognito를 구성합니다. 풀을 생성한 후앱에 사용자 디렉터리 추가.
옵션을 선택합니다.공급자 유형의 경우Cognito 사용자 풀옵션을 선택하고 이메일, 사용자 이름 및 전화를 사용한 로그인을 허용하도록 선택할 수 있습니다. 이메일만 선택할 수 있으며 원하는 항목을 선택하고 첫 번째 단계로 동화를 선택하세요.
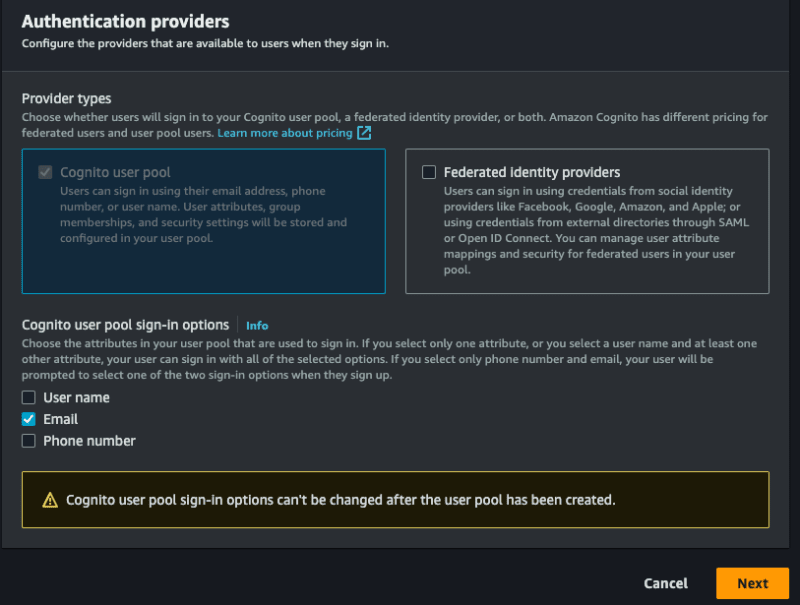
몇가지 설정을 더 해야 하는데 어서 갑시다!
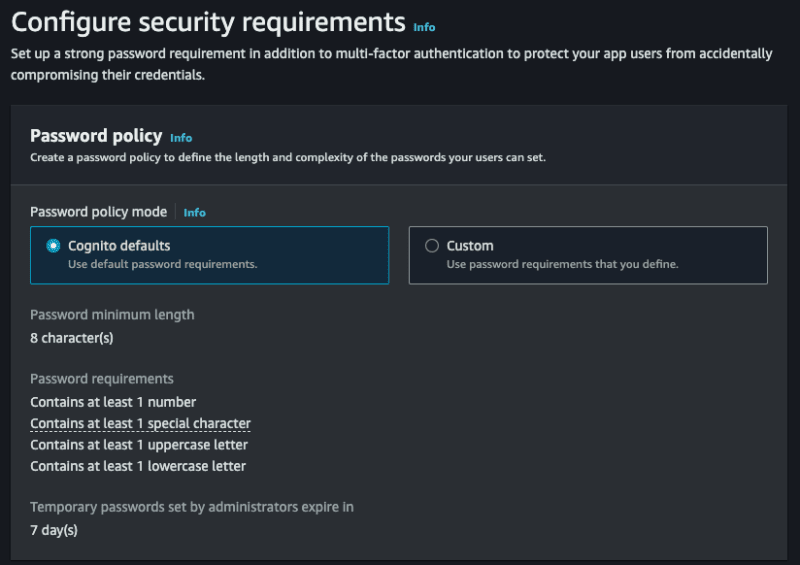
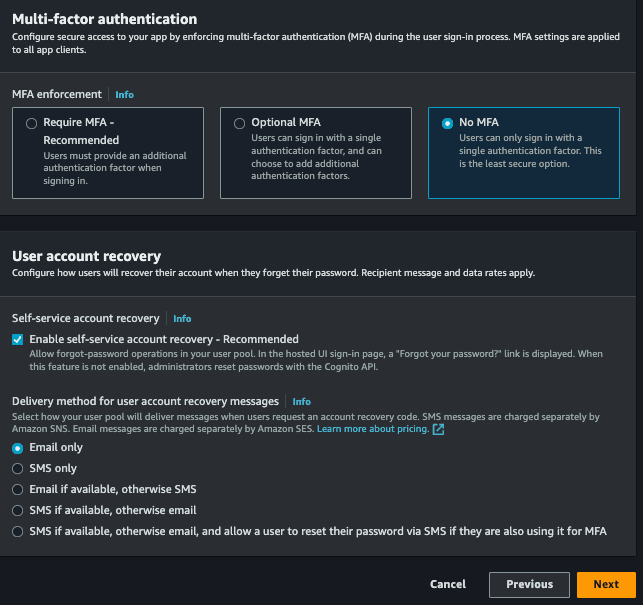
다음 단계:
이 단계도 발생했습니다.
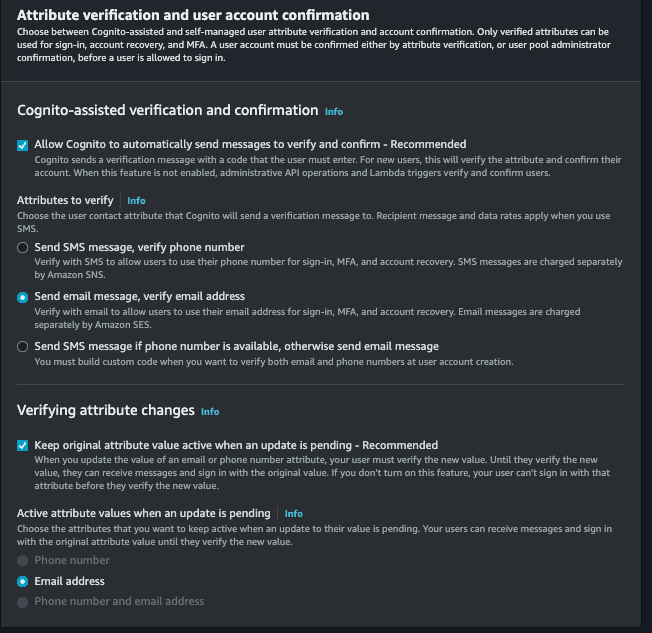
다음으로Cognito로 이메일 보내기옵션을 선택하면 이메일을 트리거하기 위해 아무것도 구성할 필요가 없습니다.
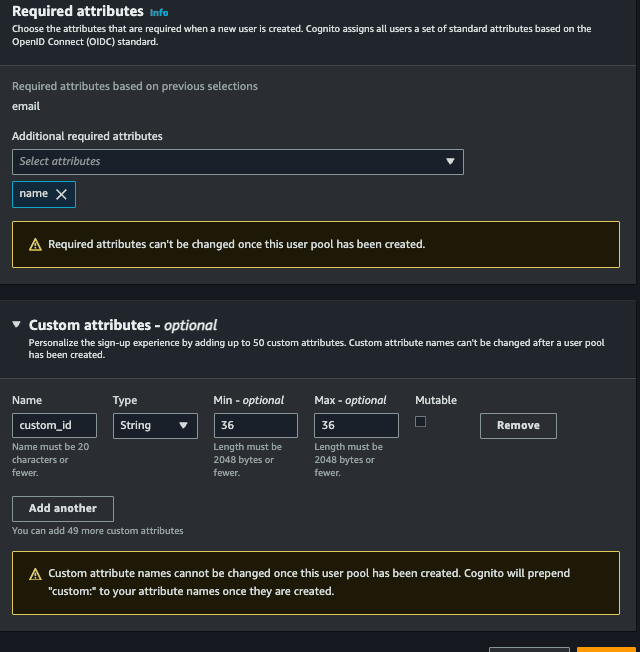
다음 단계에서사용자 풀 이름의앱 클라이언트 이름에 원하는 이름을 입력하고, 또한 원하는 이름을 입력하고 계속하세요.
마지막 단계에서는 아무것도 변경할 필요가 없으며 사용자 풀을 완료하고 생성하기만 하면 됩니다.
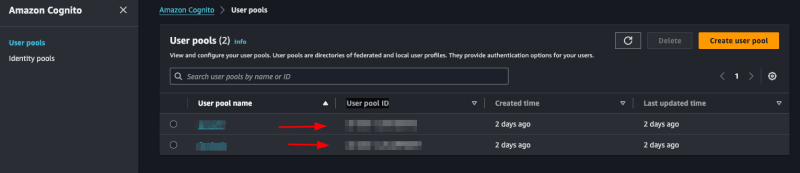
모든 것, 액세스 또는 인식 > 사용자 풀, 방금 생성한 풀을 선택하면 이 부분에 애플리케이션의 모든 사용자가 나열되며 사용자의 토큰 취소, 비활성화, 기타 기능 확인이 가능합니다.
AWS용 Go SDK를 사용하고 생성된 풀에 액세스할 수 있도록 풀의 ID를 지정하겠습니다.앱 통합>앱 클라이언트 목록을 확인하고클라이언트 ID를 확인하세요.

이 ID를 .env 파일에 저장해 보겠습니다.
일반적으로 /Users/your-user/.aws 디렉터리에 있는 AWS 자격 증명이 여전히 필요하다는 점을 기억하세요. 아직 구성하지 않은 경우 여기에서 구성 방법을 참조하세요.
코그니토 부분을 다른 파일로 분리해 보겠습니다.
cognito.go 파일 내에서 cognito를 초기화하고 인터페이스를 생성합니다.
먼저 User라는 구조체를 만듭니다. 이 구조체에는 cognito에 저장해야 하는 사용자 필드가 있습니다.
그런 다음 CognitoInterface라는 인터페이스를 만들고 사용할 메서드를 갖게 됩니다. 먼저 User 구조체에 대한 포인터를 받을 SignUp만 갖게 됩니다.
그런 다음 생성자가 될 NewCognitoClient에 대한 인스턴스를 포함하는 cognitoClient라는 또 다른 구조체가 있습니다.
언급한 대로 NewCognitoClient는 생성자와 같으며 여기서 AWS로 세션을 생성하고 이 연결을 반환합니다. 이 연결은 전역 변수일 수 있습니다. 우리의 경우에는 이를 수행하지 않을 것입니다. 귀하의 사용 사례에 가장 적합한 접근 방식이 무엇인지 확인하는 것은 귀하에게 달려 있습니다.
이제 SignUp을 구현해 보겠습니다.
Cognito의 AttributeType을 사용하여 AWS SDK의 SignUp으로 보낼 매개변수를 조합할 것입니다. 사용자 정의 필드인 custom_id는 이전에 사용자 정의로 배치해야 하며 이것이 없으면 허용되지 않습니다. 방금 Google 패키지로 UUID를 생성했습니다. 이 필드는 단지 맞춤 속성을 사용하는 방법을 보여주기 위한 것입니다.
ClientId 필드는 환경의 COGNITO_CLIENT_ID를 참조하며 main.go를 시작할 때 이를 전달합니다.
사용자를 구하기 위해서는 이것이 필요합니다. 간단하지 않나요?
다음과 같이 프로젝트를 시작하는 것을 잊지 마세요:
필요한 패키지를 설치하세요:
이메일을 통해 사용자의 계정을 확인하는 또 다른 기능을 만들어 보겠습니다. 계정을 확인하려면 사용자는 이메일로 전송된 코드를 입력해야 합니다. 새 구조체를 만들고 인터페이스에 새ConfirmAccount 메서드를 추가해 보겠습니다.
이제 구현해 보겠습니다.
매우 간단합니다. cognito 패키지의ConfirmSignUpInput을 사용하여 사용자 이름이 사용자의 이메일임을 기억하고 매개변수를 조합하겠습니다. 마지막으로confirmationInput을 전달하여ConfirmSignUp을 호출합니다.
저희는 오류만 반환했다는 점을 기억하시면 오류 메시지 유형을 확인하고 개선하실 수 있습니다.
이것은 가장 많이 사용될 기능이어야 합니다. SignIn이라는 메서드와 구조체를 만들어 보겠습니다.
저희 로그인은 UserLogin을 받게 됩니다.
구현해보자:
aws cognito 패키지의 InitiateAuth 기능을 사용할 것이며 사용자 이름(사용자 이메일), 비밀번호 및 AuthFlow를 전달해야 합니다. 이 필드는 허용할 액세스 유형을 나타냅니다(이 경우 USER_PASSWORD_AUTH).
다음과 같은 오류가 발생하는 경우:
모든 프록시를 신뢰하셨습니다. 이는 안전하지 않습니다. 값을 설정하는 것이 좋습니다
ALLOW_USER_PASSWORD_AUTH 흐름을 활성화하고 aws 패널에서 액세스 코그니토를 구성하려면 다음으로 이동해야 합니다.
사용자 풀>셀렉션스 풀>앱 통합>앱 클라이언트 목록>Selecione um client를 선택하면 다음 화면이 열립니다.
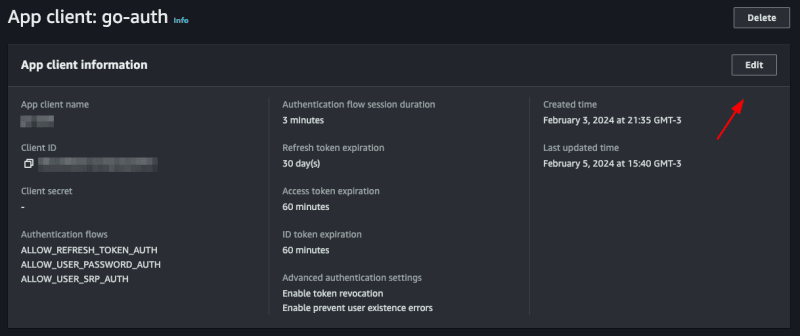
Click oneditand inAuthentication flowsselect the optionALLOW_USER_PASSWORD_AUTHthen save, with this you can now log in with the user's password and email.
Para mostrar como utilizar o token jwt fornecido pelo cognito vamos criar um endpoint que mostra os dados do usuário salvos no cognito apenas com o token.
Let's create another function called GetUserByToken that will receive a token and return a struct of type GetUserOutput that we will get from the cognito package.
type CognitoInterface interface { SignUp(user *User) error ConfirmAccount(user *UserConfirmation) error SignIn(user *UserLogin) (string, error) GetUserByToken(token string) (*cognito.GetUserOutput, error) }
If you click on GetUserOutput you will see what is inside this struct
type GetUserOutput struct { _ struct{} `type:"structure"` MFAOptions []*MFAOptionType `type:"list"` PreferredMfaSetting *string `type:"string"` UserAttributes []*AttributeType `type:"list" required:"true"` UserMFASettingList []*string `type:"list"` Username *string `min:"1" type:"string" required:"true" sensitive:"true"` }
inside the _ struct{} there are custom attributes that we created for our user, in our case the custom_id.
Let's implement:
func (c *cognitoClient) GetUserByToken(token string) (*cognito.GetUserOutput, error) { input := &cognito.GetUserInput{ AccessToken: aws.String(token), } result, err := c.cognitoClient.GetUser(input) if err != nil { return nil, err } return result, nil }
We use GetUser from the cognito package, it only needs an AccessToken which is the token provided by cognito itself.
Finally, we will update the user's password. To do this, we will need the email address and the new password. We already have the UserLogin struct with the fields we need. We will reuse it. If you wish, create a new one just for this function. Let's create the UpdatePassword function:
type CognitoInterface interface { SignUp(user *User) error ConfirmAccount(user *UserConfirmation) error SignIn(user *UserLogin) (string, error) GetUserByToken(token string) (*cognito.GetUserOutput, error) UpdatePassword(user *UserLogin) error }
Let's implement:
func (c *cognitoClient) UpdatePassword(user *UserLogin) error { input := &cognito.AdminSetUserPasswordInput{ UserPoolId: aws.String(os.Getenv("COGNITO_USER_POOL_ID")), Username: aws.String(user.Email), Password: aws.String(user.Password), Permanent: aws.Bool(true), } _, err := c.cognitoClient.AdminSetUserPassword(input) if err != nil { return err } return nil }
We will use the AdminSetUserPassword function from the cognito package, we need to pass the user's email and the new password, in addition we have to pass the UserPoolId, we will put the COGNITO_USER_POOL_ID in the .env file, to search in aws just access your pool and copy the User pool ID
We will also pass Permanent, informing that it is a permanent password, you could pass false, so Cognito would create a temporary password for the user, this will depend on the strategy you will use in your application.
Let's create our main.go, this will be the file where we will start cognito and create our routes.
func main() { err := godotenv.Load() if err != nil { panic(err) } cognitoClient := congnitoClient.NewCognitoClient(os.Getenv("COGNITO_CLIENT_ID")) r := gin.Default() fmt.Println("Server is running on port 8080") err = r.Run(":8080") if err != nil { panic(err) } }
First we will load our envs with the godotenv package, then we start our cognito client, passing the COGNITO_CLIENT_ID, which we got earlier, then we start gin and create a server, that's enough.
Let's create a function inside the main.go file itself, let's call it CreateUser:
func CreateUser(c *gin.Context, cognito congnitoClient.CognitoInterface) error { var user congnitoClient.User if err := c.ShouldBindJSON(&user); err != nil { return errors.New("invalid json") } err := cognito.SignUp(&user) if err != nil { return errors.New("could not create use") } return nil }
Something simple, we just convert what we receive in the body to our struct using gin's ShouldBindJSON, then we call the SignUp that we created in cognito.go.
Now let's create the endpoint inside the main.go function:
r.POST("user", func(context *gin.Context) { err := CreateUser(context, cognitoClient) if err != nil { context.JSON(http.StatusBadRequest, gin.H{"error": err.Error()}) return } context.JSON(http.StatusCreated, gin.H{"message": "user created"}) })
We call the function we just created CreateUser, if there is an error we throw a StatusBadRequest, if it is successful a StatusCreated, let's test.
Let's do a go mod tidy downloading all the packages, then we'll run the application with go run main.go
Now we can create a call in the request.http file and execute:
POST http://localhost:8080/user HTTP/1.1 content-type: application/json { "Name": "John Doe", "email": "wivobi1159@bitofee.com", "password": "Pass@1234" }
If everything is correct we will receive the message:
{ "message": "user created" }
Now entering the Cognito panel on AWS, and accessing the pool then the users, we will have our user there:
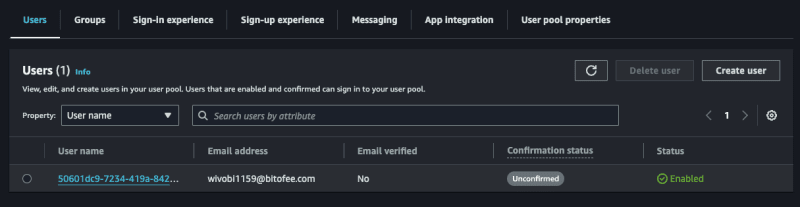
Note that the user we created above is not confirmed, let's confirm it!
Create a function called ConfirmAccount in the main.go file:
func ConfirmAccount(c *gin.Context, cognito congnitoClient.CognitoInterface) error { var user congnitoClient.UserConfirmation if err := c.ShouldBindJSON(&user); err != nil { return errors.New("invalid json") } err := cognito.ConfirmAccount(&user) if err != nil { return errors.New("could not confirm user") } return nil }
Same concept we used before, let's convert the body to the UserConfirmation struct and pass it to ConfirmAccount in cognito.go.
Let's create the endpoint:
r.POST("user/confirmation", func(context *gin.Context) { err := ConfirmAccount(context, cognitoClient) if err != nil { context.JSON(http.StatusBadRequest, gin.H{"error": err.Error()}) return } context.JSON(http.StatusCreated, gin.H{"message": "user confirmed"}) })
It's also simple, we just handle the error and return a message, let's create our call and test it:
POST http://localhost:8080/user/confirmation HTTP/1.1 content-type: application/json { "email": "wivobi1159@bitofee.com", "code": "363284" }
We will receive the message:
{ "message": "user confirmed" }
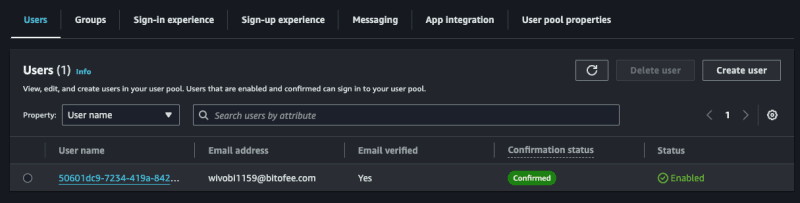
Now accessing Cognito again on the AWS panel, notice that the user is confirmed, remembering that you need to enter a valid email, you can use a temporary email to play around, but it needs to be valid, as Cognito will send the confirmation code and it needs to be a valid code to confirm successfully.
Now let's create our token, to do this in the main.go file create a function called SignIn, this function will return an error and a token.
func SignIn(c *gin.Context, cognito congnitoClient.CognitoInterface) (string, error) { var user congnitoClient.UserLogin if err := c.ShouldBindJSON(&user); err != nil { return "", errors.New("invalid json") } token, err := cognito.SignIn(&user) if err != nil { return "", errors.New("could not sign in") } return token, nil }
Same pattern as the other functions, we convert the body to the UserLogin struct and pass it to SignIn of cognito.go.
Let's create the endpoint:
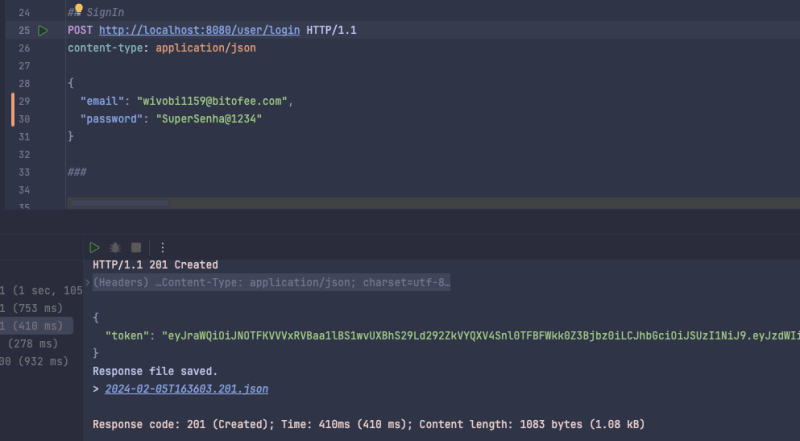
r.POST("user/login", func(context *gin.Context) { token, err := SignIn(context, cognitoClient) if err != nil { context.JSON(http.StatusBadRequest, gin.H{"error": err.Error()}) return } context.JSON(http.StatusCreated, gin.H{"token": token}) })
Now we return a token to the user, let's create the call and test:
POST http://localhost:8080/user/login HTTP/1.1 content-type: application/json { "email": "wivobi1159@bitofee.com", "password": "Pass@1234" }
When making the call we will receive our jwt token:
{ "token": "token_here" }
If we get the jwt token we can see what's inside, using the website jwt.io.
Now we will list the user data saved in cognito using only the token, to do this create a function called GetUserByToken in main.go and we will need a struct to represent the response that we will return to the user, we will create it in main as well:
type UserResponse struct { ID string `json:"id"` Name string `json:"name"` Email string `json:"email"` CustomID string `json:"custom_id"` EmailVerified bool `json:"email_verified"` } func main() {}
Now the function:
func GetUserByToken(c *gin.Context, cognito congnitoClient.CognitoInterface) (*UserResponse, error) { token := strings.TrimPrefix(c.GetHeader("Authorization"), "Bearer ") if token == "" { return nil, errors.New("token not found") } cognitoUser, err := cognito.GetUserByToken(token) if err != nil { return nil, errors.New("could not get user") } user := &UserResponse{} for _, attribute := range cognitoUser.UserAttributes { switch *attribute.Name { case "sub": user.ID = *attribute.Value case "name": user.Name = *attribute.Value case "email": user.Email = *attribute.Value case "custom:custom_id": user.CustomID = *attribute.Value case "email_verified": emailVerified, err := strconv.ParseBool(*attribute.Value) if err == nil { user.EmailVerified = emailVerified } } } return user, nil }
This will be the biggest function, we need to map what we receive from Cognito to our UserResponse struct, we do this with a for and a switch, of course we could improve it, but for the sake of example we will keep it like this. Also to map custom attributes we need to put custom before, like custom:custom_id.
We also check if the user passed the token in the header, if not we return an error.
Let's create the endpoint:
r.GET("user", func(context *gin.Context) { user, err := GetUserByToken(context, cognitoClient) if err != nil { if err.Error() == "token not found" { context.JSON(http.StatusUnauthorized, gin.H{"error": "token not found"}) return } context.JSON(http.StatusBadRequest, gin.H{"error": err.Error()}) return } context.JSON(http.StatusOK, gin.H{"user": user}) })
We perform the same validation as the other endpoints, but now we check the error type and if it is of the token not found type we return a StatusUnauthorized.
Let's test:
GET http://localhost:8080/user HTTP/1.1 content-type: application/json Authorization: Bearer token_jwt
Let's receive the user:
{ "user": { "id": "50601dc9-7234-419a-8427-2a4bda92d33f", "name": "John Doe", "email": "wivobi1159@bitofee.com", "custom_id": "cb748d09-40de-457a-af23-ed9483d69f8d", "email_verified": true } }
Finally, let's create the UpdatePassword function that will update the user's password:
func UpdatePassword(c *gin.Context, cognito congnitoClient.CognitoInterface) error { token := strings.TrimPrefix(c.GetHeader("Authorization"), "Bearer ") if token == "" { return errors.New("token not found") } var user congnitoClient.UserLogin if err := c.ShouldBindJSON(&user); err != nil { return errors.New("invalid json") } err := cognito.UpdatePassword(&user) if err != nil { return errors.New("could not update password") } return nil }
We also make it mandatory to inform the token in the header, the rest of the function is what we have already done previously.
Let's create the last endpoint:
r.PATCH("user/password", func(context *gin.Context) { err := UpdatePassword(context, cognitoClient) if err != nil { if err.Error() == "token not found" { context.JSON(http.StatusUnauthorized, gin.H{"error": "token not found"}) return } context.JSON(http.StatusBadRequest, gin.H{"error": err.Error()}) return } context.JSON(http.StatusOK, gin.H{"message": "password updated"}) })
Let's make the call:
PATCH http://localhost:8080/user/password HTTP/1.1 content-type: application/json Authorization: Bearer token_jwt { "email": "wivobi1159@bitofee.com", "password": "NovaSenha2@2222" }
Now when you update your password and try to log in you will receive an error, and if you use the new password, everything will work.
In this post we talk a little about Cognito, one of the many AWS services that many people don't know about but that helps a lot in the evolution of your system.
Cognito's practicality goes beyond what I've discussed. Making a basic login is simple, but Cognito stands out for already providing you with an account verification system "ready", a login option with social networks (which can be quite annoying to implement without Coginito), two-factor authentication, among others, and it also has AWS security to protect user data.
Cognito has more functionality, it's worth seeing all of them in the documentation.
Project repository
See the post on my blog here
Subscribe and receive notification of new posts, participate
위 내용은 Golang 및 AWS Cognito를 사용한 인증의 상세 내용입니다. 자세한 내용은 PHP 중국어 웹사이트의 기타 관련 기사를 참조하세요!


![[웹 프런트엔드] Node.js 빠른 시작](https://img.php.cn/upload/course/000/000/067/662b5d34ba7c0227.png)


