本篇文章给大家带来了react组件间通信简单易用的常用方式,react知识中一个主要内容便是组件之间的通信,以下列举几种常用的组件通信方式,结合实例,通俗易懂,建议收藏,希望对大家有帮助。

原理:父组件通过props(与vue中的props区分开)向子组件通信,子组件通过回调事件与父组件通信。
首先,先创建一个父组件Parent.js跟子组件Children.js,二者的关系为直接父子关系。
Parent.js父组件如下,给父组件一个默认状态state,引入子组件,通过在子组件加上toChildren={this.state.msg},该处即为向子组件传props。
import React from 'react';
import { Button } from 'element-react';
import Children from './Children';

class Parent extends React.Component {
  constructor(props) {
	super(props);
	this.state = {
		msg:'父组件传递给子组件'
	};
    this.changeMsg = this.changeMsg.bind(this)
  }
  changeMsg(){
    this.setState({
      msg:'父组件传递给子组件(改变之后的内容)'
    })
  }
  render(){
    return (
      <p>
        </p><p>父子组件通信实例</p>
        <button>父传子</button>
        <children></children>

    )
  }
}

export default ParentChildren.js子组件如下,初始状态通过props拿到父组件传过来的值。
import React from 'react';

class Children extends React.Component {
  constructor(props) {
	super(props);
	this.state = {
		msg:this.props.toChildren   //通过props拿到父组件传过来的值
	};
  }
  render(){
    return (
      <p>
        </p><p>从父组件传过来:</p>
        <span>{this.state.msg}</span>

    )
  }
}

export default Children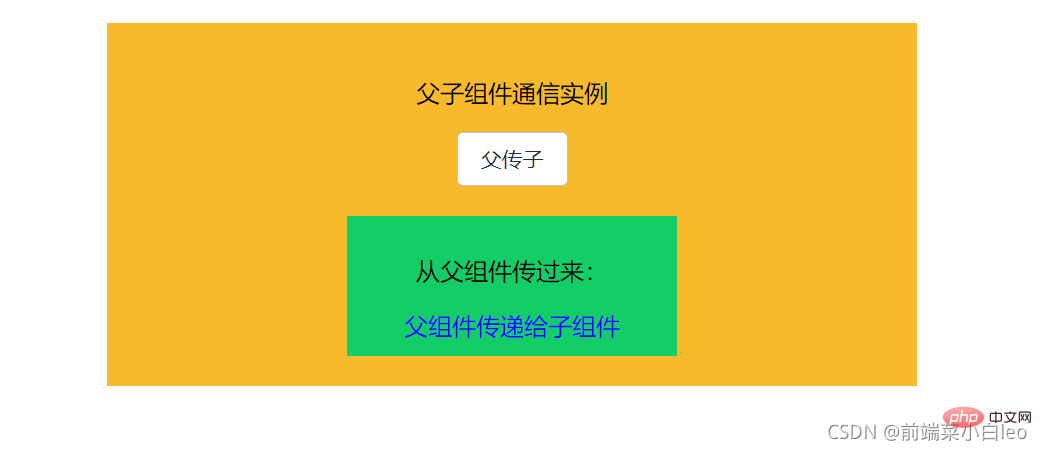
注意:子组件取值时应与父组件放在子组件的字段props一致,即本例中的 toChildren,如下


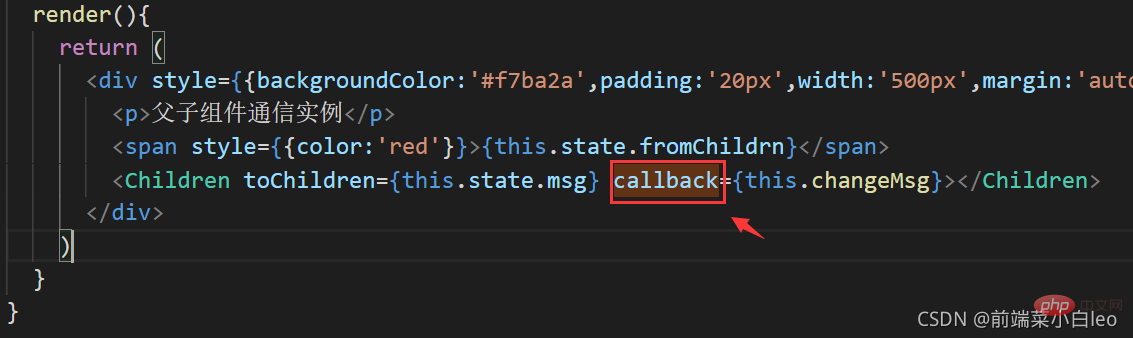
那么子组件想向父组件传值(向上传值),可以通过调用父组件传过来的回调函数
在Parent.js中向Children.js中加入回调函数callback,绑定changeMsg方法
import React from 'react';
import Children from './Children';

class Parent extends React.Component {
  constructor(props) {
	super(props);
	this.state = {
	    msg:'父组件传递给子组件',
        fromChildrn:''
	};
    this.changeMsg = this.changeMsg.bind(this)
  }
  changeMsg(val){
    this.setState({
      fromChildrn: val
    })
  }
  render(){
    return (
      <p>
        </p><p>父子组件通信实例</p>
        <span>{this.state.fromChildrn}</span>
        <children></children>

    )
  }
}
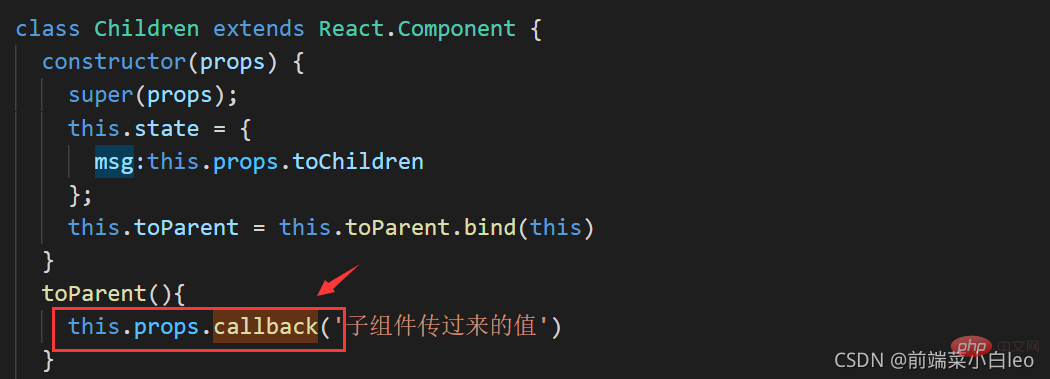
export default Parent在子组件中,用this.props.callback()执行父组件的回调函数,从而执行绑定方法changeMsg,显示子组件传过来的值
import React from 'react';
import { Button } from 'element-react';

class Children extends React.Component {
  constructor(props) {
	super(props);
	this.state = {
		msg:this.props.toChildren
	};
    this.toParent = this.toParent.bind(this)
  }
  toParent(){
    this.props.callback('子组件传过来的值')   //子组件通过此触发父组件的回调方法
  }
  render(){
    return (
      <p>
        </p><p>从父组件传过来:</p>
        <span>{this.state.msg}</span>
        <button>子传父</button>

    )
  }
}

export default Children注意:props中的回调函数名称需一致,即本例中的callback,如下
小结: 以上为直接父子组件通信的其中一种方式,父传子,通过props;子传父,执行回调。
假设一个父组件中存在一个子组件,这个子组件中又存在一个子组件,暂且称为“孙组件”,当父组件需要与“孙组件”通信时,常用的方式有两种,逐层传值与跨层传值。
1、逐层传值
这种方式就是上面的直接父子通信的基础上在加上一个中间层。如父、“孙”组件通信,可以先父子通信,然后再子“孙”通信,传递的层级变成父-->子-->“孙”,同理,通过props往下传,通过回调往上传。不展开,有兴趣的自己动手实现一下。
2、跨级传值
顾名思义,父跟“孙”通信,不需要经过子(中间层)组件。这里引出了Context。
React官方文档对Context做出了解释:
在一个典型的 React 应用中,数据是通过 props 属性自上而下(由父及子)进行传递的,但这种做法对于某些类型的属性而言是极其繁琐的(例如:地区偏好,UI 主题),这些属性是应用程序中许多组件都需要的。Context 提供了一种在组件之间共享此类值的方式,而不必显式地通过组件树的逐层传递 props。
一句话概括就是:跨级传值,状态共享。
看下简单的实例,直接讲用法。
首先,我先创建一个context.js文件(与父子孙同个目录),默认值为一个对象。
import React from "react";
const MyContext = React.createContext({text:'luck'});
export default MyContext然后,对父组件进行改写,引入context,使用一个 Provider 来将当前的 value 传递给以下的组件树,value为传递的值。
import React from 'react';
import Children from './Children';
import MyContext from './context';

class Parent extends React.Component {
  constructor(props) {
	super(props);
  }
  // 使用一个 Provider 来将当前的 value 传递给以下的组件树。
  // 无论多深,任何组件都能读取这个值。
  render(){
    return (
      <p>
        </p><p>context通信实例</p>
        <mycontext.provider>
          <children></children>
        </mycontext.provider>

    )
  }
}

export default Parent子组件为中间层,不做处理,用于包裹“孙”组件。
import React from 'react';
import Grandson from './Grandson';

class Children extends React.Component {
  render(){
    return (
      <p>
        <grandson></grandson>
      </p>
    )
  }
}

export default Children新增一个“孙”组件,同样需引入context,在组件内部添加static contextType = MyContext,此时将能通过this.context直接获取到上层距离最近的Provider传递的值,此时this.context = {text:good luck},即父组件传递value。
import React from 'react';
import MyContext from './context';

class Grandson extends React.Component {
  static contextType = MyContext
  render(){
    return (
      <p>
        </p><p>通过context传过来:</p>
        <span>{this.context.text}</span>

    )
  }
}

export default Grandson通过this.context.text获取到传递的值。

以上的是一个父-->孙的过程,即向下的流程,如果想孙-->父向上传值,可以通过回调的方式
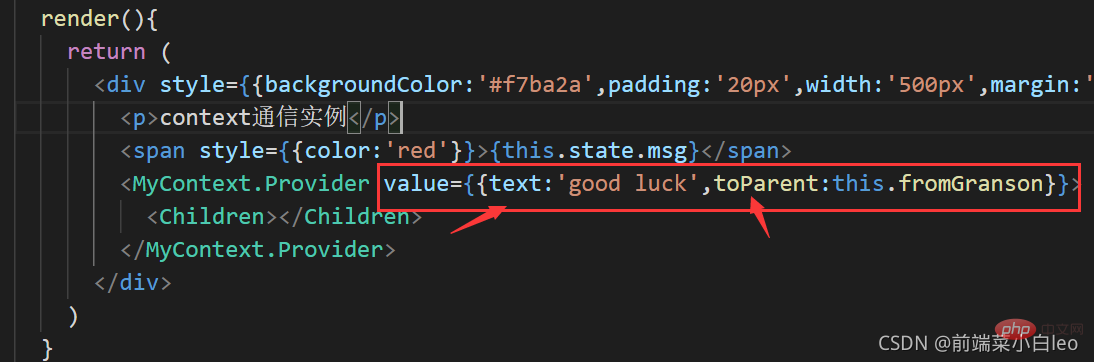
对父组件进行传值修改,在传过来的对象中添加一个属性,里面绑定父组件的方法value={{text:'good luck',toParent:this.fromGranson}}
import React from 'react';
import Children from './Children';
import MyContext from './context';

class Parent extends React.Component {
  constructor(props) {
	super(props);
    this.state = {
      msg:''
    };
    this.fromGranson = this.fromGranson.bind(this)
  }
  fromGranson(val){
    this.setState({
      msg:val
    })
  }
  // 使用一个 Provider 来将当前的 theme 传递给以下的组件树。
  // 无论多深,任何组件都能读取这个值。
  render(){
    return (
      <p>
        </p><p>context通信实例</p>
        <span>{this.state.msg}</span>
        <mycontext.provider>
          <children></children>
        </mycontext.provider>

    )
  }
}
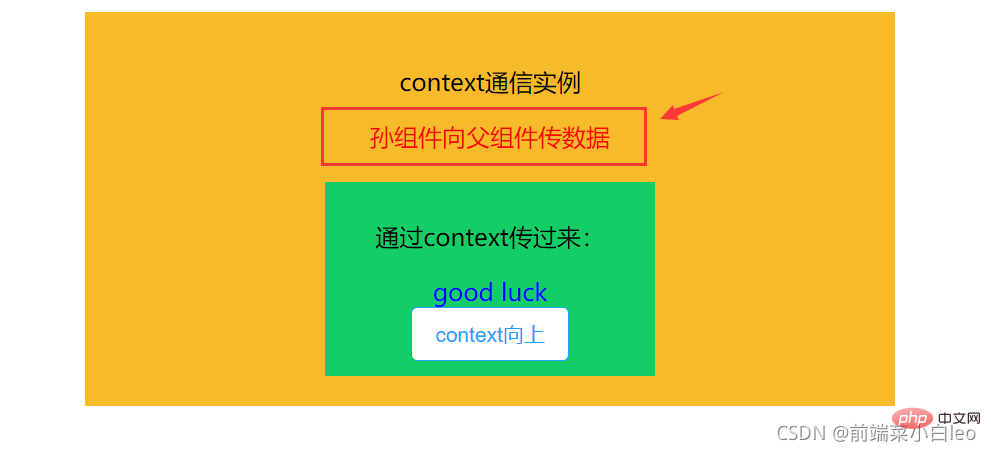
export default Parent然后在孙组件中添加一个按钮,绑定方法,执行函数回调
toParent(){
this.context.toParent('孙组件向父组件传数据')
}
import React from 'react';
import MyContext from './context';
import { Button } from 'element-react'
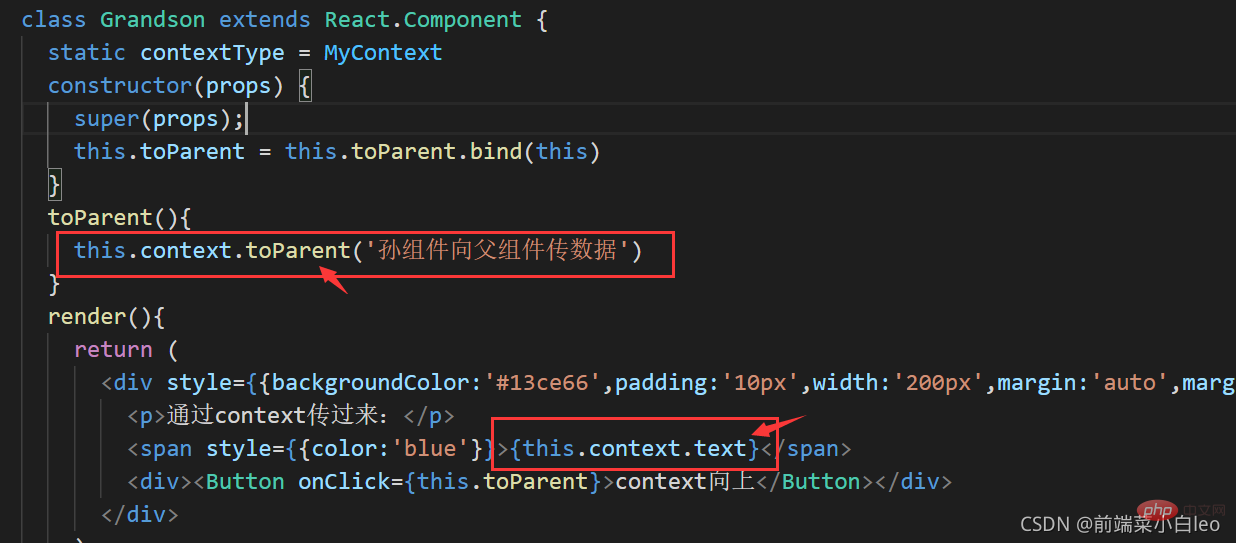
class Grandson extends React.Component {
static contextType = MyContext
constructor(props) {
super(props);
this.toParent = this.toParent.bind(this)
}
toParent(){
this.context.toParent('孙组件向父组件传数据')
}
render(){
return (
<p>
</p><p>通过context传过来:</p>
<span>{this.context.text}</span>
<p><button>context向上</button></p>
)
}
}
export default Grandson默认的页面为:

点击按钮之后,执行context中的回调,向上传值。
不管层级有多深,都可以使用context进行向下或向上传值。
注意:在下层组件中取的context中的字段需与value中传递字段保持一致。text与toParent
以上就是Context的大致使用,更多细节请往React官方文档:
Context – React=https://react.docschina.org/docs/context.html
当两个组件互不嵌套,处在同个层级或者不同层级上,他们之间要进行通信,有以下几种常用方法
1、某个组件先将值传到同一个父组件,然后在通过父组件传给另外一个组件,用到父子组件传值
2、使用缓存sessionStorage、localStorage等
3、如果两个组件之间存在跳转,可以使用路由跳转传值,附上详细用法
React学习笔记 -- 组件通信之路由传参(react-router-dom)_前端菜小白leo的博客-CSDN博客
4、event(发布--订阅)
首先,安装event
npm install event -save
新建一个event.js
import { EventEmitter } from 'events';
export default new EventEmitter();然后另两个组件处于同层级(不同个父组件或者不同层级都可以)
import React from 'react';
import Grandson from './Grandson';
import GrandsonOther from './GrandsonOther';

class Children extends React.Component {
  render(){
    return (
      <p>
        <grandson></grandson>
        <grandsonother></grandsonother>
      </p>
    )
  }
}

export default Children组件一,导入event,在componentDidMount阶段添加监听addListener(订阅),在componentWillUnmount移除监听removeListener,事件名称与组件二中emit一致。
import React from 'react';
import event from '../event';
class Grandson extends React.Component {
constructor(props) {
super(props);
this.state = {
msg:''
}
}
componentDidMount(){
event.addListener('eventMsg',val => {
this.setState({
msg:val
})
})
}
componentWillUnmount(){
event.removeListener('eventMsg')
}
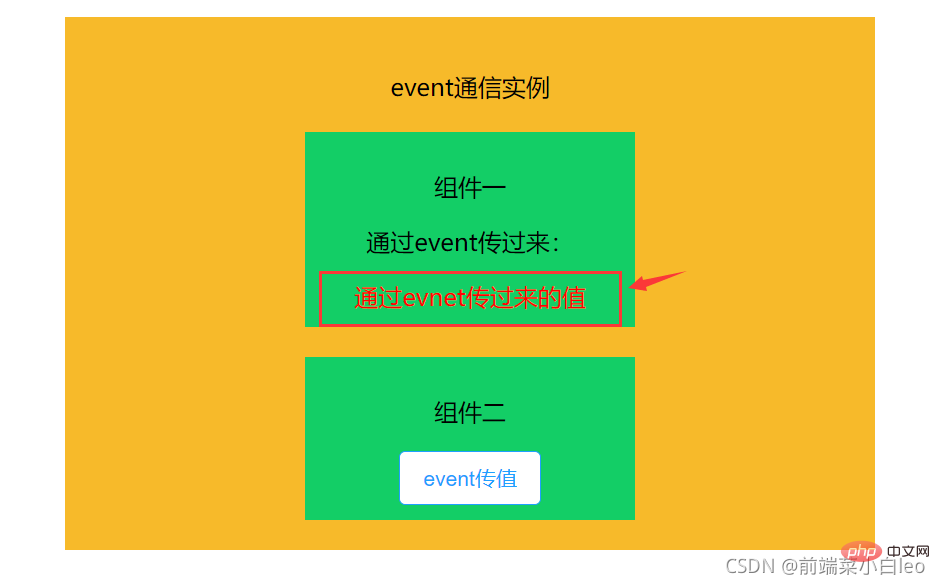
render(){
return (
<p>
</p><p>组件一</p>
<p>通过event传过来:</p>
<span>{this.state.msg}</span>
)
}
}
export default Grandson组件二,导入event,按钮绑定方法,使用event.emit触发(发布)事件。
import React from 'react';
import event from '../event';
import { Button } from 'element-react'

class Grandson extends React.Component {
  constructor(props) {
	super(props);
    this.state = {
      msg:''
    }
    this.toOther = this.toOther.bind(this)
  }
  toOther(){
    event.emit('eventMsg','通过evnet传过来的值')
  }
  render(){
    return (
      <p>
        </p><p>组件二</p>
        <span>{this.state.msg}</span>
        <p><button>event传值</button></p>

    )
  }
}

export default Grandson点击按钮,组件二发布事件,组件一监听(订阅)事件,更新内容。(如果交换发布者订阅者身份,写法一致)

注意:如果两个组件使用event进行通信,确保发布订阅的事件名称一致,如上例中 eventMsg
小结: event的方式比较灵活,不管是父子、跨级、还是同级,甚至毫无关联的组件,都可以使用此方式进行通信。
React学习笔记 -- 组件通信之路由传参(react-router-dom)_前端菜小白leo的博客-CSDN博客
Redux基本用法(在react中使用,链路打通)_前端菜小白leo的博客-CSDN博客
总结:主要讲了react中常用的组件通信方式,在平时工作中,根据不同的应用场景,选择不同的通信方式,会让通信流程更加简单、清晰。
对比Vue中的组件通信方式,你会发现很多相似之处:
Vue组件间的通信方式(多种场景,通俗易懂,建议收藏)_前端菜小白leo的博客-CSDN博客
推荐学习:《react视频教程》
以上就是简单常用技巧之React组件间通信(整理分享)的详细内容,更多请关注php中文网其它相关文章!

Copyright 2014-2024 //m.sbmmt.com/ All Rights Reserved | php.cn | 湘ICP备2023035733号


 1
1 1066
1066


![ThinkPHP5实战之[教学管理系统]](https://img.php.cn/upload/course/000/000/068/6253d87459486427.png)