

$parent / $children with ref
provide / inject

// App.vue 父组件
<template>
<a-compontent></a-compontent>
</template>
<script>
import aCompontent from './components/A.vue';
export default {
name: 'app',
compontent: { aCompontent },
data () {
return {
dataA: 'dataA数据'
}
}
}
// aCompontent 子组件
<template>
<p>{{dataA}} // 在子组件中把父组件传递过来的值显示出来
<script>export default {
name: 'aCompontent',
props: {
dataA: {
//这个就是父组件中子标签自定义名字
type: String,
required: true // 或者false
}
}
}
</script>// 子组件
<template>
<p>点击向父组件传递数据</p>
</template>
<script>export default {
name: 'child',
methods:{
changeTitle() {
// 自定义事件,会触发父组件的监听事件,并将数据以参数的形式传递
this.$emit('sendDataToParent','这是子组件向父组件传递的数据');
}
}
}
// 父组件
<template>
<child @sendDataToParent="getChildData">
<script>
import child from './components/child.vue';
export default {
name: 'child',
methods:{
getChildData(data) {
console.log(data); // 这里的得到了子组件的值
}
}
}
</script>D.js import Vue from 'vue'export default new Vue()
// 我们可以在router-view中监听change事件,也可以在mounted方法中监听
// home.vue<template>  <p>    <child-a></child-a>    <child-b></child-b>    <child-c></child-c>  </p></template>
// A组件
<template>
<p>将A组件的数据发送给C组件 - {{name}}</p>
</template>
<script>
import Event from "./D";export default { data() { return {
name: 'Echo'
}
},
components: { Event },
methods: { dataA() {
Event.$emit('data-a', this.name);
}
}
}
</script>// B组件
<template>
<p>将B组件的数据发送给C组件 - {{age}}</p>
</template>
<script>
import Event from "./D";export default { data() { return {
age: '18'
}
},
components: { Event },
methods: { dataB() {
Event.$emit('data-b', this.age);
}
}
}
</script>// C组件
<template>
<p>C组件得到的数据 {{name}} {{age}}</p>
</template>
<script>
import Event from "./D";export default { data() { return {
name: '',
age: ''
}
},
components: { Event }, mounted() {
// 在模板编译完成后执行
Event.$on('data-a', name => {
this.name = name;
})
Event.$on('data-b', age => {
this.age = age;
})
}
}
</script>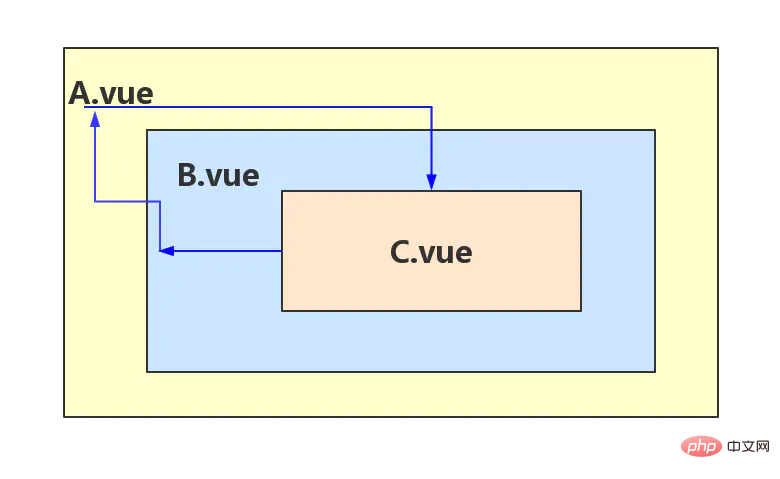
// App.vue
<template>
<p>
</p>
<p>App.vue</p>
<hr>
// 这里我们可以看到,app.vue向下一集的child1组件传递了5个参数,分别是name / age / job / sayHi / title
<child1></child1>
</template>
<script>
const child1 = () => import("./components/child1.vue");
export default {
name: 'app',
components: { child1 }, data() { return {
name: "Echo",
age: "18",
job: "FE",
say: "this is Hi~"
};
}
};
</script>// child1.vue
<template>
<p>
</p>
<p>child1.vue</p>
<p>name: {{ name }}</p>
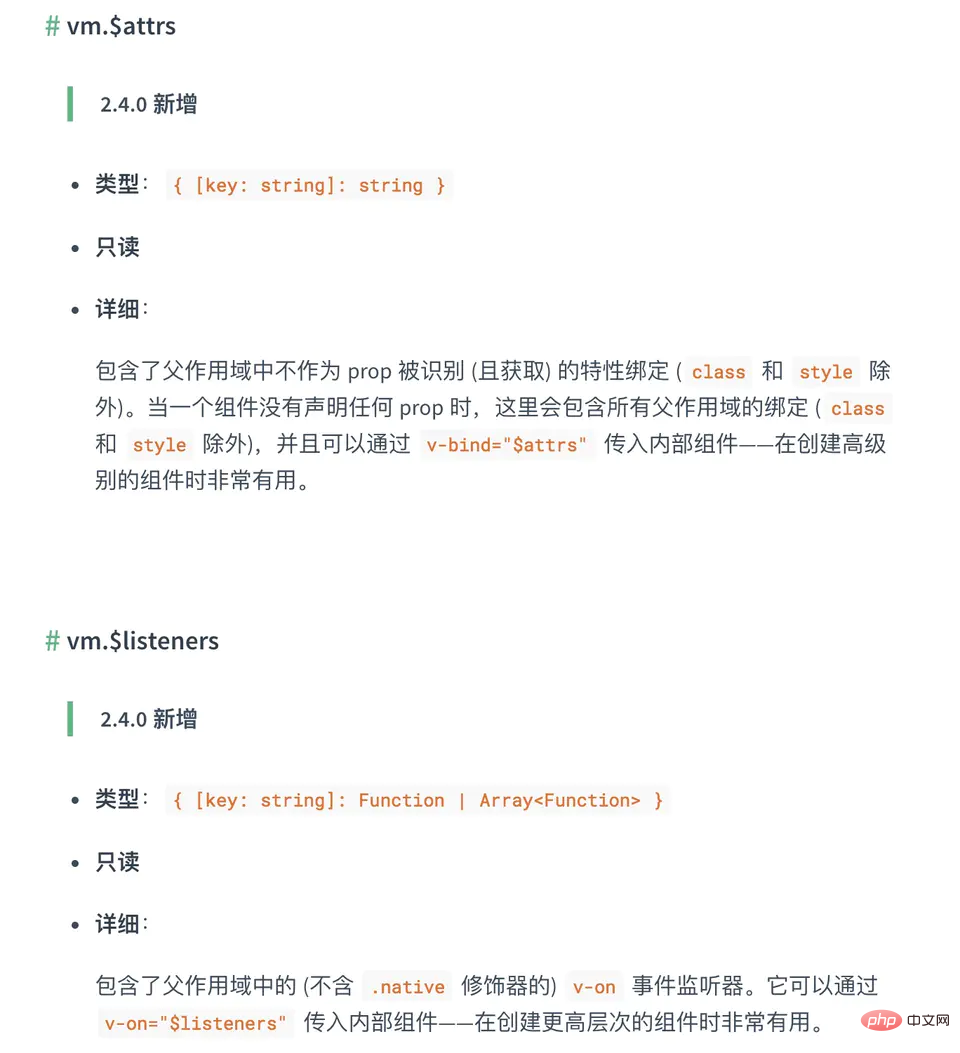
<p>childCom1的$attrs: {{ $attrs }}</p>
<p>可以看到,$attrs这个对象集合中的值 = 所有传值过来的参数 - props中显示定义的参数</p>
<hr>
<child2></child2>
</template>
<script>
const child2 = () => import("./child2.vue");
export default {
components: {
child2
},
// 这个inheritAttrs默认值为true,不定义这个参数值就是true,可手动设置为false
// inheritAttrs的意义在用,可以在从父组件获得参数的子组件根节点上,将所有的$attrs以dom属性的方式显示
inheritAttrs: true, // 可以关闭自动挂载到组件根元素上的没有在props声明的属性
props: {
name: String // name作为props属性绑定
}, created() {
// 这里的$attrs就是所有从父组件传递过来的所有参数 然后 除去props中显式定义的参数后剩下的所有参数!!!
console.log(this.$attrs); // 输出{age: "18", job: "FE", say-Hi: "this is Hi~", title: "App.vue的title"}
}
};
</script>// child2.vue
<template>
<p>
</p>
<p>child2.vue</p>
<p>age: {{ age }}</p>
<p>childCom2: {{ $attrs }}</p>
<hr>
<child3></child3>
</template>
<script>
const child3 = () => import("./child3.vue");
export default {
components: {
child3
},
// 将inheritAttrs设置为false之后,将关闭自动挂载到组件根元素上的没有在props声明的属性
inheritAttrs: false,
props: {
age: String
}, created() {
// 同理和上面一样,$attrs这个对象集合中的值 = 所有传值过来的参数 - props中显示定义的参数
console.log(this.$attrs);
}
};
</script>// child3.vue
<template>
<p>
</p>
<p>child3.vue</p>
<p>job: {{job}}</p>
<p>title: {{title}}</p>
<p>childCom3: {{ $attrs }}</p>
</template>
<script>export default {
inheritAttrs: true,
props: {
job: String,
title: String
}
};
</script>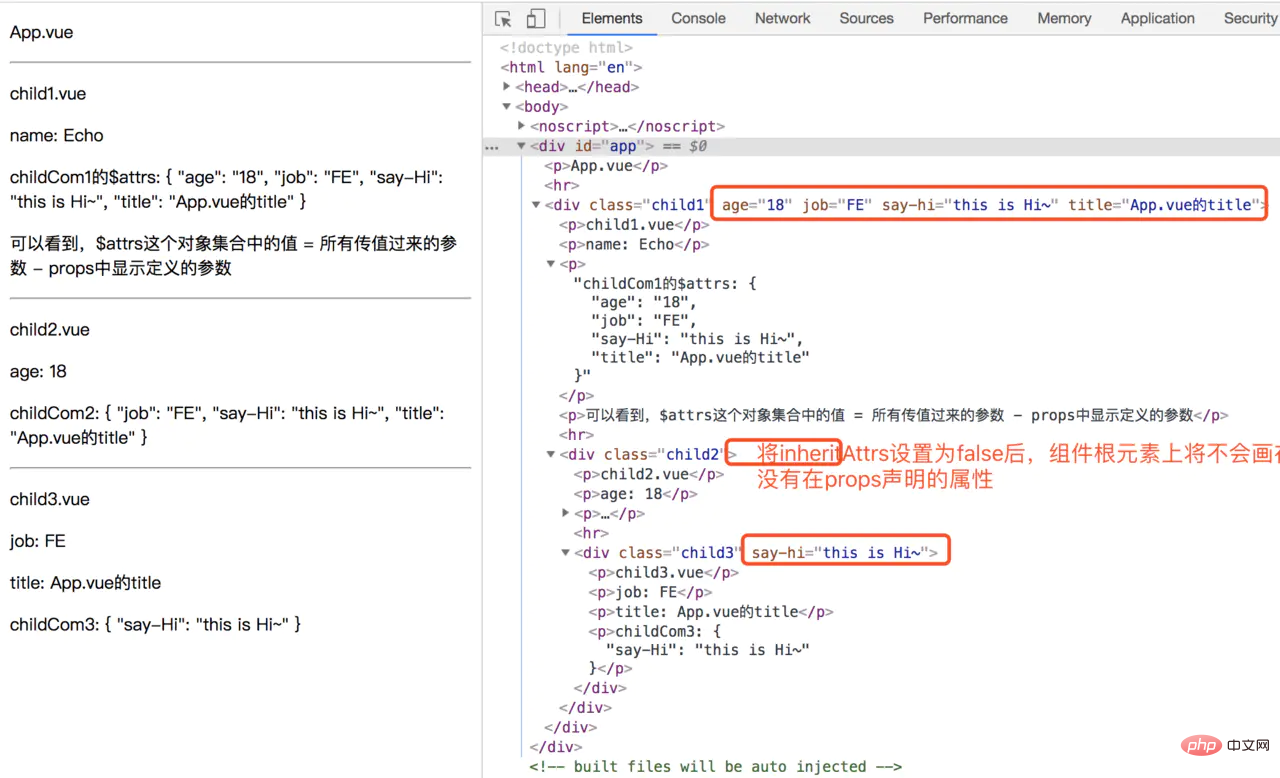
<template>
  <p>
    <child2></child2>
  </p>
</template>
<script>
const child2 = () => import("./child2.vue");
export default {
  components: {
    child2
  },
  methods: {    reciveRocket() {
      console.log("reciveRocket success");
    }
  }
};
</script>复制代码<template>
<p>
<child3></child3>
</p>
</template>
<script>
const child3 = () => import("./child3.vue");
export default {
components: {
child3
}, created() {
this.$emit('child2', 'child2-data');
}
};
</script>复制代码// child3.vue
<template>
<p>
</p>
<p>child3</p>
</template>
<script>
export default {
methods: { startUpRocket() {
this.$emit("upRocket");
console.log("startUpRocket");
}
}
};
</script>复制代码这里的结果是,当我们点击 child3 组件的 child3 文字,触发 startUpRocket 事件,child1 组件就可以接收到,并触发 reciveRocket 打印结果如下:
> reciveRocket success
> startUpRocket
这两种方式都是直接得到组件实例,使用后可以直接调用组件的方法或访问数据。
我们先来看个用 ref 来访问组件的:
// child1子组件
export default {
        data() {
            return {
      title: 'Vue.js'
    };
  },
  methods: {
      sayHello() {
      console.log('child1!!');
    }
  }
};// 父组件
<template>
<child1></child1>
</template>
<script>
export default {
methods: {
sayHi () {
const child1 = this.$refs.child1;
console.log(child1.title); // Vue.js
child1.sayHello(); // 弹窗
}
}
}
</script>provide/inject 是 Vue2.2.0 新增 API,这对选项需要一起使用,以允许一个祖先组件向其所有子孙后代注入一个依赖,不论组件层次有多深,并在起上下游关系成立的时间里始终生效。如果你熟悉 React,这与 React 的上下文特性很相似。
provide 和 inject 主要为高阶插件/组件库提供用例。并不推荐直接用于应用程序代码中。
由于自己对这部分的内容理解不是很深刻,所以感兴趣的可以前往官方文档查看: cn.vuejs.org/v2/api/#pro…
常见使用场景可以分为三类:

推荐教程:《JS教程》
The above is the detailed content of Six ways to communicate with Vue components. For more information, please follow other related articles on the PHP Chinese website!


![[Web front-end] Node.js quick start](https://img.php.cn/upload/course/000/000/067/662b5d34ba7c0227.png)


