


Use Element-UI Table to implement drag and drop function
This time I will bring you the use of Element-UI Table to implement the drag and drop function. What are the precautions for using the Element-UI Table to implement the drag and drop function? The following is a practical case, let's take a look.
Element-UI’s Table component is very powerful, but our needs are even more powerful...
A simple and crude rendering:
1. Data-driven
The traditional drag effect is based on modification through mousedown, mousemove, mouseup events Delete the dom node
But Vue is a data-driven front-end framework, you should try to avoid operating the dom during development
And the Table component of Element-UI is very rigorously encapsulated, so it is easy to directly operate the dom Unpredictable bugs occur
So my core idea is:Render the table header (column) through an array, and then modify the order of the array, thereby modifying the column sorting of the list
template part:
<p class="w-table" :class="{'w-table_moving': dragState.dragging}">
<el-table :data="data"
:border="option.border"
:height="option.height"
:max-height="option.maxHeight"
:style="{ width: parseInt(option.width)+'px' }"
:header-cell-class-name="headerCellClassName"
>
<slot name="fixed"></slot>
<el-table-column v-for="(col, index) in tableHeader" :key="index"
:prop="col.prop"
:label="col.label"
:width="col.width"
:min-width="col.minWidth"
:type="col.type"
:header-align="col.headerAlign"
:column-key="index.toString()"
:render-header="renderHeader"
>
</el-table-column>
</el-table>
</p>The above data is the list data collection, option is the Table component configuration item, header is the table header data collection, passed in by the parent component
props: {
 data: {
  default: function () {
  return []
  },
  type: Array
 },
 header: {
  default: function () {
  return []
  },
  type: Array
 },
 option: {
  default: function () {
  return {}
  },
  type: Object
 }
}Configuration items can be deleted according to the Element-UI api
But several parameters are required inside the component:
1. header-cell-class-name
Bound a function to dynamically add a class to the header cell to achieve the dotted line effect during dragging.
2. column-key
is bound to the index of the header array and is used to determine the subscript of the header element that needs to be modified
3. render-header
Header rendering function is used to add custom methods to monitor mousemove and other related events
2. Record dragging status
Several key parameters need to be recorded during the dragging process:
data () {
 return {
  tableHeader: this.header,
  dragState: {
  start: -1, // 起始元素的 index
  end: -1, // 结束元素的 index
  move: -1, // 移动鼠标时所覆盖的元素 index
  dragging: false, // 是否正在拖动
  direction: undefined // 拖动方向
  }
 }
}In addition, the parent element passes in a header data header, but this data will be modified after the dragging is completed
It is not recommended to directly modify the data of the parent element in the child component, so a tableHeader is initialized here to host the header data header
But in order to allow the tableHeader to respond to the modification when the header is modified, it is necessary Add a monitor watch
 watch: {
 header (val, oldVal) {
  this.tableHeader = val
 }
}3. Customize the header
The Table component of Element-UI In order to realize the function of [drag the border to modify the column width], The three events of mousemove, mouseup, and mousedown are not exposed
So you need to customize the header and manually add the mouse event processing function, which requires usingrenderHeader() Method
renderHeader (createElement, {column}) {
  return createElement(
  'p', {
   'class': ['thead-cell'],
   on: {
   mousedown: ($event) => { this.handleMouseDown($event, column) },
   mouseup: ($event) => { this.handleMouseUp($event, column) },
   mousemove: ($event) => { this.handleMouseMove($event, column) }
   }
  }, [
   // 添加 <a> 用于显示表头 label
   createElement('a', column.label),
   // 添加一个空标签用于显示拖动动画
   createElement('span', {
   'class': ['virtual']
   })
  ])
},Among the three mouse events, the first parameter is the event object, and the second is the header object
In the corresponding processing function, you can pass column.columnKey Get the corresponding header element subscript index
Empty label is used to display the animation during dragging (Dotted line)
4. Event processing
When the mouse is pressed, the starting column is recorded. When the mouse is lifted, the ending column is recorded. The drag direction is calculated based on the difference between the two.
Then the header data is reordered according to the positions of the starting column and the ending column, so as to realize column dragging.
The processing function of the dragging process is as follows:
// 按下鼠标开始拖动
handleMouseDown (e, column) {
this.dragState.dragging = true
this.dragState.start = parseInt(column.columnKey)
// 给拖动时的虚拟容器添加宽高
let table = document.getElementsByClassName('w-table')[0]
let virtual = document.getElementsByClassName('virtual')
for (let item of virtual) {
item.style.height = table.clientHeight - 1 + 'px'
item.style.width = item.parentElement.parentElement.clientWidth + 'px'
}
},
// 鼠标放开结束拖动
handleMouseUp (e, column) {
this.dragState.end = parseInt(column.columnKey) // 记录起始列
this.dragColumn(this.dragState)
// 初始化拖动状态
this.dragState = {
start: -1,
end: -1,
move: -1,
dragging: false,
direction: undefined
}
},
// 拖动中
handleMouseMove (e, column) {
if (this.dragState.dragging) {
let index = parseInt(column.columnKey) // 记录起始列
if (index - this.dragState.start !== 0) {
this.dragState.direction = index - this.dragState.start < 0 ? 'left' : 'right' // 判断拖动方向
this.dragState.move = parseInt(column.columnKey)
} else {
this.dragState.direction = undefined
}
} else {
return false
}
},
// 拖动易位
dragColumn ({start, end, direction}) {
let tempData = []
let left = direction === 'left'
let min = left ? end : start - 1
let max = left ? start + 1 : end
for (let i = 0; i < this.tableHeader.length; i++) {
if (i === end) {
tempData.push(this.tableHeader[start])
} else if (i > min && i < max) {
tempData.push(this.tableHeader[ left ? i - 1 : i + 1 ])
} else {
tempData.push(this.tableHeader[i])
}
}
this.tableHeader = tempData
},5. Dotted line effect
During the dragging process, change the header status of the current column through the mousemove event
Then use headerCellClassName Dynamic modification of its class
headerCellClassName ({column, columnIndex}) {
 return (columnIndex - 1 === this.dragState.move ? `darg_active_${this.dragState.direction}` : '')
}This class will be added to the header cell
Post the complete style I wrote myself (using sass as the compilation tool):
<style lang="scss">
.w-table {
 .el-table th {
 padding: 0;
 .virtual{
  position: fixed;
  display: block;
  width: 0;
  height: 0;
  margin-left: -10px;
  z-index: 99;
  background: none;
  border: none;
 }
 &.darg_active_left {
  .virtual {
  border-left: 2px dotted #666;
  }
 }
 &.darg_active_right {
  .virtual {
  border-right: 2px dotted #666;
  }
 }
 }
 .thead-cell {
 padding: 0;
 display: inline-flex;
 flex-direction: column;
 align-items: left;
 cursor: pointer;
 overflow: initial;
 &:before {
  content: "";
  position: absolute;
  top: 0;
  left: 0;
  bottom: 0;
  right: 0;
 }
 }
 &.w-table_moving {
 .el-table th .thead-cell{
  cursor: move !important;
 }
 .el-table__fixed {
  cursor: not-allowed;
 }
 }
}6. Parent component call
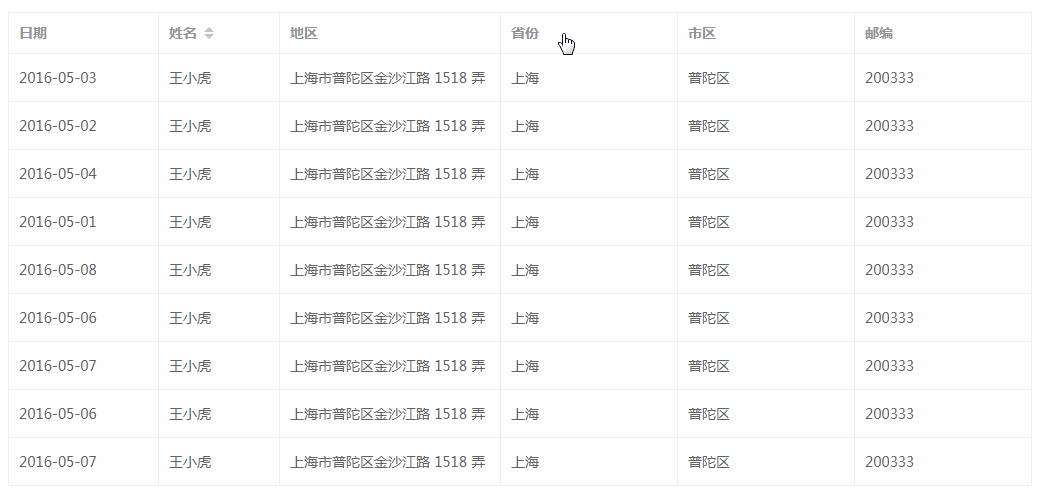
<template>
<p>
 <wTable :data="tableData" :header="tableHeader" :option="tableOption">
 <el-table-column slot="fixed"
  fixed
  prop="date"
  label="日期"
  width="150">
 </el-table-column>
 </wTable>
</p>
</template>

<script>
import wTable from '@/components/w-table.vue'
export default {
 name: 'Table',
 data () {
 return {
  tableOption: {
  border: true,
  maxHeight: 500
  },
  tableHeader: [{
  prop: 'name',
  label: '姓名',
  sortable: true,
  sortMethod: this.handleNameSort
  }, {
  prop: 'province',
  label: '省份',
  minWidth: '120'
  }, {
  prop: 'city',
  label: '市区',
  minWidth: '120'
  }, {
  prop: 'address',
  label: '地区',
  minWidth: '150'
  }, {
  prop: 'zip',
  label: '邮编',
  minWidth: '120'
  }],

  tableData: [{
  date: '2016-05-03',
  name: '王小虎',
  province: '上海',
  city: '普陀区',
  address: '上海市普陀区金沙江路 1518 弄',
  zip: 200333
  }, {
  date: '2016-05-02',
  name: '王小虎',
  province: '上海',
  city: '普陀区',
  address: '上海市普陀区金沙江路 1518 弄',
  zip: 200333
  }, {
  date: '2016-05-04',
  name: '王小虎',
  province: '上海',
  city: '普陀区',
  address: '上海市普陀区金沙江路 1518 弄',
  zip: 200333
  }, {
  date: '2016-05-01',
  name: '王小虎',
  province: '上海',
  city: '普陀区',
  address: '上海市普陀区金沙江路 1518 弄',
  zip: 200333
  }, {
  date: '2016-05-08',
  name: '王小虎',
  province: '上海',
  city: '普陀区',
  address: '上海市普陀区金沙江路 1518 弄',
  zip: 200333
  }, {
  date: '2016-05-06',
  name: '王小虎',
  province: '上海',
  city: '普陀区',
  address: '上海市普陀区金沙江路 1518 弄',
  zip: 200333
  }]
 }
 },
 methods: {
 handleNameSort () {
  console.log('handleNameSort')
 }
 },
 components: {
 wTable
 }
}
</script>I believe you have mastered the method after reading the case in this article. For more exciting information, please pay attention to other related articles on the php Chinese website!
Recommended reading:
Progressbar component practical case analysis
How to optimize the Vue project
The above is the detailed content of Use Element-UI Table to implement drag and drop function. For more information, please follow other related articles on the PHP Chinese website!

Hot AI Tools

Undresser.AI Undress
AI-powered app for creating realistic nude photos

AI Clothes Remover
Online AI tool for removing clothes from photos.

Undress AI Tool
Undress images for free

Clothoff.io
AI clothes remover

AI Hentai Generator
Generate AI Hentai for free.

Hot Article
Hot Tools

Notepad++7.3.1
Easy-to-use and free code editor

SublimeText3 Chinese version
Chinese version, very easy to use

Zend Studio 13.0.1
Powerful PHP integrated development environment

Dreamweaver CS6
Visual web development tools

SublimeText3 Mac version
God-level code editing software (SublimeText3)
Hot Topics
 1378
1378
 52
52

 How to modify element.style
Nov 24, 2023 am 11:15 AM
How to modify element.style
Nov 24, 2023 am 11:15 AM
Methods for element.style to modify elements: 1. Modify the background color of the element; 2. Modify the font size of the element; 3. Modify the border style of the element; 4. Modify the font style of the element; 5. Modify the horizontal alignment of the element. Detailed introduction: 1. Modify the background color of the element, the syntax is "document.getElementById("myElement").style.backgroundColor = "red";"; 2. Modify the font size of the element, etc.
 How to use JavaScript to implement the drag and zoom function of images?
Oct 27, 2023 am 09:39 AM
How to use JavaScript to implement the drag and zoom function of images?
Oct 27, 2023 am 09:39 AM
How to use JavaScript to implement the drag and zoom function of images? In modern web development, dragging and zooming images is a common requirement. By using JavaScript, we can easily add dragging and zooming functions to images to provide a better user experience. In this article, we will introduce how to use JavaScript to implement this function, with specific code examples. HTML structure First, we need a basic HTML structure to display pictures and add
 Why does the Elden Ring UI keep showing up?
Mar 11, 2024 pm 04:31 PM
Why does the Elden Ring UI keep showing up?
Mar 11, 2024 pm 04:31 PM
In Elden's Ring, the UI page of this game will be automatically hidden after a period of time. Many players do not know how the UI is always displayed. Players can select the gauge display configuration in the display and sound configuration. Click to turn it on. Why does the Elden Ring UI keep displaying? 1. First, after we enter the main menu, click [System Configuration]. 2. In the [Display and Sound Configuration] interface, select the meter display configuration. 3. Click Enable to complete.
 Tips and best practices for drag-and-drop selection and placement in Vue
Jun 25, 2023 am 10:13 AM
Tips and best practices for drag-and-drop selection and placement in Vue
Jun 25, 2023 am 10:13 AM
Vue is a popular JavaScript framework suitable for building single page applications (SPA). It supports drag-and-drop selection and placement functions through instructions and components, providing users with a better interactive experience. This article will introduce the techniques and best practices for drag-and-drop selection and placement in Vue. Drag Instruction Vue provides a v-draggable instruction that can easily achieve drag effects. This command can be applied to any element, and the drag style can be customized.
 What are the common UI component libraries in Vue?
Jun 11, 2023 am 11:47 AM
What are the common UI component libraries in Vue?
Jun 11, 2023 am 11:47 AM
Vue is a popular JavaScript framework that uses a component-based approach to build web applications. In the Vue ecosystem, there are many UI component libraries that can help you quickly build beautiful interfaces and provide rich functions and interactive effects. In this article, we will introduce some common VueUI component libraries. ElementUIElementUI is a Vue component library developed by the Ele.me team. It provides developers with a set of elegant,
 How to use Vue to implement drag-and-drop sorting effects
Sep 20, 2023 pm 03:01 PM
How to use Vue to implement drag-and-drop sorting effects
Sep 20, 2023 pm 03:01 PM
How to use Vue to implement drag-and-drop sorting effects Vue.js is a popular JavaScript framework that can help us build highly interactive front-end applications. In Vue, we can easily implement drag-and-drop sorting effects, allowing users to sort data by dragging elements. This article will introduce how to use Vue to implement drag-and-drop sorting effects, and provide specific code examples. First, we need to create an instance of Vue and define an array to store the data to be sorted. In the example we will
 Vue practical skills: use the v-on instruction to handle mouse drag events
Sep 15, 2023 am 08:24 AM
Vue practical skills: use the v-on instruction to handle mouse drag events
Sep 15, 2023 am 08:24 AM
Vue practical skills: Use the v-on instruction to handle mouse drag events Preface: Vue.js is a popular JavaScript framework. Its simplicity, ease of use and flexibility make it the first choice for many developers. In Vue application development, handling user interaction events is an essential skill. This article will introduce how to use Vue's v-on directive to handle mouse drag events and provide specific code examples. Create a Vue instance: First, introduce the Vue.js library file in the HTML file: &
 How to copy and move drag-and-drop elements in Vue?
Jun 25, 2023 am 08:35 AM
How to copy and move drag-and-drop elements in Vue?
Jun 25, 2023 am 08:35 AM
Vue is a popular JavaScript framework that provides a convenient drag-and-drop function, allowing us to easily copy and move elements. Next, let's take a look at how to copy and move drag-and-drop elements in Vue. 1. Basic implementation of drag-and-drop elements To copy and move drag-and-drop elements in Vue, you first need to implement the basic drag-and-drop function of the element. The specific implementation method is as follows: Add the elements that need to be dragged in the template: <divclass="drag-elem"
