This time I will bring you a detailed explanation of the steps to publish the vue2.0 plug-in using npm. What are theprecautionsfor vue2.0 plug-in using npm to publish. The following is a practical case, let's take a look.
This article will try to be as detailed and clear as possible from the development of vue plug-ins to the release of npm. Thinking about showing what you have made to the majority of "netizens", I feel a little excited...^_ ^
First upload the plug-in renderings------github portal

Let’s talk about the detailed method below:
vue init webpack-simple vue-pay-keyboard
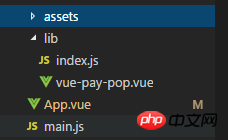
Create a simple project using vue,Deleteexcept main.js and app.vue in src External files, clear the useless content in app.vue
After finishing the project directory

2. Write plug-in
vue-pay -pop (you can get the source code from github)
{{title}}
{{item}}
0
{{loadingTxt}}
export default { name: 'vue-pay-pop', props: ['payPopOptions'], data () { return { //可选参数,支持改变 //顶部文字 title: this.payPopOptions.title || '请输入支付密码', //密码长度 pwdLength: this.payPopOptions.pwdLength || 6, //底部删除按钮 del: this.payPopOptions.del || '', //默认等候文字 loadingTxt: this.payPopOptions.loadingTxt || '请稍候...', //默认等候时间 loadingTime: this.payPopOptions.loadingTime || 1000, //显示结果后,多久重回默认 resultTime: this.payPopOptions.resultTime || 1000, //成功文字 successTxt: this.payPopOptions.successTxt || '支付成功', //失败文字 failTxt: this.payPopOptions.failTxt || '支付失败', //默认参数,无法改变 //键盘数字(1~9) keyBoards: ['1', '2', '3', '4', '5', '6', '7', '8', '9'], //键入的值 val: [], //默认输入框与等待层是否显示 status: true } }, methods: { val2input(item) { this.val.push(item) if (this.val.length == this.pwdLength) { //打开等待层 this.status = false //输入完毕后将值传递给父组件 this.$emit('inputDown', this.val.join('')) //清空数据 this.val = [] } }, delVal () { if (this.val.length > 0) this.val.pop() }, closePay () { this.payPopOptions.isShow = false; }, $payStatus(flag = false) { const that = this //模拟等候feel setTimeout(() => { if (flag) { //成功 this.loadingTxt = this.successTxt //关闭输入层,重置等待语 setTimeout(function() { that.payPopOptions.isShow = !flag that.status = true that.loadingTxt = that.payPopOptions.loadingTxt || '请稍候...' }, this.resultTime) } else { //失败 this.loadingTxt = this.failTxt //重新打开输入层,重置等待语 setTimeout(function() { that.status = true that.loadingTxt = that.payPopOptions.loadingTxt || '请稍候...' }, this.resultTime) } }, this.loadingTime) } } }
The basic source code is here. The implementation method is relatively simple, so I won’t introduce it here...
3. Try to use
Let’s first try to use
点击弹出支付框
import vuePayPop from './lib/vue-pay-pop' export default { name: 'app', data () { return { payPopOptions: { isShow: false }, } }, components: { vuePayPop }, methods: { inputDown(val) { //模拟检查数据 setTimeout(() => { if (val == '111111') { this.$refs.pay.$payStatus(true) } else { this.$refs.pay.$payStatus(false) } }, 1000) }, showPayPop() { this.payPopOptions.isShow = true; } } }
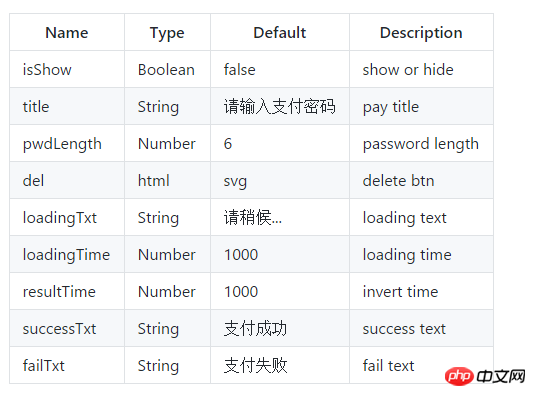
in the local app.vue. Among them, isShow in payPopOptions is a required item, which is used to control the display and hiding of the pop-up box.
Other parameters are optional

4. Change theconfiguration file
ok , now we go to change the configuration file to prepare for our release
index.js
import vuePayPop from './vue-pay-pop.vue' const PayPop = { install(Vue, options) { Vue.component(vuePayPop.name, vuePayPop) } } if (typeof window !== 'undefined' && window.Vue) { window.PayPop = PayPop Vue.use(PayPop) } export default PayPop
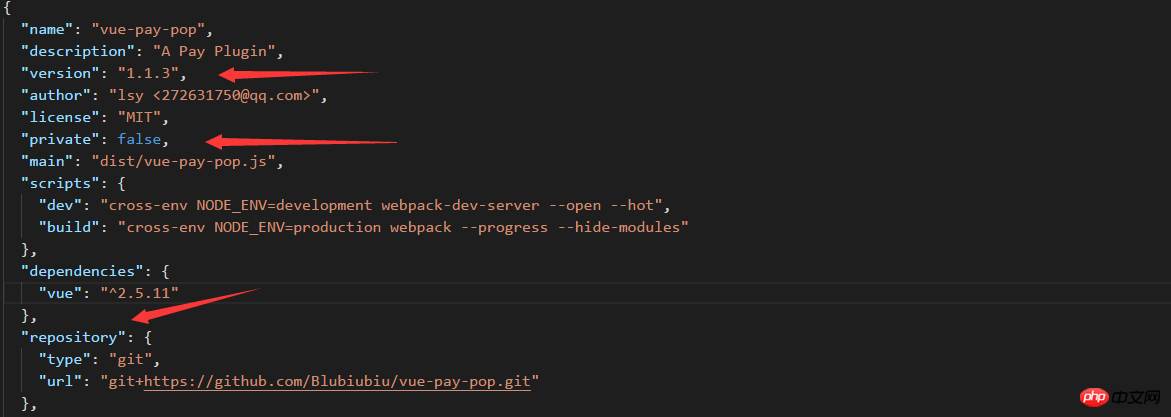
package.json

Modify arrow As mentioned in
1. Your plug-in version number needs to be changed every time youuploadnpm
2. It cannot be published unless it is set to false
3. Fill in your own github hosting address (I won’t talk about how to upload the code to github, you can refer to the Git tutorial---Liao Xuefeng)
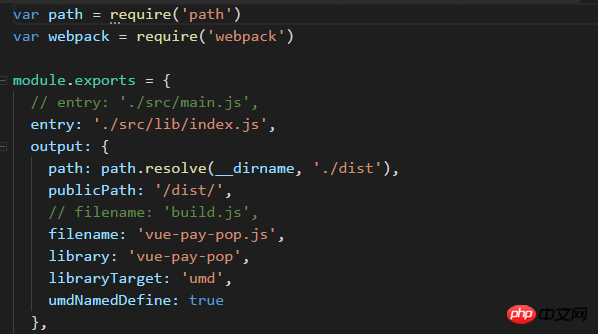
webpack.config.js

Modify the entry and filename
index.html
dist file. Enter npm run build on the command line and it will be customized.
5. Publish npm
You need to go to the npm official website to register an npm account
After registering

Enter you User name, password, and email address (the password is not displayed)
After successfully logging in, we enter

ok, and we publish successfully!
6. Reference
In your project npm install vue-pay-pop --save download our package
main.js
import vuePayPop from "vue-pay-pop" vue.use(vuePayPop)
So we can quote it directly in our vue file...
ok, then our content ends here.
In addition, if you find it useful, you are welcome to give your star on github. Of course, you can also ask me your questions and suggestions in the comments or issues. Thank you very much.
I believe you have mastered the method after reading the case in this article. For more exciting information, please pay attention to other related articles on the php Chinese website!
Recommended reading:
JS to create folding and unfolding animation (with code)
JS implements transparency gradient function
The above is the detailed content of Detailed explanation of the steps to use npm to publish the vue2.0+ plug-in. For more information, please follow other related articles on the PHP Chinese website!


