Electron allows you to use Web development technology to develop cross-platform desktop applications. It is led and open sourced by Github. The familiar Atom and VSCode editors are developed using Electron. This article mainly introduces the practical use of Webpack to build Electron applications. The editor thinks it is quite good, so I will share it with you now and give it as a reference. Let’s follow the editor to take a look, I hope it can help everyone.
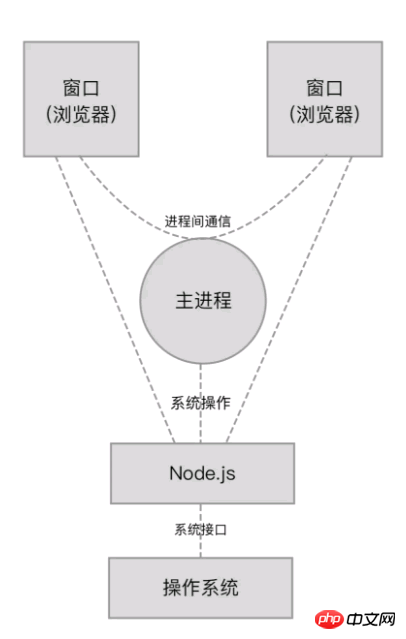
Electron is a combination of Node.js and the Chromium browser. It uses the Web page displayed by the Chromium browser as the GUI of the application and interacts with the operating system through Node.js. When you operate on a window in an Electron application, you are actually operating on a web page. When your operation needs to be completed through the operating system, the web page will interact with the operating system through Node.js.
The advantages of developing desktop applications in this way are:
Lower the development threshold, you only need to master web development technology and Node.js, a large number of Web Development technologies and ready-made libraries can be reused in Electron;
Since the Chromium browser and Node.js are both cross-platform, Electron can write the same code on different operating systems. run.
When running an Electron application, it starts by starting a main process. The startup of the main process is achieved by executing an entry JavaScript file through Node.js. The content of this entry file main.js is as follows:
##
const { app, BrowserWindow } = require('electron')
// 保持一个对于 window 对象的全局引用,如果你不这样做,
// 当 JavaScript 对象被垃圾回收, window 会被自动地关闭
let win
// 打开主窗口
function createWindow() {
 // 创建浏览器窗口
 win = new BrowserWindow({ width: 800, height: 600 })
 // 加载应用的 index.html
 const indexPageURL = `file://${__dirname}/dist/index.html`;
 win.loadURL(indexPageURL);
 // 当 window 被关闭,这个事件会被触发
 win.on('closed', () => {
  // 取消引用 window 对象
  win = null
 })
}

// Electron 会在创建浏览器窗口时调用这个函数。
app.on('ready', createWindow)

// 当全部窗口关闭时退出
app.on('window-all-closed', () => {
 // 在 macOS 上,除非用户用 Cmd + Q 确定地退出
 // 否则绝大部分应用会保持激活
 if (process.platform !== 'darwin') {
  app.quit()
 }
})
Connect to Webpack
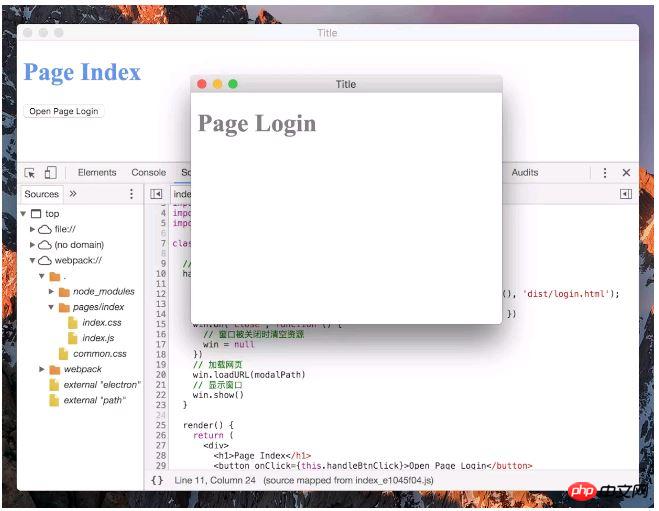
Next, make a simple Electron application. It is required to display a main window after the application is started. There is a button in the main window. Click this A new window is displayed after the button, and React is used to develop the web page. Since each window in the Electron application corresponds to a web page, two web pages need to be developed, namely the index.html of the main window and the newly opened window login.html. In other words, the project consists of 2 single-page applications, which is very similar to the project in 3-10 Managing Multiple Single-page Applications. Let's transform it into an Electron application. The places that need to be changed are as follows: Create a new entry file main.js for the main process in the project root directory, the content is consistent with the above mentioned;import React, { Component } from 'react';
import { render } from 'react-dom';
import { remote } from 'electron';
import path from 'path';
import './index.css';
class App extends Component {
// 在按钮被点击时
handleBtnClick() {
// 新窗口对应的页面的 URI 地址
const modalPath = path.join('file://', remote.app.getAppPath(), 'dist/login.html');
// 新窗口的大小
let win = new remote.BrowserWindow({ width: 400, height: 320 })
win.on('close', function () {
// 窗口被关闭时清空资源
win = null
})
// 加载网页
win.loadURL(modalPath)
// 显示窗口
win.show()
}
render() {
return (
<p>
<h1>Page Index</h1>
<button onClick={this.handleBtnClick}>Open Page Login</button>
</p>
)
}
}
render(<App/>, window.document.getElementById('app'));target: 'electron-renderer',
# 安装 Electron 执行环境到项目中
npm i -D electron

Electron builds React, Webpack desktop application tutorial
Electron uses html js css to develop desktop applications under Windows_html/css_WEB-ITnose
Write desktop applications with electron_html/css_WEB-ITnose
The above is the detailed content of Webpack practical construction Electron application examples detailed explanation. For more information, please follow other related articles on the PHP Chinese website!


