


Angular form validation is divided into two types of validation: 1. Built-in validation (required, minlength, etc.); 2. Custom validation (regular expression). This article mainly introduces the form verification function of Angular in detail. It has certain reference value. Interested friends can refer to it. I hope it can help you.
Next, let’s use a demo to register an account to see how these two verifications are implemented.
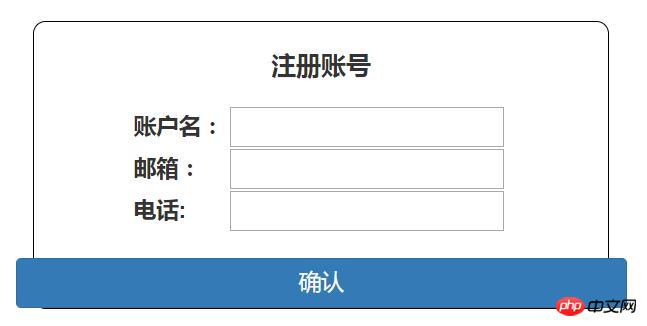
Project interface
1. Built-in verification
Among the accounts There are required verification and minimum length verification, and the other two are only required verification
1. Project directory
----------app.component.ts
----------app.component.html
----------app.component.css
------ ----app.module.ts
2. Project code
app.module.ts
import { BrowserModule } from '@angular/platform-browser'; import { NgModule } from '@angular/core'; import { FormsModule,ReactiveFormsModule } from '@angular/forms';//表单验证必须导入这两个模块 import { AppComponent } from './app.component'; @NgModule({ declarations: [ AppComponent ], imports: [ BrowserModule, FormsModule, //注册模块 ReactiveFormsModule ], providers: [], bootstrap: [AppComponent] }) export class AppModule { }
app.component. ts
import { Component,OnInit } from '@angular/core'; import { FormGroup, FormControl, Validators } from '@angular/forms'; @Component({ selector: 'app-root', templateUrl: './app.component.html', styleUrls: ['./app.component.css'] }) export class AppComponent { title = 'app'; Form:FormGroup; data={ name:"", email:"", tel:"" } ngOnInit(): void { this.Form = new FormGroup({ 'name': new FormControl(this.data.name, [ Validators.required, Validators.minLength(4) ]), 'email': new FormControl(this.data.email, Validators.required), 'tel': new FormControl(this.data.tel, Validators.required) }); } get name() { return this.Form.get('name'); } get email() { return this.Form.get('email'); } get tel() { return this.Form.get('tel'); } }
Simply speaking, when using the verification form, it is roughly divided into four steps:
(1) Import related modules FormGroup, FormControl, Validators;
(2) Declare the form validation variable From:FromGroup;
(3) Define validation rules;
(4) Through the control group (FormGroup) to which it belongs The get method to access the form control
app.component.html
注册账号
请输入长度账户名!
账户名长度不小于4!
请输入邮箱!
请输入电话!
app.component.css
*{ font-size: 18px; } .wrapper{ margin: 0 auto; margin-top:10%; width:30%; height: 20%; border:1px solid black; border-radius: 10px; } .title-wrapper{ margin: 0 auto; padding-top: 20px; padding-bottom: 20px; width:370px; text-align: center; font-size: 20px; font-weight: 800; } label{ display: inline-block; width:72px; } .contain-wrapper{ width: 300px; margin:0 auto; } .confirm{ margin-top:20px; width:100%; }
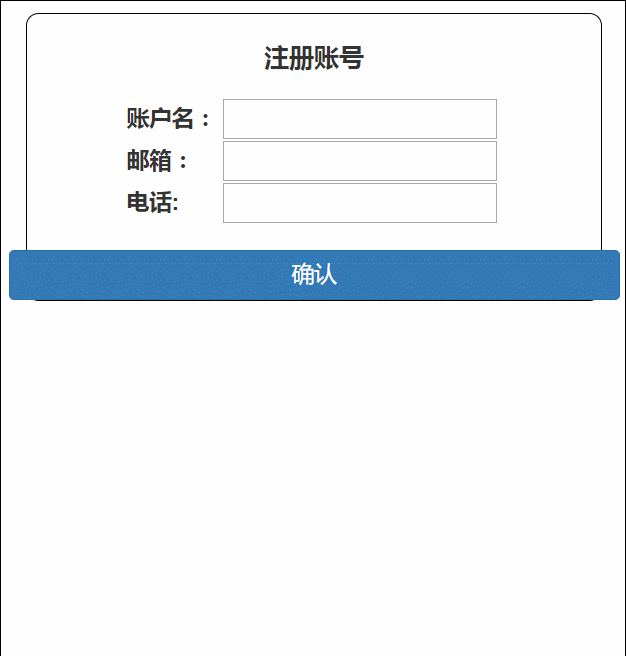
3. Project effect
2. Custom verification
Custom form verification, required Create a custom validator. Next, we change the verification of the mailbox to formatted verification instead of simple existence verification. First, let’s take a look at the changes to the project directory
1.Project Directory
----------app.component.ts
----------app.component.html
--- -------app.component.css
----------app.module.ts
----------emailAuthentication .ts
2. Project code
app.module.ts
Register custom validator EmailValidatorDirective
import { BrowserModule } from '@angular/platform-browser'; import { NgModule } from '@angular/core'; import { FormsModule,ReactiveFormsModule } from '@angular/forms'; import { EmailValidatorDirective } from './emailAuthentication'; import { AppComponent } from './app.component'; @NgModule({ declarations: [ AppComponent, EmailValidatorDirective ], imports: [ BrowserModule, FormsModule, ReactiveFormsModule ], providers: [], bootstrap: [AppComponent] }) export class AppModule { }
emailAuthentication.ts
import { Directive, Input, OnChanges, SimpleChanges } from '@angular/core'; import { AbstractControl, NG_VALIDATORS, Validator, ValidatorFn, Validators } from '@angular/forms'; /** A hero's name can't match the given regular expression */ export function emailValidator(nameRe: RegExp): ValidatorFn { return (control: AbstractControl): { [key: string]: any } => { const forbidden = !nameRe.test(control.value); return forbidden ? { 'forbiddenName': { value: control.value } } : null; }; } @Directive({ selector: '[appForbiddenName]', providers: [{ provide: NG_VALIDATORS, useExisting: EmailValidatorDirective, multi: true }] }) export class EmailValidatorDirective implements Validator { @Input() forbiddenName: string; validate(control: AbstractControl): { [key: string]: any } { return this.forbiddenName ? emailValidator(new RegExp(this.forbiddenName, 'i'))(control) : null; } }
app.component.ts
##
import { Component,OnInit } from '@angular/core'; import { FormGroup, FormControl, Validators } from '@angular/forms'; import { emailValidator } from './emailAuthentication'; //导入emailValidator自定义验证器 @Component({ selector: 'app-root', templateUrl: './app.component.html', styleUrls: ['./app.component.css'] }) export class AppComponent { title = 'app'; //email的正则表达式 emailExp = /^([a-zA-Z0-9_-])+@([a-zA-Z0-9_-])+(.[a-zA-Z0-9_-])+/ ; Form:FormGroup; data={ name:"", email:"", tel:"" } ngOnInit(): void { this.Form = new FormGroup({ 'name': new FormControl(this.data.name, [ Validators.required, Validators.minLength(4) ]), 'email': new FormControl(this.data.email, [ Validators.required, emailValidator(this.emailExp) //自定义验证器 ]), 'tel': new FormControl(this.data.tel, Validators.required) }); } get name() { return this.Form.get('name'); } get email() { return this.Form.get('email'); } get tel() { return this.Form.get('tel'); } }
注册账号
请输入账户名!
账户名长度不小于4!
请输入正确格式的邮箱!
请输入电话!
jquery form validation plug-in
JQuery form validation example code
Implementing form validation in JavaScript
The above is the detailed content of Detailed explanation of Angular's implementation of form validation function. For more information, please follow other related articles on the PHP Chinese website!


![[Web front-end] Node.js quick start](https://img.php.cn/upload/course/000/000/067/662b5d34ba7c0227.png)


