


The previous article "Mybatis series in simple terms (7)---mapper mapping file configuration insert, update, delete" introduced the usage of insert, update, and delete. This article will introduce the usage of select and resultMap. Select is undoubtedly our most commonly used and most complex one. Mybatis can help us perform advanced mapping well through resultMap. Let’s start looking at the options And the usage of resultMap:
Let’s look at the configuration of select first:
<select        <!--  1. id (必须配置)
        id是命名空间中的唯一标识符,可被用来代表这条语句。
        一个命名空间(namespace) 对应一个dao接口,
        这个id也应该对应dao里面的某个方法(相当于方法的实现),因此id 应该与方法名一致  -->

     id="selectPerson"
     <!-- 2. parameterType (可选配置, 默认为mybatis自动选择处理)
        将要传入语句的参数的完全限定类名或别名, 如果不配置,mybatis会通过ParameterHandler 根据参数类型默认选择合适的typeHandler进行处理
        parameterType 主要指定参数类型,可以是int, short, long, string等类型,也可以是复杂类型(如对象) -->
     parameterType="int"
     <!-- 3. resultType (resultType 与 resultMap 二选一配置)
         resultType用以指定返回类型,指定的类型可以是基本类型,可以是java容器,也可以是javabean -->
     resultType="hashmap"
     <!-- 4. resultMap (resultType 与 resultMap 二选一配置)
         resultMap用于引用我们通过 resultMap标签定义的映射类型,这也是mybatis组件高级复杂映射的关键 -->
     resultMap="personResultMap"
     <!-- 5. flushCache (可选配置)
         将其设置为 true,任何时候只要语句被调用,都会导致本地缓存和二级缓存都会被清空,默认值:false -->
     flushCache="false"
     <!-- 6. useCache (可选配置)
         将其设置为 true,将会导致本条语句的结果被二级缓存,默认值:对 select 元素为 true -->
     useCache="true"
     <!-- 7. timeout (可选配置)
         这个设置是在抛出异常之前,驱动程序等待数据库返回请求结果的秒数。默认值为 unset(依赖驱动)-->
     timeout="10000"
     <!-- 8. fetchSize (可选配置)
         这是尝试影响驱动程序每次批量返回的结果行数和这个设置值相等。默认值为 unset(依赖驱动)-->
     fetchSize="256"
     <!-- 9. statementType (可选配置)
         STATEMENT,PREPARED 或 CALLABLE 的一个。这会让 MyBatis 分别使用 Statement,PreparedStatement 或 CallableStatement,默认值:PREPARED-->
     statementType="PREPARED"
     <!-- 10. resultSetType (可选配置)
         FORWARD_ONLY,SCROLL_SENSITIVE 或 SCROLL_INSENSITIVE 中的一个,默认值为 unset (依赖驱动)-->
resultSetType="FORWARD_ONLY">There always seem to be so many configurations, but the actual commonly used configurations There are only a few, depending on your own needs. It has been noted above whether they must be configured.
Let’s practice using the previous demo in time:
--------------------------- --------------------------------------------------The following is a practice for select demo------------------------------------------------- -----------------------------------------------
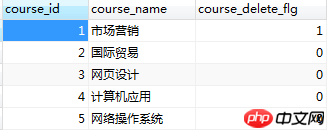
Database: Two new files are added Table (t_course, t_student)
t_course:
t_student:
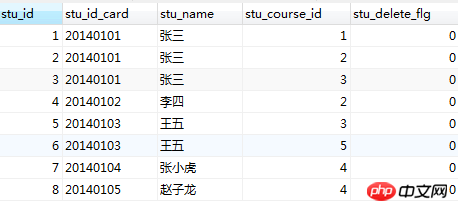
Among them, 1 Students can choose multiple courses to study.
Let’s take the demo from the previous article and continue writing:
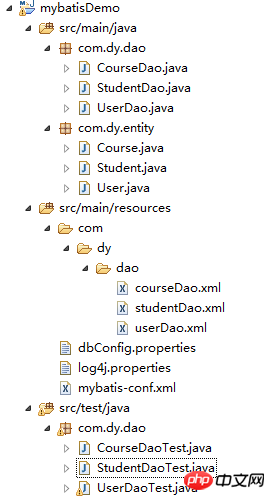
After adding, the project directory will look like this:
Course.java:
package com.dy.entity;public class Course {    private int id;    private String name;
    private int deleteFlag;
    public int getId() {        return id;
    }    public void setId(int id) {        this.id = id;
    }    public String getName() {        return name;
    }    public void setName(String name) {        this.name = name;
    }    public int getDeleteFlag() {        return deleteFlag;
    }    public void setDeleteFlag(int deleteFlag) {        this.deleteFlag = deleteFlag;
    }

}Student.java:
package com.dy.entity;
import java.util.List;public class Student {
private int id;
private String idCard;
private String name;
private List<Course> courseList;
private int deleteFlag;
    public Student(int id, String idCard, String name, List<Course> courseList, int deleteFlag) {
    this.id = id;
    this.idCard = idCard;
    this.name = name;
    this.courseList = courseList;
    this.deleteFlag = deleteFlag;
    }
    public int getId() {        return id;
    }    public void setId(int id) {        this.id = id;
    }    public String getIdCard() {        return idCard;
    }    public void setIdCard(String idCard) {        this.idCard = idCard;
    }    public String getName() {        return name;
    }    public void setName(String name) {        this.name = name;
    }    public List<Course> getCourseList() {        return courseList;
    }    public void setCourseList(List<Course> courseList) {        this.courseList = courseList;
    }    public int getDeleteFlag() {        return deleteFlag;
    }    public void setDeleteFlag(int deleteFlag) {        this.deleteFlag = deleteFlag;
    }
}CourseDao.java:
package com.dy.dao;import com.dy.entity.Course;public interface CourseDao {
public Course findCourseById(int courseId);

}StudentDao.java:
package com.dy.dao;import com.dy.entity.Student;public interface StudentDao {
public Student findStudentById(String idCard);
}courseDao.xml:
<mapper namespace="com.dy.dao.CourseDao">

    <!--
        1.此处直接将resultType 设置为course, 一看就知道我设置了别名吧,如果没有设置别名,那么resultType = com.dy.entity.Course。
         2.可能细心的你会发现:Course.java中的属性名与数据库字段名不一致,下面,我就在sql语句中用了as, 使之匹配,当然方法不止一种,
             在学习了resultMap之后,你能看到一种更直观优雅的方式去将javabean中的属性与数据库字段名保持一致
         3.findCourseById 与CourseDao中findCourseById方法对应, 那么传入的参数名称以及类型也应该保持对应关系。
         4.可以看到,在sql语句中,通过#{}表达式可以获取参数。
         5.下面这条sql语句,实际上的形式是怎么样的?还记得之前说过,mybatis默认为preparedStatement吧,那么,用我们jdbc代码来看,它其实就是:
             select course_id as id, course_name as name, course_delete_flg as deleteFlag from t_course where course_id=?     -->
    <select id="findCourseById"  resultType="course" >
        select course_id as id, course_name as name, course_delete_flg as deleteFlag from t_course where course_id=#{courseId}    </select>
</mapper>CourseDaoTest.java:
package com.dy.dao;
import java.io.IOException;import org.apache.ibatis.io.Resources;
import org.apache.ibatis.session.SqlSession;
import org.apache.ibatis.session.SqlSessionFactory;
import org.apache.ibatis.session.SqlSessionFactoryBuilder;import org.junit.Test;
import com.dy.entity.Course;public class CourseDaoTest {

    @Test    public void findCourseById() {
        SqlSessionFactory sqlSessionFactory = getSessionFactory();
        SqlSession sqlSession = sqlSessionFactory.openSession();
        CourseDao courseDao = sqlSession.getMapper(CourseDao.class);
        Course course = courseDao.findCourseById(1);
    }

    //Mybatis 通过SqlSessionFactory获取SqlSession, 然后才能通过SqlSession与数据库进行交互
    private static SqlSessionFactory getSessionFactory() {
        SqlSessionFactory sessionFactory = null;
        String resource = "mybatis-conf.xml";
        try {
            sessionFactory = new SqlSessionFactoryBuilder().build(Resources
                    .getResourceAsReader(resource));
        } catch (IOException e) {
            e.printStackTrace();
        }
        return sessionFactory;
    }
}In the above example, we briefly demonstrated the use of select for course, but there is a question worth thinking about: A student can correspond to multiple courses, so how to deal with this pair in mybatis What about many, or even many-to-many, one-to-one relationships?
Here, we have to mention resultMap. The resultMap function of mybatis is very powerful and can handle complex relationship mapping. So how to configure resultMap? Don’t worry, here it comes:
resultMap的配置:
<!--
        1.type 对应类型,可以是javabean, 也可以是其它
        2.id 必须唯一, 用于标示这个resultMap的唯一性,在使用resultMap的时候,就是通过id指定     -->
    <resultMap type="" id="">

        <!-- id, 唯一性,注意啦,这个id用于标示这个javabean对象的唯一性, 不一定会是数据库的主键(不要把它理解为数据库对应表的主键)
            property属性对应javabean的属性名,column对应数据库表的列名
            (这样,当javabean的属性与数据库对应表的列名不一致的时候,就能通过指定这个保持正常映射了)        -->
        <id property="" column=""/>

        <!-- result与id相比, 对应普通属性 -->
        <result property="" column=""/>

        <!--
            constructor对应javabean中的构造方法         -->
        <constructor>
            <!-- idArg 对应构造方法中的id参数 -->
            <idArg column=""/>
            <!-- arg 对应构造方法中的普通参数 -->
            <arg column=""/>
        </constructor>

        <!--
            collection,对应javabean中容器类型, 是实现一对多的关键
            property 为javabean中容器对应字段名
            column 为体现在数据库中列名
            ofType 就是指定javabean中容器指定的类型        -->
        <collection property="" column="" ofType=""></collection>

        <!--
            association 为关联关系,是实现N对一的关键。
            property 为javabean中容器对应字段名
            column 为体现在数据库中列名
            javaType 指定关联的类型         -->
        <association property="" column="" javaType=""></association>
</resultMap>好啦,知道resutMap怎么配置后,咱们立即接着上面的demo来练习一下吧:
------------------------------------------------------------------下面是用resultMap处理一对多关系的映射的示例-------------------------------------------------------------
一个student对应多个course, 典型的一对多,咱们就来看看mybatis怎么配置这种映射吧:
studentDao.xml:
<mapper namespace="com.dy.dao.StudentDao">

    <!-- 这儿定义一个resultMap -->
    <resultMap type="student" id="studentMap">

        <!--
            数据库中主键是id, 但是我这儿却是指定idCard为主键,为什么?
            刚刚讲了,id用来表示唯一性, 我们可以认为只要idCard一样,那么他就是同一个学生。
            如果此处用数据库中id, 那么mybatis将会认为数据库中每条记录都是一个student, 这显然不符合逻辑        -->
        <id property="idCard" column="stu_id_card"/>
        <result property="id" column="stu_id"/>
        <result property="name" column="stu_name"/>
        <result property="deleteFlag" column="stu_delete_flg"/>

        <!--
            这儿就是实现一对多的关键。
            在Student中,courseList为List<Course>, 因此,ofType也应该与之对应(当然,我用了别名,不然要蛋疼的写全名了)。
            collection的子标签是在指定Course的映射关系(由于Course的javabean的属性名与数据库的列名不一致)        -->
        <collection property="courseList" column="stu_course_id" ofType="Course">
            <id property="id" column="course_id"/>
            <result property="name" column="course_name"/>
            <result property="deleteFlag" column="course_delete_flg"/>
        </collection>
    </resultMap>

    <!-- 这儿将返回类型设置成了上面指定的studentMap -->
    <select id="findStudentById" resultMap="studentMap">
        SELECT s.*, c.* FROM t_student s LEFT JOIN t_course c ON s.stu_course_id=c.course_id WHERE s.stu_id_card=#{idCard}    </select>
</mapper>StudentDaoTest.java:
package com.dy.dao;import java.io.IOException;
import java.util.List;
import org.apache.ibatis.io.Resources;
import org.apache.ibatis.session.SqlSession;
import org.apache.ibatis.session.SqlSessionFactory;
import org.apache.ibatis.session.SqlSessionFactoryBuilder;import org.junit.Test;
import com.dy.entity.Course;import com.dy.entity.Student;public class StudentDaoTest {

    @Test    public void findCourseById() {
        SqlSessionFactory sqlSessionFactory = getSessionFactory();
        SqlSession sqlSession = sqlSessionFactory.openSession();
        StudentDao studentDao = sqlSession.getMapper(StudentDao.class);
        Student student = studentDao.findStudentById("20140101");
        List<Course> courseList = student.getCourseList();        for (Course course: courseList) {
            System.out.println(course.getId() + "   " + course.getName());
        }
    }

    //Mybatis 通过SqlSessionFactory获取SqlSession, 然后才能通过SqlSession与数据库进行交互
    private static SqlSessionFactory getSessionFactory() {
        SqlSessionFactory sessionFactory = null;
        String resource = "mybatis-conf.xml";
        try {
            sessionFactory = new SqlSessionFactoryBuilder().build(Resources
                    .getResourceAsReader(resource));
        } catch (IOException e) {
            e.printStackTrace();
        }
        return sessionFactory;
    }
}相信通过以上demo, 大家也能够使用mybatis的select 和 resultMap的用法了。上面demo只演示了一对多的映射,其实多对一、多对多也与它类似,所以我就没演示了,有兴趣的可以自己动手再做做。
好啦,本次就写到这儿了。(PS,生病一周了,所以到现在才更新博客)。
以上就是深入浅出Mybatis系列(八)---mapper映射文件配置之select、resultMap 的内容,更多相关内容请关注PHP中文网(m.sbmmt.com)!
 mybatis first level cache and second level cache
 What is the difference between ibatis and mybatis
 How to configure database connection in mybatis
 What is the working principle and process of mybatis
 What are the differences between hibernate and mybatis
 What does it mean when a message has been sent but rejected by the other party?
 Today's Toutiao gold coin is equal to 1 yuan
 The difference between console cable and network cable


![[Web front-end] Node.js quick start](https://img.php.cn/upload/course/000/000/067/662b5d34ba7c0227.png)


