

1、nginx和apache的动静分离配置:
把下面配置放到nginx配置文件相应的server { }里面,如果使用其他端口号,改一下就行:
#所有php的动态页面均交由apache处理
location ~ \.(php)?$ { proxy_set_header host $host; proxy_set_header x-real-ip $remote_addr; proxy_set_header x-forwarded-for $proxy_add_x_forwarded_for; proxy_pass http://127.0.0.1:88; }
#所有静态文件由nginx直接读取不经过apache
location ~ .*\.(htm|html|gif|jpg|jpeg|png|bmp|swf|ioc|rar|zip|txt|flv|mid|doc|ppt|pdf|xls|mp3|wma)$ { expires 15d; } location ~ .*\.(js|css)?$ { expires 1h; }
如果之前设置了fastcgi的,把下面的配置注释掉:
# pass the php scripts to fastcgi server listening on 127.0.0.1:9000 # #location ~ \.php$ { # root /var/www/html; # fastcgi_pass 127.0.0.1:9000; # fastcgi_index index.php; # include fastcgi.conf; #}
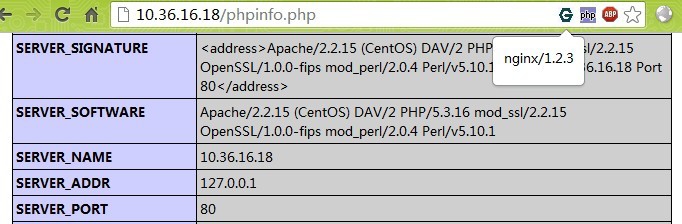
重启nginx就生效,如图所示,标头显示nginx,phpinfo里面显示是apache,说明动静分离生效。
2.niginx和tomcat的动静分离配置:
#主配置文件配置
[root@localhost ~]# vi /usr/local/nginx/conf/nginx.conf
user nginx; worker_processes 1; error_log logs/error.log; pid logs/nginx.pid; events { worker_connections 1024; } http { include mime.types; default_type application/octet-stream; #日志格式定义 log_format main '$remote_addr - $remote_user[$time_local] "$request" ' '$status $body_bytes_sent"$http_referer" ' '"$http_user_agent" "$http_x_forwarded_for"'; access_log logs/access.log main; sendfile on; keepalive_timeout 65; #gzip压缩功能设置 gzip on; gzip_min_length 1k; gzip_buffers 4 16k; gzip_http_version 1.0; gzip_comp_level 2; gzip_types text/plain application/x-javascripttext/css application/xml; gzip_vary on; server { listen 80; server_name www.test.com; location / { #jsp网站程序根目录,一般nginx与tomcat在同一个目录 root /usr/local/tomcat/webapps/root; index index.html index.jsp index.html; } location ~ .*.jsp$ { index index.jsp; proxy_pass http://127.0.0.1:8080; #来自jsp请求交给tomcat处理 proxy_redirect off; proxy_set_header host $host; #后端的web服务器可以通过x-forwarded-for获取用户真实ip proxy_set_header x-real-ip $remote_addr; proxy_set_header x-forwarded-for $proxy_add_x_forwarded_for; client_max_body_size 10m; #允许客户端请求的最大单文件字节数 client_body_buffer_size 128k; #缓冲区代理缓冲用户端请求的最大字节数 proxy_connect_timeout 90; #nginx跟后端服务器连接超时时间(代理连接超时) proxy_read_timeout 90; #连接成功后,后端服务器响应时间(代理接收超时) proxy_buffer_size 4k; #设置代理服务器(nginx)保存用户头信息的缓冲区大小 proxy_buffers 6 32k; #proxy_buffers缓冲区,网页平均在32k以下的话,这样设置 proxy_busy_buffers_size 64k;#高负荷下缓冲大小(proxy_buffers*2) proxy_temp_file_write_size 64k; #设定缓存文件夹大小,大于这个值,将从upstream服务器传 } location ~ .*\.(gif|jpg|png|bmp|swf)$ #由nginx处理静态页面 { expires 30d; #使用expires缓存模块,缓存到客户端30天 } location ~ .*\.( jsp|js|css)?$ { expires 1d; } error_page 404 /404.html; #错误页面 error_page 500 502 503 504 /50x.html; location = /50x.html { root html; } }
#编写nginx启动、停止、重启等sysv管理脚本,方便使用
[root@localhost ~]# vi /etc/init.d/nginx
#!/bin/bash # chkconfig: 345 99 20 # description: nginx servicecontrol script prog="/usr/local/nginx/sbin/nginx" pidf="/usr/local/nginx/logs/nginx.pid" case "$1" in start) $prog echo "nginx servicestart success." ;; stop) kill -s quit $(cat $pidf) echo "nginx service stopsuccess." ;; restart) $0 stop $0 start ;; reload) kill -s hup $(cat $pidf) echo"reload nginx configsuccess." ;; *) echo "usage: $0{start|stop|restart|reload}" exit 1 esac
[root@localhost ~]# chmod +x /etc/init.d/nginx [root@localhost ~]# service nginx restart [root@localhost ~]# chkconfig --add nginx [root@localhost ~]# chkconfig nginx on
以上がNginx と Apache または Tomcat の動的および静的分離を構成する方法の詳細内容です。詳細については、PHP 中国語 Web サイトの他の関連記事を参照してください。


![[Web フロントエンド] Node.js クイック スタート](https://img.php.cn/upload/course/000/000/067/662b5d34ba7c0227.png)


