


Netty は、高性能 IO フレームワークであり、非常に使いやすい技術フレームワークです。
Netty は、NIO に基づいたクライアントおよびサーバー側のプログラミング フレームワークです。Netty を使用すると、特定のプロトコルを実装するクライアント アプリケーションやサーバー アプリケーションなどのネットワーク アプリケーションを簡単に開発できます。 Netty は、TCP および UDP に基づくソケット サービス開発などのネットワーク アプリケーションのプログラミングおよび開発プロセスを簡素化および合理化することに相当します。
「高速」かつ「シンプル」であるため、メンテナンスやパフォーマンスの問題は発生しません。 Netty は、複数のプロトコル (FTP、SMTP、HTTP などのさまざまなバイナリ テキスト プロトコルを含む) の実装経験を吸収するプロジェクトであり、非常に慎重に設計されています。最終的に、Netty は、アプリケーションのパフォーマンス、安定性、スケーラビリティを確保しながら、開発を容易にする方法を見つけることに成功しました。
まず第一に、pom
<?xml version="1.0" encoding="UTF-8"?>
<project xmlns="http://maven.apache.org/POM/4.0.0" xmlns:xsi="http://www.w3.org/2001/XMLSchema-instance"
         xsi:schemaLocation="http://maven.apache.org/POM/4.0.0 https://maven.apache.org/xsd/maven-4.0.0.xsd">
    <modelVersion>4.0.0</modelVersion>
    <parent>
        <groupId>org.springframework.boot</groupId>
        <artifactId>spring-boot-starter-parent</artifactId>
        <version>2.2.1.RELEASE</version>
        <relativePath/> <!-- lookup parent from repository -->
    </parent>
    <groupId>com.cxy</groupId>
    <artifactId>netty</artifactId>
    <version>0.0.1-SNAPSHOT</version>
    <name>netty</name>
    <description>Demo project for Spring Boot</description>

    <properties>
        <java.version>1.8</java.version>
    </properties>

    <dependencies>
        <dependency>
            <groupId>org.springframework.boot</groupId>
            <artifactId>spring-boot-starter-web</artifactId>
        </dependency>
        <dependency>
            <groupId>io.netty</groupId>
            <artifactId>netty-all</artifactId>
            <version>4.1.25.Final</version>
        </dependency>
        <dependency>
            <groupId>org.springframework.boot</groupId>
            <artifactId>spring-boot-starter-test</artifactId>
            <scope>test</scope>
            <exclusions>
                <exclusion>
                    <groupId>org.junit.vintage</groupId>
                    <artifactId>junit-vintage-engine</artifactId>
                </exclusion>
            </exclusions>
        </dependency>
    </dependencies>

    <build>
        <plugins>
            <plugin>
                <groupId>org.springframework.boot</groupId>
                <artifactId>spring-boot-maven-plugin</artifactId>
            </plugin>
        </plugins>
    </build>

</project>handler クラスをプロジェクト全体に導入することで、変更されたものではありません
package com.cxy.netty.controller;
import io.netty.buffer.ByteBuf;
import io.netty.channel.ChannelFutureListener;
import io.netty.channel.ChannelHandlerContext;
import io.netty.channel.ChannelInboundHandlerAdapter;
import io.netty.util.CharsetUtil;
public class EchoServerHandler extends ChannelInboundHandlerAdapter {
    @Override
    public void channelRead(ChannelHandlerContext ctx, Object msg){
        ByteBuf in = (ByteBuf) msg;
        System.out.println("Server received: " + in.toString(CharsetUtil.UTF_8));
        ctx.write(in);
    }
    public void channelReadComplete(ChannelHandlerContext ctx){
        ctx.writeAndFlush(ChannelFutureListener.CLOSE);
    public void exceptionCaught(ChannelHandlerContext ctx, Throwable cause){
        cause.printStackTrace();
        ctx.close();
}このハンドラーは公式 Web サイトからコピーされました
package com.cxy.netty.controller;
import io.netty.bootstrap.ServerBootstrap;
import io.netty.channel.ChannelFuture;
import io.netty.channel.ChannelInitializer;
import io.netty.channel.EventLoopGroup;
import io.netty.channel.nio.NioEventLoopGroup;
import io.netty.channel.socket.SocketChannel;
import io.netty.channel.socket.nio.NioServerSocketChannel;
import org.slf4j.Logger;
import org.slf4j.LoggerFactory;
import org.springframework.boot.autoconfigure.web.ServerProperties;
import org.springframework.stereotype.Component;
import javax.annotation.PostConstruct;
import javax.annotation.PreDestroy;
import java.net.InetSocketAddress;
@Component
public class NettyServer {
/*private int port =8080;
public int getPort() {
return port;
}
public void setPort(int port) {
this.port = port;
}
public NettyServer(int port) {
this.port = port;
}*/
@PostConstruct
public void start() throws Exception {
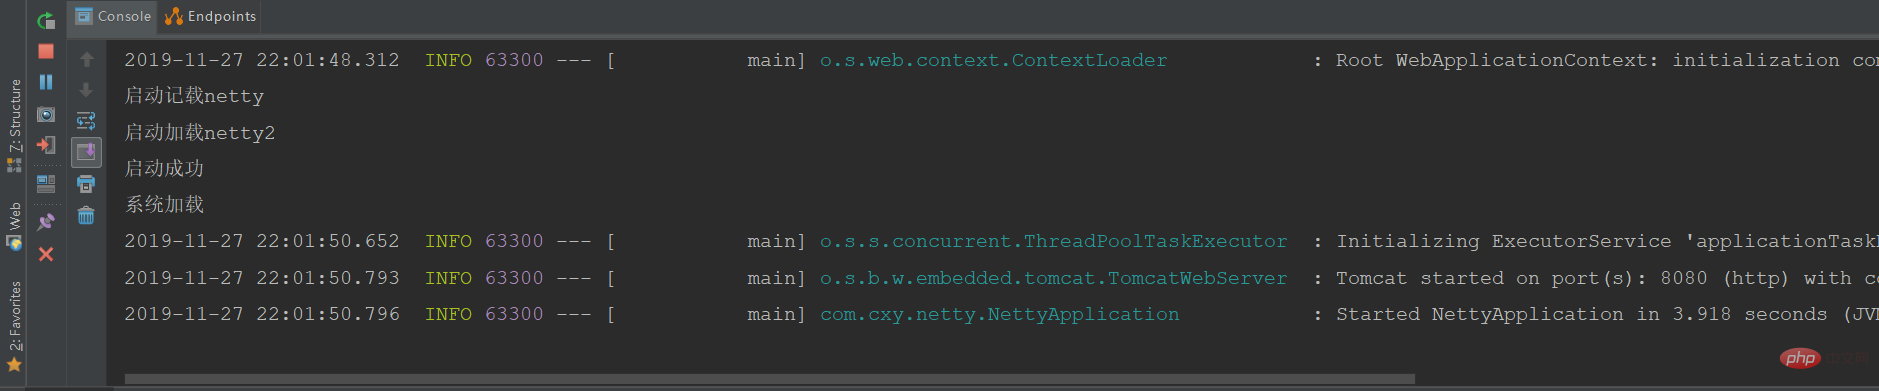
System.out.println("启动记载netty");
EventLoopGroup boss = new NioEventLoopGroup();
EventLoopGroup work = new NioEventLoopGroup();
ServerBootstrap b = new ServerBootstrap();
b.group(boss,work)
.channel(NioServerSocketChannel.class)
.localAddress(new InetSocketAddress(8082))
.childHandler(new ChannelInitializer<SocketChannel>() {
@Override
protected void initChannel(SocketChannel ch) throws Exception {
ch.pipeline().addLast(new EchoServerHandler());
}
});
System.out.println("启动加载netty2");
ChannelFuture channelFuturef = b.bind().sync();
if (channelFuturef.isSuccess()){
System.out.println("启动成功");
}
}
}クリックして開始:
ログを表示します:
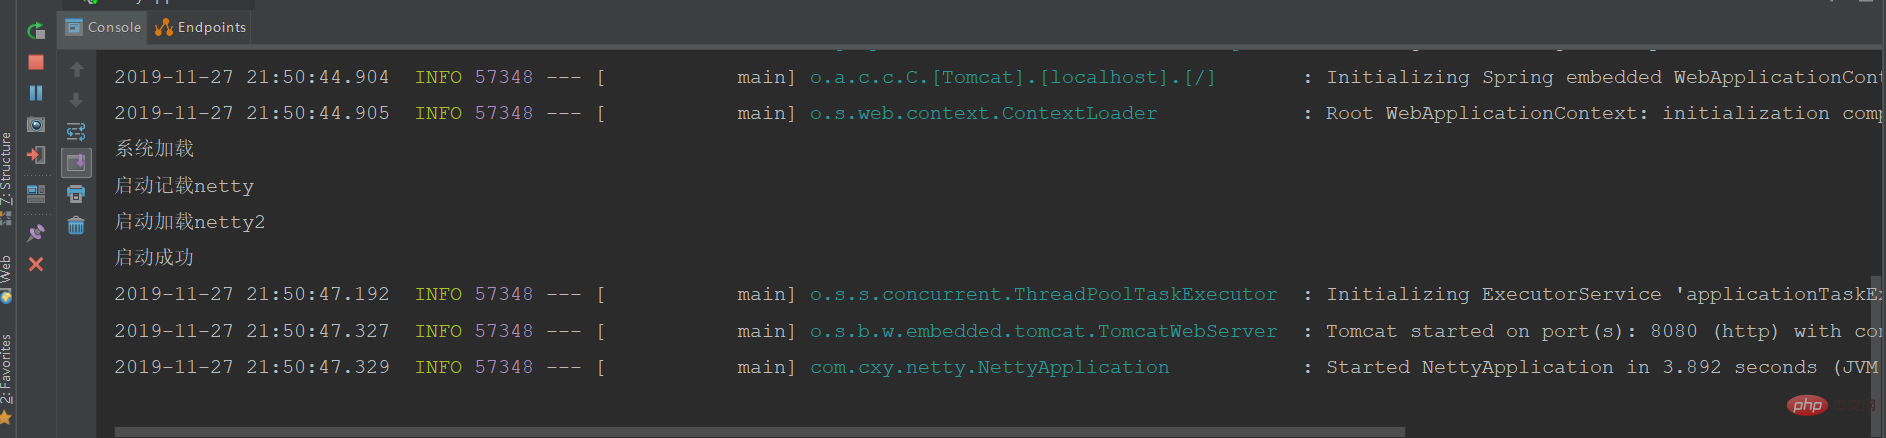
#開始されたことを示します
では、この注釈がなぜそれほど魅力的なのか:

# #意味について見てみましょう, クラスがロードされるときにこのメソッドもロードされることを意味します. 初期ロードの意味は次のとおりです:
@Documented
@Retention (RUNTIME)
@Target(METHOD)
public @interface PostConstruct {
}package com.cxy.netty.controller;
import javax.servlet.ServletContextEvent;
import javax.servlet.ServletContextListener;
/**
* 系统初始化监听器
* @author Administrator
*
*/
public class InitListener implements ServletContextListener {
@Override
public void contextInitialized(ServletContextEvent sce) {
NettyServer nettyServer = new NettyServer(8081);
try {
nettyServer.start();
} catch (Exception e) {
e.printStackTrace();
}
}
@Override
public void contextDestroyed(ServletContextEvent sce) {
}
}クラスを開始します:
package com.cxy.netty;
import com.cxy.netty.controller.InitListener;
import com.cxy.netty.controller.NettyServer;
import org.springframework.boot.CommandLineRunner;
import org.springframework.boot.SpringApplication;
import org.springframework.boot.autoconfigure.SpringBootApplication;
import org.springframework.boot.web.servlet.ServletListenerRegistrationBean;
import org.springframework.context.annotation.Bean;
@SpringBootApplication
public class NettyApplication {
    /**
     * 注册监听器
     * @return
     */
    @SuppressWarnings({ "rawtypes", "unchecked" })
    @Bean
    public ServletListenerRegistrationBean servletListenerRegistrationBean() {
        ServletListenerRegistrationBean servletListenerRegistrationBean =
                new ServletListenerRegistrationBean();
        servletListenerRegistrationBean.setListener(new InitListener());
        return servletListenerRegistrationBean;
    }
    public static void main(String[] args) {
        SpringApplication.run(NettyApplication.class, args);
    }
}ログを確認します:
package com.cxy.netty.controller;
import com.cxy.netty.controller.NettyServer;
import org.springframework.context.ApplicationListener;
import org.springframework.context.event.ContextRefreshedEvent;
import org.springframework.stereotype.Component;
@Component
public class NettyBooter implements ApplicationListener<ContextRefreshedEvent> {
    @Override
    public void onApplicationEvent(ContextRefreshedEvent event) {
        NettyServer nettyServer = new NettyServer(8081);
        try {
            nettyServer.start();
        } catch (Exception e) {
            e.printStackTrace();
        }
    }
}package com.cxy.netty;
import com.cxy.netty.controller.NettyServer;
import org.springframework.boot.CommandLineRunner;
import org.springframework.boot.SpringApplication;
import org.springframework.boot.autoconfigure.SpringBootApplication;
import org.springframework.boot.web.servlet.ServletListenerRegistrationBean;
import org.springframework.context.annotation.Bean;
@SpringBootApplication
public class NettyApplication {
/**
* 注册监听器
* @return
*/
/* @SuppressWarnings({ "rawtypes", "unchecked" })
@Bean
public ServletListenerRegistrationBean servletListenerRegistrationBean() {
ServletListenerRegistrationBean servletListenerRegistrationBean =
new ServletListenerRegistrationBean();
servletListenerRegistrationBean.setListener(new InitListener());
return servletListenerRegistrationBean;
}*/
public static void main(String[] args) {
SpringApplication.run(NettyApplication.class, args);
}
}
package com.cxy.netty;
import com.cxy.netty.controller.NettyServer;
import org.springframework.boot.CommandLineRunner;
import org.springframework.boot.SpringApplication;
import org.springframework.boot.autoconfigure.SpringBootApplication;
import org.springframework.boot.web.servlet.ServletListenerRegistrationBean;
import org.springframework.context.annotation.Bean;
/*
@SpringBootApplication
public class NettyApplication {
   */
/**
     * 注册监听器
     * @return
     *//*
   */
/* @SuppressWarnings({ "rawtypes", "unchecked" })
    @Bean
    public ServletListenerRegistrationBean servletListenerRegistrationBean() {
        ServletListenerRegistrationBean servletListenerRegistrationBean =
                new ServletListenerRegistrationBean();
        servletListenerRegistrationBean.setListener(new InitListener());
        return servletListenerRegistrationBean;
    }*//*
    public static void main(String[] args) {
        SpringApplication.run(NettyApplication.class, args);
    }
}
*/
@SpringBootApplication
public class NettyApplication implements CommandLineRunner {
    public static void main(String[] args) {
        SpringApplication.run(NettyApplication.class, args);
    }
    @Override
    public void run(String... args) throws Exception {
        NettyServer echoServer = new NettyServer(8083);
        echoServer.start();
    }
}
以上がspringboot が netty フレームワークを統合する方法は何ですか?の詳細内容です。詳細については、PHP 中国語 Web サイトの他の関連記事を参照してください。


![[Web フロントエンド] Node.js クイック スタート](https://img.php.cn/upload/course/000/000/067/662b5d34ba7c0227.png)


