
この記事の内容は、SpringBoot が Jsp と Thymeleaf を統合する方法についてです。必要な方は参考にしていただければ幸いです。
この記事では主に、簡単なユーザーの追加、削除、変更、クエリのサンプル プロジェクトを実装するための SpringBootintegrationJsp と SpringBootintegrationThymeleaf について説明します。先に述べておくと、項目は 3 つあり、2 つは個別に統合され、1 つはすべてを統合します。これらのいずれかが必要な場合は、対応するセクションの概要を参照してください。プロジェクトのソース コードが必要な場合は、一番下に直接ジャンプし、リンクからプロジェクト コードをダウンロードできます。
環境要件
JDK: 1.7以降
SQL: MySql
ここでは、ユーザー情報を保存するためにmysqlにユーザーテーブルを作成する必要があります。
データベーススクリプトは次のとおりです:
CREATE TABLE `t_user` (
  `id` int(11) NOT NULL AUTO_INCREMENT COMMENT '自增id',
  `name` varchar(10) DEFAULT NULL COMMENT '姓名',
  `age` int(2) DEFAULT NULL COMMENT '年龄',
  `password` varchar(24) NOT NULL COMMENT '密码',
  PRIMARY KEY (`id`)
) ENGINE=InnoDB AUTO_INCREMENT=17 DEFAULT CHARSET=utf8
新しいテーブルを作成したら、プロジェクトを作成しましょう。
私たちのプロジェクトは、Maven を通じて作成された通常の Web プロジェクトです。
プロジェクトを作成した後、対応するjarパッケージをダウンロードし、関連する開発を実行する必要があります。
これらの jar パッケージの場合、springBoot と Jsp に関連する jar を pom.xml ファイルに追加するだけです。
関連する注意事項が書かれているので、ここでは詳しく説明しません。
Maven の依存関係は次のとおりです:
 <dependencies>
        <!-- Spring Boot Web 依赖 核心 -->
        <dependency>
            <groupId>org.springframework.boot</groupId>
            <artifactId>spring-boot-starter-web</artifactId>
        </dependency>

        <!-- Spring Boot 热部署 class文件之后会自动重启 -->
        <dependency>
            <groupId>org.springframework.boot</groupId>
            <artifactId>spring-boot-devtools</artifactId>
            <optional>true</optional>
        </dependency>
        <!-- Spring Boot Test 依赖 -->
        <dependency>
            <groupId>org.springframework.boot</groupId>
            <artifactId>spring-boot-starter-test</artifactId>
            <scope>test</scope>
        </dependency>

        <!-- Spring Boot JPA -->
        <dependency>
            <groupId>org.springframework.boot</groupId>
            <artifactId>spring-boot-starter-data-jpa</artifactId>
        </dependency>

          <!-- Spring Boot Mybatis 依赖 -->
        <dependency>
            <groupId>org.mybatis.spring.boot</groupId>
            <artifactId>mybatis-spring-boot-starter</artifactId>
            <version>${mybatis-spring-boot}</version>
        </dependency>

        <dependency>
            <groupId>mysql</groupId>
            <artifactId>mysql-connector-java</artifactId>
        </dependency>

        <!--fastjson 相关jar -->
        <dependency>
            <groupId>com.alibaba</groupId>
            <artifactId>fastjson</artifactId>
            <version>${fastjson}</version>
        </dependency>

                <!--JSP 依赖  -->
        <!-- servlet依赖. -->
        <dependency>
            <groupId>javax.servlet</groupId>
            <artifactId>jstl</artifactId>
        </dependency>

        <dependency>
            <groupId>javax.servlet</groupId>
            <artifactId>javax.servlet-api</artifactId>
            <scope>provided</scope>
        </dependency>

        <!-- tomcat的支持.-->
        <dependency>
            <groupId>org.apache.tomcat.embed</groupId>
            <artifactId>tomcat-embed-jasper</artifactId>
            <scope>provided</scope>
        </dependency>
</dependencies> 関連する Jar パッケージをダウンロードした後、プロジェクトの構造を確認します。
まずはバックグラウンド関連のパッケージ説明:
src/main/java
com.pancm.web - Controller 层
com.pancm.dao - 数据操作层 DAO
com.pancm.pojo- 实体类
com.pancm.service - 业务逻辑层
Application - 应用启动类

src/main/resources
application.properties - 应用配置文件,应用启动会自动读取配置
フロントエンド関連のファイルストレージ説明:
src/main/webapp
WEB-INF - web.xml web相关的核心配置
WEB-INF/jsp - JSP文件的存放路径
プロジェクト全体構造図: 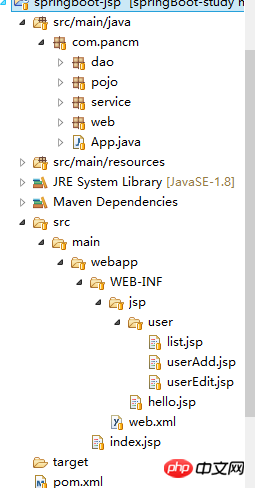
プロジェクト構造が確認できたら、対応する設定を追加していきます。
対応する設定をapplication.propertiesに追加するだけです。
データソースの構成は前のものと同様ですが、注意する必要があるのは、Jspの関連構成です。
springBoot のデフォルトでサポートされているテンプレートは Thymeleaf であるため、ここで対応する変更を加える必要があります。
構成は次のとおりです:
## 编码 banner.charset=UTF-8 server.tomcat.uri-encoding=UTF-8 spring.http.encoding.charset=UTF-8 spring.http.encoding.enabled=true spring.http.encoding.force=true spring.messages.encoding=UTF-8 ## 端口 server.port=8088 ## 数据源 spring.datasource.url=jdbc:mysql://localhost:3306/springBoot?useUnicode=true&characterEncoding=utf8 spring.datasource.username=root spring.datasource.password=123456 spring.datasource.driver-class-name=com.mysql.jdbc.Driver ## JSP配置 # 页面默认前缀 spring.mvc.view.prefix=/WEB-INF/jsp/ # 响应页面默认后缀 spring.mvc.view.suffix=.jsp
実際、ここでのコードは前の記事で説明したものと基本的に同じです。唯一の違いは、ここではデータベースの操作にJPAを使用していることです。ちなみに、JPA はこのフレームワークを使用しています)。
1つ目はエンティティクラスです。ここではJPAを使用しているため、以前のものとは少し異なり、いくつかのアノテーションが追加されています。
Entity: これがエンティティクラスであることを示します。
Table: このエンティティ クラスによってマップされるデータ テーブルの名前。
列: フィールドの属性を指定します。nullable は空でないかどうかを示し、unique は一意であるかどうかを示します。
すると、エンティティクラスのコードは以下のようになります。
@Entity
@Table(name = "t_user")
public class User {

     /** 编号 */
     @Id
     @GeneratedValue
     private Long id;
     /** 姓名 */
     @Column(nullable = false, unique = true)
     private String name;
     /** 密码*/
     @Column(nullable = false)
     private String password;
     /** 年龄 */
     @Column(nullable = false)
     private Integer age;

    //getter和setter略
} JPAを使用しているため、dao層はJpaRepositoryクラスを継承するだけでよく、エンティティクラスと主キーの型を指定する必要があります。
dao レイヤーのコードは次のとおりです:
@Mapper
public interface UserDao extends JpaRepository<User, Long>{

}ビジネスレイヤーは JPA を使用しますが、追加と変更には save を使用し、削除には findOne を使用して ID を渡す方法も非常に簡単です。 search、findAll はすべてをクエリするなどです。
サービスのコードは次のとおりです:
@Service
public class UserServiceImpl implements UserService {

    @Autowired
    private UserDao userDao;


    @Override
    public boolean addUser(User user) {
        boolean flag=false;
        try{
            userDao.save(user);
            flag=true;
        }catch(Exception e){
            System.out.println("新增失败!");
            e.printStackTrace();
        }
        return flag;
    }

    @Override
    public boolean updateUser(User user) {
        boolean flag=false;
        try{
            userDao.save(user);
            flag=true;
        }catch(Exception e){
            System.out.println("修改失败!");
            e.printStackTrace();
        }
        return flag;
    }

    @Override
    public boolean deleteUser(Long id) {
        boolean flag=false;
        try{
            userDao.delete(id);
            flag=true;
        }catch(Exception e){
            System.out.println("删除失败!");
            e.printStackTrace();
        }
        return flag;
    }

    @Override
    public User findUserById(Long id) {
        return userDao.findOne(id);
    }

    @Override
    public List<User> findAll() {
        return userDao.findAll();
    }
}コントロール層に関しては、ここでもJspが呼び出すためのインターフェースを提供しますが、このクラスのアノテーションは以前のRestControllerアノテーションを使用できません。データは json 形式で返されますが、返すときにインターフェースにジャンプする必要がある場合があるため、Controller アノテーションを使用する必要があります。メソッドで返したいデータ形式が json の場合は、メソッドに ResponseBody アノテーションを追加するだけです。
制御層のコードは次のとおりです:
@Controller
public class UserRestController {
        @Autowired
        private UserService userService;

        @RequestMapping("/hello")
        public String hello() {
            return "hello";
        }

        @RequestMapping("/")
        public String index() {
            return "redirect:/list";
        }


        @RequestMapping("/list")
        public String list(Model model) {
            System.out.println("查询所有");
            List<User> users=userService.findAll();
            model.addAttribute("users", users);
            return "user/list";
        }

        @RequestMapping("/toAdd")
        public String toAdd() {
            return "user/userAdd";
        }

        @RequestMapping("/add")
        public String add(User user) {
            userService.addUser(user);
            return "redirect:/list";
        }

        @RequestMapping("/toEdit")
        public String toEdit(Model model,Long id) {
            User user=userService.findUserById(id);
            model.addAttribute("user", user);
            return "user/userEdit";
        }

        @RequestMapping("/edit")
        public String edit(User user) {
            userService.updateUser(user);
            return "redirect:/list";
        }


        @RequestMapping("/toDelete")
        public String delete(Long id) {
            userService.deleteUser(id);
            return "redirect:/list";
        }
}バックエンド コードの紹介は以上です。フロントエンド JSP コードについては、これ以上は言いません (主な理由は次のとおりです)。インターフェイスが醜すぎます...)、プロジェクトを直接開始して効果を確認します。
プロジェクトを開始し、ブラウザで http://localhost:8088/list と入力します
メインインターフェイス: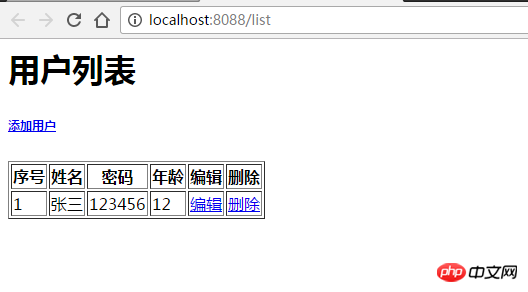
データを追加した後のインターフェイス:
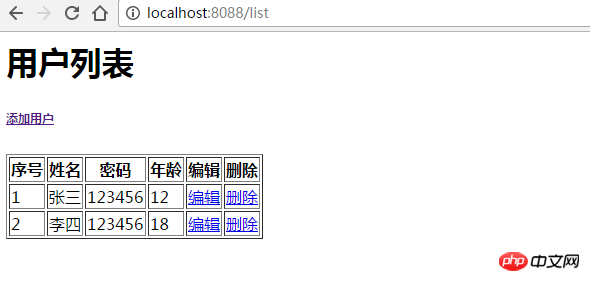
その他の変更や削除も可能です実現するには、ここにマップを 1 つずつ配置する必要はありません。
springBoot 統合 Jsp はここにあります。
Thymeleaf は、Web および非 Web アプリケーションで使用できるテンプレート エンジンであり、XML/XHTML/HTML5、JavaScript、CSS、さらにはテキスト ファイルでも動作します。
私は Thymeleaf の使い方にあまり慣れていません。これはこの記事の主な内容ではありません。詳細については公式ドキュメントを確認してください。
https://www.thymeleaf.org/documentation.html
基本的に上記のSringBoot統合Jspと同じなので、ここでは詳しく説明しません。
由于SpringBoot默认的模版引擎就是Thymeleaf,所以Maven 依赖这块只需要在原先的springBoot项目添加Thymeleaf的依赖就行。
  <dependency>
            <groupId>org.springframework.boot</groupId>
            <artifactId>spring-boot-starter-thymeleaf</artifactId>
</dependency>application.properties 配置这块,可以和之前的项目基本一致,需要注意的也只有spring.thymeleaf.cache配置,为false的时候是关闭Thymeleaf的缓存,更改界面之后会自动重启然后生效。
SringBoot整合Thymeleaf和SringBoot整合Jsp有个比较大的不同是,Thymeleaf的资源文件是放在src/main/resources目录下,Jsp的是放在src/main/webapp目录下。其中resources目录下的的static目录用于放置静态内容,比如css、js、jpg图片等。templates目录用于放置项目使用的页面模板,也就是.html文件。
它的项目结构图如下: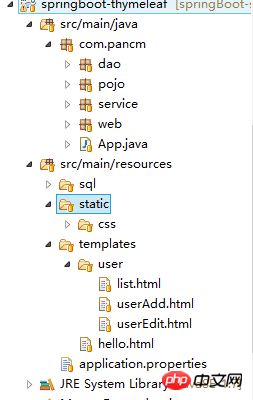
代码基本和SringBoot整合Jsp一致,这里就不在赘述了。
启动该项目,在浏览器输入:http://localhost:8085
主界面:
修改用户数据之后的: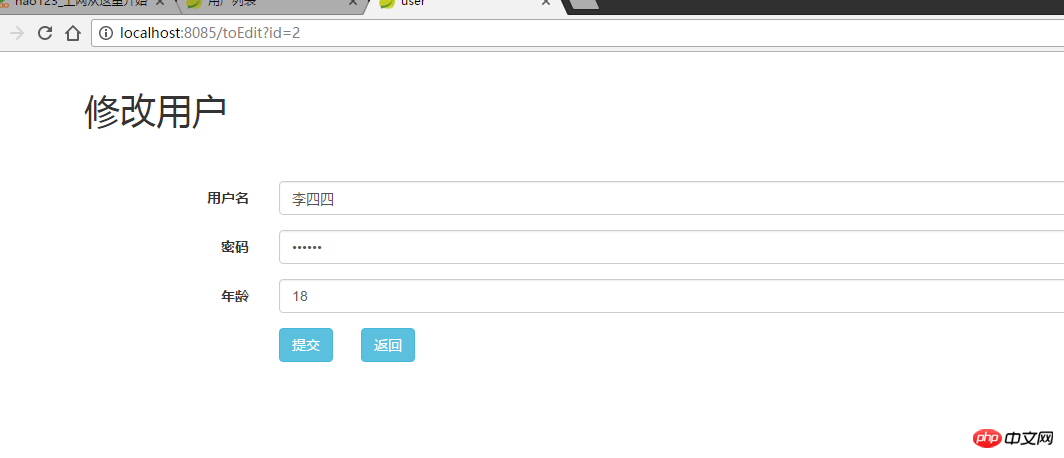
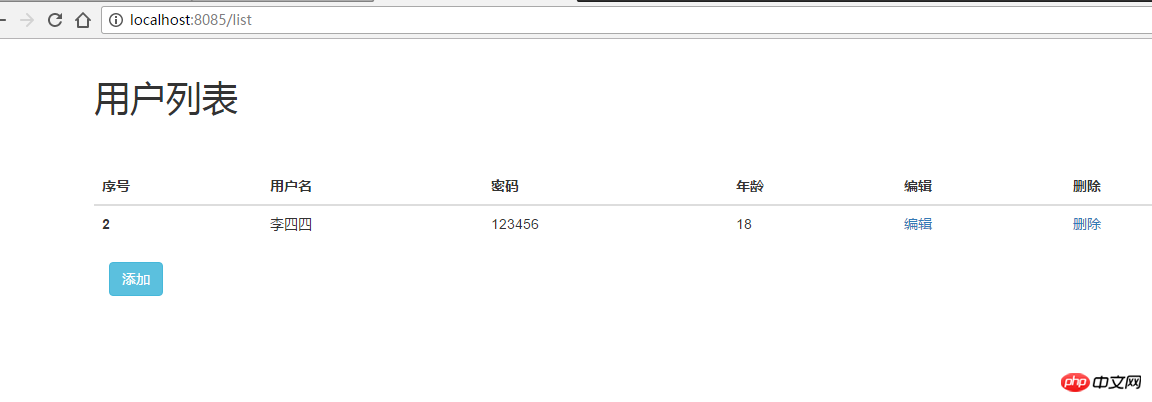
其它的功能也是可以实现的,这里就不再过多贴图了。
springBoot整合 Thymeleaf到这就结束了。
注:这个是后来新加的一个项目。
SpringBoot单独整合Jsp和Thymeleaf都还好,没出现什么问题。但是在一起之后,就有了改变,因为SpringBoot默认的模板引擎是Thymeleaf,加上JSP之后,JSP的模板引擎并不会生效。但是如果想用JSP模板,此时的禁用到Thymeleaf,虽然可以通过多态更改配置实现,但是感觉太过麻烦了。于是研究了一下,找到了共存的方法。
和前面来两个项目区别如下:
之前的Jsp和Thymeleaf配置都是在application.properties
文件中,这里我将它们的配置改到代码中获取。
2.之前Thymeleaf相关文件是放在 src/main/resources 目录下,这里移动到WEB-INF目录下,和之前的jsp文件夹同级。
3.增加一个控制层,严格区分访问Jsp和Thymeleaf的路径。访问Jsp的路径前缀加上jsp,访问Thymeleaf前缀加上templates。
那么新增的配置代码如下:
@Configuration
@EnableWebMvc
@ComponentScan
public class WebConfig extends WebMvcConfigurerAdapter {

       @Bean
       public ViewResolver viewResolver() {
           InternalResourceViewResolver resolver = new InternalResourceViewResolver();
           resolver.setPrefix("/WEB-INF/");
           resolver.setSuffix(".jsp");
           resolver.setViewNames("jsp/*");
           resolver.setOrder(2);
           return resolver;
       }

       @Bean
       public ITemplateResolver templateResolver() {
           SpringResourceTemplateResolver templateResolver = new SpringResourceTemplateResolver();
           templateResolver.setTemplateMode("HTML5");
           templateResolver.setPrefix("/WEB-INF/");
           templateResolver.setSuffix(".html");
           templateResolver.setCharacterEncoding("utf-8");
           templateResolver.setCacheable(false);
           return templateResolver;
       }

       @Bean
       public SpringTemplateEngine templateEngine() {
           SpringTemplateEngine templateEngine = new SpringTemplateEngine();
           templateEngine.setTemplateResolver(templateResolver());
           return templateEngine;
       }

       @Bean
       public ThymeleafViewResolver viewResolverThymeLeaf() {
           ThymeleafViewResolver viewResolver = new ThymeleafViewResolver();
           viewResolver.setTemplateEngine(templateEngine());
           viewResolver.setCharacterEncoding("utf-8");
           viewResolver.setViewNames(new String[]{"thymeleaf/*"});
           viewResolver.setOrder(1);
           return viewResolver;
       }

       @Override
       public void configureDefaultServletHandling(DefaultServletHandlerConfigurer configurer) {
           configurer.enable();
       }

       @Override
       public void addResourceHandlers(ResourceHandlerRegistry registry) {
           super.addResourceHandlers(registry);
       }
}项目的结构图如下: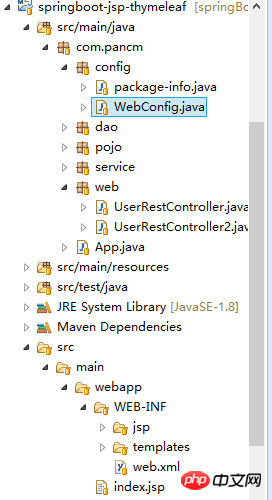
在浏览器输入:http://localhost:8089/list
查看Thymeleaf模板的界面
在浏览器输入:http://localhost:8089/list2
查看JSP模板的界面
可以看到已经成功整合。
关于SpringBoot整合Jsp和Thymeleaf 到这里就结束了。
SpringBoot整合Jsp的项目工程地址:
https://github.com/xuwujing/springBoot-study/tree/master/springboot-jsp-jpa
SpringBoot整合Thymeleaf的项目工程地址:
https://github.com/xuwujing/springBoot-study/tree/master/springboot-thymeleaf
SpringBoot整合Jsp和Thymeleaf的项目工程地址:
https://github.com/xuwujing/springBoot-study/tree/master/springboot-jsp-thymeleaf
相关推荐:
SpringBoot整合Netty并使用Protobuf进行数据传输的实现过程
以上がSpringBoot は Jsp と Thymeleaf をどのように統合しますか?の詳細内容です。詳細については、PHP 中国語 Web サイトの他の関連記事を参照してください。