この記事では主にタイムライン効果を実現するためのangularjsのサンプルコードを紹介していますが、編集者がとても良いと思ったので、参考として共有させていただきます。エディターをフォローして一緒に見てみましょう
1. パッケージを紹介します
angular-timeline パッケージを紹介します。
ダウンロードアドレス:angular-timeline.zip
index.htmlで紹介され、
<link href="lib/angular-timeline/dist/angular-timeline.css" rel="external nofollow" rel="stylesheet">
<script src="lib/angular-timeline/dist/angular-timeline.js"></script>
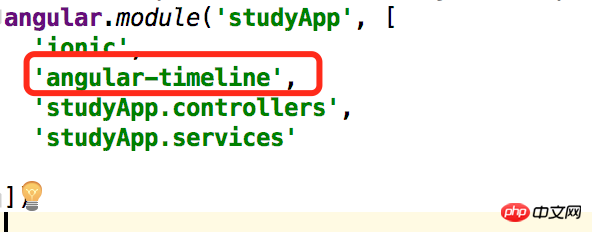
app.jsで引用されていますが、引用しないと効果はありません。

2 cssを書き換える
必要に応じてcssを書き換え、コア部分を書き換えます。
style.css に記述することも、新しい CSS ファイルを作成することもできますが、index.html で引用符で囲む必要があります。
/* 时间轴 */
.timeline-event {
 margin-bottom: 0px !important;
}

timeline-badge.infos {
 background-color: #47d09e !important;
}

.timeline:before {
 width: 1px !important;
 left: 24px !important;
 margin-top: 30px !important;
 background-color: #47d09e !important;
}

timeline-badge {
 left: 16px !important;
 width: 15px !important;
 height: 15px !important;
 top: 15px !important;
 box-shadow: none !important;
}

timeline-panel {
 float: left !important;
 width: 85% !important;
 padding: 13px 0px 6px 0px !important;
 margin-left: 39px !important;
 background: none !important;
 border: none !important;
 box-shadow: none !important;
}

timeline-panel:before {
 visibility: hidden !important;
}

timeline-panel:after {
 visibility: hidden !important;
 display: none !important;
}

timeline-panel .time {
 font-size: 14px;
 font-family: 'PingFangSC-Regular';
}

timeline-panel .detail {
 display: flex;
 display: -webkit-flex;
 align-items: center;
 -webkit-align-items: center;
 justify-content: space-between;
 -webkit-justify-content: space-between;
 margin-top: 10px;
}

timeline-panel .detail .linename {
 font-size: 16px;
 max-width: 80%;
 color: #1c1c1c;
 display: inline-block;
 font-family: 'PingFangSC-Medium';
}

timeline-panel .detail .linelevel {
 position: absolute;
 right: 18%;
 border-radius: 4px;
 color: white;
 padding: 1px 5px 1px 5px;
 font-size: 11px;
}

timeline-panel .detail .linelevel-g {
 background-color: #f27373;
}

timeline-panel .detail .linelevel-p {
 background-color: #e29431;
}

timeline-panel .detail .linenum {
 float: right;
 font-size: 14px;
 color: #323232;
}3ページ
準備作業が完了したので、これからページを書きます。
<!--html页面-->
<ion-view view-title="{{title}}">
 <ion-content scroll="true">

  <timeline>
   <timeline-event ng-repeat="event in teamDataList" side="right">
    <timeline-badge class="infos">
    </timeline-badge>
    <timeline-panel class="infos">
       <span class="time">
        {{event.hour}}
       </span>
     <p class="detail" ng-repeat="item in event.data">
      <span class="linename">{{item.customerName}}</span>
      <p style="float: right;">
         <span class="linenum">
         {{item.reserveNumber}}人
         </span>
      </p>

     </p>
    </timeline-panel>
   </timeline-event>
  </timeline>

 </ion-content>
</ion-view>//controller
angular.module('studyApp.controllers')
.controller('TimeLineCtrl', function ($scope, $rootScope, $location) {
$scope.title = '时间轴';
makeData();
function makeData() {
$scope.teamDataList=[
{
hour:"12:00",
data:[
{
customerName:"中国国旅(江苏)国际旅行社有限公司",
reserveNumber:"12",
id:"aaaabbb12112"
},
{
customerName:"江苏2",
reserveNumber:"122",
id:"aaaabbb12112"
}
]
},
{
hour:"13:00",
data:[{
customerName:"江苏2",
reserveNumber:"112",
id:"aaaabbb12112"
}]
},
{
hour:"14:00",
data:[{
customerName:"江苏3",
reserveNumber:"12",
id:"aaaabbb12112"
}]
},
{
hour:"13:00",
data:[{
customerName:"江苏2",
reserveNumber:"112",
id:"aaaabbb12112"
}]
},
{
hour:"14:00",
data:[{
customerName:"江苏3",
reserveNumber:"12",
id:"aaaabbb12112"
}]
}
];
}
});4つのレンダリング

上記は私が皆さんのためにまとめたもので、将来的に皆さんのお役に立てれば幸いです。
関連記事:
js+cookieを使用してショッピングカート機能を実装する方法
axiosを使って画像バンドをアップロードする方法 プログレスバー機能あり
以上がangularjsでタイムラインを実装する方法の詳細内容です。詳細については、PHP 中国語 Web サイトの他の関連記事を参照してください。